Artistic pruning makes an animal from a shrub or a cloud from a tree. It can also turn a fruit tree that would grow 25 feet wide into a freestanding narrow fence or a candelabra grown against a wall. With pruning, you can even change a tree into a shrub with much larger leaves or form living walls on tree trunks above the ground.
Although fancy topiary and other art forms demand patience and skill, the simple shearing of evergreens and the shaping of flowering shrubs and fruit trees are so easy that anyone can have fun with the process. Many varieties of dwarf plants are ideal for artistic shaping because they grow slowly. Nor do you have to sacrifice practicality. Some commercial orchardists grow trees as sheared hedges, cordons, and fences — forms that are traditionally considered more ornamental than useful.
The pruning of an artistic form must continue during the life of the plant. Snipping and shearing will be part of your summer chores, just like mowing the lawn and pulling weeds in the garden. If you spend years creating a horticultural masterpiece and then neglect it and go on to other projects, you’ll find that within a year or so it’s overgrown and probably past help. But such is the life of a gardener — a thing of beauty is a job forever.
Q What’s it called when a bush is turned into a sculpture?
A The art of trimming trees and shrubs into geometric forms, arches, animals, and many other shapes is called topiary. Shearing reaches its zenith in this form of artistic pruning. European topiary started around the time of Julius Caesar. Since then its popularity has waxed and waned, but it remains a formal garden feature on both sides of the Atlantic. Some Americans keep spiral topiaries in pots near the stoop, and you can now buy these ready-made. Creating topiary can be lots of fun. Potential shapes are limited only by your patience and imagination, and sometimes by your climate.
Q Does pruning fancy topiary take a lot of time and effort?
A Artistic pruning requires your time throughout the growing season. Most of the shearing must be done in early summer, when the trees and shrubs are growing fast, so if you like to scuba dive in Aruba or fish in Alaska in May or June, this hobby isn’t for you. You’ll need to be in your garden several days a week when the plants are growing, if only for a few minutes each time.
Q I’d like to try my hand at making a whimsical topiary. Where on earth do I begin?
A Start with small, tight-growing plants. Plant them in an area where they will receive a full day of sunlight.
Begin shaping after the first year or so, when the plant is still small. You can’t take a large tree and sculpt it into an artistic shape like an artist chiseling away at a block of marble.
Shear as soon as growth starts and continue as long as necessary throughout the summer. The amount of shearing depends upon the plant you choose to train. Some evergreens need two or three shearings a year; deciduous plants have the advantage of growing faster and producing quicker results but they need more shearing. You want to create a closely grown, tiny-leafed (or needle) effect.
Shear your basic shape (for example, a cone or pyramid), allowing bulges to appear gradually. Shape a bulge into a head, or leg, or other part of your design.
Q How do I make a simple geometric topiary?
A Follow this three-step method:
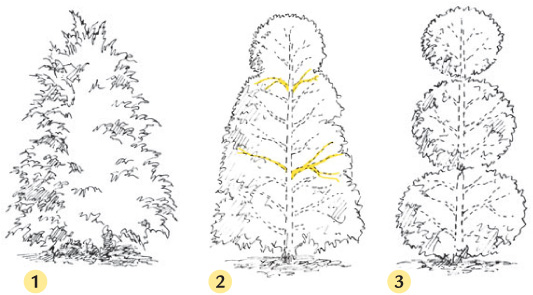
1. To create a three-tier geometric topiary, start with a tree that will grow to a shape similar to the form you want to create. Shear it all around.
2. Begin to remove unwanted branches between sections.
3. Clip remaining branches into globes or cubes, the largest ones on the bottom.

Q At Disney World I loved the character-shaped shrubs in big pots. How would I make something like that?
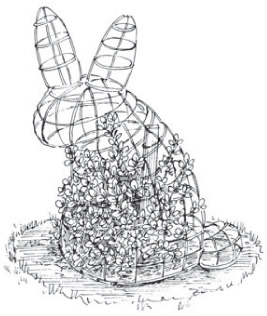
A More complicated forms — four trees that form the legs and body of Jumbo the elephant, for instance — require careful planning and usually a framework of wood or metal. Some gardeners train English ivy (Hedera helix) over topiary frames instead of training shrubs to grow through the frames. To make your own:
1. Buy a preformed frame or make your own.
2. Plunge a stake or pole into the ground as close as possible to the middle of the young plant and secure the frame to the stake at some point. Otherwise, the frame may shift over time and make it difficult for you to keep to your original plan.
3. Wait for stems to emerge beyond the frame’s bounds, then clip them back neatly, or, if you want them to expand laterally to fill in the shape, tie them loosely to the frame with soft twine.
Q I live in Minnesota. Is making topiary possible in my cold climate?
A Most topiary is grown in warmer zones, where snow can’t crush it. If you live in the North and want to experiment, remember:
 Use only the hardiest plants. Native species are usually best.
 Select topiary shapes that are pointed or rounded on top and narrow in width, so they won’t collect heavy loads of snow and ice.
 When winter comes, build a wooden tepee around fragile pieces, or plan on removing the snow as soon as possible after each big storm.
Q Which plants make the best topiary?
A Evergreens are the usual choice for topiaries large and small. However, you can train the crowns of some deciduous trees into less intricate shapes such as globes, cubes, cylinders, arches, and free forms.
GOOD CHOICES FOR TOPIARY
Evergreen
Boxwood (Buxus spp.)
Dwarf Alberta spruce (Picea glauca ‘Conica’)
Holly (Ilex spp.)
Ivy (Hedera spp.)
Japanese podocarpus (Podocarpus chinensis)
Juniper (Juniperus spp.)
Loropetalum (Loropetalum chinense)
Olive (Olea europaea)
Rosemary (Rosmarinus officinalis)
Sweet bay (Laurus nobilis)
Yew (Taxus spp.)
Deciduous
Apple and crab apple (Malus spp.)
European beech (Fagus sylvatica)
Hedge cotoneaster (Cotoneaster lucidus)
Hedge maple (Acer campestre)
Hornbeam (Carpinus betulus)
Japanese zelkova (Zelkova serrata)
Little-leaf linden (Tilia cordata)
Thornless honey locust (Gleditsia triacanthos var. inermis)
Q How do I turn a rosemary into a lollipop tree?
A Follow the directions on pages 104–105 for turning a shrub into a tree. Once your rosemary has reached the height you desire, clip or shear the top growth into a globe shape. You’ll need to clip or shear several times a year to maintain the size and shape.
This lollipop form of shrub or small tree is known as a standard. Tree roses are another form of standard. Other common choices for standards are lavender, bay laurel, and dwarf citrus.
Q If I had room, I’d grow an orchard in my tiny city garden. Is there some way I can squeeze in one fruit tree?
A You don’t need an orchard to grow your own fruit. With an espalier, even people with tiny yards can grow apples, pears, peaches, and other kinds of fruit almost flat against a wall, fence, building, or trellis. An espalier is a tree or shrub trained to grow in a two-dimensional pattern rather than in the round. Espalier may also refer to the support on which the pruned plant grows. And it’s not only fruit trees that grow on an espalier. Firethorn’s brilliant berries and evergreen camellias with their elegant blooms look stunning when espaliered.
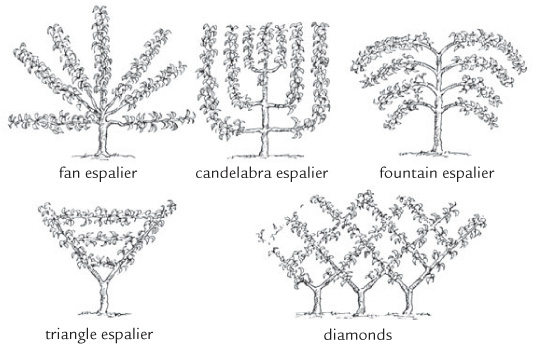
A decorative espalier shaped like a fan or candelabra makes an effective focal point in a small garden.
Q What kind of support do I need for an espalier?
A Install a trellis or wire fence at least 6 inches away from a wall or fence. Galvanized 14-gauge wire is easiest and usually most practical for fruit trees. Shrubs are best trained on a trellis or lattice. Set two sturdy posts, 7 or 8 feet tall, at the expected outside spread of the espalier. Brace them to prevent the wires from sagging. Next, staple smooth wire from one post to the other like a wire fence, or screw eyebolts into the posts and thread wire through each bolt, wrapping the ends around the taut wire five or six times. Attach wires about 18 inches apart, starting 18 inches from the ground and continuing to the desired height of the espalier. Use a level to keep the tiers horizontal.
Q I love crab apples but have no room for a full-size tree in my little courtyard. Can I grow one as an espalier?
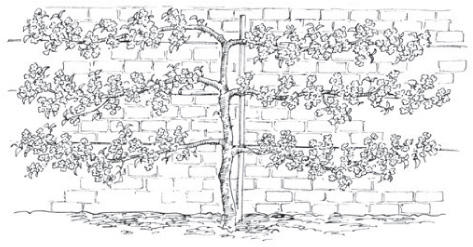
A Certainly. This special technique is not as difficult as you may think, but it does require diligence. For best results, install the support before you plant (see the previous question) and start training while the crab apple is still quite young. Here’s how:
1. Select a dormant whip (a rooted, unbranched shoot) of your chosen tree. Or, some nurseries sell small espaliers that they have started to train. Although a head start may help you, there are benefits to making your own. You get your choice of plants, choose your own design, and save money.
2. Plant the tree or shrub next to a stake, keeping the bud union a couple of inches above the ground if the tree is grafted. Lightly attach the whip to the stake with twine in a figure-8 loop, which you can loosen as the trunk increases in size. Once the design is established, you can remove the stake.3. Clip off the top of the dormant shoot just below the bottom wire. The cut should be above two buds on either side of the stem.
Q Are successful espaliers all about pruning?
A No. Climate also matters, because it affects plant choice and growing conditions. In fact, the right setting may enable you to grow an espalier where a freestanding tree can’t survive. The following tips explain how to tailor an espalier to your environment.
 Grow your espalier in a spot that does not receive direct sun all day; a wall reflects heat, which will cause the leaves and fruit to suffer on hot days.
 A white wall is preferable as a growing background because it reflects heat away from the plant.
 The more sun, the better.
 A dark-colored wall, such as red brick, attracts heat and is a nice backdrop.
 A fruit tree or vine may grow as an espalier against a wall when it would struggle growing in the open. For example, you can often cultivate grapes in a cool climate if you train them against a dark, south-facing building, whereas it would be impossible to ripen them a few feet from the building.
Q How do I turn a three-dimensional tree into a two-dimensional diamond pattern?
A Here’s how to train a diamond-shaped espalier. The crossing pattern comes from the crossing branches of trees planted side by side.
1. When growth begins on your new plant, train one shoot upright and two to either side. Rub, pinch, or clip off all other shoots throughout the growing season.
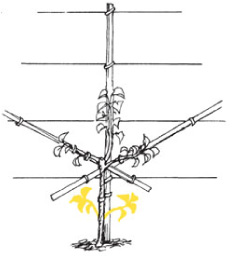
2. Bend the branches as they grow — while they are still pliable — and secure them with twine looped loosely in figure-eights to the supporting wire or trellis in your chosen pattern. Pinch back long shoots on the limbs.
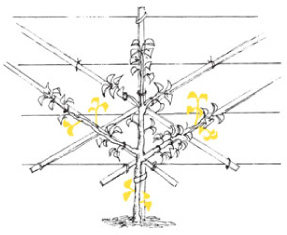
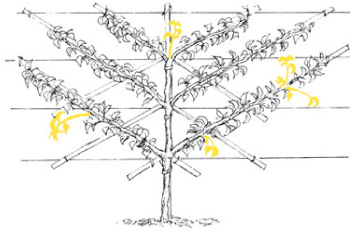
3. Above the first tier of branches, remove shoots on the trunk until it reaches the second tier. Repeat step 1 to continue the design on the second level and each year afterward until the espalier is complete. When your tree reaches the top tier, cut off the top of the trunk, retaining a branch on either side to end the pattern. It may take years to finish a complicated design. Carefully remove stakes, using soft loops (not wire) to attach the trunk and branches to the tiered support. Each year, check the loops and prune off stray shoots and dead, diseased, and broken branches.
Q I want to grow an apple tree as an espalier. What do I need to know?
A Fruit-tree espaliers need special treatment. Follow the rules for pruning your particular fruit tree but keep these additional tips in mind:
 Along with the regular pruning of a fruit tree, you may need to prune off some of the fruit buds in late winter to prevent overbearing. If too may fruits set anyway, thin them out in early summer, when they are still small, so the tree will produce a crop annually.
 When you’re trimming, don’t cut off the short, stubby spurs that bear the fruit! Flowering crab apples and hawthorns need to have their older spurs thinned out occasionally, as they get too numerous, but always leave enough to produce a good crop.
Q Which plants make good espaliers?
A Fruit trees make good espaliers because they are both productive and pretty in leaf and in flower. Espaliers of apple and crab apple (Malus spp.), pears (Pyrus spp.), citrus, and fig (Ficus carica) are common and easy to train. Plums, cherries, peaches, and apricots (Prunus spp.) are more difficult to train, as are bush fruits and nut trees. Sheltered fruit espaliers ripen earlier than those grown in the open, which are subjected to cooling winds.
Japanese maple (Acer palmatum), camellia, blue Atlas cedar (Cedrus atlantica ‘Glauca’), cotoneaster, flowering quince (Chaenomeles spp.), forsythia, ginkgo, hawthorn (Crataegus spp.), holly (Ilex spp.), winter jasmine (Jasminum nudiflorum), bay laurel (Laurus nobilis), magnolia, firethorn, yew (Taxus spp.), and viburnum are among ornamentals you can use this way.
Avoid plants that grow vigorously, such as common lilac (Syringa vulgaris) and hydrangea. Keeping them pruned to a strict form would be a chore.
Q I saw a group of beanpole fruit trees at a nearby orchard. What are they?
A They are cordons, among the most popular espaliers. Cordon is the French word for “cord” or “rope” and refers to a planting (usually a dwarf fruit tree) that extends in a ropelike fashion, either vertically or horizontally. Europeans have used this method of creating beanpolelike fruit trees for centuries. Now Americans practice the technique.
Some commercial orchardists grow fruit trees as upright cordons because they take up so little space and come into production faster. Fruit growers, for instance, plant as many as 60 dwarf cordons to the acre; compare that with 35 full-size trees. The initial cost of buying, planting, and training is high, but subsequent pruning, insect and disease control, and harvesting costs are lower. Moreover, the planting starts producing good crops many years sooner than a regular orchard. To make owning a vertical cordon even easier, nurseries sell Canadian and European apple tree varieties selected for their ropelike habit.
Q What do I need to know to grow a cordon?
A Several factors contribute to a cordon’s success:
 Choose an upright-growing tree or shrub that will not grow too tall or too fast. Dwarf apples and pears are good candidates; the stone fruits (peaches, plums, and cherries) and citrus fruits are more difficult to train as cordons.
 For easy reach, limit the growth of the main trunk to a height of about 6 feet.
 Cordons must be kept to a manageable size, but as the roots grow, this becomes more difficult. If necessary, slow down the growth by pruning the roots (by cutting around the tree; see Root Pruning, pages 68–76).

 In addition to regular pruning of a fruit tree, you may need to remove some of the fruit buds in late winter to prevent overbearing. If too many fruits set anyway, thin them out in early summer, when they are still small, so that the tree will produce a crop annually.
 Growing a cordon horizontally or obliquely — angles contrary to the plant’s normal growth habit — requires heavy pruning to keep the plant attractive.
Q How do I create a cordon?
A Follow these steps:
1. Start with a branchless tree seedling. Some nurseries sell young trees with no side shoots. Plant as usual, and then prune back the top by about a third, cutting to a good fat bud. If you are working on a little tree with some side shoots, cut them off close to the trunk, leaving a single, straight whip.
2. Place a sturdy stake close to the newly planted tree but without damaging its roots. Tie the tree to the stake with soft cloth or twine at regular intervals.
3. Clip or pinch all the new growth coming from the sides to 4 or 5 inches in length. Always snip off any growth beyond the 4- or 5-inch limit on the side branches.
Q My neighbor has a golden catalpa shrub about 7 feet tall with big yellow leaves. I thought catalpas were trees. What’s going on?
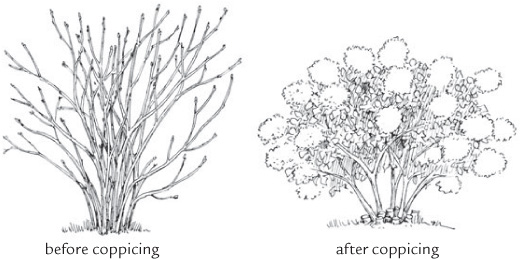
A This is called coppicing, also known as stooling. Coppicing is a technique whereby you regularly cut a tree or shrub to ground level, resulting in a flush of new stems from the base.
You can do the same thing in your garden. Plant a seed or seedling of golden catalpa (Catalpa bignonioides ‘Aurea’). Let it grow for a year or two to get the roots established, then cut it to the ground after the first hard frost, when the foliage browns. In spring, new shoots will appear. You can let them all grow and turn your tree into a giant shrub or you can select a few straight shoots and eliminate the rest so that it resembles a multistem tree. Or play around and try something different every year. When you cut this tree to the ground each fall, you sacrifice the flower clusters and cigar-like seedpods, but you gain a tropical-looking conversation piece with gigantic leaves!
Q What are some reasons for coppicing?
A Gardeners coppice for many reasons. In past centuries, it was done to produce copious branches for firewood.
Now it’s usually done for aesthetics:
 to renew an old shrub (such as a hydrangea)
 to turn a single-trunk tree into a shrub
 to stimulate new colorful growth on shrubs such as redtwig dogwood (Cornus alba) and red-stem willow (Salix alba ‘Chermesina’)
 to promote big, tropical-looking leaves on trees such as empress tree and Indian bean tree (Catalpa spp.)
 to encourage shoots of large, handsome juvenile leaves on purple smoke bush (Cotinus coggygria ‘Royal Purple’)
COPPICING TO RENOVATE A HYDRANGEA
Q When should I coppice a plant?
A To reduce shock to the plant, cut only when the tree or shrub is dormant.
Q What are some plants I can coppice?
A Several trees besides the catalpa mentioned on page 189 stand this treatment well. Try it on hornbeam (Carpinus betulus), redbud (Cercis spp.), and linden (Tilia spp.).
Some shrubs with colorful bark require periodic coppicing to maintain their color. Examples are the various species of red-twigged and yellow-twigged dogwoods and coral bark willow (Salix alba ‘Chermesina’). Coppicing can also be done on smokebush (Cotinus coggygria) and yew (Taxus spp.)
You can coppice for practical reasons. Basketmakers use it to get flexible willow stems. Traditionally it was done in Europe to produce firewood. Poplar, willow, wild cherry, wild plum, and black locust can withstand this treatment. When harvested in the dormant season, these trees will regrow a new crop of wood in a decade or so.
Q Deer overrun my property. Is there a pruning technique that can keep them from eating my trees and shrubs?
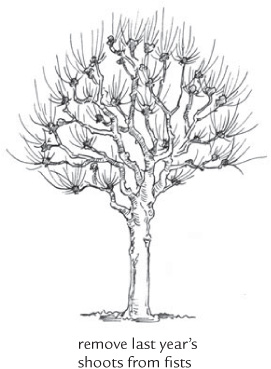
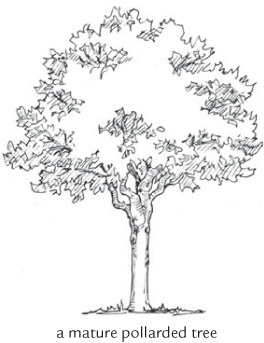
A Try pollarding, a shaping technique that results in a formal, mannered look, like coppicing above the ground. Pollarded trees typically have thick trunks and high rounded crowns when in leaf. In dormancy, the crowns look knobby and misshapen — a beautiful-ugly aesthetic when done right. Originally used for renewable crops of firewood and fodder, this technique offers gardeners a way to regulate the height and crown size of certain vigorous trees, whether they’re part of a street planting or single specimens near a porch or patio. Proper pollarding may extend the life of a tree and keeps new growth beyond the reach of deer and other grazers. To pollard a tree or shrub, begin when the plant is young and small. First, decide upon a size and form for the tree, then sculpt it through early and consistent pruning. To maintain the form, prune new shoots to the established framework each year.
Q What are some good plants for pollarding?
A Some trees used for pollarding are fast growers like linden (Tilia spp.), catalpa, horse chestnut (Aesculus hippocastanum), and London plane tree (Platanus × acerifolia).
A This technique may seem complicated in the beginning, but once you catch on, it’s easy to maintain. Here’s how:
1. When dormant, remove the low limbs on the trunk of a small young tree to create a high crown. Head back the leader and lateral limbs to stubs to shape a framework for the pollarded tree. The framework can have one or more stems.
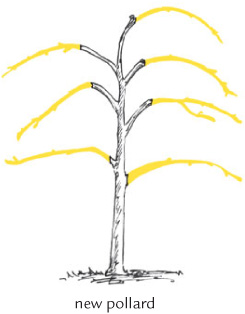
2. Shoots will sprout from dormant buds below these cuts in the spring. If shoots occur on the trunk or branches beyond the cut, remove them immediately. The next year, in late winter or early spring, cut off that year’s growth as close to the original cuts as you can.
3. Over time, woody fists will develop at the cuts. Each year during dormancy, remove shoots close to these knobs but avoid cutting into them and thus harming the tree.
