CHAPTER 20
Principles of Skin Surgery
S. Walayat Hussain1, Richard J. Motley2 and Timothy S. Wang3
1Leeds Centre for Dermatology, Chapel Allerton Hospital, Leeds Teaching Hospitals NHS Trust, Leeds, UK
2Welsh Institute of Dermatology, University Hospital of Wales, Cardiff, UK
3Cutaneous Surgery Unit and Micrographic Surgery & Dermatologic Oncology (Mohs) Fellowship Program, Johns Hopkins Health System, Baltimore, MD, USA
Introduction
The acquisition of dermatological surgery skills is an integral component of dermatological training. Indeed, the increasing burden of skin cancer has resulted in competence in dermatological surgery being a mandatory requirement for all dermatologists. This chapter provides an overview of the fundamental basics of skin surgery and provides an introduction to more advanced surgical techniques, including Mohs micrographic surgery (MMS). For more in-depth coverage a selection of introductory [1, 2, 3] and intermediate textbooks [4, 5, 6] can be recommended.
Critical anatomical considerations
It is essential to have a working knowledge of the important clinical anatomy at each operation site. This section outlines some of the critical anatomical details with which the surgeon must be familiar. Excisions down to superficial fat rarely result in exposure of or potential damage to functionally important structures. Incisions to deep fat or fascia and the removal of large cysts or lipomas may result in exposure of important structures. On the head and neck, division of larger arteries and veins will not cause vascular complications because of the extensive collateral circulation. However, it is important to be aware of the position of large arteries and veins in order to be prepared to deal with bleeding from these vessels. Division of sensory nerves may produce troublesome sensory loss, but this will have little functional impact on the head and neck. Knowledge of the anatomy of the supraorbital, infraorbital and mental sensory nerves is important, as these are commonly utilized in peripheral nerve blockade. Division of motor nerves is potentially disabling and thus it is essential to know the anatomy of the vulnerable superficial cranial and peripheral motor nerves.
Skin tension lines and scar orientation
To produce favourable aesthetic results, incisions should generally be designed to follow rhytids or the relaxed skin tension lines (RSTL; synonyms: stress lines, favourable skin tension lines, maximal skin tension lines) as the resulting scars will be stronger and less likely to stretch [1]. RSTLs run perpendicular to the direction of contraction of the underlying muscles and parallel to the dermal collagen bundles [2]; cutting transversely across these weakens the skin much more than a cut running parallel to the collagen bundles [3]. In the absence of rhytids (wrinkles), RSTL may be identified by asking patients to smile or frown or, on the trunk and limbs, by skin manipulation. Langer's lines [4] (synonym: resting stress lines) were mapped on cadaver skin and differ from RSTL on the limbs and trunk [3]: they should not be used for guiding the planned direction of an excision.
Undermining levels
When undermining to increase skin mobility, different levels are appropriate at different sites. On the face, the level of undermining should be within the subcutaneous fat, just beneath the hair follicles (Table 20.1).
Table 20.1 Undermining levels.
| Site | Undermining level |
| Face | Mid-fat |
| Nose | Just above the periosteum and perichondrium |
| Forehead | Beneath the deep frontalis fascia (equivalent to the subgaleal plane) |
| Scalp | Subgaleal plane |
| Trunk and limb | |
| Small excisions | Deep fat |
| Large excisions | Just above the deep fascia |
Head and neck
Cosmetic units and free margins
Cosmetic units are defined facial regions where the overlying skin shares similar characteristics such as sebaceous quality, pigmentation, follicular density and degree of sun damage. Surgical outcomes may be optimized if all incisions remain within a cosmetic unit [5]. The junction between the units is also important as scars placed within the transition zone between cosmetic units are better concealed whereas scars that bridge two cosmetic units, are very obvious (Figure 20.1).
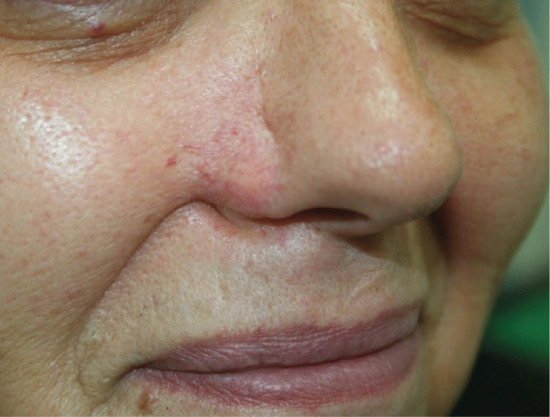
Figure 20.1 Cosmetic unit bridging. A poorly designed and executed transposition flap has effaced the aesthetically important alar–cheek sulcus and also blunted the apical triangle of the upper cutaneous lip.
Extra care must be taken when planning surgery around the lips, lower third of the nose and in the periorbital region. Unless tension vectors during closure are orientated parallel to the free margins of the lips, nasal alar, eyelids and eyebrows, these areas may be readily distorted resulting in marked facial asymmetry.
Blood vessels and lymphatic supply of the face
Larger vessels, particularly the temporal artery, can be avoided by hydrodissection: the skin is lifted away from underlying critical arteries and veins by injecting approximately 20 mL of saline into loose tissue beneath the lesion, thereby lifting the area to be excised off any underlying vital structures. The injection must be given after local anaesthesia, just before excision. The technique works best where there is a boundary that will delay the spread of the saline, for example on the temple and the ear [6].
The facial artery (Figure 20.2) at the nasolabial fold, and its continuation into the angular artery at the medial canthus, are frequently divided when excising tumours at these sites. The external jugular vein runs under the platysma muscle but on top of the sternocleidomastoid muscle, and may be easily damaged during superficial incisions on the neck at this site (Figure 20.3). Emissary veins, connecting the intracranial and extracranial venous circulation, run across the subgaleal space towards the back of the scalp (parietal emissary vein) and just above the forehead (frontal emissary vein) [7]. These veins may be damaged when undermining the subgaleal space at these sites. Lymphatic drainage sites should routinely be examined for metastases during follow-up of patients treated for invasive squamous cell carcinoma or melanoma [8]. Division of skin lymphatics during incisions under the eye may result in temporary but unavoidable lower eyelid lymphoedema.

Figure 20.2 Arteries of the head and neck encountered in skin surgery. The labial artery lies on the inside (mucosal) surface of the lip approximately 5 mm from the visible vermilion border. (—) Arteries rarely encountered; (—) arteries frequently identified during superficial skin surgery on the face.
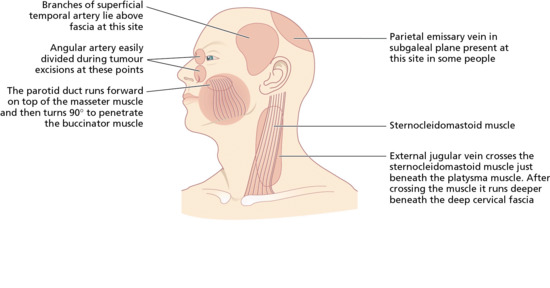
Figure 20.3 Potential surgical hazard sites during skin surgery on the head. Potential blood vessel and duct. (From Lawrence [10].)
Sensory nerves of the face
Nerve blocks.
Sensation to the face is supplied by the trigeminal (Vth) cranial nerve. The three branches readily blocked in skin surgical procedures on the head and neck include the supraorbital, infraorbital and mental nerves (Figure 20.4). These emerge from the skull via palpable foramina, which all lie in the same plane, just medial to a mid-pupillary vertical line [9]. Blocking the great auricular, transverse cervical and lesser occipital nerves as they emerge, approximately 10–20 mm above and below Erb's point, from the posterior border of the middle third of the sternocleidomastoid muscle [11] produces anaesthesia of a large portion of the scalp, neck and ear. Erb's point is identified by dropping a plumb line from the mid-point of a line drawn between the mastoid process and the angle of the jaw. Where this line meets the posterior border of the sternocleidomastoid muscle is Erb's point. At this site, the spinal accessory (XIth) cranial nerve also emerges from behind the sternocleidomastoid muscle. This motor nerve is rarely affected by the local anaesthesia, as it lies deeper, on the floor of the posterior triangle, whereas the three named sensory branches of the cervical plexus curl round to lie on top of the sternocleidomastoid muscle [12].
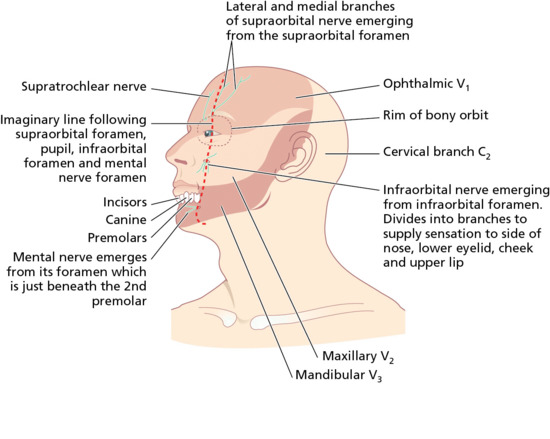
Figure 20.4 Sensory nerves on the face used in nerve block anaesthesia. Sensation on the face is served by the three main divisions of the trigeminal nerve: the ophthalmic, maxillary and mandibular divisions. Three important branches of these nerves – the supraorbital, infraorbital and mental nerves – emerge in the same plane along a vertical line running through the pupil.
Division of small sensory nerves.
This is of little consequence, with the possible exception of numbness of the superior forehead and scalp following incisions on the forehead. Recovery from sensory loss following surgery is a gradual process which may continue for up to 12 months. It is advisable to inform patients about the possibility of damage to sensory nerves as part of the consent process prior to surgery.
Motor nerves of the head and neck
Two branches of the facial (VIIth) cranial nerve, the marginal mandibular branch and the temporal branch are vulnerable during skin surgery (Figure 20.5). At both sites, there is little tissue between the skin and periosteum (Figure 20.6). The temporal branch of the facial nerve supplies the frontalis and orbicularis muscles. Damage to the nerve supplying the frontalis muscle results in difficulty raising the eyebrow (Figure 20.7), and the forehead furrows disappear. This can easily occur during excision of large tumours on the temple, lateral to the frontalis muscle, and as the nerve crosses the zygomatic arch.
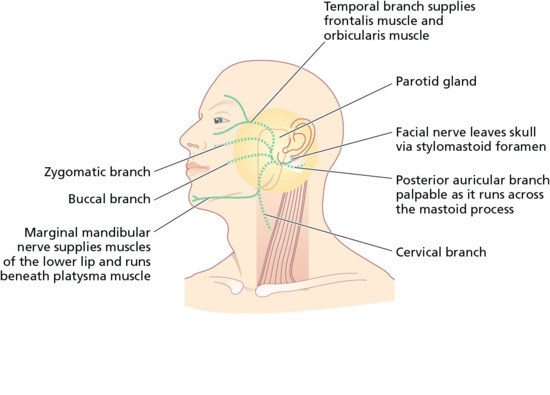
Figure 20.5 Motor branches of the facial nerve vulnerable in skin surgery. (—) Nerves rarely encountered; (—) nerves at risk during superficial skin surgery on the face.
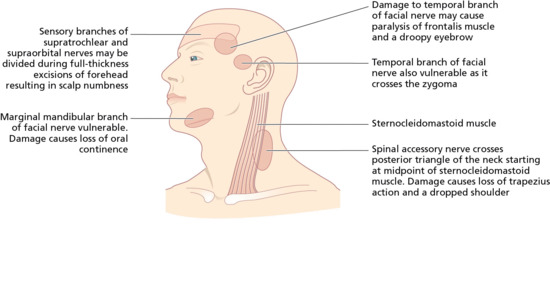
Figure 20.6 Potential surgical hazard sites during skin surgery on the head. Nerve. (From Lawrence [10].)
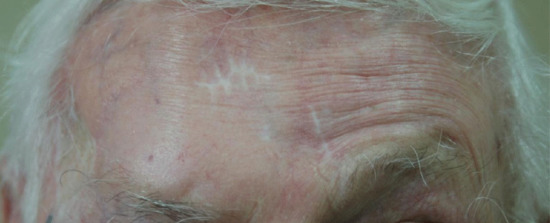
Figure 20.7 Nerve damage: transection of the temporal branch of the facial nerve resulting in ipsilateral paralysis of the frontalis muscle.
The marginal mandibular branch innervates muscles that move the lower lip. Damage can be devastating because it results in weakness of the lips, with dribbling when eating and drinking. The nerve is superficial and vulnerable as it emerges from under the parotid gland at the angle of the jaw, behind the point where the facial artery can be palpated as it crosses the mandible. More anteriorly, the nerve runs beneath the platysma muscle [13]. Variations in nerve position with age and neck position must also be considered. The remaining branches of the facial nerve are less vulnerable because they share several cross-connections and lie deeper. The other important motor cranial nerve is the spinal accessory (XIth) nerve, which supplies the trapezius and sternocleidomastoid muscles. This may be damaged during dissection in the posterior triangle of the neck, causing weakness of the trapezius muscle and producing a dropped shoulder.
Specific facial sites
If an incision runs across the vermilion of the lip, the vermilion border must be carefully marked before anaesthetic injection to avoid a poor cosmetic result (Figure 20.8). In older patients with poor lid elasticity, operations around the lower eyelid may result in ectropion if any downwards tension is applied to the lower eyelid. In a patient with poor lid elasticity, the procedure should be designed to ensure tension vectors run parallel to the free margin of the lower eyelid to reduce the risk of ectropion. If an incision goes across the hair line, ensure that the scalp margin is reconstructed so that a smooth contour remains. Because hairs grow obliquely through the skin, any incision through hair-bearing skin should be made parallel to the hair shafts rather than vertically through the scalp so that fewer follicles are damaged.
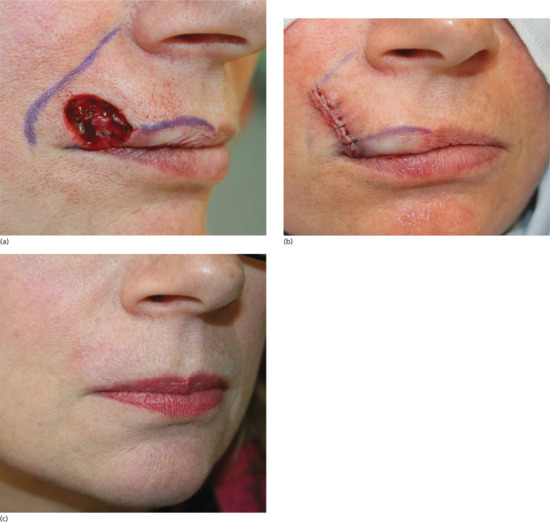
Figure 20.8 Vermilion approximation. (a) The vermilion border and melolabial crease have been marked prior to closure of the Mohs surgical defect. (b) Closure of the surgical defect in a linear fashion ensuring the vermilion border is meticulously aligned to prevent unsightly asymmetry and notching. (c) Eight week outcome showing pleasing alignment of the vermilion border.
Limbs
The only superficial motor nerve on the limbs is on the lateral aspect of the knee, where the common peroneal nerve (lateral popliteal) can be palpated against the bone as it winds round the neck of the fibula. Injury to the nerve at this site will produce a foot drop resulting from paralysis of foot dorsiflexors and elevators.
The sensory innervation of the hand is supplied by branches of the radial, ulnar and median nerves. Digital sensory nerves and arteries run together in a neurovascular bundle along the lateral aspects of the fingers. Care should be taken when obtaining haemostasis on the lateral finger to avoid damage to the associated nerve. Loss of sensation can occur distal to the site of injury.
Postoperative lymphatic leakage sometimes occurs after lower limb or axillary excision. This resolves spontaneously with conservative management.
Equipment and sterilization
Although most dermatological surgical procedures can be safely performed in well-lit, dedicated outpatient units using relatively simple equipment and surgical instruments [1, 2, 3], the absence of a need for either expensive equipment or a completely sterile environment does not justify the use of inadequate facilities or inappropriate equipment.
Dermatological surgery ranges from superficial tissue destruction and removal to complex surgical excision and repair. A range of basic surgical instruments for commonly performed procedures should be available to all dermatologists. The basic equipment, with optional items that should be available for those who undertake more specialized procedures, is shown in Table 20.2. Advanced skin surgery (e.g. excision and complex repair for extensive tumours or MMS) requires both dedicated facilities and specialized surgical instruments to achieve the best results.
Table 20.2 Essential surgical equipment.
Equipment
|
Disposables General
|
Haemostasis
|
Dressings
|
Histopathology
|
Cryosurgery
|
Preoperative
|
Anaesthesia
|
Instruments
|
Wound infection, an uncommon complication of dermatological surgery, is more commonly related to poor surgical technique than inadequate instrument sterilization or intraoperative cleanliness. However, correct hand-washing techniques are vital to the prevention of cross-infection [4]. The tradition of protracted ‘scrubbing up’ is not essential prior to most dermatological surgical procedures – two washes in warm running water using 4% chlorhexidine or 10% povidine–iodine solution are sufficient.
Hand hygiene in UK NHS hospitals has been the subject of much publicity and concern. The routine use of alcohol-based hand rubs [5] has been recommended to help prevent the spread of hospital-acquired infections, particularly MRSA (meticillin-resistant Staphylococcus aureus). Hand disinfection using such alcohol-based hand rubs is associated with less skin irritation [6] and less skin barrier disruption [7] than hand washing using soap or detergent-based products.
During surgery, the use of either clean non-sterile or sterile surgical gloves is mandatory, and the wearing of eye protection and a face-mask is strongly recommended [8].
The sterilization of non-disposable medical and surgical instruments is an important factor in reducing the risk of infection. Individual instrument manufacturers often provide specific information and requirements for sterilization of their equipment. Three levels of importance have been described in this area [9]: firstly, non-critical items (e.g. dermoscopes, which normally come into contact with intact skin) require only simple disinfection between patients; secondly, semi-critical items (e.g. endoscopes, which contact mucous membranes) require high-level disinfection between patients; and, finally, critical items (e.g. surgical instruments, which come into contact with sterile tissues) require sterilization between patients. Both high-level disinfection and sterilization should be preceded by manual or ultrasonic cleaning in order to remove any dried tissue, pus or blood [9, 10, 11]. Older methods of sterilization, for example boiling in water at atmospheric pressure and the use of various chemical agents (e.g. glutaraldehyde, phenolic agents), are no longer recommended [3]. The new variant Creutzfeldt–Jakob disease (vCJD) prion cannot be destroyed by sterilization, and equipment suspected of being contaminated must be quarantined. If contact is confirmed, the equipment must be destroyed.
Safety aspects
Certain basic safety measures and protocols are essential within a dermatological surgery unit in order to minimize the risks of infection and accidental injury to both patients and staff [1].
The routine use of aseptic technique minimizes the risk of bacterial colonization at the operation site, and prevents contamination from adjacent sites. Antisepsis and sterilization are discussed elsewhere. Control of blood-borne infections, especially HIV and hepatitis viruses, should focus on the prevention of transmission from patient to patient, and protection of the surgical team. It is now mandatory for all British medical and nursing staff to be adequately vaccinated against hepatitis B, and for hospitals to have both dedicated infection control staff and protocols to ensure instrument sterility. One approach suggested by the US Centers for Disease Control and Prevention (CDC) is to treat all patients as if they were infected with HIV, hepatitis B or other blood-borne pathogens and to adopt ‘universal precautions’ [1, 2].
Needle-stick injuries and other sharp instrument cuts are particularly important, and all members of the surgical team should take extreme care with the use and disposal of sharps. It is extremely dangerous either to leave uncapped needles on the instrument tray or to attempt needle recapping by the two-handed method. Ideally, the surgeon should make a habit of both disposing of used needles and syringes immediately after use and removing all sharp disposable instruments (e.g. needles, scalpel blades) from the tray after the operation, placing these directly into a sharps disposal boxes. All relatives and those theatre personnel not directly concerned with the procedure should be excluded from the operating room. Clothing should be specific for surgery – apart from potentially introducing a variety of organisms to the procedure room, clothes may become contaminated [3].
At the preoperative consultation, a careful history may identify certain potential problems (e.g. diabetes, epilepsy) or the presence of cardiac pacemakers, implantable defibrillators and cochlear implants [4, 5]. A full drug history including any potential allergies (both prescribed and over the counter) is important – aspirin, clopidogrel, ticlopidine, anticoagulants (both coumarin and non-coumarin) and herbal preparations such as St John's wort, ginseng and Gingko biloba promote bleeding. Non-selective β-blockers (e.g. propranolol) may rarely interact with epinephrine (adrenaline) in local anaesthetics, resulting in malignant hypertension. On direct questioning, some people may admit to a tendency to faint very easily, and some patients with epilepsy may have a history of fits triggered by surgery or dental procedures. As there is always a risk of patient collapse in operating rooms, there must be adequate space available for an emergency resuscitation to be performed. Resuscitation drugs and equipment, together with both suction and an oxygen supply, should be readily available. All theatre personnel should ideally be trained in basic life support and resuscitation techniques. A modern computerized portable automated external defibrillator (AED) should be locally available and its location known to all staff within the department.
Complications
All dermatological surgical procedures may result in complications [1], most commonly bleeding, infection and poor wound healing (Table 20.3). Although complications inevitably occur, most may be prevented by a combination of thorough preoperative preparation and good surgical technique.
Table 20.3 Complications in wound healing.
| Complications | Predisposing factors | Prevention |
| Infection (see Figure 20.9a) | Infected lesions | Careful preoperative and operative techniques |
| Poor sterility | Sutureless closure | |
| Steroids | Antibiotic sprays | |
| Adjacent infectious source | Prophylactic antibiotics for infected or potentially infected wounds | |
| Occlusive dressings | ||
| Poor blood supply | ||
| Fat, haematoma and foreign material | ||
| Sutures | ||
| Poor technique | ||
| Excessive devitalized tissue from careless handling or electrocoagulation | ||
| Delay in closure | Poor blood supply | Layered closure |
| Excess movement | Gentle tissue handling | |
| Infection | Minimize devitalization of tissues | |
| Tension | Care in decision to operate | |
| Steroids | Warmth | |
| Debilitated patient | Careful postoperative dressings | |
| Poor nutritional status | ||
| ‘Gaping scar’ (see Figure 20.9b) | Inadequate apposition | Careful apposition |
| Dermal instability | Subcutaneous or subcuticular sutures | |
| Excess movement | Adequate postoperative support (e.g. antitension dressings) | |
| Infection | ||
| Tension | ||
| Painful scars | Feet and fingers especially | Avoid pressure sites if possible |
| Dressings to reduce subsequent pressure and/or movement | ||
| Careful apposition | ||
| Hypertrophic scars | Site | Avoid ‘cape’ area if possible |
| Tension | Good surgical technique including undermining of edges where necessary | |
| Reaction to embedded material | ||
| Trauma | ||
| Individual susceptibility | ||
| Keloids | Previous history | Avoid surgery where possible |
| Fitzpatrick skin types V and VI | Antitension measures for 3 weeks | |
| Upper half of body | Watch and prepare to treat | |
| Tension | ||
| ‘Railroad tracks’ (see Figure 20.9c) | Skin sutures under too much tension | Good suture technique |
| Use of ‘non-reactive’ suture material | ||
| Stitch marks ‘abscess’ | Sutures left in too long | Early suture removal |
| Wound edge inversion | Poor technique | Good surgical technique |
| Occlusive or semi-occlusive dressings | ||
| Bleeding and/or haematoma formation (see Figure 20.9d) | Bleeding tendency | Preoperative screening |
| Aspirin | Good haemostasis | |
| Clopidogrel | Use of epinephrine (adrenaline) in local anaesthetic | |
| Ticlopidine | ||
| Eptifibatide | ||
| Tirofiban | ||
| Coumarin | ||
| Dabigatran | ||
| Rivaroxaban | ||
| Apixaban |
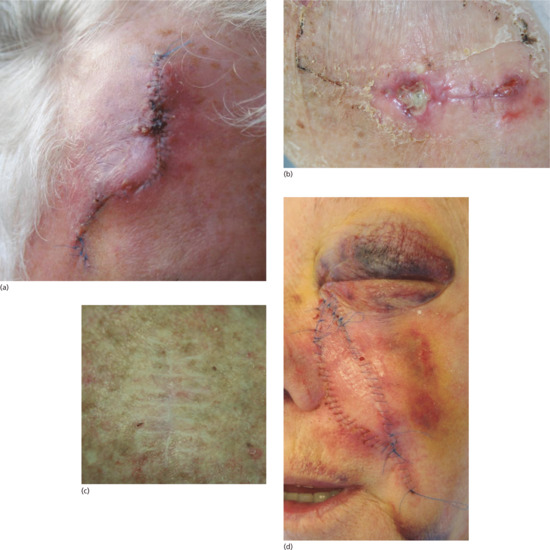
Figure 20.9 (a) Postoperative infection characterized by erythema, crusting and wound swelling and tenderness. (b) Areas of wound dehiscence following a flap repair on the lower leg. These areas must now be left to heal secondarily. (c) ‘Railroad’ track marks arising as a consequence of skin sutures being left in place under tension and for too long. (d) Postoperative swelling and haematoma formation.
The incidence of complications following general dermatological surgery and MMS is in the main very low. In a prospective, multicentre study published in 2005, 84 French dermatologists performed 3788 outpatient dermatological surgical procedures under local anaesthesia. These included excision of benign and malignant tumours (excluding ‘sebaceous’ cysts and pyodermas) [2]. There were 236 recorded complications occurring in 213 (6%) procedures. Excessive bleeding (3%), vasovagal syncope (1.4%) and wound infection (2%) were the main complications. Infection was superficial in 92% of cases, with only one case of systemic infection. Antibiotic therapy or further surgery was required in 1%; haemorrhagic complications appeared to be independently associated with the risk of wound infection. In 2007, the same authors reported an almost identical study (73 dermatologists performed 3491 procedures) [3]. Overall, 67 (1.9%) patients developed wound infections, with a higher rate (4.3%) of infection following complex wound repair. Again, haemorrhagic complications were independently associated with the risk of development of wound infection.
Mohs micrographic surgery is also a safe procedure associated with a low risk of complications. An overall infection rate of 2.3% was reported following 530 Mohs procedures and 517 non-Mohs excisions performed on outpatients [4]. One US Mohs unit reported its complication rate to be equal to or lower than the published complication rates from specialists in other surgical disciplines [5]. The common practice of using clean but non-sterile gloves during Mohs tumour excision stages appears to be both safe and cost- effective. A retrospective case note review of 1239 Mohs patients (1400 Mohs procedures) revealed 25 cases of wound infection, with no significant difference in infection rates seen between those treated with either sterile or non-sterile gloves in the Mohs excision stages [6]. A more recent prospective study from Perth, Western Australia looked at 2370 dermatological surgery procedures including 934 Mohs surgery cases. The rate of complications of bleeding and infection were extremely low: 0.2% and 0.5%, respectively [7].
Bleeding
Warfarin and other anticoagulants pose a significant risk of postoperative complications. In a prospective study of 102 patients undergoing minor plastic surgery (37 regularly taking aspirin, 21 taking warfarin and 44 on neither drug), 57% of the patients taking warfarin developed complications, significantly more than the control and aspirin-taking groups [8].
Similarly, antiplatelet drugs (e.g. aspirin, clopidogrel, ticlopidine) potentially increase the risks of bleeding complications. In one study of patients undergoing minor plastic surgery, no significant difference in bleeding complication rates was seen between aspirin-taking and control groups [8]. However, other reports have found a link between aspirin therapy and a small but significant increased risk of postoperative bleeding following excision of cutaneous head and neck lesions [9], the risk being particularly pronounced in patients undergoing local flap wound repair. Current opinion favours continuing anticoagulation therapy in all its forms for patients undergoing dermatological surgery procedures. The increased risks of bleeding should be explained to the patient, and the surgeon should take measures to accommodate this – these include meticulous haemostasis, minimizing tissue undermining, using pressure dressings, perforating grafts and even using small suction drains where indicated. It is important to make sure that patients taking warfarin do not have an excessively prolonged international normalised ratio (INR) and it is reasonable to check this prior to surgery, especially if they have a history of widely fluctuating INR readings. The preoperative evaluation is thus critical in identifying whether the patient has a history of a bleeding disorder or possible platelet dysfunction such as thrombocytopenia.
New oral anticoagulants such as dabigatran, rivaroxaban and apixaban target key coagulation factors rather than vitamin K. Compared to warfarin, they have more rapid onset of action, stable pharmacokinetic properties and lack significant drug interactions. They do not require coagulation monitoring. Like warfarin, their use can result in postoperative complications. Perioperative management of new oral anticoagulants should balance the risk of bleeding with the risk of thrombosis. A recent comprehensive review of the topic has been published in the British Journal of Dermatology [10].
The use of epinephrine-containing local anaesthetics results in vasoconstriction and prolongs the duration of anaesthesia. Intraoperatively, bleeding can be controlled by a combination of electrosurgery, pressure and ligation. Postoperatively, the use of appropriate wound dressings is important, ranging from simple dressings for superficial wounds to layered dressings with pressure pads for larger wounds where there is a significant risk of haematoma formation (e.g. following cyst or lipoma excision; or with widely undermined wounds). This is largely a matter of personal surgical preference with no data showing the ‘superiority’ of one type of dressing over another. All patients should be given verbal and written information regarding wound care and how to contact the surgical unit if problems arise. Haematoma formation may occur at various times after surgery and usually results in acute pain and swelling. The clinical appearances, together with the age and size of the haematoma, will dictate whether to open the wound, evacuate the haematoma and obtain haemostasis, or to manage the complication conservatively.
Infection
Wound infection is a major concern, but is fortunately relatively uncommon following skin surgery of all types [2, 3, 4]. Antibiotic therapy may be appropriate for operations on ulcerated skin tumours: these are commonly colonized with Staphylococcus aureus, which considerably increases the risk of postoperative wound infection. Antibiotics may also be used prophylactically for wounds that are repaired with skin flaps or skin grafts or for wounds in the groin or on the lower leg. If the risk of infection is higher than normal (e.g. following excision of an ulcerated tumour from a flexural site), prophylactic antibiotic therapy may be appropriate. Postoperative infection usually presents as erythema, pain and swelling in and around the wound, 4–8 days after the procedure. Depending upon the clinical appearances, management will range from wound care, topical and systemic antibiotics, through to incision and drainage of a frank wound abscess.
Unsatisfactory outcome
Other significant problems relate both to the adequacy of excisional surgery and to the cosmetic and functional outcome.
Incomplete excision
of malignant and benign skin lesions may occur either because of poor technique or, even with judicious clinical assessment of margins, due to subclinical tumour extension. Patients should be forewarned about these risks and the potential need for further surgery.
Unsatisfactory scars.
The risk of abnormal/greater than predicted scarring must be carefully explained prior to surgery, with special attention to the possibility of distortion of free margins and unsightly hypertrophic scars in high-risk body sites (e.g. upper arm, shoulders, chest). Altered pigmentation in and around the wound is an additional cosmetic risk in those with Fitzpatrick darker skin types V and VI.
Nerve damage
is a significant concern, as both sensory and motor nerves may be damaged during dermatological surgery, particularly at certain ‘high-risk’ anatomical sites (see Figures 20.4 and 20.5).
Local anaesthetics
Principles and types
An ideal local anaesthetic agent would be non-toxic, painless on injection, rapid in onset, highly effective and carry a low risk of sensitization. The best compromise is found in 0.5–2% lidocaine hydrochloride (lignocaine), an amide-type local anaesthetic, which is the agent of choice for most dermatological surgery. Other amide-type local anaesthetic agents include mepivacaine, bupivacaine and ropivacaine, which have a slower onset but more sustained duration of action than lidocaine [1]. Local anaesthetics in ‘multiuse’ bottles generally contain parabens preservative, but those supplied in glass ampoules are often preservative free. Special care should be taken when using multidose bottles of lidocaine. It is all too easy to inadvertently contaminate the contents of a bottle by extracting lidocaine using a needle that has already been used for a patient. Subsequent users of the bottle may be unaware that the contents are contaminated. The only safe way to use multidose bottles of lidocaine is for their contents to be completely extracted into one or several syringes as soon as the seal is removed. It is not acceptable practice to take lidocaine from a previously opened multidose bottle. Multidose vials are prohibited in some countries because of the risk of cross-contamination when used between patients.
Ester-type local anaesthetics, for example procaine (ester of p-aminobenzoic acid), are seldom used by dermatologists.
Epinephrine 1 : 80 000 to 1 : 200 000, when added to local anaesthetic solutions, prolongs the duration of anaesthesia and produces local vasoconstriction, thereby reducing bleeding into the operative field. By reducing absorption, it may also reduce the risk of systemic lidocaine toxicity.
Toxic reactions
Toxic reactions to lidocaine are rare, and more likely to occur with the use of high volumes of high-concentration solutions or if accidental intravascular injection occurs. Lidocaine toxicity usually presents as a sensation of numbness or tingling. Systemic reactions include vasodilatation, cardiac or respiratory depression, or central nervous system manifestations such as dizziness, drowsiness, tinnitus, slurring of speech, muscle twitching and seizures. These side effects are, to some extent, reversible with diazepam but full resuscitation measures may be required.
Ester-type local anaesthetics should be used with caution in patients with renal impairment. They also cross-react with a number of drugs of the p-aminobenzoic acid ester type (e.g. sulphonamides, paraphenylenediamine) [3, 4]. Amide-type anaesthetics should be used with care in patients with hepatic impairment.
The maximum recommended dosage for lidocaine with epinephrine is 7 mg/kg or approximately 50 mL of a 1% lidocaine solution for an average adult. In practice, most dermatological procedures require substantially lower anaesthetic doses. In order to minimize the risk of accidental intravascular injection, it is a wise precaution either to aspirate prior to infiltration or, if using very fine (e.g. 30 gauge) needles which will not aspirate blood, to keep moving the needle about in the skin while slowly infiltrating small volumes.
Systemic absorption of epinephrine may be associated with mild tachycardia and an excited state. More serious reactions are rare but, as with lidocaine toxicity, are more likely to occur with the use of high-volume high-concentration solutions or following accidental intravascular injection. The use of epinephrine in local anaesthetics should be avoided, or it should be used with caution, during pregnancy, in combination with inhalation anaesthesia or in patients suffering from severe narrow angle glaucoma [5]. Interaction with non-selective β-blockers (e.g. propranolol) may rarely cause malignant hypertension [2], but this is not a risk with ‘cardio-selective’ β-blockers (e.g. atenolol).
Patients should always be asked if they have had any untoward reactions to local anaesthetics (e.g. in dental procedures). These may have been nothing more than fainting, as vasovagal attacks are commonly associated with local anaesthesia, and should not be confused with serious toxic reactions. In cases of serious doubt, alternative methods of anaesthesia are necessary.
Methods
Local anaesthesia may be achieved topically using either lidocaine (LMX4®), tetracaine (amethocaine) cream (Ametop®) or a eutectic lidocaine–prilocaine cream (EMLA®) [4]. LMX4 can be simply applied to the skin; EMLA and Ametop are applied under occlusion before the procedure. The duration of application required varies according to the product used. Ametop is the fastest acting working within 20 min, but if left for significantly longer periods may cause urticaria and even superficial blistering of the skin. LMX4 generally achieves satisfactory anaesthesia in 30 min. It usually takes at least 60 min for adequate anaesthesia to be achieved with EMLA: the depth of anaesthesia can be increased by leaving the cream in place for longer. The treated skin is vasoconstricted following EMLA application.
Conjunctival anaesthesia is best achieved using proxymetacaine eye drops, which sting much less than tetracaine. The lower eyelid should be gently retracted and 2–3 drops of local anaesthetic placed in the inferior fornix. Reflex tear formation washes away some of the anaesthetic and so further drops should be instilled after a minute or so. Tetracaine is useful for more prolonged and intensive anaesthesia and may be instilled after proxymetacaine.
Other methods of anaesthesia include field block and nerve block anaesthesia [3, 5], which produce temporary blockade of sensory nerve function in a given area. Field block involves infiltration of local anaesthetic at several points around surgical sites such as the nose and ear [2], and nerve block anaesthesia involves blockade of one or more major sensory nerves. The most useful nerve blocks on the face in dermatological surgery involve branches of the trigeminal (Vth) cranial nerve (see Figure 20.4) – the supraorbital (forehead), supratrochlear (glabella), infraorbital (lower eyelid, nasal side-wall, upper lip) and mental (lower lip) nerves [4, 5]. The choice of local anaesthetic method depends upon a number of factors, including the procedure itself, anatomical site and expected duration of the operation.
Historically, there was controversy surrounding the use of epinephrine in digital nerve block (‘ring block’) anaesthesia because of a real or perceived theoretical risk of digital ischaemia. Some believed it is absolutely contraindicated [6], whereas others describe routine use without incident [7, 8]. Careful review of the literature and current experience has shown that the combination of lidocaine and epinephrine safe both for ring block anaesthesia and for direct infiltration into digits (where the addition of epinephrine will reduce bleeding and prolong anaesthesia). The use of epinephrine-containing local anaesthetics should not therefore be considered contraindicated in anaesthetizing the digits, penis, nose or ears (as is often mistakenly promulgated).
In order to minimize discomfort when administering a local anaesthetic injection, consideration should be given to using a relatively fine needle, injecting slowly, and using both verbal and tactile distraction techniques. Injecting into the subcutaneous fat is less painful than intradermal infiltration, although it does take longer for the skin surface to become anaesthetic. Whenever possible, anaesthetic solutions should be at room temperature. Pain on injection is less when lidocaine solutions are buffered with sodium bicarbonate immediately prior to use [9]. Plain 0.5% lidocaine without epinephrine is an ideal agent to initiate local anaesthesia in children and very nervous patients. It causes no discomfort but the duration of action is brief and so it is usually necessary to top up with a second injection of lidocaine with epinephrine. For most dermatological procedures lidocaine with epinephrine is beneficial.
Other anaesthetic agents include the following:
- Ethyl chloride (which is highly flammable) and liquid nitrogen spray give short-lived periods of anaesthesia by skin refrigeration. This may be sufficient for quick superficial procedures such as the incision of small cysts and milia, abscesses, removal of skin tags or the curettage of multiple small warts. In many departments, machines that produce a variable flow of cold air are now used in preference for simple topical cryo-anaesthesia.
- The anaesthetic effect of antihistamines (e.g. 1% diphenhydramine hydrochloride solution) can be used when hypersensitivity to other agents is present or strongly suspected.
- The intradermal injection of normal saline produces a brief anaesthetic effect [2].
- Hypnosis and acupuncture may be useful when performed by an experienced practitioner and in a suitable subject.
- General anaesthesia is rarely used in dermatological surgery. Patients requiring a general anaesthetic (e.g. children requiring treatment of large facial birthmarks) are best admitted to hospital either as a day case or overnight.
Biopsy techniques
Incisional and excisional elliptical biopsy
The elliptical excision biopsy is used for tumour or suspect mole removal and is the ‘workhorse’ surgical procedure performed by dermatologists (Figure 20.10). An incisional biopsy is used to take diagnostic biopsies of rashes and tumours before treatment is started. The technique has the advantage that the entire thickness of skin down to the fat is excised which provides the dermatopathologist with an optimal amount of tissue to provide accurate histological assessment. An appropriate margin can be selected if required and the incision line placed in the optimum direction [1].
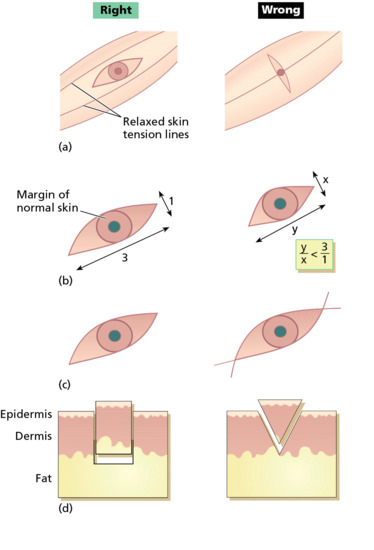
Figure 20.10 Principles of elliptical excision. The ellipse is designed to follow skin-crease lines (a), and should be approximately three times as long as it is wide (b). Ensure that an appropriate margin of normal skin is also excised (b). At the ends of the ellipse, hold the blade vertically so that the incision lines do not cross over (c). The blade should be held at 90° to the skin when cutting the ellipse so that the wound has vertical sides down to fat. Do not bevel the blade towards the specimen as this makes the wound more difficult to close and may cut into the dermal component of the lesion (d). (From Lawrence [3].)
Planning the biopsy.
For lesions on the face, orientate the ellipse so that the scar runs parallel to or within an existing skin crease (wrinkle), or follows a boundary line between two adjacent cosmetic units (Figure 20.11a–c). Excision direction is best assessed with the patient standing or seated upright rather than lying flat, to allow for the effect of gravity on the skin crease lines. Wrinkle or smile lines can be exaggerated by asking the patient to grimace or smile, or by manipulating the skin [2]. In an excisional biopsy, measure the margin to be excised and mark the optimal line of closure before injecting the anaesthetic. When drawing on the skin, use a recognized skin marker pen as other inks may permanently tattoo the skin when performing the excision or repair. The length of the wound should be at least three times its breadth (the angles at the ends of the ellipse should ideally not exceed 30° to minimize the size of any ‘dog ears’ at the apices), taking care not to allow the incisions to cross each other (‘fishtailing’) at either end [3]. A larger angle may be acceptable at some sites or in older people [4].
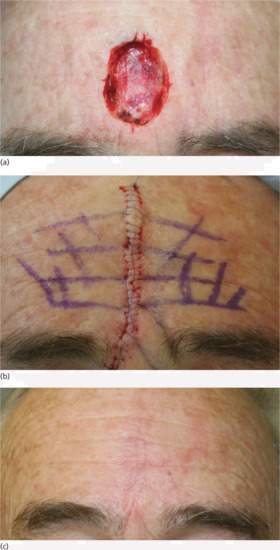
Figure 20.11 Scar orientation: (a) a surgical defect on the central forehead. (b) Having marked out the forehead skin rhytids, the defect is closed primarily ensuring the rhytids are aligned on wound approximation. (c) The result, even at 4-week review is pleasing.
Performing the biopsy.
The incision should be made as a smooth single continuous movement rather than a series of small nicks. The scalpel blade should be aligned at 90° to the skin, not angled inwards, so that the ellipse sides are vertical [5]. The incision lines should meet neatly without crossing over at the tip by starting and finishing each sweep with the blade held vertically. Incisions should be down to the fat. When the ellipse sides and tips have been completely separated from the surrounding skin, the ellipse should be sitting on a bed of fat. The fat under the ellipse should be separated using sharp and blunt dissection using curved tissue dissection scissors, while the ellipse is gently pulled away from the skin using a skin hook or fine-toothed forceps [6]. Undermining of the edges at the appropriate level is required to enable tension-free wound closure and allow optimal wound edge eversion. The wound should be closed in a layered fashion utilizing both subcutaneous and surface sutures if necessary, using the correct suture technique to maximize wound edge eversion.
Punch biopsy
Punch biopsy produces a core of skin down to the fat. It is quick and easy to perform, and leaves only a small wound. The disadvantages include the potential for sampling error, and with skin tumours the risk associated with breaching the dermis and the potential for tumour implantation, depth control in critical sites in less experienced hands and the difficulty in stopping bleeding if a small arteriole is punctured at the base of the wound – although in practice, given the small wound size, firm constant pressure for 10–15 min will deal with this. Punch biopsies can also be used to excise naevi on the trunk. Punch biopsy wounds may sometimes be allowed to heal by second intention, with acceptable cosmetic results [7]. Subcutaneous tissue lesions can be sampled using a punch biopsy by pinching up a fold of skin to include the subcutaneous tissue before the biopsy is taken [8].
Disposable and reusable 2–8 mm diameter punches are available. When the skin is numb, the circular punch biopsy blade should be ‘drilled’ down to the fat with gentle downward pressure [5]. To minimize the scar size, stretching the skin at right angles to the RSTLs while taking the biopsy creates an oval rather than a round wound, with its long axis parallel to the RSTLs [6]. The skin core may pop up when the surrounding skin is pressed down, or it may be hooked out using a needle. Cutting through the fat at the base with scissors releases the specimen which should then be carefully removed to avoid crush artefact during tissue processing. The wound can then be sutured or allowed to granulate; the latter produces an acceptable small round or oval scar. If the wound is to be allowed to heal by second intention, stopping bleeding using a collagen matrix dressing results in a better cosmetic result than using Monsel's solution (ferric subsulphate), which may tattoo the skin [9].
Shave biopsy
Shave excision is a simple, rapid and effective method for removing benign superficial lesions and obtaining tissue samples from protuberant nodular skin tumours. Shave biopsy of dermatoses affecting the epidermis or high dermis provides adequate tissue for diagnosis, and the subsequent re-epithelialization from follicular epithelium produces a good cosmetic result. The use of card upon which to place the specimen prevents it curling up during histopathological processing, thus allowing adequacy of margins to be assessed [10].
Shave biopsy of a solid tumour is faster and easier than an incisional biopsy, which needs to be sutured. A fragment can be shaved off to confirm the diagnosis prior to definitive treatment. This biopsy technique is unsuitable if histological examination of the deep margin or edge of a tumour is required to confirm the diagnosis. If melanoma is therefore suspected clinically, a full-thickness excisional biopsy is preferred. Bleeding can be stopped using silver nitrate stick coagulation, as the cosmetic outcome will be determined by the subsequent treatment.
Benign naevi may be shave excised using a number 15 blade held horizontally or using a flexible safety razor blade or commercial equivalent (Dermablade®) [11]. This allows the naevus to be shaved off flush with the skin. Haemostasis should be obtained using cautery, electrodessication or a chemical haemostatic agent. Any remaining wound edge tissue fragments may be destroyed using cautery or electrodessication. On average, such wounds take 2–3 weeks to heal. In approximately 45% of head and neck and 30% of truncal naevi, no visible scar remains (Figure 20.12). In the remainder, the scar is smaller than the original naevus on the head, neck and limb sites and a little larger than the naevus on truncal sites. Pigmentation at the scar edge or centre remains in approximately 25% of initially pigmented naevi after shave excision – it is therefore important to forewarn patients about this possibility; non-pigmented naevi rarely, if ever, leave a pigmented scar [12]. Persistent pigmentation is even more common when aluminium chloride haemostasis is used rather than cautery [13]. Recurrent or retained pigment does not need to be excised. If a further specimen is sent, the pathologist must be given the full history in order that the changes may be correctly interpreted. Hairs remain in 25% of initially hairy naevi; these can be destroyed by electrolysis if necessary.
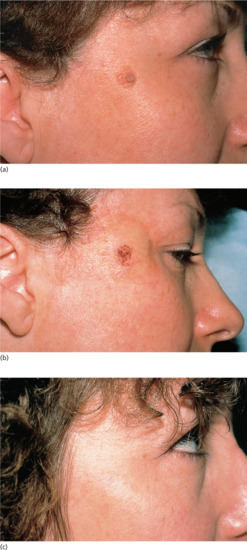
Figure 20.12 Shave biopsy of benign papular naevi. (a) This patient had a benign tan-coloured naevus on the face (b) removed by shave excision followed by cautery, (c) resulting in a good cosmetic result 6 months later.
Preoperative preparation
Surgeon preparation
Dermatologists should be confident that they are competent to perform the proposed procedure and to manage any possible complications. If not, they should ask for a second opinion. The surgeon must be fully immunized against hepatitis B, and should observe safe practices with regard to handling sharps and tissue specimens. Surgical gloves should always be worn and face and eye protection is strongly recommended.
Patient preparation and consent
Patients should be fully aware of the significant risks, benefits and possible complications associated with the planned procedure. Informed consent [14] should be obtained, both verbally and in writing, for all invasive procedures. Usually, consent should be obtained from the parent or guardian in the case of minors, although some adolescents may be fully capable of both giving and withholding consent. Most patients about to undergo surgery are anxious and usually respond positively to appropriate reassurance as well as a calm and professional manner displayed by all members of the surgical team.
The use of a surgical checklist is helpful in minimizing risks during skin surgery. Such checklists confirm the patient's identity, highlight relevant medication (e.g. warfarin) and raise awareness of implanted devices (e.g. pacemakers) and allow all members of the team to ensure the correct patient is attending to have the correct lesion treated by an agreed surgical modality. Wrong site surgery is an increasing cause of litigation in dermatological surgery and various strategies have been suggested to minimize the risk of its occurrence [15].
Preoperative planning and preparation
It is important to consider which method of biopsy or skin lesion removal is most appropriate in each individual circumstance. Often techniques other than elliptical excision are preferable, many of which (e.g. curettage, shave biopsy) do not result in a linear scar. Consequently, the decision on which surgical technique to use should balance the possible cosmetic advantages of these other techniques (e.g. epidermal lesions and benign facial naevi) against the need to provide a full-thickness tissue specimen for histological examination (e.g. possible melanoma) by performing a formal surgical excision.
Examination and palpation of skin lesions will help to estimate their extent, depth and proximity to large blood vessels, nerves or other important structures. Langer's lines of skin tension [1] were previously used as a guide to incision, but the best cosmetic results are usually obtained by following the RSTLs [2, 3], which on the face tend to lie perpendicular to the major underlying muscles. Langer's lines and RSTLs often coincide, as on the neck. When they do not, as on the limbs, the choice depends on other factors. Excisions on the lower leg, for instance, close more easily along the long axis of the limb, rather than transversely. Testing for skin laxity by manipulating the skin usually clarifies the best direction in which to plan an excision. The size and type of excision made will also depend upon many factors, including the site and nature of the lesion to be excised and the nature of the planned skin closure.
The skin surface should be cleaned prior to operation with a detergent–antibacterial combination, most commonly containing either chlorhexidine [4] or povidone–iodine [5]. This helps to reduce the risk of wound infection by removing pathogens and reducing the resident cutaneous bacterial flora [6].
Simple excision, suture technique and wound closure
Elliptical excision – general technique [1, 2]
Preoperative planning and preparation.
It is recommended that the planned excision lines are marked prior to cleansing the skin surface and infiltrating local anaesthetic. A reasonable period of time should be allowed for the anaesthetic and epinephrine, if used, to take full effect (ideally a minimum of 5 min).
A number 15 blade is most commonly used to make two hemi-elliptical incisions perpendicularly through the skin into the subcutaneous tissues (see Biopsy techniques earlier). Once incised, the ellipse of tissue is held firmly but gently with either fine-toothed Adson forceps or a skin hook, and separated from its base ideally using sharp and blunt dissection with curved tissue scissors. For both histological purposes and to facilitate wound closure, the excised specimen should contain subcutaneous fat.
For standard histological processing, the specimen should be placed in a formaldehyde–saline specimen bottle, clearly labelled with the patient's details. As with a shave excision specimen, to prevent curling of small biopsy or excision samples, these may be placed on small squares of filter paper and floated into the formalin solution. With any potentially malignant skin lesion, a marker suture (e.g. at the 12 o'clock position) should be placed to enable specimen orientation during histopathological processing. Blunting of one end of the specimen, away from the main lesion, will also allow orientation without the need for a marker suture [3]. For immunofluorescence studies, specimens are placed in Michel's medium, a tissue transport medium which preserves tissue well for up to 5 days at room temperature.
Intraoperative bleeding is controlled by a combination of pressure, electrosurgery, clamping and ligation of vessels. Bleeding from superficial wounds may be controlled with topical agents such as aluminium chloride.
Depending upon the size of the defect and the body site, a variable degree of undermining of the wound edges will be necessary to facilitate the placing of subcutaneous absorbable sutures and to reduce wound tension. Finally, non-absorbable or absorbable surface sutures are used to neatly appose and evert the wound edges [1, 2].
The timing of suture removal depends upon the site and the amount of tension across the wound. With appropriate surgical technique and use of buried vertical mattress sutures all cutaneous sutures may be removed at 7 days. Where there is a history of skin reactivity, sutures on the face may be removed after 4–5 days. When the wound is expected to heal slowly (e.g. on the lower leg) or lacks the support of buried sutures then it is sensible to leave the surface sutures in place for 10–14 days.
Surgical needles and suture materials
An ideal suture material would have high tensile strength, handle easily, provide good knot security and cause no tissue reaction. Skin sutures are of two main types: absorbable which are generally used beneath the skin and non-absorbable which are generally used in the skin surface. The gauges normally used for skin surgery range from 3/0 (strong) to 6/0 (fine), with suture selection depending on the wound size, anatomical site and surgeon preference.
Monofilament sutures are less likely to become bacterially contaminated but are harder to knot and stiff to work with compared with braided sutures. Absorbable sutures such as Vicryl®, which is braided (Vicryl polyglactin 910), and polydioxanone (PDS), which is a monofilament (PDS II® polydioxanone), are designed to be used as buried sutures. They lose their strength and are resorbed over several weeks (PDS lasts longer than Vicryl and is stronger and better for large wounds, especially on the trunk). Fine gauge Vicryl can be used as a surface suture for eyelids and mucosal surfaces when a soft flexible suture is required but should not normally be used as a surface suture as it carries a higher risk of creating suture marks in the skin.
Non-absorbable sutures are of monofilament construction and may be of polyamide 6 (e.g. Ethilon® or polypropylene (e.g, Prolene®).
Both types of suture are suitable for surface use, but polypropylene is completely non-reactive and suitable for use as a permanent buried suture when this is required.
Most skin sutures use a 3/8th curved needle which is generally the most useful shape, although a compound bicurved needle can be easier to use when placing buried sutures in small wounds. Many are ‘Prime’ quality – these maintain their sharpness for longer – which is important when multiple needle punctures are being made with the suture. Most needles have a ‘cutting’ edge – without this it would be very difficult to penetrate the skin, and many are ‘reverse cutting’ which means the triangular shape of the needle is orientated with the base of the triangle to the inside of the curve and the sharp apex on the outside (Figure 20.13). The reverse cutting needle is less likely to ‘cut out’ of the skin edge if any tension is applied when the needle is inserted into the skin. With a conventional ‘cutting’ needle which has the sharp edge in the inside of the curve, there is a risk that slight tension applied with the needle in the skin will result in an extended cut through the skin surface.

Figure 20.13 Reverse cutting needle.
The front two-thirds of the needle is hardened metal with a sharp triangular tip and then a square section body. The final third or swage is soft metal into which the suture is crimped. The needle should be gripped in the tip of the needle-holder at the junction between the middle and end thirds, not on the swage which is easily bent. Needle-holders should be fine enough not to distort the needle but should hold it firmly. The suture material should not be gripped in its working length with the needle-holder – the jaws may damage the material and lead to premature rupture.
Surgical knots
The ideal surgical knot should allow precise adjustment of tension on the wound and then tie securely without risk of slipping. No single knot will be ideal in all circumstances and it is helpful to be familiar with the principles of creating a knot and several variations. Knots are usually tied using the needle-holder, which is the most efficient method and saves time and suture material, but there are occasions where tying the knots by hand is preferable.
Modern suture materials require careful handling and knot creation, and incorrectly tied knots are all too common. It is simple to test the security of a knot by stretching the tied suture until it breaks or, if the knot is poor, the knot slips.
A tied suture has several components:
- The loop of suture material that holds the tissue together.
- The knot that is composed of a number of throws snuggled against each other.
- The suture ends or ‘ears’.
A throw is a wrapping of one strand around another. When two throws in opposite directions are pulled to form a knot, depending on the direction of ‘twist’ of the throws, the ends may emerge parallel to each other on one side of the loop – a ‘square’ knot, or on opposite sides – a ‘granny’ knot. The granny knot is less secure and more easily comes undone.
The ideal surgical knot should hold its initial position after the first throws whilst still being adjustable by the surgeon who makes sure the tissues are correctly apposed and completes the knot with further throws to make it secure and resistant to slipping. The ends of the suture should be about 3 mm long to allow for a little stretching of the suture material without the knot coming undone. With buried knots, the ends may be cut short and security obtained by putting an additional throw on the knot.
Tying knots with the needle-holder
For simplicity, we have assumed the surgeon is right-handed and places the suture through the tissues of the wound with a forehand movement – from right to left. The short end of suture material will be on the surgeon's right and the long end, with the needle attached, on the left.
In the first move, the surgeon places the needle-holder between the short and long ends, wraps the long end twice around the tips of the needle-holder in a clockwise direction, creating two full loops of suture around the needle-holder. The short end of the suture is then grasped in the tips of the needle-holder and pulled back towards the left side, whilst the left hand still holding the main length of suture is taken over to the right side. This creates a simple, double wrap throw, which has greater friction and less slippage than a single throw. In many cases, the edges of the wound can be apposed with this first throw (Figure 20.14). It is important to pull in a direction perpendicular to the wound edge and in the plane of the skin.
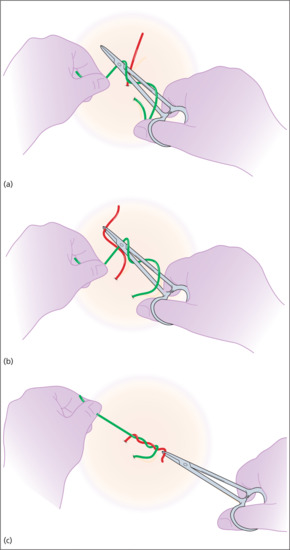
Figure 20.14 (a–c) Tying knots with the needle-holder.
The next step is to secure the knot by applying a square knot on top of the initial double throw. The needle-holder is again placed between the long and short ends of the suture and the long end of the suture is wrapped once around the needle-holder in the opposite direction (anticlockwise as viewed from the handle of the needle-holder). The short end is once again grasped with the needle-holder and pulled to the opposite (right) side, whilst the left hand takes the long end of the suture to the left side. Again, pulling perpendicular to the wound edge and flat, in the plane of the skin. At this stage, the knot is called a surgeon's friction knot – but it is still insufficiently secure for modern suture material (Figure 20.15). Taking one final throw, the needle-holder is positioned between the long and short ends, the long end is wrapped clockwise around the needle-holder, the short end is grasped and the ends are pulled to opposite sides of the wound (Figure 20.16). The knot is then placed on one side of the wound (usually placing the knot on the side which is marginally more depressed to correct any minor depression). It is essential that the suture ends are pulled in opposite directions after each throw and the final throw is pulled tightly to secure the knot.
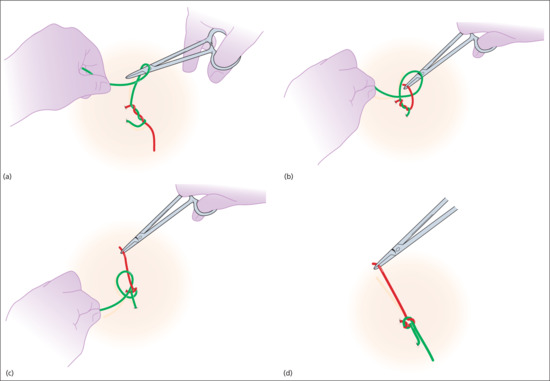
Figure 20.15 Surgeon's friction knot.
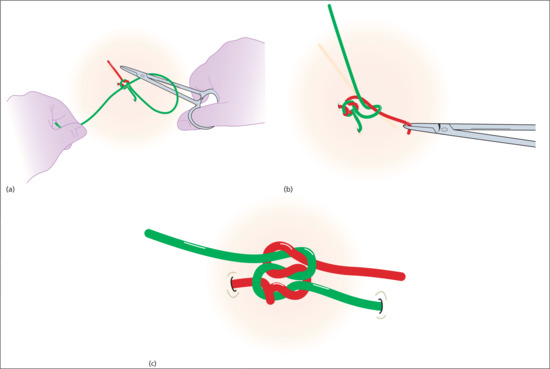
Figure 20.16 Final throw.
Sometimes the elasticity of the skin pulls the first double wrap of the knot apart and the edges are not held in apposition. A simple way of reducing slippage is to pull the short suture end back to the original side, prior to the second throw, converting the intertwining throw into two loops around the short suture end. The two loops have a tightening action on the suture and hold it in place, but if the alignment of the suture ends is disturbed it will loosen its grip. The knot can then be secured with a conventional square knot.
If this manoeuvre is not sufficient, it can be helpful to create a more powerful ‘slipping’ knot. This can be done using two conventional alternate throws, but instead of pulling the suture ends in alternate directions, the short end of the suture is kept on its original side. This creates a series of loops around the short suture end. The short end is then grasped with the needle-holder and gently pulled, whilst gently ‘easing down’ the knot of loops. When the desired apposition has been achieved, the ‘slipping’ knot is secured with a conventional square knot on top. This slipping knot is particularly useful for buried dermal sutures but also clearly demonstrates the importance of pulling the suture ends in opposite directions to create a secure knot and the ease with which this becomes a slipping knot if directions of pull are not reversed between throws.
It is also helpful to be familiar with tying knots by hand – particularly for buried sutures. Although hand tying is more wasteful of suture material, the tension on the suture ends is more evenly distributed and makes it easier to create a knot where the suture is under tension.
One of the problems with instrument-tied knots is that the tension of the throws is unevenly distributed which may generate sufficient frictional heat to break the suture as it is tightened. If you find that the suture frequently breaks when tying buried suture knots under tension, try using a slipping knot or tying by hand.
Suture technique [1, 2, 3]
The ability to employ several different suture techniques is one of the skills needed in order to become proficient in dermatological surgery. The dermatological surgeon should be proficient at techniques for both superficial and deep or buried sutures.
The simple interrupted suture is the mainstay of superficial skin closure. They are normally 4/0–6/0 gauge, and are placed close to the skin edge for fine approximation. Useful superficial stitches to know include: simple interrupted, simple running, horizontal and vertical mattress, tip and running interlocking stitches.
The horizontal mattress suture (with or without bolsters) [4] is useful for wounds under tension and can also be used to approximate long wounds. Vertical mattress sutures are useful for wound eversion, the tip stitch, also termed the half-buried mattress, is useful as a corner stitch when insetting the tips of flaps and the running interlocking stitch is useful for haemostasis at the wound edge.
Deep or buried sutures are used to close off ‘dead space’ in a deep wound and to relieve tension across the wound. They are typically performed using dissolving suture and optimally placed as a heart shape to give the wound eversion and to take advantage of the tensile strength of the dermis by following a longer course within the dermis.
Prior to closure, wound tension can be decreased by undermining. Meticulous haemostasis prior to closure and good surgical technique can minimize the risk of complications.
Excess tension on superficial stitches will increase the risks of infection and wound dehiscence, and often leaves permanent unsightly, papular or linear suture marks known as ‘train tracks’.
To minimize tension across the wound, tape closure such as steri-strips can be used in conjunction. The running intradermal (subcuticular) suture, although difficult to learn, is an elegant suture technique, and it can be left in place for long periods, leaving only two suture marks. Cyanoacrylate glue (Dermabond®) can also be used for superficial wound closure for wounds that are well approximated and under little tension.
Simple interrupted suture
The simple interrupted suture penetrates the skin surface on one side of the wound, passes under the dermis of both sides and exits on the other side and is tied securely with a surgical knot. It is important that the tension within the suture is sufficient to hold the wound edges together but not so tight as to impair the microcirculation in the area; allowance should be made for postoperative swelling that may increase tension in the suture. The edges of a wound naturally contract and invert, this tendency should be countered by careful insertion of the needle through the skin in a way that creates a stitch with a wider base; this encourages wound eversion (Figure 20.17). The skin sutures should puncture the skin typically 1–3 mm from the edge, depending on skin thickness; the distance from the edge should match the thickness of the skin. Greater distances can lead to a loss of control of the skin edges with a risk of overlapping. The sutures should be placed at intervals equal to the span of the suture, creating a ‘square’ or ‘cuboidal’ relationship between the track of the suture and the thickness of the skin. In general, the distance from the wound edge should be proportional to the depth of the stitch below the surface.
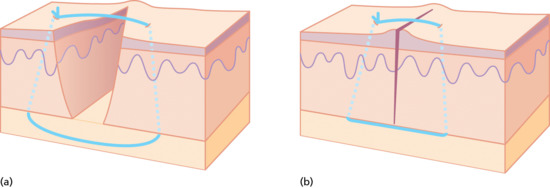
Figure 20.17 (a,b) Simple interrupted suture.
Buried dermal suture
Most skin wounds will be improved if one or several buried dermal sutures are used. The buried dermal suture passes from the dermis of one side to the dermis of the other side of the wound and is buried beneath the skin surface. Typically, slowly absorbable suture materials are used and this type of suture provides support for the wound for several weeks whilst the wound regains its strength. By eliminating dead space the use of buried sutures reduces the risk of haematoma formation, reduces infection and also enables wounds under tension to be apposed. In the majority of wounds, the use of buried sutures results in a better scar.
The first buried suture is usually placed in the middle of the wound. The point of the needle is placed underneath the dermis of one side and a small ‘bite’ of dermal tissue taken with the needle, taking care to ensure the needle does not penetrate the skin surface. The further back from the wound edge the dermal bite is taken, the more effective and powerful the dermal suture will be (i.e. most of the tensile strength of the buried stitch comes from the dermis). The more dermis contained within the path of the stitch, the stronger the stitch will be. Having taken a bite of dermis, the needle may exit either through, or below the cut edge of the wound before taking a symmetrical bite of tissue from the other side.
If the suture passes through the cut edges of the wound, the effectiveness of the suture is restricted when the apposing edges meet. If the suture exits below, rather than through the wound edges, it may be tightened beyond apposition of the edges, and appose and evert a greater length of the wound (Figure 20.18).
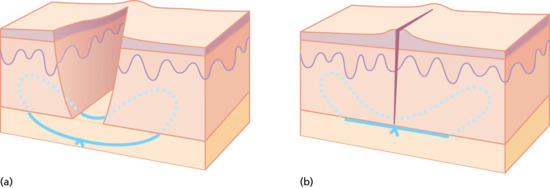
Figure 20.18 (a,b) Buried dermal suture.
The final number of buried sutures required will depend upon experience and individual defect but recall that the deep sutures are used to eliminate dead space and to relieve tension across superficial stitches.
When tying the knot for the buried suture, pull the suture ends in line with the wound, rather than across it. Tension across the wound can make the knot slip and it may help to start with a ‘slipping’ knot or to tie the suture by hand. At all times, placement of the sutures should be symmetrical in order to have an even effect on the skin, but it may be necessary to adjust this approach if the wound edges differ markedly in height.
A number of simple interrupted sutures may be used to close the wound. With experience, running simple or running locked sutures are often preferred for speed and economy of suture material (Figures 20.19 and 20.20). The surgeon should be vigilant and make sure that the wound edges are perfectly level, apposed and everted with each stitch. It is all too easy to overlap one wound edge with the other through careless suturing – and the wound will not then heal efficiently.

Figure 20.19 (a,b) Simple running sutures.
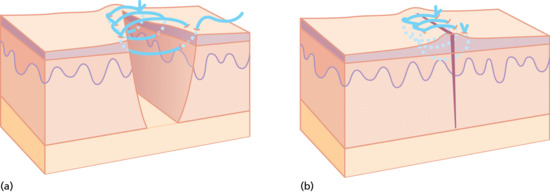
Figure 20.20 (a,b) Running locked sutures.
Although perfectly regularly spaced and placed sutures look attractive, there is a disadvantage to being too uniform in suture placement, particularly with running sutures; if all the sutures have the same line of entry and the skin can move on one axis, it is possible that the wound edges may ‘slip’ relative to one another allowing overlap to occur. This can be avoided by slight variation in the width and depth of the suture placement along the wound.
Vertical mattress suture
The vertical mattress suture is particularly useful in everting the wound edges and in areas where the skin has to be closed under some tension, or where it is very thin and fragile and a greater amount of tissue is necessary to hold the needle without tearing through (if a large bite were taken as a simple suture the outer edges would tend to invert) (Figure 20.21).
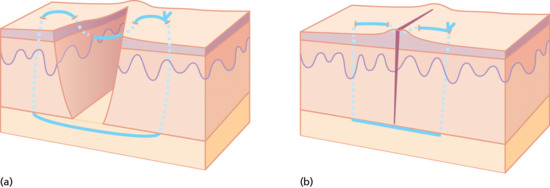
Figure 20.21 (a,b) Vertical mattress suture.
Horizontal mattress suture
The horizontal mattress suture is the most everting suture of all. It is useful in areas requiring high tension as the force of the stitch is distributed across two transverse stitches and the tissue included between them. The needle is inserted through the skin on one side of the wound at a distance from the edge, it passes underneath to the opposite side, emerges and is reinserted a little further laterally and passes back, under the wound to emerge on the opposite side. This suture takes a wide bite of skin, but passes entirely under the wound, thus preventing any tendency to invert the edges and ensuring maximum eversion. It is usually used in combination with simple or running sutures at the wound edge (Figure 20.22).
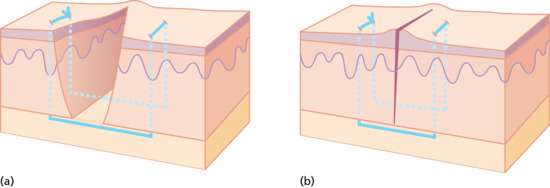
Figure 20.22 (a,b) Horizontal mattress suture.
Pulley suture
There are times in closing a wound under tension when it is clear from moving the skin with finger pressure that the edges could come together but attempts to persuade this to happen with a simple suture fail – either because the suture breaks, or the tension results in it cutting through the skin. Under these circumstances, a pulley suture is most useful and perhaps most often used on scalp wounds. In the simple pulley suture, the needle takes a large bite from the skin of one side of the wound, passes to take a small bite from the opposite side, returns to take a small bite from the original side and then passes to take a large bite from the opposite side before being tied. This creates a powerful suture that has twice as many points of contact in the skin and twice as many suture strands as a simple suture. The double-loop creates a pulley action that will pull the edges together (Figure 20.23). There is a slight risk of compromising the vascular circulation if the pulley loops overlap, this can be countered by slightly staggering the loops along the wound. This suture should not be used when a wound does not close with reasonable finger pressure – if excessive pressure is used to close a wound it will become avascular and necrosis will result. If the wound edges are white when the edges are closed, the wound is ‘too tight’. Pulley stitches can be used to initially take tension off a wound allowing easier placement of buried sutures and then removed prior to final closure.
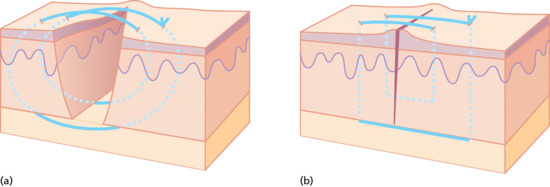
Figure 20.23 (a,b) Pulley suture.
Purse string suture
This is a very useful way of reducing the size of a wound, which will then be allowed to heal by second intention. It is particularly useful for large tumours which are necrotic or infected or where the exact nature of the tumour or the adequacy of excision is in question. Having excised the lesion with a suitable margin, a running monofilament absorbable PDS intradermal suture is then run around the margin, taking bites into the edge of the dermis. The suture is tightened drawing the edges together. This causes some distortion of the skin surface but the distortion disappears as the wound heals. The suture should be left in place for at least 6 weeks or until the wound has healed. Absorbable sutures do not need to be removed unless they are causing irritation (Figure 20.24).
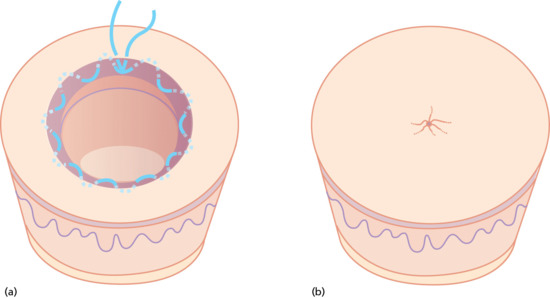
Figure 20.24 (a,b) Purse string suture.
Running intradermal (subcuticular) suture
This suture technique may be employed where sutures are to remain in the skin for prolonged periods of time and when it is desirable to avoid visible sutures or the necessity for their removal. It is quite commonly employed to close incisional wounds in various branches of surgery and when used in combination with a soluble monofilament suture such as poly dioxanone can obviate the need for suture removal, although the placement of the running suture is often combined with external placement of the ends of the suture at either end of the wound.
The subcuticular suture is confined to the dermis and passes from one side of the wound to the opposite side like the rungs of a ladder. Before placing a subcuticular suture, the wound should be apposed with buried dermal sutures. Care should be taken to ensure that needle insertion is of equal depth on both sides of the wound and the needle should cross the wound perpendicularly. It may be preferable to start by placing a buried dermal suture at what will become the final end of the wound, leaving a free suture end to secure to the end of the subcuticular suture. The subcuticular suture then starts at the opposite end of the wound with a buried suture and proceeds in a ladder-like manner along the length of the wound before being finally secured to the first-placed buried suture at that end. It is preferable to use monofilament soluble sutures such as poly dioxanone which do not require removal. This suture technique is commonly employed following wide local excision of lesions on areas of mobility such as the limbs or the back where wound stretch often occurs.
Dressings and postoperative care
Although perhaps not strictly necessary, a dressing following a cutaneous surgical procedure is likely to produce a better final result and, furthermore, conform to the expectations of most patients.
An ideal dressing should:
- Soak up excess exudate from the wound surface, thereby reducing the risk of bacterial penetration.
- Maintain a moist wound–dressing interface to encourage migration of epidermal cells over the granulating tissue. Partial-thickness wounds heal faster if they are covered than if they are left to dry [1]. A scab is a poor barrier against loss of moisture from the dermal surface because it allows the surface to dry out, thus forcing the epidermis to grow under the dry wound surface. As the epidermal cells migrate, they secrete a proteolytic enzyme which dissolves the base of the scab; migration ceases when cell–cell contact occurs [2].
- Not contain organisms or fibres that may contaminate the wound. Cellulose-derived dressings may shed fibre fragments into the wound [3], causing a foreign-body reaction and leading to increased risk of infection.
- Be impermeable to bacteria.
- Cause minimal injury to healing tissue when removed.
It is often claimed that a dressing that permits increased oxygen permeability aids wound healing. Such dressings do aid healing in partial-thickness wounds [4]. However, in full-thickness wounds, the same synthetic wound dressings create hypoxic conditions at the healing surface [5]. Paradoxically, tissue hypoxia in full-thickness wounds appears to stimulate rather than retard granulation tissue formation [6].
Basic dressing
This includes contact, absorbent and outer layers [7]. The layer in contact with the wound is non-adherent, either because it contains a greasy ointment (e.g. paraffin gauze) or because it is made from a specially designed, low-adherence material (e.g. polyethylene) [8]. The absorbent layer (e.g. hydrocolloid dressing or gauze) soaks up the excess wound exudate and cushions the wound. The outer layer (e.g. tubular bandage, elasticated tape) holds the other two layers in place and applies slight pressure. The basic dressing may be left in place until suture removal, but should be changed if it becomes wet or is saturated with exudate, as this greatly increases bacterial penetration. Many proprietary dressings combine two or all three components (e.g. Melolin® contains a polyethylene non-adherent layer attached to an absorbent cellulose component). The hydrogel (e.g. Vigilon®), hydrocolloid (e.g. Granuflex®), xerogel (e.g. dextranomer starch polymer), alginate (e.g. Kaltostat®) and synthetic foam dressings are designed to provide all three components, and these can also be used on pressure sores [9, 10], leg ulcers [11] and full-thickness surgical wounds [12].
Pressure dressings
These are typically placed over the basic dressing and are useful in the immediate postoperative period to assist with haemostasis. Most commonly, and on suitable sites, a piece of compressible padded dressing (e.g. cotton-wool, dental roll, sponge, eye pad) is pressed down onto the wound with an elasticated or crepe bandage for 24–48 h. Where bandage application is difficult, adhesive tape can be used. A tie-over pressure dressing is commonly applied over skin grafts, but can be used on any wound. Paired sutures are placed around the wound and tied together to hold down a three-layered contact, absorbent and compression dressing, so that the graft is held down onto the recipient site to stabilize the graft and prevent a haematoma forming beneath it. Aquaplast®, a conforming thermoplastic material, may also be used to tie over skin grafts [13].
Secondary intention healing
Full-thickness wounds may be left to heal by secondary intention. The cosmetic result depends on the wound site and the patient's age. The nasolabial fold, medial canthus, scalp and pre- and postauricular skin produce particularly good results, although the technique can be used at almost any site [1]. Wounds that heal by secondary intention contract significantly and thus care should be taken when granulating defects near free margins such as the lip, nasal ala and eyelid. Distortion of these free margins gives poor cosmesis and can affect function. In general, the cosmetic results are best for granulating defects on concave rather than convex skin surfaces [1] and in older rather than younger patients. Hypertrophic scarring is less common in older patients. The method can be used if there is doubt about the adequacy of excision, or closure of the defect requires a larger or more complex procedure, which the patient will not tolerate. In some situations, such as excision of small naevi on the back [2] or the treatment of acne keloidalis nuchae [3] and hidradenitis [4], secondary intention healing may be viewed as the preferred method as it may produce a very pleasing cosmetic result.
Postoperative care of granulating wounds
After surgery, an initial contact dressing is applied, and covered by a pressure dressing for 24–48 h. Thereafter, the dressing can be changed at 2–4-day intervals, depending on the amount of exudate. At each dressing change, the wound is cleaned to remove crust or debris and a greasy ointment (e.g. Polyfax®, Flamazine® or even plain petrolatum jelly) and non-adherent dressing are applied. On average, a 25-mm diameter head and neck wound takes approximately 35 days to heal [5]. These wounds are pain free during the healing process. Bacterial contamination may occur, but tissue infection is rare. The patient should be made aware of the predicted time course for healing and that even a successfully healing wound will develop a somewhat reddened, elevated margin. A yellow exudate is common in the first few days. Before granulation tissue appears, a yellowish fibrin clot covers the wound. Exposed periosteum and perichondrium must be kept moist and viable by using petrolatum jelly plus a moistened alginate dressing. This encourages granulation tissue to migrate over the exposed area and also reduces the risk of bone or cartilage desiccation and necrosis [6]. If the periosteum has been stripped off, the exposed bone can be fenestrated or abraded to encourage the formation of granulation tissue and hence enhance re-epithelialization [7]. When the wound first heals, the scar often contains large looped vessels, which slowly disappear as the scar thickens. A slightly elevated red hypertrophic scar is then present, and the cosmetic result is not optimal until approximately 1 year (Figures 20.25 and 20.26).

Figure 20.25 (a) This man had a basal cell carcinoma on the side of the nose; (b) this was excised and the wound was allowed to heal by second intention. (c) The cosmetic result 4 months later was good.
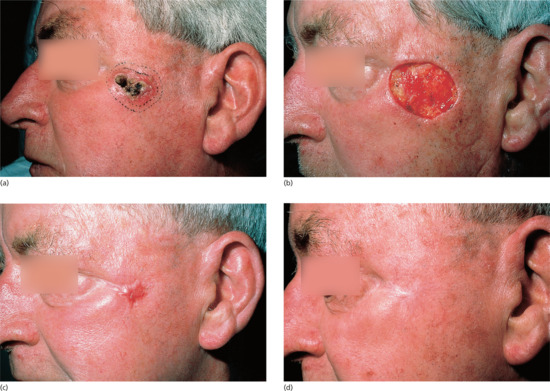
Figure 20.26 (a) This man had a basal cell carcinoma on the temple (b) excised. (c) Three months later, the wound had healed but the scar was thick and red; (d) 15 months later this scar had become considerably less conspicuous.
Removal of sutures
The timing of removal of surface sutures varies according to the anatomical site of the surgery, wound tension and the surgeon's preference. In general, facial skin sutures may be removed on days 4 to 7; on the trunk and limbs between 7 and 14 days. The longer surface sutures remain in place, the greater the risk of cosmetically unsatisfactory surface ‘track marks’ occurring.
Flaps (Figures 20.27, 20.28, 20.29, 20.30 and 20.31)

Figure 20.27 Rotation flap for the repair of a Mohs surgical defect of the left zygomatic cheek. (a) Note the design of the flap is such that the arc of rotation passes above the lateral canthus to ensure no tension on the lower eyelid as the flap is rotated into place. (b) The flap is incised and elevated by sharp and blunt dissection in a subcutaneous plane. (c) Immediately at closure. Note no tension on the free margin of the lower eyelid. (d) The result at 8-week review is pleasing.

Figure 20.28 Transposition flap. (a) A large Mohs surgical defect on the right cheek/jawline. (b) The main skin reservoir is located within the ipsilateral neck. A rhombic transposition flap is designed as shown. (c) Immediately at closure following transposition of the flap. (d) The 6-week result is very pleasing.
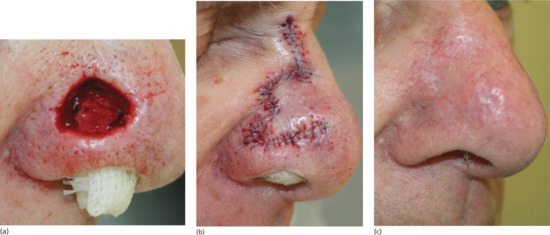
Figure 20.29 Bilobed flap repair on the nose. (a) A Mohs surgical defect of the right lower nasal sidewall and alar. To prevent effacement of the aesthetically critical alar–cheek sulcus, a medially based flap was designed. (b) Immediately at closure. (c) A satisfactory outcome at 3-month review.

Figure 20.30 An interpolated paramedian forehead flap. An ill-defined morphoeic basal cell carcinoma (BCC) of the nose. (a) Following Mohs surgical removal, an extensive defect results. (b) A full-thickness skin graft would have provided a suboptimal aesthetic result and consequently a left-sided paramedian forehead flap was designed and elevated. (c) The flap is transposed 180° and inset into the surgical defect. The forehead donor site is repaired primarily. (d–f) At 3 weeks the pedicle is divided and inset. (g) The final outcome 4 weeks post-pedicle division is pleasing.
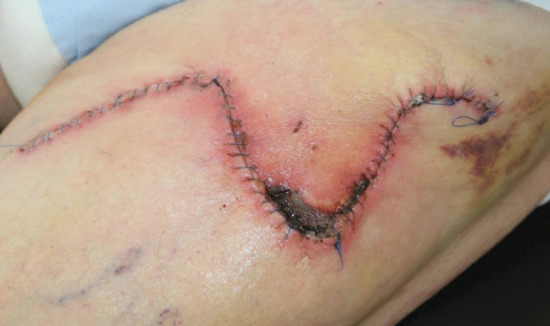
Figure 20.31 Complications. Flap necrosis. A large modified rhombic transposition flap on the left anterior thigh of a heavy smoker has undergone a degree of tip necrosis. This area will subsequently heal by secondary intention.
A flap is a full-thickness piece of skin moved to cover a defect where the proximal portion, or pedicle, remains attached to the original site while the distal portion is moved to cover the defect [1]. The blood supply of any flap is therefore initially provided by its pedicle. The pedicle is sometimes based on a portion of skin which remains attached to the origin and sometimes, as in an island pedicle flap, the skin is entirely detached and the blood supply comes from the underlying subcutaneous tissue or muscle.
Dermatologists almost exclusively use local flaps performed under local anaesthesia and do not perform distant flaps or free flaps. Distant flaps are tunnelled subcutaneously, with a long muscle pedicle attached over long distances; for example, from the anterior chest wall skin to the head and neck. Free flaps involve the harvesting of, for example, a piece of forearm skin with an attached artery and vein; these vessels must then be anastomosed onto named vessels at the recipient site before the skin can be used to repair the defect.
Similarly, dermatologists mostly use random pattern flaps where the blood supply is inherent in the skin being moved, but also perform axial pattern flaps which obtain their blood supply from a named artery; the median or paramedian forehead flap [2, 3], based on the supratrochlear artery being the most common. The more closely a flap resembles a graft (thin, defatted skin), the greater the contribution to its blood supply from the recipient site rather than the flap pedicle.
Flaps are variously categorized by the direction of movement, the name of the surgeon who first described the flap, the blood supply or the type of tissue moved. The most useful method relates to how the skin has been moved to resurface the defect. All flaps may therefore be described in terms of being advancement, rotation, transposition or pedicle (sometimes called interpolated) flaps (Table 20.4). As skin is moved to close the primary or original defect, a secondary defect is created which in turn also must be closed. The essence of flap repair is to design the flap so that this secondary defect is created where there is sufficient loose skin to permit closure. Successful flap design requires understanding of tension vectors to avoid permanent distortion of nearby free margins. In advancement and rotation flaps, the main tension vector is in the direction of closure of the primary defect and in transposition flaps, the main tension vector is in closure of the secondary defect.
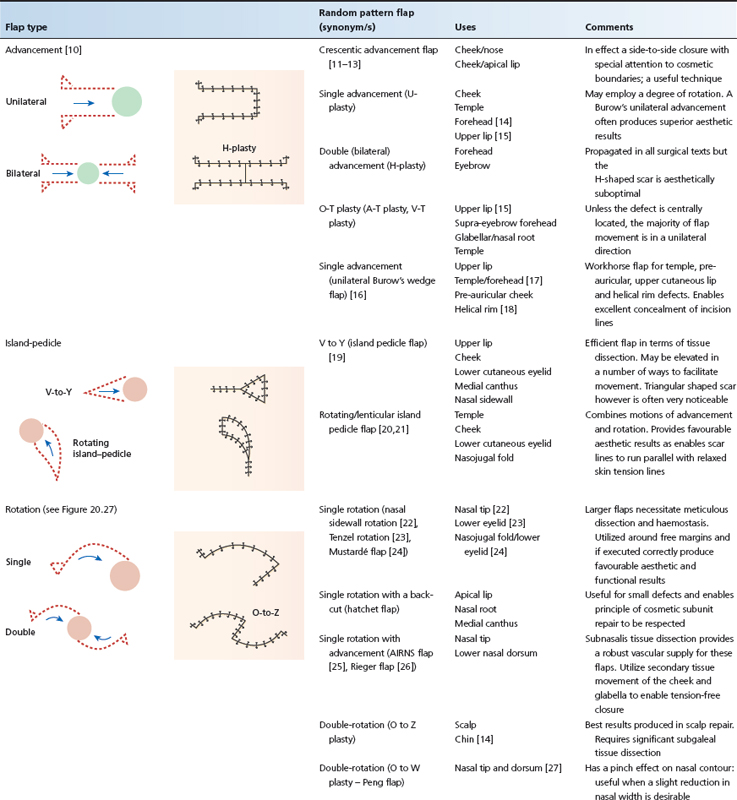

Table 20.4 Common flap type and uses.
Advancement flaps
Advancement flaps move skin in a generally linear direction utilizing laxity in adjacent tissues to close the defect. Tissue movement may be mostly from one side of the defect as in a Burow's advancement flap or a U-plasty or from two sides as in an H-plasty or O-T flap. Tension vectors occur in the direction of closure of the primary defect.
Rotation flaps
Rotation flaps involve the motions of both advancement and rotation on a pivot point on a broad pedicle (see Figure 20.27). Mobility may be limited, and long incisions and extensive undermining may be required to mobilize sufficient tissue; the secondary defect is closed last. When rotating into a surgical defect, such flaps ‘lose height’ and thus a predesigned elevation in the arc of rotation is required particularly when operating around the free margins of the lower eyelid, for example. As in advancement flaps, tension vectors occur in the direction of closure of the primary defect.
Transposition flaps
Transposition flaps can utilize tissue that is not immediately adjacent to the defect and thus offer great variety. Tension vectors occur in the direction of closure of the secondary defect, allowing for redirection of tension vectors (see Figure 20.28). Such flaps are pushed rather than pulled into the defect. Transposition flaps are widely used (see Figure 20.29). A wide variety of transposition flaps are based on three simple designs with careful refinements for different sites (see Table 20.4).
Pedicle flaps
Pedicle flaps include island pedicle flaps (also known as V to Y flaps) and interpolation flaps. The island pedicle flap derives its nutritional support from the attached subcutaneous and muscle tissue, whereas the interpolation pedicle flap derives its vascular supply from a skin and subcutaneous tissue pedicle. The island pedicle flap is a one-stage procedure whereas the interpolation flap involves the creation of a bridge-like skin pedicle; this remains attached for 2–3 weeks at both the donor and defect site whilst the donor skin establishes ‘its own’ blood supply at the defect site (see Figure 20.30). Recent reports, however, advocate pedicle division at 1 week to also be effective with no adverse effect on functional or aesthetic outcomes [4]. Interpolation flaps therefore always involve a second surgical stage when the pedicle has to be divided and inset. Interpolation flaps are used when the nature, position or depth of the defect means that a simpler local flap or skin graft could not be used or where a suboptimal result would occur. Pedicle flaps are most frequently moved into position by transposition, although the presence of the pedicle permits greater flexibility and less reliance on matching donor and recipient site.
Complications
Ischaemic necrosis of a flap usually occurs because of excessive tension resulting from poor design or limited flap mobility. Secondary infection is also more common if the flap has a poor blood supply [5]. On the head and neck, the extensive rich collateral circulation ensures that the blood supply is excellent at all sites, but on the trunk, and especially on the lower limb, attempts at flap repair frequently result in failure because of a relatively poor blood supply. Cigarette smokers are more likely to suffer from flap or graft necrosis than non-smokers (see Figure 20.31), although this can be reversed if smokers significantly reduce cigarette consumption 2 days before and 7 days after surgery [6]. If any resultant scar is suboptimal, particularly on the nose, it may be revised by judicious use of dermabrasion either manually or using an ablative laser [7, 8, 9].
Skin grafts
Skin of varying thicknesses can be used for skin grafting. A split-thickness skin graft is not limited in size, because the donor site regenerates. Full-thickness and composite skin grafts potentially produce better cosmetic results than split-thickness skin grafts, but are limited in size by the amount of skin that can be harvested. Compared with flaps, grafts are technically easier to perform, but generally produce inferior cosmetic results because of their inability to replace ‘tissue volume’ and differences between the donor skin and recipient site.
Full-thickness skin grafts
A full-thickness skin graft is used, in preference to a split-thickness skin graft, when the cosmetic result and strength of the repair are important. Any site with matching and ‘spare’ skin is a potential donor site [1]. Common donor sites used in facial reconstruction include the skin behind and in front of the ear, the nasolabial fold, upper eyelid, inner aspect of the upper arm and supraclavicular fossa [2]. The donor and graft sites should match for skin thickness, adnexal structures, surface markings, weathering and texture. After careful assessment of the amount and shape of skin required, the donor skin is excised down to the superficial fat [3]. The fat is then trimmed off the undersurface of the graft to aid new blood vessel penetration. Skin sutures are used to prevent shearing forces dislodging the graft, and a pressure dressing, usually held in place using tie-over sutures, is employed to prevent a haematoma lifting the graft off the recipient site (Figure 20.32). In most instances, the donor site is chosen because there are redundant folds of skin present and the skin edges can be sutured easily after donor skin excision. At some sites (e.g. behind the ear), the donor defect can be allowed to heal by second intention. Grafts take best on dermis and granulation tissue, perichondrium and periosteum, but will generally not survive on exposed bone or cartilage and often fail on fat. Grafts may fail because of infection or poor blood supply. The latter potentially occurs because of a faulty technique (e.g. poor haemostasis, suturing or wound care) or because the recipient site has an inadequate blood supply (e.g. previous radiotherapy or lower leg sites in people with compromised venous and/or arterial supply). All skin grafts contract, and near the lower eyelid this may lead to ectropion. Hence, at this and other critical sites, grafts should be oversized by 10–25% to compensate for this. Depressed graft scars may be elevated by injection of autograft fat under the graft [4]. Delayed grafting to allow the recipient site to produce granulation tissue increases the chance of graft survival and enables deeper defects to fill up prior to grafting, thus producing an improved contour [5].
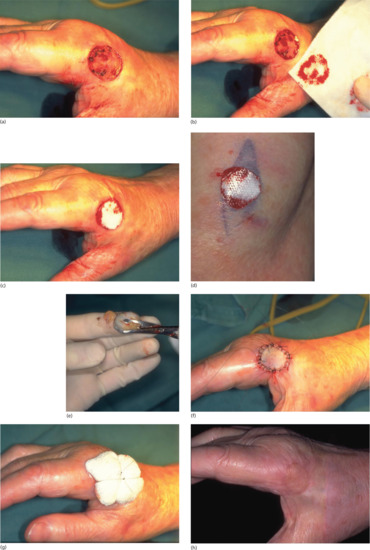
Figure 20.32 (a) Surgical defect following excision of a basal cell carcinoma. (b) A template of the defect is created on a non-adherent dressing. (c) Template in place. (d) The template is used on the donor site – in this case the upper arm – to harvest the graft.(e) The harvested graft is de-fatted using curved tissue dissection scissors. (f) The graft is then sutured into the recipient wound bed and a tie over bolster dressing applied to immobilize the graft and reduce haematoma formation beneath the graft itself. (g) Dressing in place. (h) Three-month follow-up reveals a well-healed graft.
Composite grafts
Composite grafts are defined as those comprising two or more germ layers. In dermatology, these are grafts containing skin and cartilage components. When used to repair full-thickness alar rim defects using skin taken from the helical rim, graft survival is unpredictable [6]. In contrast, composite grafts containing skin and perichondrium, e.g. perichondrial cutaneous grafts harvested from auricular skin and cartilage, are claimed to be better than full-thickness grafts for nose, ear and periocular defects, as they contract less, induce new cartilage formation and maintain their thickness and epidermal appendages [7].
Split-thickness skin graft
Except in extreme circumstances (e.g. extensive burns), split-thickness skin graft size is not limited by the amount of donor skin that can be harvested, because the donor skin site will re-epithelialize by regeneration from retained adnexal remnants. Split-thickness skin grafts can therefore be used to cover very large wounds. Because the skin is thin and relatively transparent, split-thickness skin grafts are also sometimes used to cover tumour excision sites where the adequacy of excision cannot be guaranteed at the time of surgery, because recurrence is more easily identified through the thinner graft than it would be after full-thickness or flap closure. The disadvantages of split-thickness skin grafts compared with full-thickness skin grafts are the relatively poor cosmetic result and greater graft shrinkage [1]. When a split-thickness skin graft is taken, skin is sliced off through the dermis, leaving behind parts of the adnexal and follicular structures from which epidermis migrates to cover the donor site. Split-thickness skin grafts can be taken using a hand-held knife or a mechanical dermatome (Figure 20.33a). The latter is easier to use and produces a predictably good graft [8]. Meshing, or cutting multiple parallel slits in the graft, allows it to expand rather like a fishnet stocking when stretched (Figure 20.33b). The gaps are covered by epithelium migrating from the adjacent strips of the graft (Figure 20.33c). A meshed graft will therefore cover a wider area, allow exudate to drain through the gaps (e.g. on the leg) and will conform to an uneven contour (e.g. ear). The common donor sites include the upper thigh, and less frequently the upper outer arm and anterior abdominal wall.
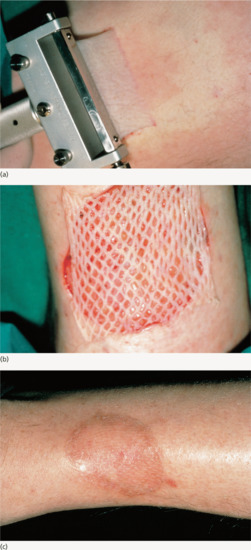
Figure 20.33 Meshed split-skin graft. (a) A split-skin graft was harvested from the thigh skin using a power dermatome. (b) The skin was meshed on a mesher, and the meshed graft applied to the defect. (c) This was the appearance of the graft 11 months later. See split-thickness skin graft online video which accompanies this reference: Optimizing the transfer of split-thickness skin grafts from the donor to the recipient site using the ‘moist gauze pick-up’ technique. Mortimer NJ, Salmon PJ, Hussain W, Br J Dermatol 2013 Jan;168(1):215–16.
Other techniques for facilitating closure
M-plasty [1, 2]
This is a very useful technique if one end of an elliptical excision will cross an important anatomical or cosmetic line. In this situation, an M-plasty will help to reduce the overall length of excision required by bringing the apex of the excision back within the original area to be excised (Figure 20.34).
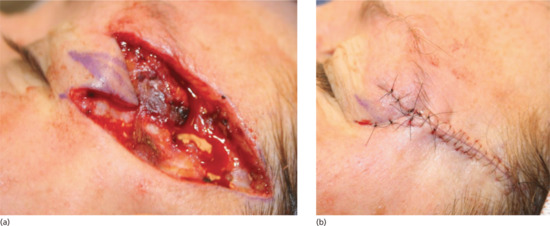
Figure 20.34 (a,b) M-plasty design in this case prevents the scar extending onto the eyelid skin.
Z-plasty [3]
This is a technique that is used to treat scar contractures, skin ‘webbing’ for example along the inner canthus and to break up or alter the direction of linear scars to try to improve the cosmetic or functional result via the redirection of tension vectors. The size of the angle used determines the increase in the length of the scar that will result (Figures 20.35 and 20.36).

Figure 20.35 Technique of Z-plasty. (From Eedy et al. [3].)
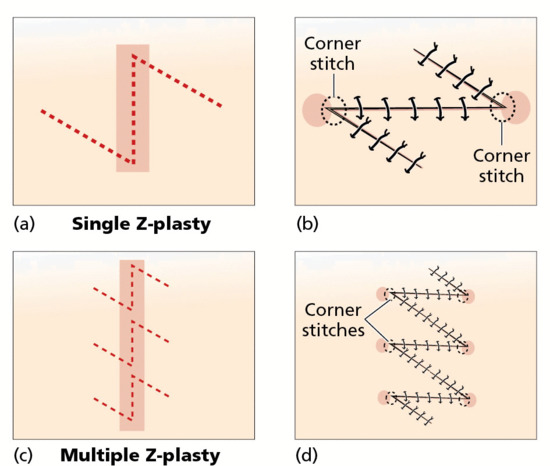
Figure 20.36 Single and multiple Z-plasty. (a,b) Single Z-plasty. (c,d) Multiple Z-plasty. Note breaking up of zone of lateral tension (shaded areas) with multiple Z-plasty. (From Eedy et al. [3].)
Wedge excision – lip, eyelid and ear
On the eyelid, lip and ear, a tumour can be excised and the defect readily closed by removing a full-thickness wedge with an appropriate margin of uninvolved skin. The different layers at the defect edges are then sutured, and thus the technique varies with the site. The inherent tissue elasticity of the eyelid and lip allows considerable defects to be repaired by direct closure without distorting the free margins of these structures. On the lip, defects smaller than one-third of the lip length can be closed directly following a wedge excision [4], if necessary using a W-plasty correction on the lower lip to avoid excessive distortion [5]. On the eyelid, defects of up to 50% can be closed directly, using a pentagonal wedge technique [6]. However, a wedge excision on the ear reduces its size considerably, and buckling of the ear may occur unless the technique is modified to avoid this [7]. In most instances, this type of defect is not a problem, as spectacles can still be supported by the ear and differences in ear size are rarely noticed.
Vermilionectomy
This is sometimes referred to as a mucosal advancement [4, 8, 9]. The vermilion, usually of the lower lip, is excised, principally because of actinic damage, and replaced by lip mucosa pulled forward and sutured at the vermilion–skin border.
‘Dog ears’ tend to occur when the length to width ratio of an excision is insufficient to prevent the skin at the poles from bulging outwards when the opposing skin edges are brought together. They tend to occur more commonly when there is limited laxity or movement in the surrounding tissues. Excisions where the angle at the apex exceeds 30° are also liable to produce dog ears. ‘Pseudo dog ears’ occur if too much fat is left at the poles of an excision.
There are several ways in which this problem can be surmounted [11]:
- The excision can be extended and the redundant overlapping skin excised.
- One side of the pucker can be cut back flush with the skin and the excess skin from the other side identified by drawing it across the wound; this can then be cut off.
- The excess skin of the dog ear can be removed by converting it into a T-plasty or an M-plasty. This is a useful technique when the length of the wound cannot be extended [12].
Dog ears may be minimized by ensuring the apices of the wound are widely undermined. Judicious removal of subcutaneous fat directly beneath the apices will also minimize the tendency for dog-ear formation.
Relaxing incisions
Relaxing incisions represent one of several techniques used to increase skin mobility. Multiple small full-thickness incisions are made parallel to the skin edge at the site of greatest wound tension [13]. These allow the skin to stretch like a meshed graft, resulting in small elliptical defects which heal by second intention. Although the technique has been promulgated by some as being particularly useful for excisions on the lower leg, its utility is limited and patients are likely to be more satisfied with the outcome from a planned skin graft than from a closure requiring multiple incisions and the discomfort from the associated wound tension.
Mohs micrographic surgery
Definition
Mohs micrographic surgery is a specialized treatment for skin cancer that offers extremely high cure rates and maximal preservation of healthy tissue. Intraoperative microscopic examination of the entire surgical margin by the surgeon allows accurate and dependable identification and removal of all residual invasive tumour while preserving adjacent uninvolved skin. MMS is most often used to treat the most challenging forms of facial basal and cutaneous squamous cell carcinoma, where it is rightly considered the ‘gold standard’. There is, however, a growing body of literature supporting its use in non-facial sites for recurrent disease and/or particularly large or aggressive tumours.
History
The technique evolved from the pioneering work of Frederic E. Mohs while working as a cancer research assistant at the University of Wisconsin, USA, in the early 1930s. Initially called chemosurgery, the original technique involved the overnight application of zinc chloride paste, with subsequent excision of the devitalized preserved tissues, and microscopic examination of histological tissue sections. Consequently, the wounds created had to be allowed to heal by secondary intention. Mohs introduced three features that remain fundamental to the success of the modern technique:
- Tissues were sectioned and examined in a horizontal plane.
- Excised specimens were marked and colour coded using a novel technique.
- A mapping process was used to accurately identify the location of residual tumour which could then be excised with further cycles of treatment.
As experience with the technique grew, the combination of consistently high cure rates for large and extremely destructive tumours, and the surprisingly acceptable results of wound healing by secondary intention [1], resulted in a gradual acceptance of the technique by the medical community.
Mohs first published his results in the general surgical literature [2], but as the main interest in his work was amongst dermatologists he subsequently began to publish in the dermatological literature [3]. Practical use of chemosurgery spread slowly amongst dermatologists, and nearly 30 years passed before there were enough ‘chemosurgeons’ to form a society; the original 23 members of the American College of Chemosurgery (ACC) first met in 1967 [4].
The evolution of chemosurgery into the technique that is now widely practised worldwide began at the 1970 meeting of the ACC when Tromovitch reported no recurrences in 99 (97%) of 102 patients following excision of basal cell carcinomas using the Mohs technique but omitting the use of zinc chloride paste and simply excising living tissue under a local anaesthetic [5, 6]. This ‘fresh tissue’ technique had first been used by Mohs himself in 1953 and had become his preferred technique for the removal of periorbital tumours, a site where the use of zinc chloride paste led to particularly severe inflammation, swelling and morbidity [7].
As confidence in chemosurgery grew, it became increasingly clear that the success of the procedure was fundamentally linked to the comprehensive microscopic control of resection margins, rather than in situ tissue fixation. Consequently, there began a gradual move away from the use of chemosurgery and an increased adoption of the fresh tissue technique of Mohs surgery, most commonly using rapidly prepared frozen tissue sections. As a result, a painful prolonged technique, producing sloughy granulating wounds, was replaced by a procedure which could be performed comfortably under local anaesthesia, lasting hours rather than days, and resulting in defects which could be immediately reconstructed when necessary [8].
Treatment of skin cancer
Skin cancer can be treated with a variety of techniques including topical therapy, destructive procedures, surgical excision and radiation therapy. However, only surgical excision and MMS provide tissue suitable for histological examination of the surgical margins. The following are the fundamental differences between traditional surgical excision and MMS:
- Traditional surgical excision involves removing a predetermined margin of clinically normal skin from around and underneath the cancer, and generally wider and deeper margins are recommended for more advanced, difficult and recurrent tumours. MMS does not rely upon clinical estimation as the true extent of the cancer is revealed as the technique proceeds through the number of stages required to clear the tumour (Figure 20.37a–f).
- Traditional surgical excision is generally followed by immediate reconstruction of the wound, with histological examination of the surgical margins occurring days later. MMS uses intraoperative histological examination to establish complete tumour removal on the day of surgery. Consequently, traditional surgery may result in incomplete excision of the cancer, and difficult management decisions as the wound has already been repaired. In contrast, MMS confirms complete tumour resection prior to wound reconstruction.
- Traditional surgical excision generally relies upon histological evaluation of the surgical margins using vertically orientated tissue sections (‘bread-loafing’) which has been estimated to have a sensitivity no greater than 44% [9] as it involves assessment of <1% of the entire surgical margin. In contrast, the horizontally orientated tissue sections used in MMS are designed to allow microscopic examination of theoretically nearly 100% of the true surgical margin.
- Traditional surgical excision involves the surgeon, pathologist and possibly an anaesthetist. MMS is performed by the Mohs surgeon who also acts as anaesthetist, pathologist and reconstructive surgeon.
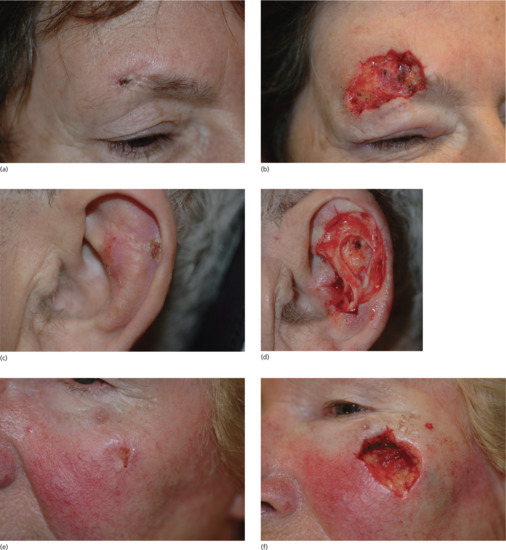
Figure 20.37 Defects following Mohs micrographic surgery (MMS) for ‘high risk’ facial basal cell carcinoma (BCC) illustrating significant tumour extension beyond the apparent clinical margins. (a) Morphoeic eyebrow BCC, and defect (b) following MMS, showing extensive spread medially into the eyebrow; (c) poorly defined BCC on the ear, and defect (d) following MMS, showing extensive spread and involvement of underlying cartilage; (e) morphoeic BBC on the left upper cheek, and Mohs defect (f).
Procedure
The practical aspects of modern fresh tissue MMS have been well described [8, 10]. The technique involves sequential cycles of local anaesthetic surgery and pathological investigation. The visible skin cancer is initially excised as a flat layer with bevelled edges, which is accurately orientated, colour coded, mapped, horizontally sectioned and examined microscopically (Figure 20.38).
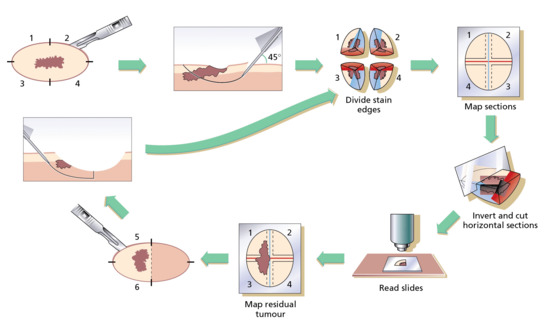
Figure 20.38 The stages of Mohs micrographic surgery.
Any residual tumour identified at any part of the surgical margin is marked on the Mohs map, which accurately guides the Mohs surgeon in the re-excision of all residual tumour-involved areas (Figure 20.39a,b). This meticulous and extremely methodical use of highly accurate, staged excisions underpins the very high cure rates associated with the technique. In contrast, those areas of the wound that do not contain tumour are not excised further, thus providing the maximal tissue preservation associated with the technique. Each tissue layer is examined microscopically and, if there is still residual cancer, the process continues, layer by layer, until the cancer has been completely removed. Frozen section histology is the preferred option for most experienced Mohs surgeons excising basal and squamous cell carcinoma [11], but permanent-section histology is used by some, and this means that the wounds cannot be repaired on the same day [12]. Mohs surgeons who routinely use frozen section histology may occasionally use permanent-section histology when treating highly infiltrative or uncommon tumours such as dermatofibrosarcoma protuberans [13].
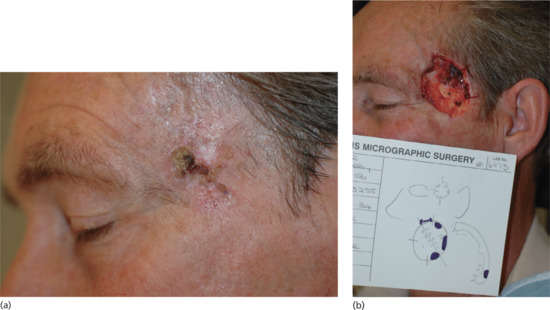
Figure 20.39 Intraoperative picture during Mohs micrographic surgery illustrating the role of the Mohs map in identifying the location of residual tumour. (a) Poorly defined basal cell carcinoma of the left temple, recurrent following excision. (b) Intraoperative picture showing correlation between residual tumour (blue areas on Mohs map) and the Mohs defect.
In a feature unique to MMS, the final decision on the exact mode of wound repair is made only after the cancer has been completely removed, although likely wound repair options in a particular anatomical area can be discussed in advance. All wounds resulting from the old chemosurgical technique had to heal by secondary intention, but wounds following MMS are suitable for immediate reconstruction or secondary intention healing, whichever is most likely to result in the best cosmetic and functional outcome. In selected cases, other surgical specialists may perform reconstruction of the Mohs defect as part of a multidisciplinary approach to the management of aggressive facial skin cancer. In many major Mohs units, Mohs surgery is frequently performed in collaboration with plastic [14], maxillofacial, otorhinolaryngeal [15] or oculoplastic [16] colleagues.
Results
With MMS, a 98–99% 5-year cure rate for basal cell carcinoma and a 94.4% 5-year cure rate for squamous cell carcinomas was reported by Mohs himself [17]. There is considerable evidence supporting the use of MMS to treat the most difficult cases of basal cell carcinoma. A review of studies published since the mid-1940s suggested an overall 5-year cure rate of 99% following MMS for primary basal cell carcinoma [18] and 94.4% for recurrent disease [19]. Two prospective studies have been reported from Australia; in one, 5-year cure rates of 100% and 92.2% for primary and recurrent tumours were reported in 819 patients with periocular basal cell carcinoma [20], and in another study of 3370 basal cell carcinomas on the head and neck treated with MMS there were 5-year cure rates of 98.6% for primary basal cell carcinoma and 96% for recurrent disease [21]. A retrospective review of 620 patients with 720 lesions gave estimated 5-year cure rates of 98.8% for primary basal cell carcinoma and 93.3% for recurrent disease [22] (Tables 20.5 and 20.6).
Table 20.5 Types of basal cell carcinoma (BCC) that should not be treated by curettage.
| Large tumours (>2 cm diameter) |
| Tumours at sites where the appearance of the scar produced by curettage is cosmetically unacceptable to the patient or where recurrence of the tumour has an unacceptable risk of further morbidity |
| Morphoeic, infiltrating or basosquamous BCCs |
| Recurrent tumours |
| Ill-defined tumours |
| Tumours penetrating muscle, fat, bone, etc. |
Table 20.6 Sites to avoid curettage and cautery of basal cell carcinomas
| Sites with a high recurrence rate after all treatment modalities | Sites where curettage is technically difficult | Sites associated with poor cosmesis after curettage |
| Nose | Lips | Vermilion border |
| Naso-labial fold | Eyelid | Alar rim |
| Around the eye | Hair-bearing scalp | Nose tip |
| Around the ear | Chin | |
| Scalp |
Cutaneous squamous cell carcinoma can also be successfully treated by MMS [17, 23]. In an Australian multicentre study of 1263 cases (38.9% were recurrent lesions) treated over a 10-year period, there was an overall 5-year cure rate of 96.1% (97.4% for primary and 94.1% for recurrent disease) [24].
The cost of MMS has been compared with traditional management [25, 26, 27]. The procedure (to produce tumour-free margins) has a similar cost to traditional excision [25] but is less expensive than excision using intraoperative frozen section control [26]. A study from the Netherlands found MMS was more expensive than traditional surgery [27], but as MMS is likely to produce higher cure rates than standard excision in selected cases, it remains cost-effective. The only study to date which tried to compare cure rates following standard excision and MMS [28] appeared to show little difference between the two treatment modalities. However, a failure to adhere to the study design (with 24 of 301 patients randomized to have standard surgical excision being moved into the MMS treatment group) raises concerns about the conclusions of this study [29].
Practical aspects and indications
Mohs micrographic surgery is a remarkably safe procedure when performed under local anaesthesia on a day-case basis [30, 31]. The complete surgical margin control achieved by MMS lends itself ideally to the excision of tumours that grow in a contiguous (all parts of the tumour are directly connected to all other parts) fashion, and whereas the two most common tumours treated by MMS are basal cell carcinoma and squamous cell carcinoma, many less common cutaneous tumours can be excised by experienced clinicians working in a multidisciplinary fashion and using either standard or modified forms of MMS (Box 20.1).
The success of MMS has led to the development of other surgical/pathological techniques offering more comprehensive surgical margin control than is available using standard histology techniques. Techniques such as ‘peripheral in-continuity tissue examination’ [35] and ‘three-dimensional histology’ [36] all have their merits, but none has gained widespread popularity.
Basal cell carcinoma and squamous cell carcinoma can often be adequately managed without the use of MMS, and the technique is generally reserved for ‘high-risk lesions’ [37, 38], which can be defined by various criteria, including those listed in Box 20.2.
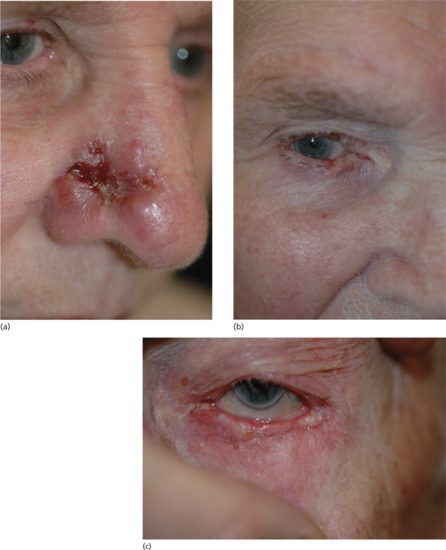
Figure 20.40 ‘High-risk’ facial basal cell carcinoma (BCC) suitable for Mohs micrographic surgery (MMS). (a) Extensive nasal BCC. (b) Extensive lower eyelid BCC, recurrent following radiotherapy. (c) Infiltrative medial canthal BCC involving medial portions of both eyelids.
As the use of MMS became widespread, the ACC first changed its name to the American College of Mohs Micrographic Surgery and Cutaneous Oncology (ACMMSCO), and is now the American College of Mohs Surgery (ACMS), with over 1000 members worldwide. For many years, the college and its members have undertaken a long-term policy of improvement of the specialty, through scientific and technical development and through the formalization of training for new Mohs surgeons through minimum 12-month, college-approved fellowships. Successful graduates from fellowship training, and others trained outside the college training schemes, should not only be proficient in the technique, but also be experts in cutaneous oncology, and highly competent reconstructive surgeons. The continuing success and development of MMS as a recognized specialty is dependent upon a consistent demonstration of high cure rates, maximal tissue conservation and good aesthetic outcomes of the technique, which can only result from appropriate training and experience.
In the UK, the British Society for Dermatological Surgery has also created training standards for MMS with postgraduate fellowship training programmes, which have been ratified by the relevant postgraduate training authorities. In the US, many of the criteria for postgraduate training have been adopted by the Accreditation Council for Graduate Medical Education (ACGME) under the recently renamed Fellowship in Micrographic Surgery and Dermatologic Oncology. In addition to training in MMS and skin oncology, this fellowship includes training in cosmetic procedures including lasers and injectables such as fillers and Botox®.
Electrocautery and electrosurgery [1, 2, 3]
Electrocautery
Cautery is the application of heat to living tissue. In electrocautery the metal element or burner is heated by the passage of electricity and the hot element is applied to the skin or lesion to be treated. Heat causes tissue coagulation and if excessive will lead to unsightly hypertrophic scarring. A red-hot element may be used to cut tissue (e.g. the stalk of a large papilloma) but in doing so causes considerable lateral tissue damage, which may lead to unsightly scarring. Electrocautery units vary in size from small disposable pen size units that are popular for eyelid surgery to portable battery and mains powered units. The more powerful units tend to have more rugged elements that last longer. It is common to heat the element until red-hot to sterilize the tip before use, but the tip should be allowed to cool before applying to the skin and only the lowest temperature for the shortest time should be used to achieve the desired effect.
Electrocautery may be used on its own or in combination with curettage to destroy a wide range of superficial skin lesions such as seborrhoeic keratoses. It can also be used for haemostasis after simple shave excisions, the most effective technique is to apply the element to the skin surface and move it around in a rotating motion whilst triggering the current and watching carefully for the first indication of tissue coagulation.
No electricity passes through the patient and so electrocautery is completely safe in patients with implanted cardiac devices, but in common with electrosurgery it may ignite inflammable liquids, vapours and gases and even dry cotton gauze so care must be taken to exclude these from the operative field.
Whilst heating the element may sterilize the tip, the body of the element remains cooler and may carry a risk of cross-contamination from patient to patient. It is therefore desirable to use a newly sterilized or sterile disposable element for each new patient.
Electrosurgery
Electrosurgery, also known as radiosurgery, radiofrequency surgery or surgical diathermy, is a technique by which heat is created in tissues by the passage of high frequency alternating current. It has largely replaced electrocautery in clinical practice.
Low frequency alternating currents such as the 230 Volt 50 Hz or 110 Volt 60 Hz which are present in domestic mains electricity are hazardous to health because they stimulate muscle tissue and can cause cardiac ventricular fibrillation. Frequencies from 0.3 to 5.0 MHz are used for electrosurgery because at these higher frequencies the muscle does not react and fibrillation does not occur. Frequencies above 5.0 MHz propagate like radiowaves; this makes them unpredictable in their effect and unsuitable for electrosurgery.
There are two ways of delivering electrosurgical current to the skin: monopolar and bipolar; two types of electrical contact with the patient: monoterminal and biterminal; two different types of electrosurgical generator: ground (earth) referenced and isolated machines; and a number of distinct electrosurgical techniques including electrosection, fulguration, electrodessication and electrocoagulation and different types of electrosurgical currents. It is important to be familiar with the individual characteristics of an electrosurgical machine before use.
Characteristics
In electrosurgery, current flows through the patient's tissues and destruction takes place at the tip of the active electrode. With most electrosurgery generators, the area of the electrode tip in contact with the tissue will usually determine the energy density and the resulting degree of tissue destruction. At any given output setting, fine needle points will deliver a concentrated tissue destruction whereas broader tips will have a more gentle action.
The electrosurgery current must return to the generator and there are two ways in which this may happen. With a ground referenced machine (such as the Conmed® hyfrecator) the non-active pole in the machine is connected to the ground and the current may return through the patient by any contact with anything connected to the ground, or due to the high frequencies, by capacitative coupling with the ground.
In practice, this means that small procedures may be undertaken with only an active electrode applied to the patient's skin. This is a monopolar monoterminal technique. It is only safe at low powers and in conscious patients. Any measure that increases the return circuit to the ground (such as touching the patient) may increase the apparent power of the machine, and making or breaking contact with the patient's skin during treatment may result in a mild electric shock to the medical or nursing attendant. Ground referenced machines may be used with a large dispersive patient return electrode and will then have a more consistent electrosurgical effect.
Higher power electrosurgery generators and those designed for use in unconscious patients are isolated from the ground. They need to be used with a dispersive patient return electrode that returns the current to the machine. Because the machine is isolated from the ground, there is almost no risk of current travelling through the patient unless they are connected to the dispersive electrode. This is important for electrical safety and to protect the patient from electrical burns away from the operative field. The dispersive plates may be conductive, and these need to make a good electrical contact with the patient, or capacitative; in which case the plate is placed next to the patient's skin but does not need to make direct electrical contact (the high frequency current returns to the generator through capacitative coupling). Capacitative plates are not as safe as conductive plates but are convenient in a clinic setting for treatments on conscious patients. The plate does not need to be directly attached to the patient's skin and can, for example, be simply placed behind the patient which again makes this easier for simple procedures in conscious patients.
When electrosurgery is undertaken with an active monopolar electrode and a patient dispersive electrode, it is referred to as biterminal mode.
Correct attachment of the dispersive electrode to the patient is an important aspect of electrosurgical safety and many generators have a facility to monitor this and to sound an alarm if contact between the patient and the dispersive electrode is broken. It is important that the plate is attached to the body in a position that avoids current flow from the treatment site across implanted cardiac devices or metal prosthetic joints. There should be no jewellery beneath the plate. Powers employed during cutaneous electrosurgery are rarely a cause for concern and most precautions are required for high power urological applications of electrosurgery.
Bipolar biterminal electrosurgery
In this mode, two active electrodes of equal size are used, the most common being the insulated tips of bipolar forceps; the flow of current is confined to the tissue grasped between the tips of the forceps. This gives a very precise coagulation confined to the target tissue. Many electrosurgery machines have bipolar outputs, but some machines are solely for bipolar electrosurgery. These machines have specific electrical characteristics that make them more effective for bipolar coagulation and the most sophisticated work automatically, detecting the presence of moist tissue and delivering a coagulating current until the tissue is perfectly coagulated and haemostasis achieved.
Electrosurgical currents
There were two original types of electrosurgical generator: a spark-gap machine that produced an intermittent, highly dampened, electrical discharge in pulses, and a vacuum oscillator which produced a continuous sine wave. The intermittent pulse produced good tissue coagulation, whereas the continuous sine wave cut the tissue like a knife. The two waveforms could be mixed together in a ‘blend’ setting. Modern electrosurgical machines use solid-state oscillators but the principle of the action of the waveform still applies and should be selected according to the desired effect. Some machines allow customization of current delivery into pulses or trains of pulses and this can be useful when trying to create reproducible electrosurgical effects, e.g. for controlled destruction of cutaneous lesions such as syringomas.
Electrosurgical effects
Electrosection
Electrosurgery may be used to cut tissue. The optimal setting would use a fine monopolar electrode and a constant sine wave electrosurgical current. The use of a patient dispersive electrode is mandatory to allow sufficient current to flow (so this is a biterminal technique). Much has been made of the possibility of cutting tissue without causing bleeding, but this is only possible if a degree of lateral tissue coagulation occurs. This may then impair wound healing and so electrosection may not be appropriate for wounds which will be closed primarily. Electrosection may be used to remove excess tissue in rhinophyma (Figure 20.41) although ablative (carbon dioxide or erbium) laser therapy may also be successfully employed to treat this condition. Smoke and tissue fluid splatter will occur and a suitable smoke evacuator should be used; appropriate surgical masks and eye protection should be worn by medical staff.
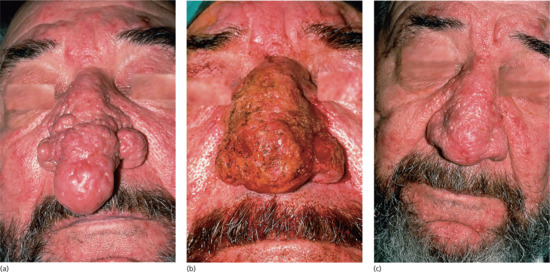
Figure 20.41 Shave excision and electrosurgery of a rhinophyma. (a) This disfiguring rhinophyma was reduced in size, and (b) the nose shape recreated by shave excision and electrodesiccation of the bleeding surface under local anaesthetic, (c) resulting in an acceptable cosmetic result at 4 months.
Fulguration (Figure 20.42)

Figure 20.42 Electrofulguration. Diffuse superficial coagulation can be achieved by passing the electrode of a monopolar electrosurgical unit over the skin without touching it. Energy is dispersed over a wide area by the spark which jumps from the needle to the skin.
The term ‘fulguration’ (‘fulgur’ = lightning) refers to the technique whereby a monopolar electrode is held just above the skin surface and a train of sparks strikes the surface, often causing a blackened non-conductive char. In order to create sparks, the electrosurgery machine must have an output with a sufficiently high voltage. As high voltage causes increased tissue charring and lateral tissue damage, and may be undesirable for other electrosurgery procedures; some machines have a specific output setting just for fulguration.
Despite the frequent production of a blackened char, fulguration has an extremely shallow superficial effect and is a useful way of producing haemostasis following shave excisions and curettage without damaging underlying tissues.
Electrodessication (Figure 20.43)
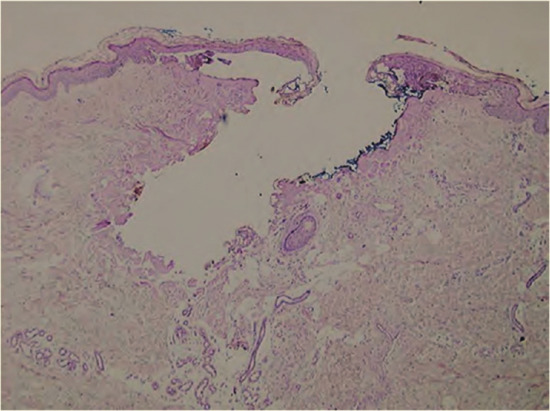
Figure 20.43 Electrodesiccation. Focused coagulation, e.g. of bleeding points, can be achieved with a monopolar unit using a fine-tipped needle to deliver more concentrated energy to a focal point.
Electrodessication creates an intense but superficial coagulation and dehydration of tissue. This occurs when a monopolar electrode is held in direct contact with the skin surface. The resulting layer is a poor electrical and thermal conductor, and insulates the deeper tissues from further damage.
Electrocoagulation
Electrocoagulation occurs when tissue is heated sufficiently to denature its protein. The active electrode is held in good contact with the tissue to be treated, and a relatively low current is applied to the tissue for several seconds. The depth of coagulation depends on the duration of the current rather than its magnitude. Higher currents will dessicate the surface of the tissue and prevent injury to the deeper tissue.
Hazards and risks of electrosurgery
Fire
Electrosurgery may ignite inflammable liquids, vapours and gases. Particular care should be taken with alcoholic skin cleansers which may pool in anatomical recesses such as the conchal bowl or umbilicus and create a fire risk.
Electrical safety
Electrical safety may be considered from two perspectives: the safe use of any electrical equipment in the operating room, and the specific risks associated with electrosurgical current.
As with any electrical equipment, electrosurgical equipment should be tested regularly and handled carefully; in particular, there should be no liquids in proximity to the equipment.
Many electrosurgical machines have in-built safety features and will not work unless correctly set up and with a patient return electrode attached to the patient when this is required. It is important to be familiar with the individual machine.
Current passes from the active electrode to the patient return electrode and so the position of the patient return electrode, relative to the operative site, will determine the direction of current flow. This should generally be positioned to avoid any metal prosthetic joints and to avoid the chest in patients with implanted cardiac devices.
In general, most implanted cardiac devices will resist interference from electrosurgery but it is sensible to seek advice from the cardiac electrophysiologist responsible for the device if there are concerns or doubts.
Cryosurgery
Various methods of freezing skin lesions have been described [1]. Liquid nitrogen is the most effective and most studied cryogen and the only one which will be considered in further detail here. Nitrous oxide may be used with a cryotherapy gun – particularly for treating genital warts. Volatile (and highly flammable) ether and propane mixture sprays are sold in pharmacies for home treatment of warts. Neither of these achieve the same depth of freeze as liquid nitrogen, but can be effective for treating viral warts and benign skin lesions.
Cryotherapy is believed to cause cell death in four ways:
- Ice crystals formed in the cell damage cellular components [2].
- Uneven intracellular ice formation during freezing leads to osmotic differences arising during thawing, which in turn causes cell disruption.
- Cold injury to small blood vessels results in ischaemic damage.
- Immunological stimulation produced by the release of antigenic components results in cell damage.
The extent of injury is determined by the rate of freezing, the coldest temperature reached, freeze time and rate of thawing. Maximum damage is produced by rapid freezing and slow thawing. Repeating the freeze–thaw cycle produces much greater tissue damage than a single freeze because the greater conductivity of the previously frozen skin and the already impaired circulation both allow a greater and faster depth of cold penetration. It is suggested that a temperature of −30°C is required to produce cell death. In practice, tissue temperatures achieved during cryotherapy do not need to be measured because clinical studies have determined the duration of liquid nitrogen spray freeze times for common skin conditions.
Clinical methods
Liquid nitrogen is best stored in a pressurized container to reduce evaporative loss and the canister kept in a secure ventilated outside area. One litre of liquid nitrogen held in an unsealed vacuum flask will last approximately 6 h. Liquid nitrogen can be applied using cotton-wool swabs dipped into the liquid. However, a liquid nitrogen spray can is easier to direct accurately, faster and more convenient.
Clinical uses
Liquid nitrogen cryotherapy has been used to treat a wide range of skin lesions [3]. The simplicity and speed of cryosurgery treatment is both a strength and a weakness. Cryotherapy can easily be done incorrectly and ineffectively. The correct technique and freeze times are required to produce results similar to those described in published studies. It is important to recognize fundamental differences in the descriptions of cryotherapy techniques between British literature, which describes ‘freeze’ times, and American literature, where ‘thaw’ times are recorded. The development of post-cryotherapy complications (see later) also remains one of the most frequent sources of litigation for dermatologists.
Cryosurgical treatment of basal cell carcinomas gives cure rates that compare favourably with other modes of therapy [4, 5, 6] provided the correct technique is used and the treatment limited to small (<20 mm), well-defined, previously untreated tumours, avoiding basal cell carcinomas on the inner canthus of the eye, nasolabial and retro-auricular folds and the hair-bearing scalp. The temperature reached and the number of freeze–thaw cycles are also critical. Debulking the tumour using curettage or electrosurgery prior to cryotherapy is advocated by some authors [7, 8] although this is not routinely practised.
Side effects [1]
Cryotherapy pain is significant but usually transient, and tissue swelling is common. Inflammation can be reduced with potent topical corticosteroid applications [9]. Haemorrhagic blisters may occur but blister formation is not necessary for the cure of lesions such as viral warts. Sun-damaged and senile atrophic skin, and areas previously treated with topical steroids or radiotherapy, are more likely to blister or become necrotic after freezing. Skin necrosis is a desirable part of the treatment of neoplastic and many pre-neoplastic lesions, and several weeks may elapse before healing is complete. Hypopigmentation is common after liquid nitrogen cryosurgery, is particularly noticeable in dark-skinned patients and may be permanent [2, 10]. Temporary post-inflammatory hyperpigmentation is to be expected following less intense freezing. Nerve damage resulting in paraesthesiae, distal anaesthesia and motor paralysis occasionally occur [11]. Similarly, deep freezing over the lacrimal ducts may, very rarely, lead to permanent ductal obstruction [1].
Caustics
In experienced hands, caustics provide a simple and readily available means of destroying many superficial skin lesions. The operator should be well acquainted with the action and degree of penetration of individual caustics, and the toxic effects that may result from absorption, especially if they are to be used on large areas, and particularly when applied to the face [1, 2]. In treating individual lesions, caustics are usually applied by means of a cotton-bud applicator or a wool-tipped orange stick, pointed if necessary.
Aluminium chloride hexahydrate
A 20% solution (Driclor®; Anhydrol Forte®), usually applied on a cotton-bud, is a very useful styptic for superficial wounds such as those following shave excision. Ferric subsulphate (Monsel's solution) is widely used but may leave a pigmented scar.
Silver nitrate [3]
This is used in the form of a pencil or as a strong solution to suppress exuberant granulation. It is haemostatic and may be used to arrest bleeding after curettage. Repeated use tends to lead to unsightly staining of the skin.
Trichloroacetic acid
This is an effective haemostatic caustic, which has many uses. The 30–50% concentration can be used as a styptic, and may be employed in conjunction with superficial curettage in the treatment of solar keratoses, seborrhoeic warts, etc.
The supersaturated solution can also be used on its own to treat many benign and dysplastic skin lesions. Trichloracetic acid 35% is used for its destructive effect on the epidermis and may be a useful treatment for xanthelasmas and actinic lentigines. It must be applied with great care, however, especially around the eyes. Its action is rapid, and a white ‘frosting’ occurs within a few seconds of application. The caustic action can be partially neutralized by applying alcohol, water or sodium bicarbonate-soaked gauze, but this is unlikely to have any effect once the acid has penetrated the skin.
Excess sebum should first be removed using detergent or isopropyl alcohol. Trichloroacetic acid should then be applied with an ‘almost dry’ cotton applicator. The concentration to be used will vary according to the site, the condition to be treated and whether the trichloroacetic acid is being used as a styptic or a superficial skin caustic. Weaker solutions of trichloroacetic acid are sometimes used. Xanthelasma can also be treated using the blunt end of an orange stick, dampened with trichloroacetic acid, dabbed onto the affected area.
Intralesional corticosteroid therapy [1]
Aqueous suspensions of triamcinolone acetonide (10 mg/mL (Adcortyl®) and 40 mg/mL (Kenalog®)) are available and can be diluted with saline or lidocaine. Intralesional hydrocortisone acetate (25 mg/mL) can also be used. Triamcinolone acetonide 10 mg/mL is sufficient for all conditions except keloids, for which the more potent preparation is required in order to achieve the desired degree of collagen resorption.
The amount injected normally ranges from 0.1 to 0.5 mL of 10 mg/mL solution, depending on the size and nature of the lesion. The injection should be given using a 27–30 gauge needle deep in the dermis when possible, to minimize the risk of collagen atrophy. The manufacturers recommend that no more than 30 mg of triamcinolone acetonide should be given in one session, with a maximum of 5 mg at any one site. (Steroid equivalence: 5 mg prednisolone = 4 mg triamcinolone = 20 mg hydrocortisone.)
It is important to note that triamcinolone acetonide is particulate in nature and serious adverse effects may result from inadvertent intravascular injection. The avoidance of intravascular injection is especially important when injecting lesions around the forehead – where accidental intra-arterial injection and retrograde flow of a bolus of particles may result in retinal artery occlusion and blindness. In this location, counter pressure should be applied around the injection site at the time of injection to avoid this disastrous complication.
Plasma cortisol levels are suppressed for a few days by 20 mg of intralesional triamcinolone acetonide given into various sites; higher doses suppress cortisol levels for longer [2]. Cushing syndrome has occurred in a child 2–3 weeks after a single treatment with 40 mg triamcinolone acetonide injected into keloids [3]. Local side effects include collagen atrophy with localized delling of the skin [4], hypopigmentation [5], skin necrosis [5], perilymphatic linear depigmented and atrophic streaks [6, 7] and telangiectasia [8].
Indications
Intralesional triamcinolone therapy is used for inflammatory acne cysts, lichen planus, lichen simplex, cutaneous lupus erythematosus, chondrodermatitis, orofacial granulomatosis, granuloma annulare, psoriasis and nail psoriasis, alopecia areata and many other steroid-responsive conditions [9].
Intralesional therapies for skin malignancies
Surgical excision is the treatment of choice for skin malignancy, but in exceptional circumstances, intralesional chemo- or immunotherapy may be considered. The agents that have been used most frequently are methotrexate, 5-fluorouracil, bleomycin and various forms of interferon. High cure rates have been reported, but most of the published literature consists of case reports and lacks long-term follow-up.
Intralesional therapy has been mainly used for keratoacanthomas; it is easy to appreciate the desire to control this rapidly growing but spontaneously resolving tumour by non-surgical means; intralesional methotrexate or fluorouracil have been used most commonly. Bleomycin and interferon cost about ten times as much as methotrexate and fluorouracil. Intralesional injections of methotrexate and interferon are painless, whereas bleomycin and fluorouracil cause severe pain and require concurrent use of local anaesthesia. A useful practical review of intralesional chemotherapy has been published [1].
In addition to keratoacanthomas, intralesional therapies have been used for basal and squamous cell carcinomas and for bowenoid papulosis.
Intralesional bleomycin followed by electrical stimulation (electrochemotherapy) has been used for a range of skin tumours and has a place in the management of multiple cutaneous metastases [2].
Miscellaneous surgical procedures and techniques
Curettage
Curettage can be used to treat benign lesions as well as small lower risk squamous cell carcinoma in situ (Bowen disease), basal cell carcinoma and squamous cell carcinoma (Figure 20.44a). The technique relies on the principle that the curetted material is more fragile than normal skin (e.g. basal cell carcinoma), or there is a natural cleavage plane (e.g. seborrhoeic wart) between the lesion and the surrounding skin. Disposable ring curettes are now the most commonly employed in practice. They come in ring sizes ranging from 2 to 7 mm and contain a sharp (cutting) edge on one side enabling a clean plane of cleavage.
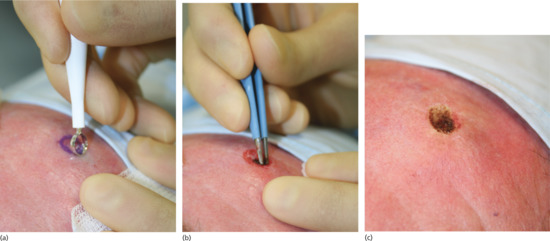
Figure 20.44 Ring curette. (a) Curettage of a small nodular basal cell carcinoma (BCC) on the forehead using a ring curette. (b) Haemostasis with bipolar diathermy. (c) Wound bed post treatment.
On mobile or fragile skin areas, a starting point for curettage can be made by fulgurating the rim of the lesion using an electrosurgery machine or scoring the skin with a size 15 blade or the sharp side of a disposable curette. Haemostasis is achieved using either a chemical haemostatic agent (e.g. aluminium chloride 20% in isopropyl alcohol), cautery or electrosurgery (Figure 20.44b). Do not use alcohol-based skin-cleansing solutions for the latter because of the fire risk. The resulting partial-thickness wound heals by re-epithelialization from the retained adnexal epithelium. Performing the curettage in a direction away from the operator ensures the creation of a shallow, superficial wound that usually heals excellently by secondary intention [1] (Figure 20.44c).
Haemostasis for open wounds
Bleeding from open wounds can be stopped readily using an absorbable haemostatic dressing such as Surgicel® (glucosic copolymer), Kaltostat® (calcium alginate), Oxycel® (oxidized cellulose) or Gelfoam® (porous gelatin matrix), although the mechanism of action of these agents is poorly understood. These materials may behave like a foreign body whilst dissolving in the wound and thus increase the risk of infection; large pieces should be removed before wound closure.
Chemical haemostatic agents [1] are effective on oozing skin wounds, for example after curettage and shave excision, but are ineffective in the presence of arterial or arteriolar bleeding, and should not be used in sutured wounds as they cause cell death, which predisposes to infection. Application should be followed by pressure on the wound for 2–3 min to allow haemostasis to occur without the chemical being washed away. Ferric subsulphate (Monsel's) solution carries the risk of iron tattooing [2]. Silver nitrate sticks are effective but caustic and may leave scars. Aluminium chloride 20% is effective: occasionally, it causes histiocytic reactions in treated skin [3].
Snip excision
Small tags can be snipped off with a pair of sharp scissors without the need for local anaesthetic. The tag should be pulled away from the skin with dissecting forceps and snipped off at its base: bleeding, if any, usually stops spontaneously. Haemostasis may be a problem with larger polyps with a well-developed blood supply; hence, an anaesthetic will be required. The wounds can be left to heal by second intention, with excellent cosmetic results.
Management of specific conditions
Epidermoid cysts (see Chapter 134)
Epidermoid cysts (erroneously called sebaceous cysts) are lined by a keratinizing epithelium, which produces the cheesy keratinous contents. Patients may request excision if they are disfiguring, cause discomfort or are repeatedly infected.
The inflamed tissue around an infected epidermoid cyst is friable, making it difficult to excise without fragmenting the cyst wall. An infected cyst should therefore be drained, and the patient treated with an appropriate antibiotic. When the inflammation settles, the cyst can be excised. Cysts inflamed as a result of a foreign-body giant cell reaction to released keratin are best treated by triamcinolone injection followed by subsequent removal.
Freely mobile cysts can be easily shelled out through the smooth tissue plane that separates the very thin cyst wall from the surrounding tissue, although at this plane the cyst wall is easily punctured and must be handled gently. In all cases, the entire cyst wall and punctum should be removed, the latter at the centre of a small skin ellipse, which can also be used to manipulate the cyst during removal. If the cyst ruptures during extraction (a not infrequent occurrence), every effort should be made to remove residual wall fragments to prevent recurrence. Irrigation of the wound prior to closure will help remove residual cyst contents which might otherwise cause a granulomatous tissue reaction.
To avoid long scars, very large cysts can be decompressed via a 4-mm punch biopsy before excision [1]. The wound is either left to heal for 4–6 weeks before definitive removal of the shrunken cyst or an attempt can be made to pull the cyst inside out through the circular wound using artery forceps [2]. Immobile cysts are surrounded by extensive scar tissue and usually have to be excised with the surrounding fibrotic tissue and overlying skin. Excision of large skin cysts leaves subcutaneous dead space, which must be obliterated with deep sutures to minimize the risks of haematoma formation, infection and wound dehiscence.
Lipomas (see Chapter 137)
Simple skin incision and lipoma excision ensures complete removal but produces a large scar. Scar size can be minimized by breaking up the lipoma into smaller fragments using blunt-ended forceps or a needle-holder inserted via a 4–6-mm punch biopsy wound made over the centre of the lipoma. The fragmented contents can then be squeezed out through the small wound. The fat can also be removed using liposuction [1]. A further development of this technique involves emulsification of the lipoma using an ultrasonic suction scalpel and removal of the fragments under endoscopic control [2]. A subfrontalis lipoma (Figure 20.45) must be distinguished from a forehead epidermoid cyst. The former can be particularly difficult to remove because of its site beneath the frontalis muscle of the forehead, and care must be taken to divide the frontalis muscle vertically to minimize the risk of damage to the sensory nerves which lie on its surface, or, more laterally, to the temporal branch of the facial nerve (damage to which will cause ipsilateral paralysis of the frontalis muscle) [3].
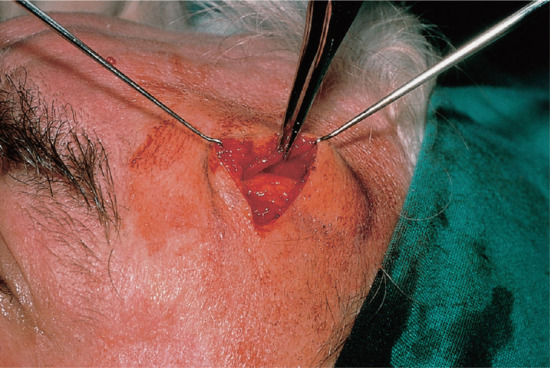
Figure 20.45 Subfrontalis lipoma. This lipoma lies beneath the frontalis muscle. The muscle has been split vertically and is held back with forceps to reveal the lipoma.
Hidradenitis suppurativa
The surgical management of hidradenitis suppurativa is fully discussed in Chapter 92.
Chondrodermatitis nodularis
The surgical management of hidradenitis suppurativa is fully discussed in Chapter 108.
Digital myxoid cysts
The surgical management of digital myxoid cysts is fully discussed in Chapter 95.
Axillary and palmar hyperhidrosis
The use of surgical techniques for hyperhidrosis, including injection of botulinum toxin and sympathectomy, is fully discussed in Chapter 94.
Hypertrophic scars and keloids
The topic is fully discussed in Chapter 96.
Lesions on the shoulder, upper back and sternum
Surgical excision on the shoulders, upper back and sternum frequently produce poor cosmetic results, with the formation of stretched and frequently hypertrophic scars. Although meticulous surgical technique, appropriate undermining and careful suture technique may minimize these problems, patients should be carefully counselled and only offered surgical excision in these areas when it is absolutely necessary.
Benign naevi (see Chapter 132)
Surgical excision, even by experts, leaves scars and consequently benign naevi are best either left alone or removed by shave excision when possible.
Non-melanoma skin cancer: basal cell and squamous cell carcinomas
The management of these is fully discussed in Chapters 141 and 142.
Lesions of the mucous membranes (see Chapters 110, 111 and 112)
Excision of lesions in the mouth and on the tongue, lips and genitalia can be difficult, with restricted access and often profuse bleeding. Consequently, only simple procedures should be attempted by non-specialists. More complex cases should be referred to colleagues in oral and plastic surgery, urology and gynaecology as appropriate.
Keratoacanthoma
This is often difficult to differentiate, both clinically and histologically, from a well-differentiated squamous cell carcinoma. Management is fully discussed in Chapter 142. In general, it is best to remove these lesions surgically without delay.
Pigmented lesions (see Chapters 132 and 143)
The diagnosis and management of pigmented lesions is a key component of clinical dermatology and forms an important part of the multidisciplinary treatment of malignant melanoma, which also involves pathology, plastic surgery, clinical oncology, radiology and specialist skin cancer nurses.
Common and blue melanocytic naevi, pigmented basal cell carcinomas, seborrhoeic keratoses and dermatofibromas are usually easily recognizable to the trained eye, although diagnostic difficulties occasionally occur. Dermoscopy can provide a valuable non-invasive diagnostic adjunct (see Chapter 144). When diagnostic doubt persists, and especially when malignancy is suspected, the lesion should be excised and submitted for histopathological examination.
When the lesion is too large to excise and repair directly, an incisional biopsy may be indicated (e.g. possible malignant change in a large congenital naevus or facial lentigo). In these cases, if malignant melanoma is proven on biopsy, a second procedure, possibly involving complex wound reconstruction, will often be necessary. The determination of key prognostic features (e.g. growth phase, depth of invasion, mitotic count, presence of vascular invasion) can only be made accurately from examination of the full excision specimen. For this reason, excision rather than biopsy of a pigmented lesion is recommended whenever possible.
Minor skin lesions: mollusca, milia and comedones
An orange stick can be used to apply small quantities of a caustic agent precisely to a skin lesion. When 90% liquid phenol is used to treat mollusca contagiosa or small cysts, the orange stick tip may need to be sharpened so that it just fits the cavity being treated.
Mollusca can be squeezed to express the cellular debris from the centre of the lesion before phenol application. The tip of the orange stick is dipped into the phenol, any excess wiped off, and the stick is then placed in the centre of the lesion and gently twisted. The solution does not need to be neutralized. After initial whitening, the molluscum becomes inflamed and then resolves 7–10 days later. Treatment is painful and not usually tolerated by small children. The use of hydrogen peroxide cream has also been reported to clear molluscum.
Multiple small facial epidermoid or acne cysts can be treated using the blunt end of an orange stick, dampened with trichloroacetic acid or phenol. The cyst is incised, the contents expressed and trichloroacetic acid or phenol carefully applied to the cyst lining using an orange stick. No dressing is required, but a local anaesthetic is necessary.
Milia are tiny, keratin-filled, epithelial-lined cysts with no connection to the overlying skin. They can be removed via a small skin incision made with a sterile venesection needle. No anaesthetic is required. Prick the needle tip into the skin and, by pulling the cutting edge upwards, incise the skin overlying the milium. Hook or squeeze out the cyst through the skin incision.
Comedones may be emptied using a comedo expressor, a metal instrument with a small cup-shaped end in the centre of which is a small hole.
References
Introduction
- Bennett RG. Fundamentals of Cutaneous Surgery. St Louis: Mosby, 1988.
- Burge S, Colver GB, Rayment R. Simple Skin Surgery, 2nd edn. Oxford: Blackwell Science, 1996.
- Lawrence CM. An Introduction to Dermatological Surgery, 2nd edn. St Louis: Mosby, 2002.
- Roenigk RK, Roenigk HH, eds. Dermatologic Surgery, 2nd edn. New York: Marcel Dekker, 1996.
- Robinson JK, Hanke CW, Siegel DM, et al. Surgery of the Skin: Procedural Dermatology, 3rd edn. Philadelphia: Elsevier Mosby, 2015.
- Rohrer TE, Cook JL, Nguyen TH. Flaps and Grafts in Dermatologic Surgery. Philadelphia: Elsevier, 2007.
Critical anatomical considerations
- Salasche SJ, Bernstein G, Senkarik M. Surgical Anatomy of the Skin. Norwalk: Appleton & Lange, 1988.
- Borges AF, Alexander JE. Relaxed skin tension lines, Z-plasty on scars and fusiform excision of lesions. Br J Plast Surg 1962;15:242–54.
- Kraissl CJ. The selection of appropriate lines for elective surgical incision. Plast Reconstr Surg 1951;8:1–28.
- Langer K. On the anatomy and physiology of the skin. I. The cleavability of the cutis. Translated and republished in Br J Plast Surg 1978;31:3–8, with covering editorial 1–2.
- Summers BK, Siegle RJ. Facial cutaneous reconstructive surgery: general aesthetic principles. J Am Acad Dermatol 1993;29:669–81.
- Salasche SJ, Giancola JM, Trookman NS. Surgical pearl: hydroexpansion with local anaesthetic. J Am Acad Dermatol 1995;33:510–12.
- Sobotta J. Head, neck upper limbs and skin. In: Staubesand J, ed. Atlas of Human Anatomy. Munich: Urban & Schwarzenberg, 1989.
- Romanes GJ. Cunningham's Manual of Practical Anatomy, 15th edn, Vol. 3. Head and Neck and Brain. Oxford: Oxford University Press, 1986.
- Scott DB. Techniques of Regional Anaesthesia. Norwalk: Appleton & Lange/Mediglobe, 1989.
- Lawrence CM. An Introduction to Dermatological Surgery, 2nd edn. St Louis: Mosby, 2002.
- Lumley JSP. Surface Anatomy, the Anatomical Basis of Clinical Examination. Edinburgh: Churchill Livingstone, 1990.
- Williams PL, Bannister LH, Berry M, et al., eds. Gray's Anatomy, 38th edn. New York: Churchill Livingstone, 1995.
- Summers BK, Siegle RJ. Facial cutaneous reconstructive surgery: facial flaps. J Am Acad Dermatol 1993;29:917–41.
Equipment and sterilization
- Burge S, Colver GB, Rayment R. Simple Skin Surgery, 2nd edn. Oxford: Blackwell Science, 1996: 5–9.
- Grande DJ, Neuberg M. Instrumentation for the dermatologic surgeon. J Dermatol Surg Oncol 1989;15:288–97.
- Diwan R. Instruments for dermatologic surgery. In: Lask GP, Moy RL, eds. Principles and Techniques of Cutaneous Surgery. New York: McGraw-Hill, 1996:85–100.
- Horton R. Hand washing: the fundamental infection control principle. Br J Nursing 1995;16:928–33.
- Parienti JJ, Thibon P, Heller R, et al. Hand-rubbing with an aqueous alcoholic solution vs traditional surgical hand-scrubbing and 30-day surgical site infection rates: a randomized equivalence study. JAMA 2002;288:722–7.
- Loffler H, Kampf G, Schmermund D, Maibach HI. How irritant is alcohol? Br J Dermatol 2007;157:74–81.
- Pedersen LK, Held E, Johansen JD, Agner T. Less skin irritation from alcohol- based disinfectant than from detergent used for hand disinfection. Br J Dermatol 2005;153:1142–6.
- Birnie AJ, Thomas KS, Varma S. Should eye protection be worn during dermatological surgery: prospective observational study. Br J Dermatol 2007;156:1258–62.
- Rutala WA, Weber DJ. Disinfection and sterilization in health care facilities: what clinicians need to know. Clin Infect Dis 2004;39:702–9.
- Sebben JE. Survey of sterile technique in dermatological surgeons. J Am Acad Dermatol 1988;18:1107–14.
- Sebben JE, Fazio MJ. Sterilization of equipment for dermatologic surgery. In: Lask GP, Moy RL, eds. Principles and Techniques of Cutaneous Surgery. New York: McGraw-Hill, 1996:47–56.
Safety aspects
- Centers for Disease Control and Prevention (CDC). Recommendations for preventing transmission of human immunodeficiency virus and hepatitis B virus to patients during exposure-prone invasive procedures. Morb Mortal Wkly Rep July 12, 1991/40 (RR08);1–9.
- Centers for Disease Control and Prevention (CDC). Perspectives in disease prevention and health promotion update: universal precautions for prevention of transmission of human immunodeficiency virus, hepatitis B virus, and other bloodborne pathogens in health-care settings. Morb Mortal Wkly Rep June 24, 1988/37(24):377–88.
- Eisen DB. Surgeon's garb and infection control: What's the evidence? J Am Acad Dermatol 2011;64(Issue 5):960.e1–960.e20.
- Taheri A, Mansoori P, Sandoval LF, et al. Electrosurgery: Part I. Basics and principles. J Am Acad Dermatol 2014;70:591.e1–591.e14.
- Taheri A, Mansoori P, Sandoval LF, et al. Electrosurgery: Part II. Technology, applications, and safety of electrosurgical devices. J Am Acad Dermatol 2014;70:607.e1–607.e12.
Complications
- Stasko T. Complications of cutaneous procedures. In: Roenigk RK, Roenigk HH, eds. Dermatologic Surgery, 2nd edn. New York: Marcel Dekker, 1996:149–75.
- Amici JM, Rogues AM, Lasheras A, et al. A prospective study of the incidence of complications associated with dermatological surgery. Br J Dermatol 2005;153:967–71.
- Rogues AM, Lasheras A, Amici JM, et al. Infection control practices and infectious complications in dermatological surgery. J Hosp Infect 2007;65:258–63.
- Futoyan T, Grande D. Postoperative wound infection rates in dermatologic surgery. Dermatol Surg 1995;21:509–14.
- Cook JL, Perone JB. A prospective evaluation of the incidence of complications associated with Mohs micrographic surgery. Arch Dermatol 2003;139:143–52.
- Rhinehart MB, Murphy MM, Farley MF, Albertini JG. Sterile versus nonsterile gloves during Mohs micrographic surgery: infection rate is not affected. Dermatol Surg 2006;32:170–6.
- Elliott TG, Thom GA, Litterick KA. Office based dermatological surgery and Mohs surgery: a prospective audit of surgical procedures and complications in a procedural dermatology practice. Australas J Dermatol 2012;53:264–71.
- Kargi E, Babuccu O, Hosnuter M, et al. Complications in minor cutaneous surgery in patients under anticoagulant treatment. Aesthetic Plast Surg 2002;26:483–5.
- Dhiwakar MA, Khan NA, McClymont LG. Surgical resection of cutaneous head and neck lesions: does aspirin use increase hemorrhagic risk? Arch Otolaryngol Head Neck Surg 2006;132:1237–41.
- Palamaras I, Semkova K. Peri-operative management of and recommendations for antithrombotic medications in dermatological surgery. Br J Dermatol 2015;172:597–605.
Local anaesthetics
- Auletta MJ, Grekin RC. Local Anesthesia for Dermatologic Surgery. New York: Churchill-Livingstone, 1991.
- Skidmore RA, Patterson JD, Tomsick RS. Local anaesthetics. Dermatol Surg 1996;22:511–22.
- Auletta MJ. Local anaesthesia for dermatologic surgery. Semin Dermatol 1994;13:35–42.
- Buckley MM, Benfield P. Eutectic lidocaine/prilocaine cream: a review of the topical anaesthetic/analgesic efficacy of EMLA. Drugs 1993;46:126–51.
- Adriani J. Regional Anaesthesia: Techniques in Clinical Practice. Springfield: Thomas, 1970.
- Bennett RG. Anesthesia. In: Bennett RG, ed. Fundamentals of Cutaneous Surgery. St Louis: Mosby, 1988:194–239.
- Sylaidis P, Logan A. Digital block with adrenaline: an old dogma refuted. J Hand Surg 1998;23:17–19.
- Millard TP, James MP. Avoidance of adrenaline in peripheral local anaesthesia: a perpetuated medical myth? Clin Exp Dermatol 2001;26:731–2.
- Matarasso SL, Glogau RS. Local anaesthesia. In: Lask GP, Moy RL, eds. Principles and Techniques of Cutaneous Surgery. New York: McGraw-Hill, 1996:63–75.
Biopsy techniques and preoperative preparation
- Borges AF, Alexander JE. Relaxed skin tension lines, Z-plasty in scars and fusiform excisions of lesions. Br J Plast Surg 1962;15:242–54.
- Summers BK, Siegle RJ. Facial cutaneous reconstructive surgery: general aesthetic principles. J Am Acad Dermatol 1993;29:669–81.
- Lawrence CM. An Introduction to Dermatological Surgery, 2nd edn. St Louis: Mosby, 2002.
- Hudson-Peacock MJ, Lawrence CM. Comparison of wound closure by means of dog ear repair and elliptical excision. J Am Acad Dermatol 1995;32:627–30.
- Zachary CB. Basic Cutaneous Surgery: a Primer in Technique. New York: Churchill Livingstone, 1991.
- Fewkes JL, Cheney ML, Pollack SV. Illustrated Atlas of Cutaneous Surgery. Philadelphia: Lippincott, 1992.
- Barnett R, Stranc M. A method of producing improved scars following excision of small lesions of the back. Ann Plast Surg 1979;5:391–4, 435.
- Crollick JS, Klein LE. Punch biopsy diagnostic technique. J Dermatol Surg Oncol 1987;13:839.
- Armstrong RB, Nichols J, Pachance J. Punch biopsy wounds treated with Monsel's solution or a collagen matrix. Arch Dermatol 1986;122:546–9.
- Hafiji J, Hussain W, Tallon B, Salmon P. Optimizing the shave excision technique to aid accurate histological diagnosis. Br J Dermatol 2012;166:226–7.
- Gambichler T, Senger E, Rapp S, et al. Deep shave excision of macular melanocytic nevi with the razor blade biopsy technique. Dermatol Surg 2000;26:662–6.
- Hudson-Peacock MJ, Bishop J, Lawrence CM. Shave excision of benign papular naevocytic naevi. Br J Plast Surg 1995;48:318–22.
- Hudson-Peacock MJ, Lawrence CM. Cosmetic outcome following shave excision of benign papular naevi using either electrocautery or aluminium chloride for haemostasis. Br J Dermatol 1995;133 (Suppl. 45):47.
- Redden EM, Baker DC. Coping with the complexities of informed consent in dermatologic surgery. J Dermatol Surg Oncol 1984;10:111–16.
- Hussain W. Avoiding wrong site surgery: how language and technology can help. Br J Dermatol 2012;167:1186.
Preoperative planning and preparation
- Ridge MD, Wright V. The directional effects of skin: a bioengineering study of skin with particular reference to Langer's lines. J Invest Dermatol 1966;46:341–6.
- Baer RL, Kopf AW. Dermatologic office surgery. In: Year Book of Dermatology 1963–64. Chicago: Year Book Medical, 1964:7–47.
- Kraissl CJ. The selection of appropriate lines for elective surgical excision. Plast Reconstr Surg 1951;8:1–28.
- Kaul AF, Jewitt JF. Agents and techniques for disinfection of the skin. Surg Gynecol Obstet 1981;152:677–85.
- Durani P, Leaper D. Povidone-iodine: use in hand disinfection, skin preparation and antiseptic irrigation. Int Wound J 2008;5:376–87.
- Selwyn S, Ellis H. Skin bacteria and skin disinfection reconsidered. BMJ 1972;i:136–40.
Elliptical excision – general technique
- Epstein E, Epstein E Jr, eds. Skin Surgery, 5th edn. Springfield: Thomas, 1982.
- Stegman SJ. Basics of Dermatologic Surgery. Chicago: Year Book Medical, 1982.
- Hussain, W, Mortimer NJ, Salmon PJ. Optimizing technique in elliptical excisional surgery: some pearls for practice. Br J Dermatol 2009;161:697–8.
Suture technique
- Dingman RO, Watanabe MJ, Izenberg PH. General principles of skin surgery. In: Epstein E, Epstein E Jr, eds. Skin Surgery, 5th edn. Springfield: Thomas, 1982:74–107.
- Stegman SJ. Suturing techniques for dermatologic surgery. J Dermatol Surg Oncol 1978;4:63–8.
- Stegman SJ, Tromovitch TA, Glogau RG. Basics of Dermatologic Surgery. Chicago: Year Book Medical, 1982.
- Simmonds WL. Surgical gems: uses of bolsters in dermatologic surgery. J Dermatol Surg Oncol 1977;3:281–2.
Dressings and postoperative care
- Hinman CD, Maibach H. Effect of air exposure and occlusion on experimental human skin wounds. Nature 1963;200:377–8.
- Harris DR. Healing of the surgical wound. I. Basic considerations. J Am Acad Dermatol 1979;1:197–207.
- Wood RAB. Disintegration of cellulose dressings in open granulating wounds. BMJ 1976;1:1444–5.
- Silver IA. Oxygen tension and epithelialization. In: Maibach HI, Rovee DT, eds. Epidermal Wound Healing. Chicago: Year Book, 1972.
- Varghese MC, Balin AK, Carer M, Caldwell D. Local environment of chronic wounds under synthetic dressings. Arch Dermatol 1986;122:52–7.
- Knighton DR, Silver IA, Hunt TK. Regulation of wound healing angiogenesis: effect of oxygen gradients and inspired oxygen concentration. Surgery 1981;90:262–70.
- Telfer NR, Moy RL. Wound care after office procedures. J Dermatol Surg Oncol 1993;19:722–31.
- Anonymous. Local applications to wounds. II. Dressings for wounds and ulcers. Drug Ther Bull 1991;29:97–100.
- Engdahl E. Clinical evaluation of Debrisan on pressure sores. Curr Ther Res 1980;28:377–80.
- Gorse GJ, Messner RL. Improved pressure sore healing with hydrocolloid dressings. Arch Dermatol 1987;123:766–71.
- Handfield-Jones SE, Grattan CEH, Simpson RA, Kennedy CTC. Comparison of a hydrocolloid dressing and paraffin gauze in the treatment of venous ulcers. Br J Dermatol 1988;118:425–7.
- Eaglstein WH. Occlusive dressings. J Dermatol Surg Oncol 1993;19:716–20.
- Fish FS, Hilger PA. Aquaplast thermoplastic (Opti-Mold). A unique moldable tie-down dressing for full-thickness skin grafts. J Dermatol Surg Oncol 1994;20:239–44.
Secondary intention healing
- Zitelli JA. Wound healing by secondary intention. J Am Acad Dermatol 1983;9:407–15.
- Barnett R, Stranc M. A method of producing improved scars following excision of small lesions of the back. Ann Plast Surg 1979;3:391–4, 435.
- Bajaj V1, Langtry JA Surgical excision of acne keloidalis nuchae with secondary intention healing. Clin Exp Dermatol 2008;33:53–5.
- Silverberg B, Smoot CE, Landa SJF, Parsons RW. Hidradenitis suppurativa: patients' satisfaction with wound healing by second intention. Plast Reconstr Surg 1987;79:555–9.
- Lawrence CM, Matthews JNS, Cox NH. The effect of ketanserin on healing of fresh surgical wounds. Br J Dermatol 1995;132:580–6.
- Snow SN, Stiff MA, Bullen R, et al. Second intention healing of exposed facial-scalp bone after Mohs surgery for skin cancer: a review of 91 cases. J Am Acad Dermatol 1994;31:450–4.
- Barry RB1, Langtry JA, Lawrence CM. The role of cortical bone fenestration in the management of Mohs surgical scalp wounds devoid of periosteum. Br J Dermatol 2009;160:1110–12.
Flaps
- Rohrer TE, Cook JL, Nguyen TH. Flaps and Grafts in Dermatologic Surgery. Philadelphia: Elsevier 2007.
- Reece EM, Schaverien M, Rohrich RJ. The paramedian forehead flap: a dynamic anatomical vascular study verifying safety and clinical implications. Plast Reconstr Surg 2008;121:1956–63.
- Jellinek NJ, Nguyen TH, Albertini JG. Paramedian forehead flap: advances, procedural nuances, and variations in technique. Dermatol Surg 2014;40 Suppl. 9:S30–42.
- Somoano B, Kampp J, Gladstone HB. Accelerated takedown of the paramedian forehead flap at 1 week: indications, technique, and improving patient quality of life. J Am Acad Dermatol 2011;65:97–105.
- Salasche SJ, Grabski WJ. Complications of flaps. J Dermatol Surg Oncol 1991;17:132–40.
- Goldminz D, Bennett RG. Cigarette smoking and flap and full-thickness graft necrosis. Arch Dermatol 1991;127:1012–15.
- Yarborough JM. Ablation of facial scars by programmed dermabrasion. J Dermatol Surg Oncol 1988;14:292–4.
- Zisser M, Kaplan B, Moy RL. Surgical pearl: manual dermabrasion. J Am Acad Dermatol 1995;33:105–6.
- Snow SNP, Stiff MA, Lambert DR. Scalpel sculpturing techniques for graft revision and dermatologic surgery. J Dermatol Surg Oncol 1994;20:120–6.
- Krishnan R, Garman M, Nunez-Gussman J, et al. Advancement flaps: a basic theme with many variations. Dermatol Surg 2005;31:986–94.
- Mellette JR, Harrington AC. Applications of the crescentic advancement flap.J Dermatol Surg Oncol 1991;17:447–54.
- Yoo SS, Miller SJ. The crescentic advancement flap revisited. Dermatol Surg 2003;29:856–8.
- Hussain W, Tan E, Salmon PJ. Inferiorly based crescentic “sliding“ cheek flaps for the reconstruction of paranasal surgical defects. Dermatol Surg 2012;38:249–55.
- Freeland RG. Reconstruction of the lower lip and chin using local and random pattern flaps. J Dermatol Surg Oncol 1991;17:605–15.
- Spinowitz AL, Stegman SJ. Partial-thickness wedge and advancement flap for upper lip repair. J Dermatol Surg Oncol 1991;17:581–6.
- Rohrer TE, Cook JL, Nguyen TH. Flaps and Grafts in Dermatologic Surgery. Philadelphia: Elsevier, 2007.
- Wang SQ, Goldberg LH. Burow's wedge advancement flap for lateral forehead defects. Dermatol Surg 2006;32:1505–8.
- Cavanaugh EB. Management of lesions of the helical rim using a chondrocutaneous advancement flap. J Dermatol Surg Oncol 1982;8:691–6.
- Braun M, Cook J. The island pedicle flap. Dermatol Surg 2005;31:995–1005.
- Salmon PJ, Klaassen MF. The rotating island pedicle flap: an aesthetic and functional improvement on the subcutaneous island pedicle flap. Dermatol Surg 2004;30:1223–8.
- Cvancara JL, Jones MS, Wentzell JM. Lenticular island pedicle flap. Dermatol Surg 2005;31:195–200.
- Tan E, Mortimer NJ, Hussain W, et al. The nasal sidewall rotation flap: a workhorse flap for small defects of the distal nose. Dermatol Surg 2010;36:1563–7.
- Tenzel RR, Stewart WB. Eyelid reconstruction by the semicircle flap technique. Ophthalmology 1978;85:1164–9.
- Mustardé JC. The use of flaps in the orbital region. Plast Reconstr Surg 1970;45:146–50.
- Hafiji J, Salmon P, Hussain W. The AIRNS flap: an alternative to the bilobed flap for the repair of defects of the distal nose. J Am Acad Dermatol 2012;67:712–16.
- Rieger RA. A local flap for repair of the nasal tip. Plast Reconstr Surg 1967;40:147–9.
- Ahern RW, Lawrence N. The Peng flap: reviewed and refined. Dermatol Surg 2008;34:232–7.
- Holt PJA, Motley RJ. A modified rhombic transposition flap and its application in dermatology. J Dermatol Surg Oncol 1991;17:287–92.
- Johnson SC, Bennett RG. Double Z-plasty to enhance rhombic flap mobility.J Dermatol Surg Oncol 1994;20:128–32.
- Zitelli JA. The nasolabial flap as a single-stage procedure. Arch Dermatol 1990;126:1445–8.
- Webster RC, Davidson TM, Smith RC. The thirty degree transposition flap. Laryngoscope 1978;88:85–94.
- Lister GD, Gibson T. Closure of rhomboid skin defects: the flaps of Limberg and Dufourmentel. Br J Plast Surg 1972;25:300–14.
- Zitelli JA. The bilobed flap for nasal reconstruction. Arch Dermatol 1989;125:957–9.
- Cook JL. Reconstructive utility of the bilobed flap: lessons from flap successes and failures. Dermatol Surg 2005;31:1024–33.
- Ricks M, Cook J. Extranasal applications of the bilobed flap. Dermatol Surg 2005;31:941–8.
- Albertini JG, Hansen JP. Trilobed flap reconstruction for distal nasal skin defects. Dermatol Surg 2010;36:1726–35.
- Jellinek NJ, Nguyen TH, Albertini JG. Paramedian forehead flap: advances, procedural nuances, and variations in technique. Dermatol Surg 2014;40 (Suppl. 9):S30–42.
- Nguyen TH. Staged cheek-to-nose and auricular interpolation flaps. Dermatol Surg 2005;31:1034–45.
Skin grafts
- Skouge JW. Skin Grafting: Practical Manuals in Dermatologic Surgery. New York: Churchill Livingstone, 1991.
- Rohrer TE, Cook JL, Nguyen TH. Flaps and Grafts in Dermatologic Surgery. Philadelphia: Elsevier, 2007.
- Roenigk RK, Zalla MJ. Full-thickness grafts. In: Robinson JK, Arndt KA, LeBoit PE, Wintroub BU, eds. Atlas of Cutaneous Surgery. Philadelphia: Saunders, 1996.
- Hambley RM, Carruthers JA. Microlipoinjection for the elevation of depressed full-thickness grafts on the nose. J Dermatol Surg Oncol 1992;18:963–8.
- Lewis R, Lang PG Jr. Delayed full-thickness skin grafts revisited. Dermatol Surg 2003;29:1113–17.
- Lipman SH, Roth RJ. Composite grafts from earlobes for reconstruction of defects in noses. J Dermatol Surg Oncol 1982;8:135–7.
- Rohrer TE, Dzubow LM. Conchal bowl skin grafting in nasal tip reconstruction: clinical and histologic evaluation. J Am Acad Dermatol 1995;33:476–81.
- Mortimer NJ, Salmon PJ, Hussain W. Optimizing the transfer of split-thickness skin grafts from the donor to the recipient site using the 'moist gauze pick-up' technique. Br J Dermatol 2013;168:215–16.
Other techniques for facilitating closure
- Webster RC, Davidson TM, Smith RC, et al. M-plasty techniques. J Dermatol Surg Oncol 1976;2:393–6.
- Wisco OJ, Wentzell JM. When an M is a V: vector analysis calls for redesign of the M-plasty. Dermatol Surg 2009;35(8):1271–6.
- Eedy DJ, Breathnach SM, Walker NPJ. Surgical Dermatology. Oxford: Blackwell Science, 1996.
- Wheeland RG. Reconstruction of the lower lip and chin using local and random pattern flaps. J Dermatol Surg Oncol 1991;17:605–15.
- Jemec BIE. A short review of some methods of excisions from and reconstructions of lower lips. J Dermatol Surg Oncol 1981;7:576–9.
- Ross JJ, Pham R. Closure of eyelid defects. J Dermatol Surg Oncol 1992;18:1061–4.
- Tebbetts JB. Auricular reconstruction: selected single stage techniques. J Dermatol Surg Oncol 1982;8:557–66.
- Field LM. An improved design for vermilionectomy with a mucous membrane advancement flap. J Dermatol Surg Oncol 1991;17:833–4.
- Barry RB, McKenzie J, Berg D, Langtry JA. Direct primary closure without undermining in the repair of vermilionectomy defects of the lower lip. Br J Dermatol 2012;167:1092–7.
- Gormley DE. The dog-ear: causes, prevention and correction. J Dermatol Surg Oncol 1977;3:194–8.
- Stegman SJ. Basics of Dermatologic Surgery. Chicago: Year Book Medical, 1982.
- Salasche SJ, Roberts LC. Dog-ear correction by M-plasty. J Dermatol Surg Oncol 1984;10:478–82.
- Motley RJ, Holt PJA. The use of meshed advancement flaps in the treatment of lesions of the lower leg. J Dermatol Surg Oncol 1990;16:346–8.
Mohs micrographic surgery
- Zitelli JA. Wound healing by secondary intention. J Am Acad Dermatol 1983;9:407–15.
- Mohs FE. Chemosurgery: a microscopically controlled method of cancer excision. Arch Surg 1941;42:279–95.
- Mohs FE. Chemosurgical treatment of cancer of the face: a microscopically con- trolled method of excision. Arch Dermatol Syphilol 1947;56:143.
- Brodland DG, Amonette R, Hanke CW, Robins P. The history and evolution of Mohs micrographic surgery. Dermatol Surg 2000;26:303–7.
- Tromovitch TA, Stegman SJ. Microscopic-controlled excision of cutaneous tumours. Chemosurgery, fresh tissue technique. Cancer 1978;41:653–8.
- Swanson NA, Taylor WB, Tromovitch TA. The evolution of Mohs surgery. J Dermatol Surg Oncol 1982;8:650–4.
- Mohs FE. Chemosurgery for skin cancer: fixed tissue and fresh tissue techniques. Arch Dermatol 1976;112:211–15.
- Cottel WI, Bailin PL, Alborn MJ, et al. Essentials of Mohs micrographic surgery. J Dermatol Surg Oncol 1988;14:11–13.
- Kimyai-Asadi A, Goldberg LH, Jih MH. Accuracy of serial transverse cross- sections in detecting residual basal cell carcinoma at the surgical margins of an elliptical excision specimen. J Am Acad Dermatol 2005;53:469–74.
- Telfer NR. Mohs micrographic surgery for nonmelanoma skin cancer. Clin Dermatol 1995;13:593–600.
- Breuninger H. Micrographic surgery of malignant skin tumors: a comparison of the frozen technique with paraffin sectioning. Facial Plast Surg 1997;13:79–82.
- der Plessis PJ, Dahl MG, Malcolm AJ, et al. Mohs' surgery of periocular basal cell carcinoma using formalin-fixed sections and delayed closure. Br J Dermatol 1998;138:1003–8.
- Barlow RJ, Ramnarain N, Smith N, et al. Excision of selected skin tumours using Mohs' micrographic surgery with horizontal paraffin-embedded sections. Br J Dermatol 1996;135:911–17.
- Dobke MK, Miller SH. Tissue repair after Mohs surgery. A plastic surgeon's view. Dermatol Surg 1997;23:1061–6.
- Stein JM, Hrabovsky S, Schuller DE, Siegle RJ. Mohs micrographic surgery and the otolaryngologist. Am J Otolaryngol 2004;25:385–93.
- Sciscio A, Stewart K, Grewal J, et al. Periocular Mohs micrographic surgery: Results of a dual-site day-surgery service. Orbit 2001;20:209–15.
- Mohs FE. Chemosurgery: microscopically controlled surgery for skin cancer – past, present and future. J Dermatol Surg Oncol 1978;4:41–54.
- Rowe DE, Carroll RJ, Day CL Jr, et al. Long-term recurrence rates in previously untreated (primary) basal cell carcinoma: implications for patient follow-up. J Dermatol Surg Oncol 1989;15:315–28.
- Rowe DE, Carroll RJ, Day CL. Mohs surgery is the treatment of choice for recurrent (previously treated) basal cell carcinoma. J Dermatol Surg Oncol 1989;15:424–31.
- Malhotra R, Huilgol SC, Huynh NT, Selva D. The Australian Mohs database, part II: periocular basal cell carcinoma outcome at 5-year follow-up. Ophthalmology 2004;111:631–6.
- Leibovitch I, Huilgol SC, Selva D, et al. Basal cell carcinoma treated with Mohs surgery in Australia II. Outcome at 5-year follow-up. J Am Acad Dermatol 2005;53:452–7.
- Smeets NW, Kuijpers DI, Nelemans P, et al. Mohs' micrographic surgery for treatment of basal cell carcinoma of the face – results of a retrospective study and review of the literature. Br J Dermatol 2004;151:141–7.
- Thomas CJ, Wood GC, Marks VJ. Mohs micrographic surgery in the treatment of rare aggressive cutaneous tumors: the Geisinger experience. Dermatol Surg 2007;33:333–9.
- Leibovitch I, Huilgol S, Selva D, et al. Cutaneous squamous cell carcinoma treated with Mohs micrographic surgery in Australia I. Experience over 10 years. J Am Acad Dermatol 2005;53:253–60.
- Bialy TL, Whalen J, Veledar E, et al. Mohs micrographic surgery vs traditional surgical excision: a cost comparison analysis. Arch Dermatol 2004;140:736–42.
- Cook J, Zitelli JA. Mohs micrographic surgery: a cost analysis. J Am Acad Dermatol 1998;39:698–703.
- Essers BA, Dirksen CD, Nieman FH, et al. Cost-effectiveness of Mohs micrographic surgery vs surgical excision for basal cell carcinoma of the face. Arch Dermatol 2006;142:187–94.
- Smeets NW, Krekels GA, Ostertag JU, et al. Surgical excision vs Mohs' micrographic surgery for basal cell carcinoma of the face: randomised controlled trial. Lancet 2004;364:1766–72.
- Otley CC. Mohs' micrographic surgery for basal cell carcinoma of the face. Lancet 2005;365:1226–7.
- Cook JL, Perone JB. A prospective evaluation of the incidence of complications associated with Mohs micrographic surgery. Arch Dermatol 2003;139:143–52.
- Kimyai-Asadi A, Goldberg LH, Peterson SR, et al. The incidence of major complications from Mohs micrographic surgery performed in office-based and hospital-based settings. J Am Acad Dermatol 2005;53:628–34.
- Snow SN, Gordon EM, Larson PO, et al. Dermatofibrosarcoma protuberans: a report on 29 patients treated by Mohs micrographic surgery with long-term follow-up and review of the literature. Cancer 2004;101:28–38.
- Cohen LM, McCall MW, Zax RH. Mohs micrographic surgery for lentigo maligna and lentigo maligna melanoma. A follow-up study. Dermatol Surg 1998;24:373–7.
- Snow S, Madjar DD, Hardy S, et al. Microcystic adnexal carcinoma: report of 13 cases and review of the literature. Dermatol Surg 2001;27:401–8.
- Strong JW, Worsham GF, Hagerty RC. Peripheral in-continuity tissue examination: a modification of Mohs' micrographic surgery. Clin Plast Surg 2004;31:1–4.
- Moehrle M, Dietz K, Garbe C, Breuninger H. Conventional histology vs. three- dimensional histology in lentigo maligna melanoma. Br J Dermatol 2006;154:453–9.
- Telfer NR, Colver GB, Bowers PW. Guidelines for the management of basal cell carcinoma. Br J Dermatol 1999;141:415–23.
- Williford PM, Feldman SR. Surgery for basal-cell carcinoma of the face. Lancet 2004;364:1732–3.
Electrocautery and electrosurgery
- Boughton RS, Spencer SK. Electrosurgical fundamentals. J Am Acad Dermatol 1987;16:862–7.
- Taheri A, Mansoori P, Sandoval LF, et al. Electrosurgery: part I. Basics and principles. J Am Acad Dermatol 2014;70:591.e1–14.
- Taheri A, Mansoori P, Sandoval LF, et al. Electrosurgery: part II. Technology, applications, and safety of electrosurgical devices. J Am Acad Dermatol 2014;70:607.e1–12.
Cryosurgery
- Dawber R, Colver G, Jackson A, Pringle F. Cutaneous Cryosurgery. Principles and Clinical Practice. London: Martin Dunitz, 1997.
- Dawber RPR. Cold kills! Clin Exp Dermatol 1988;13:137–50.
- Kuflik EG. Cryosurgery updated. J Am Acad Dermatol 1994;31:925–44.
- Kuflik EG, Gage AA. The 5 year cure rate achieved by cryosurgery for skin cancer. J Am Acad Dermatol 1991;24:1002–4.
- Torre D. Cryosurgery of basal cell carcinoma. J Am Acad Dermatol 1986;5:917–29.
- Holt PJA. Cryotherapy for skin cancer: results over a 5 year period using liquid nitrogen spray cryosurgery. Br J Dermatol 1988;119:231–40.
- Conclaves JC, Martins C. Debulking of skin cancers with radio frequency before cryosurgery. Dermatol Surg 1997;23:253–6.
- Nordic P. Curettage-cryosurgery for non-melanoma skin cancer of the external ear: excellent 5-year results. Br J Dermatol 1999;140:291–3.
- Hinds TC, Spire J, Scott LV. Clobetasol propionate ointment reduces inflammation after cryotherapy. Br J Dermatol 1985;112:599–602.
- Graham GF, Deltas RL, Garrett AB, et al. Guidelines of care for cryosurgery. J Am Acad Dermatol 1994;31:648–53.
- Faber WR, Naafs B, Sillevis Smitt JH. Sensory loss following cryosurgery of skin lesions. Br J Dermatol 1987;117:343–7.
Caustics
- Brody HJ. Chemical Peeling. St Louis: Mosby Year Book, 1992.
- Rubin MG. Manual of Chemical Peels, Superficial and Medium Depth. Philadelphia: JB Lippincott, 1995.
- Jarson PO. Topical hemostatic agents for dermatologic surgery. J Dermatol Surg Oncol 1988;14:623–32.
Intralesional corticosteroid therapy
- Callen JP. Intralesional corticosteroids. J Am Acad Dermatol 1981;4:149–51.
- Potter RA. Intralesional triamcinolone and adrenal suppression in acne vulgaris. J Invest Dermatol 1971;57:364–70.
- Teelucksingh S, Balkaran B, Ganeshmoorthi A, Arthur P. Prolonged childhood Cushing's syndrome secondary to intralesional triamcinolone acetonide. Ann Trop Paediatr 2002;22:89–91.
- Krusche T, Worret WI. Mechanical properties of keloids in vivo during treatment with intralesional triamcinolone acetonide. Arch Dermatol Res 1995;287:289–93.
- Jarratt MT, Spark RF, Arndt KA. The effects of intradermal steroids on the pituitary-adrenal axis and the skin. J Invest Dermatol 1974;62:463–6.
- Kikuchi I, Horikawa S. Perilymphatic atrophy of the skin: a side effect of topical corticosteroid injection therapy. Arch Dermatol 1974;109:558–9.
- Gupta AK, Rasmussen JE. Peri-lesional linear atrophic streaks associated with intralesional corticosteroid injections in a psoriatic plaque. Pediatr Dermatol 1987;4:259–60.
- Schetman D, Hambrick GW, Wilson CE. Cutaneous changes following local injection of triamcinolone. Arch Dermatol 1963;88:820–8.
- Lebwohl M, Heymann WR, Berth-Jones J, Coulson I, eds. Treatment of Skin Disease —Comprehensive Therapeutic Strategies. London: Mosby, 2002.
Intralesional therapies for skin malignancies
- Kirby JS, Miller CJ. Intralesional chemotherapy for nonmelanoma skin cancer: A practical review. J Am Acad Dermatol 2010;673:689–702.
- National Institute for Health and Care Excellence (NICE). Electrochemotherapy for metastases in the skin from tumours of non-skin origin and melanoma. NICE interventional procedures guidance [IPG446], March 2013 www.nice.org.uk/guidance/ipg446 (last accessed March 2015).
Curettage
- Kapadia A, Hussain W. Optimizing curettage with a 'backhand'. J Eur Acad Dermatol Venereol 2013;27:e139.
Haemostasis for open wounds
- Larson PO. Topical haemostatic agents for dermatologic surgery. J Dermatol Surg Oncol 1988;14:623–32.
- Olmstead PM, Lund HZ, Leonard DD. Monsel's solution: a histologic nuisance. J Am Acad Dermatol 1980;3:492–8.
- Barr RJ, Alpern KS, Jay S. Histiocytic reaction associated with topical aluminium chloride (Drysol reaction). J Dermatol Surg Oncol 1993;19:1017–21.
Epidermoid cysts
- O'Keeffe PJ. Trephining sebaceous cysts. Br J Plast Surg 1972;25:411–15.
- Patton HS. An alternative method for removing sebaceous cysts. Surg Gynecol Obstet 1963;117:645–6.
Lipomas
- Kaneko T, Tokushige H, Kimura N, et al. The treatment of multiple angiolipomas by liposuction surgery. J Dermatol Surg Oncol 1994;20:690–2.
- Sawaizumi M, Maruyama Y, Onishi K, et al. Endoscopic extraction of lipomas using an ultrasonic suction scalpel. Ann Plast Surg 1996;36:124–8.
- Salasche SJ, McCollough ML, Angeloni VL, Grabski WJ. Frontalis associated lipoma of the forehead. J Am Acad Dermatol 1989;20:462–8.