Easy pets, a good place to start

Larger pets, more of a challenge

The most complicated pets
If you are a total beginner knitter, then we are quite envious, as a lot of pleasure awaits you as you learn to knit. You might find holding the needles and yarn a bit awkward at first, but practise just knitting rows with some spare yarn before you start on the simplest project in the book (we suggest the Mouse or the Goldfish), and you’ll soon get the hang of it.
To help you get started the basic knitting techniques are shown on the following pages; there are also lots of good video tutorials on the Web if you’d like to see knitting in action.
We have given each of our pets a rosette rating, from one to three, to help you decide where to start. It is a good idea for new knitters to begin with a one-rosette pet.
|
|
Easy pets, a good place to start |
|
|
Larger pets, more of a challenge |
|
|
The most complicated pets |
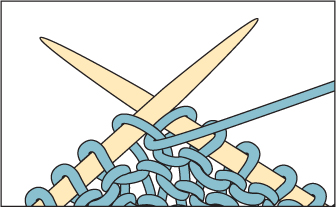
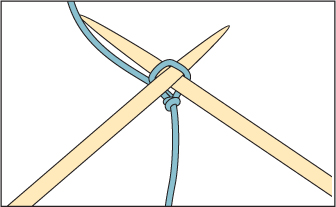
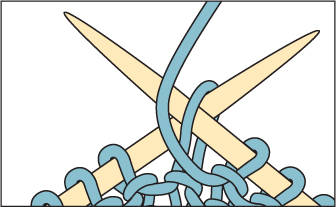
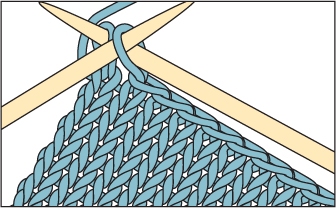
To cast on you need a slip knot, which will always count as the first cast-on stitch.
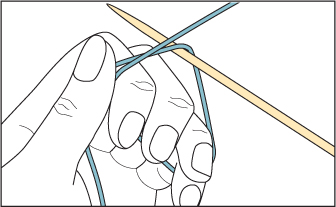
1 Hold the working (ball) end of the yarn in your right hand and wrap it around the fingers of your left hand. Put the tip of a knitting needle, held in your right hand, through the loop around your fingers.
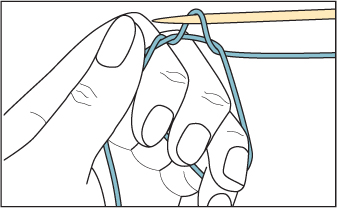
2 Wrap the working end of the yarn round the needle and pull the needle, and the yarn wrapped around it, through the loop around your left hand.
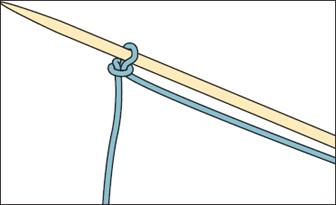
3 Keeping the yarn on the needle, slip the loop off your left hand. Pull gently on the ends of the yarn so that the loop tightens around the needle.
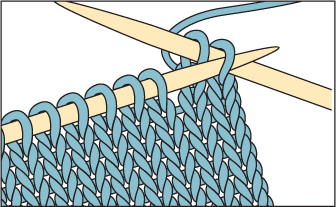
Try this popular way of holding the knitting needles and the yarn.

1 Hold the needle with the stitches on in your left hand. Wrap the yarn around the little finger of your right hand and then come up between your index and second fingers.

2 Hold the other needle in your right hand in the same way as you would hold a pencil. The right-hand index finger is going to control the tension of the yarn, so it is important to keep the yarn slightly taut around this finger.
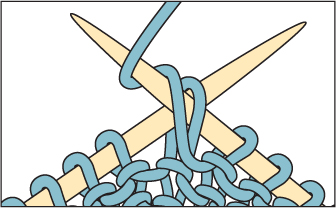
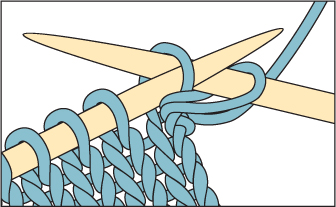
The first step is to create the number of stitches needed on the needles.
1 Make a slip knot about 10cm (4in) from the end of the yarn. Hold the needle with the slip knot in your left hand and the other needle in your right hand. Put the tip of the right-hand needle into the front of the stitch on the left-hand needle (remember that the slip knot is the first stitch). Bring the working yarn under and around the point of the right-hand needle.
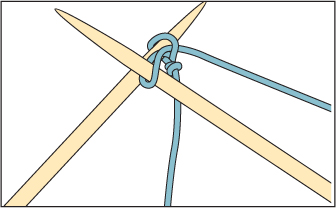
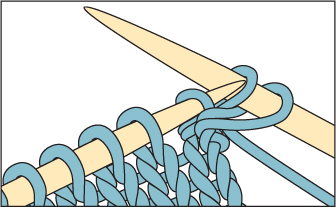
2 Pull the yarn taut so that it is wrapped around the tip of the right-hand needle. Bring the tip of the right-hand needle, and the loop of yarn wrapped around it, through the stitch and towards you.
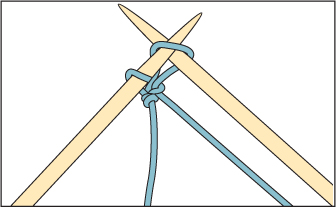
3 Slip the loop over the tip of the left-hand needle to make a new stitch on that needle. Take the right-hand needle out of the loop and pull the working end of the yarn to tighten the stitch.
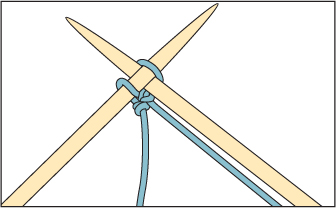
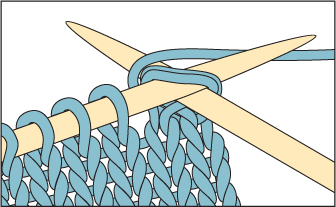
4 To cast on all the other stitches, put the tip of the right-hand needle between the last two stitches, instead of through the last one. Then repeat S eps 1–3 until you have the required number of stitches on the left-hand needle.
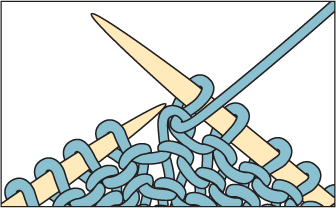
The first stitch to learn. This is very like casting on stitches.
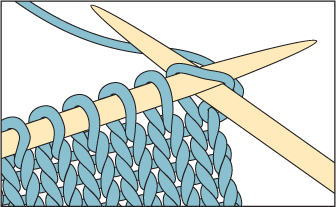
1 From front to back, insert the tip of the right-hand needle into the first stitch on the left-hand needle. Bring the yarn you are holding in your right hand under the tip of the right-hand needle.
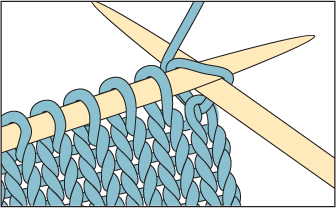
2 Wrap the yarn over the needle.
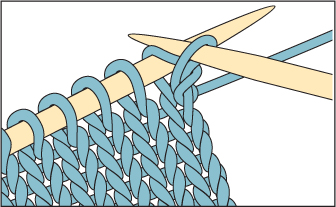
3 Bring the tip of the right-hand needle, and the loop of yarn wrapped around it, through the stitch on the left-hand needle to make a new stitch on the right-hand needle.
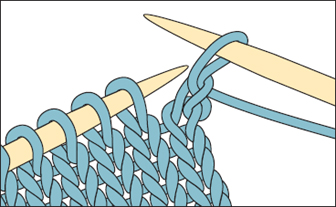
4 Slip the original stitch off the left-hand needle. The knitted stitch is now complete.
The only other knitting stitch to learn.
1 For purl stitch, the yarn is held at the front of the work, as shown. From back to front, put the tip of the right-hand needle into the first stitch on the left-hand needle. Bring the yarn forward and then take it over the tip of the right-hand needle.
2 Wrap it around the tip of the needle.
3 Bring the tip of the right-hand needle, and the loop of yarn wrapped around it, backwards through the stitch on the left-hand needle to make a new stitch on the right-hand needle.
4 Slip the original stitch off the left-hand needle. The purled stitch is now complete.
When you have finished knitting a piece, you need to stop the stitches unravelling.
1 Knit the first two stitches in the usual way. Slip the tip of the left-hand needle into the first stitch you knitted onto the right-hand needle. Lift it over the second stitch you knitted and drop it off the needle. You now have only one stitch on the right-hand needle.
2 Knit another stitch onto the right-hand needle and then pass the previous stitch you knitted over it. Continue in this way until you have one stitch remaining on the right-hand needle.

3 Cut the yarn, leaving a 10cm (4in) tail to sew in later. Put the cut end through the remaining stitch and pull it tight.
How to make an extra stitch on the needles.
1 Work to the position of the increase. Knit into the front of the next stitch in the usual way, but do not slip the original stitch off the left-hand needle. Put the tip of the right-hand needle into the back of the same stitch on the left-hand needle.

2 Wrap the yarn around the right-hand needle in the same way you would to knit a stitch.
3 Bring the needle, and the loop of yarn wrapped around it, through the stitch, and now slip the original stitch off the left-hand needle. You have made two stitches out of one and so increased by one stitch.
How to make one fewer stitches on the needle.
1 From front to back, put the tip of the right-hand needle into the next two stitches on the left-hand needle. Knit the two stitches together in the usual way as if they were one. You have made two stitches into one and so decreased by one stitch.
To knit three stitches together, simply put the right-hand needle through three instead of two stitches.
alt alternate
approx approximately
beg begin(ning)
cm centimetre(s)
cont continue
foll(s) follow(s)(ing)
g gram(s)
icos including cast (bound) off stitch. After casting (binding) off the stated number of stitches, one stitch remains on the right-hand needle. This stitch is included in the number of the following group of stitches.
in inches
inc work into front and back of next stitch to increase by one stitch
k knit
k2(3)tog knit next two (three) stitches together
oz ounces
p purl
p2(3)tog purl next two (three) stitches together
rem remain(ing)
rep repeat
RS right side
sk2po slip one stitch, knit two stitches together, pass slipped stitch over
st(s) stitch(es)
st st stocking (stockinette) stitch
w&t wrap and turn. See Wrap and Turn Method.
WS wrong side
[ ] work instructions within square brackets as directed
* work instructions after asterisk(s) as directed
There are two main techniques for working with more than one colour in the same row of knitting: the intarsia technique and the Fair Isle technique.
This method is used when knitting individual, large blocks of colour, as in the Simple Dog and the face of the Simple Cat. It is best to use a small ball (or long length) for each area of colour, otherwise the yarn will easily become tangled. When changing to a new colour, twist the yarns on the wrong side of the work to prevent holes forming.
When starting a new row, turn the knitting so that the yarns that are hanging from it untwist as much as possible. If you have several colours you may occasionally have to reorganize the yarns at the back of the knitting. Your work may look messy but once the ends are all sewn in it will look fine.
If there are no more than four stitches between colours you can use the Fair Isle technique, for instance on the head of the Ferret.
Begin knitting with the first colour, then drop this when you introduce the second colour. When you come to the first colour again, take it under the second colour to twist the yarns. When you come to the second colour again, take it over the first colour. The secret is not to pull the strands on the wrong side of the work too tightly or the work will pucker.
Use this method for the head of the Ferret, Hamster and Shetland Pony. Once you have mastered this technique you will be able to knit all the dogs, cats and wild animals from our other books. Knit the number of stitches in the first short row. Slip the next stitch purlwise from the left-hand to the right-hand needle. Bring the yarn forward then slip the stitch back onto the left-hand needle. Return the yarn to the back. On a purl row use the same method, taking the yarn back then forward.
Use this method for working the head of the Shetland Pony.
Short Row Patterning is worked as Wrap and Turn, but the number of stitches worked is decreased by one stitch a row for as many rows as in the pattern, then increased to the original number of stitches.
Use this method for the mane of the Shetland Pony.
Cut yarn as required and fold each piece in half. Slip a crochet hook through a stitch, hook the folded end of yarn through the stitch, slip the ends through the loop and pull the yarn tightly. Once all fringing has been done, cut to correct length.
This method is used for the legs and beak of the Canary and Parrot: if possible use coloured pipe cleaners and try to match the colour of the wrapping yarn. Leaving a 5cm (2in) tail of free yarn, tightly wrap the yarn around the pipecleaner, making sure no pipecleaner chenille pokes through. Continue wrapping down the pipecleaner to as close to the tip as possible, then wrap the yarn back up to the top of the pipecleaner. Knot the two ends and slip them in to the body. If there is a little bit of white pipecleaner chenille showing, colour in with a matching felt-tip pen. A little dab of clear glue will stop the wrapping slipping off the end of the pipecleaner.
We recommend using 5cm (2in) lengths of transparent nylon thread. To stop them falling out, dab a small amount of clear glue on both sides of the cheeks.