Our previous example imagined a single-use, short-lived cloud server. What if we want to create and use long-lived cloud servers, instead? Walking through the tasks of creating them and adding them to the temporary inventory each time we want to touch them seems inefficient. Manually recording the server details into a static inventory also seems inefficient, and also error-prone. Thankfully, there is a better way: using the cloud itself as a dynamic inventory source.
Ansible ships with a number of dynamic inventory scripts for cloud providers, as we discussed in Chapter 1, The System Architecture and Design of Ansible. We'll continue our examples here with OpenStack. To recap, the Ansible source repository holds these contributed scripts in contrib/inventory/, and the OpenStack script is contrib/inventory/openstack_inventory.py, with an associated configuration file at contrib/inventory/openstack.yml. To make use of this script, simply copy the .py file to the playbook directory that expects to use it, or to a path accessible to all users/playbooks on the system that will be executing Ansible. For our example, I'll copy it to the playbook directory.
The configuration file needs a bit more consideration. This file holds authentication details for the OpenStack cloud(s) to connect to. That makes this file sensitive, and it should only be made visible to the users that require access to this information. In addition, the inventory script will attempt to load the configuration from the standard paths used by os-client-config ( https://docs.openstack.org/developer/os-client-config/ ), the underlying authentication code. This means that the configuration for this inventory source can live in the following:
- clouds.yaml, in the current working directory when executing the inventory script
- ~/.config/openstack/clouds.yaml
- /etc/openstack/clouds.yaml
- /etc/openstack/openstack.yaml
- /etc/openstack/openstack.yml
The first file that's found will be used. For our example, I'll use a clouds.yaml file in the playbook directory alongside the script itself, in order to isolate configuration from any other paths.
The help output for the script shows a few possible arguments; however, the ones that Ansible will use are --list and --host:

The first is used to get a list of all of the servers visible to the account used, and the second would be used to get host variable data from each, except that this inventory script returns all of the host variables with the --list call. Returning the data with the host list is a performance enhancement, as we discussed earlier in the book, eliminating the need to call the OpenStack APIs for each and every host returned.
The output from --list is quite long; here are the first few lines:

The configured account only has one visible server, which has a UUID of 63338332-de64-4200-bb60-c74a92fcba82, the instance that we booted in a previous example. We see this instance listed in the ds1G and Fedora 29 groups , for example. The first group is for all of the servers running with the ds1G flavor, and the second is for all servers running from our Fedora 29 image. These groupings happen automatically within the inventory plugin, and may vary according to the OpenStack setup that you use. The tail end of the output will show the other groups provided by the plugin:
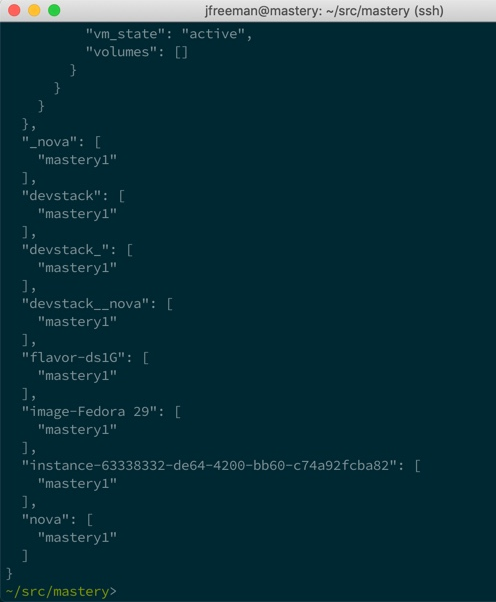
Some of the additional groups are as follows:
- devstack: All servers running on our devstack instance
- flavor-ds1G: All servers that use the ds1G flavor
- image-Fedora 29: All servers that use the Fedora 29 image
- instance-63338332-de64-4200-bb60-c74a92fcba82: A group named after the instance itself
- nova: All servers running under the nova service
There are many groups provided, each with a potentially different slice of the servers found by the inventory script. These groups make it easy to target just the right instances with plays. The hosts are defined as the UUIDs of the servers. As these are unique by nature, and also quite long, they are unwieldy as a target within a play. This makes groups all the more important.
To demonstrate using this script as an inventory source, we'll recreate the previous example, skipping over the creation of the server and just writing the second play by using an appropriate group target. We'll name this playbook configure-server.yaml:
---
- name: configure server
  hosts: all
  gather_facts: false
  remote_user: fedora

  tasks:
    - name: install python
      raw: "sudo dnf install -y python python2-dnf"

    - name: install imagemagick
      dnf:
        name: "ImageMagick"
      become: "yes"
The default user of this image is fedora; however, that information isn't readily available via the OpenStack APIs, and thus, it is not reflected in the data that our inventory script provides. We can simply define the user to use at the play level.
This time, the host pattern is set to all, as we only have one host on our demo OpenStack server at this time; however, in real life it's unlikely that you would be so open in your host targeting in Ansible.
The rest of the play is unchanged, and the output should look similar to previous executions:

This output differs from the last time that the boot-server.yaml playbook was executed in only a few ways. First, the mastery1 instance is not created or booted. We're assuming that the servers we want to interact with have already been created and are running. Secondly, we have pulled the inventory for this playbook run directly from the OpenStack server itself, using a dynamic inventory script, rather than creating one in the playbook using add_host. Otherwise, the output is the same.
As servers get added or removed over time, each execution of the inventory plugin will discover what servers are there at the moment of playbook execution. This can save a significant amount of time over attempting to maintain an accurate list of servers in static inventory files.