Chapter 3: Sharing and Collaborating
In This Chapter
 Understanding how file sharing works
 Sharing files and folders with your collaborators
 Changing how you share folders and files
 Working on files with others
 Soliciting information with a survey form
Users of the Office Web Apps can collaborate online by sharing Word documents, Excel worksheets, PowerPoint presentations, and OneNote notebooks. This chapter explains how file sharing works. It shows you how to share your folders and files with others, and what happens when others share their folders and files with you. This chapter also demonstrates how to create a survey form to gather information and enter it automatically in an Excel worksheet.
Sharing Files: The Big Picture
On the idea that you should look before you leap, these pages explain the ins and out of sharing files. They explain file access privileges and how SkyDrive generates links for file sharing.
File access privileges
The person who creates a folder or file is the owner. The owner decides whether to share a folder or file and what others can do with it:
 Can View privileges: Others can view the file (or all files in the folder if a folder is being shared), but not edit the file(s).
 Can View and Edit privileges: Others can view and edit the file (or all files in the folder if a folder is being shared). To edit the file (or files), however, you must have a Microsoft Account.
 Public: Anyone can view the file (or files in the folder if a folder is being shared). The file is searchable by Google and other search engines. Anyone with an Internet connection can find the file and view it.
Links for sharing files
SkyDrive generates a link for each file that is shared. This link is the means by which the people who share the file open it. Someone who has the link can click it and, in their web browser, open the file for viewing or editing in an Office Web App.
The owner of a folder or file can share it using these methods:
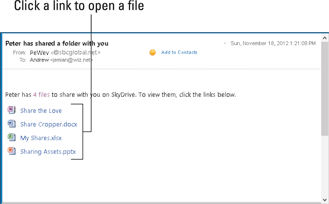
 Send by e-mail: Send the link by e-mail on a person-by-person basis to each person with whom you will share the file. Figure 3-1 shows an example of sending links by e-mail to share files. The recipient of this e-mail message can click a link to open an Office file in an Office Web App. In this case, the sender shared a folder with four files in it.
 Post to a social-networking site: Post the link on a social-networking site (such as Facebook or LinkedIn) where others can click it.
 Get a link: Generate a link and distribute it on your own or post it on a web page.
 Share with embedded HTML code: Generate HTML code that you can embed in a blog or web page. The code creates a link that others can click to open a shared file. (On the SkyDrive toolbar, click the Embed button. Then click the Generate button in the Embed dialog box, copy the HTML code that SkyDrive generates, and paste it in to your blog or web page.)

Figure 3-1: Sharing files by e-mail.
Sharing Your Files and Folders with Others
Share files with others so that they can view or edit your work. Sharing is a way to collaborate with others on Office files. Starting in the SkyDrive window, you can share a folder (that is, all the files in the folder) or an individual file.
Follow these steps to share a file or all the files in a folder:
1. In SkyDrive, select the file or folder you want to share.
You can also start by opening the Office file you want to share.
2. Click the Share (or Share Folder) button or link.
 You can find the Share button or link here, there, and everywhere:
• On the SkyDrive toolbar
• In the Details pane
• In an open Office file, by clicking the Share tab
• In an open Office file by clicking the File tab, choosing Share, and choosing Share with People in the Share window
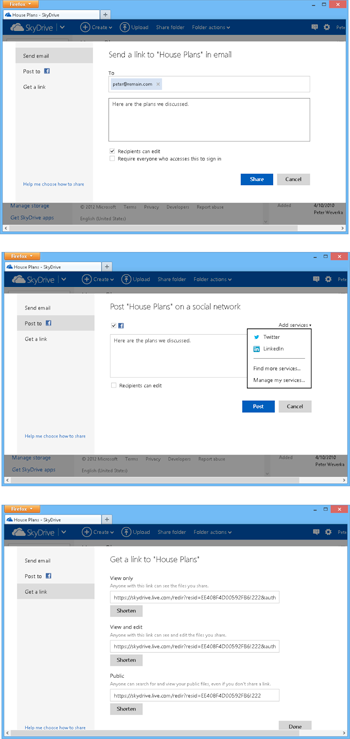
As shown in Figure 3-2, you see the dialog box for generating a link to your file or folder. (If you’re already sharing the file or folder, you see a list of people who share it with you. Click the Share With More People button.)
3. Choose Send Email, Post To, or Get a Link to generate the link to your file or folder.
Earlier in this chapter, “Links for sharing files” compares the different types of links.
• Send by e-mail: Enter the e-mail addresses of the people with whom you will share the file or folder. Enter a message as well if you want (see Figure 3-2).
• Post to a social-networking site: Click the logo of the site. If the logo doesn’t appear, click the Add Services link to add a site to the list of social-networking sites you can post to (see Figure 3-2).
• Get a link: Click one of the three Create buttons (earlier in this chapter, “File access privileges” explains what these choices mean). After you click Create, SkyDrive generates a link (see Figure 3-2). Right-click to copy it.
 Be careful about handing out links you make by clicking a Create button. These links can be forwarded hither and yon. Whoever gets hold of them can view and, if they have a Microsoft Account, edit your files.

Figure 3-2: File sharing by e-mail (top), on Facebook (middle), and by distributing links (bottom).
4. Choose the degree to which you will share the file.
Earlier in this chapter, “File access privileges” explains the different ways to share a file or folder.
• Send by e-mail: Clear all check boxes if you want people who receive the e-mail to view the file only; select Recipient Can Edit if you want recipients to be able to edit the file (to edit, they have to sign in to a Microsoft Account); select Require Everyone Who Accesses This to Sign In if you want only people with Microsoft Accounts to view the file.
• Post to a social-networking site: Select Recipients Can Edit to allow people who click the link on the social-networking site to edit as well as view your file (to edit, they have to sign in to a Microsoft Account).
• Get a link: See “File access privileges,” earlier in this chapter, to decide which Create button to click.
5. Click the Share button (Send by Email), the Post button (Post To), or the Done button (Get a Link).
That task is done — and not a moment too soon. Nothing says you can’t share a file or folder in more than one way. For example, share it by e-mail and post it on a social-networking site.
Seeing Files and Folders Others Shared with You
Go to the Shared window to see the names of folders and files that others shared with you by way of e-mail messages. To go to the Shared window, click Shared in the SkyDrive Navigation pane.
In Details view, the Shared window tells you who owns each file and folder (look in the Location column).
Open files and folders in the Shared Window the same way you open them in the Files or Recent Docs window — by clicking the Open button or right-clicking and choosing Open.
Investigating and Changing How Files and Folders Are Shared
The Details pane tells you everything you need to know about who shares a file or folder. To open the Details pane, select a file or folder and click the Show/Hide the Details Pane button.
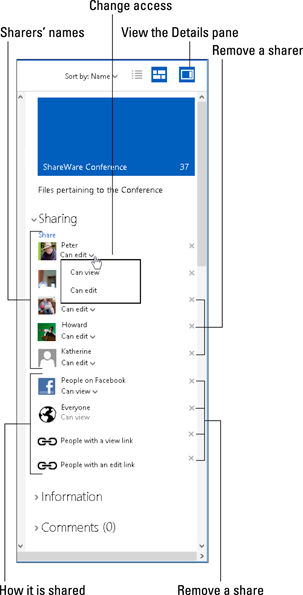
 The Details pane tells you who owns the file or folder (if no owner is listed, you’re the owner), the sharers’ names, whether a sharer can view or edit, and how the folder or file is shared, as shown in Figure 3-3.

Figure 3-3: Go to the Details pane to see and change how a file or folder is shared.
Owners of folders and files can use these techniques in the Details pane to change how folders and files are shared:
 Change Access: Open the drop-down list on a sharer’s name and choose Can View or Can Edit.
 Remove a sharer: Click the Remove Permissions button next to a sharer’s name.
 Remove a share: Click the Remove Permission button next to a share name.
Co-editing Shared Files on SkyDrive
Here are a few tricks to find out who besides yourself is working on a shared file:
 Word Web App and Excel Web App: In the lower-right corner of the Word and Excel Web App, the status bar tells you how many people are editing a file. You can click this notice to see a pop-up window that lists the names of the other editors.
 PowerPoint Web App: On the status bar, the number next to the Authors icon tells you the number of coauthors. Click the Authors icon to see a pop-up list with coauthors’ names.

 OneNote Web App: Go to the View tab and choose Show Authors to see who authored notes. The name of its author appears beside each note. (Click the Show Authors button a second time to make the initial disappear.)
Soliciting Information with a Survey Form
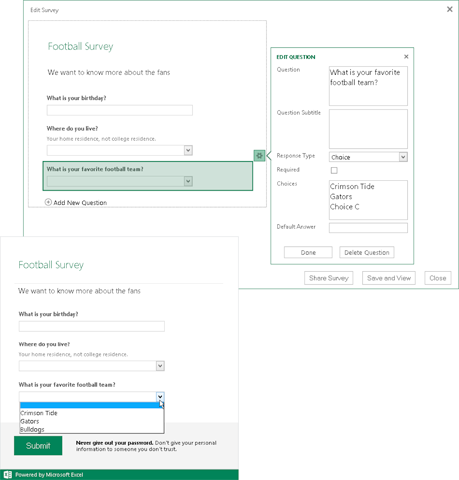
Use survey forms to collection information. Figure 3-4 shows a survey form and the dialog box that was used to create it. After you create a survey form, you generate a link to the form and send the link to the people you want to solicit for your survey. When they click the link, they see a form similar to the one in Figure 3-4. Responses to the questions on the form are entered automatically in a worksheet that the Excel Web App creates.
Forms spare you the trouble of collecting data and entering it yourself. People who respond to your survey can do so without signing in to a Microsoft Account.

Figure 3-4: Creating a survey form (top) and the form itself (bottom).
Follow these steps to create a survey form:
 1. In SkyDrive, click the Create button and choose Excel Survey on the drop-down list.
The New Microsoft Excel Survey dialog box opens.
2. Enter a name for the workbook where you will collect information from the survey and click the Create button.
The Excel Web App and Edit Survey dialog box open (see Figure 3-4).
3. Use the Edit Survey dialog box to construct your survey.
Enter the following:
• Title and description: Enter the title and description on the left side of the dialog box.
• Add questions: Click Add New Question. Then, in the Edit Question part of the dialog box, enter the question. Use the Response Type menu to describe the kind of data you want to solicit.
• Edit questions: Click a question to edit it in the Edit Question part of the dialog box.
4. Click the Save and View button.
You see what the survey form you created will look like to the people who fill it out. If necessary, click the Edit Survey button to return to the Edit Survey dialog box and fine-tune your survey form.
5. Click the Share Survey button.
6. Click the Create button to generate a link to your survey.
7. Right-click the link and choose Copy to copy the link to the Windows Clipboard.
If you want, click the Shorten button to generate a shorter version of the URL to send to others.
8. Click the Done button.
You see a new worksheet in the Excel Web App — a worksheet with the questions you entered. As people respond to your survey, the information they enter appears in this spreadsheet.
Before you forget, send the link you copied in Step 7 to the people you want to survey. In your e-mail message, explain that clicking the link opens a survey form for gathering essential and all-important information. Be sure to paste the link into your e-mail message.
 Only people who have a Microsoft Account can edit Office files with an Office Web App. People without a Microsoft Account can view the files but not edit them.