The Tools of Scenery: Surface, Texture, and Tricks
The previous chapter discussed how scenery can establish mood, underscore themes, and reveal and support the characters onstage. This is the design perspective—scenery seen from the front. Now, we’re going to take a more practical perspective—scenery seen from the back.
Basically, scenery does five things. First, it gives the actors a place to stand. Second, it gives the audience a physical surface to look at behind the actor. Third, it provides “real” physical elements, such as doors and windows. Fourth, it helps the play to move from one location to the next, through the use of multiple settings. Finally, it occasionally tricks the audience into believing something happened when it really didn’t.
A Place to Stand: Platforms, Stairs, and Ramps
The most basic job of scenery is to provide a place for a performer to stand, feeling comfortable and clearly seen by the audience. Actually, Molière said that a platform and a chair were all you needed.
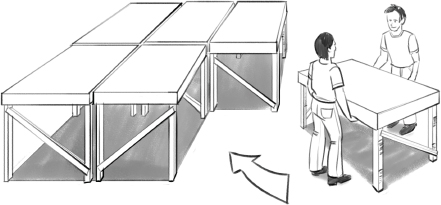
Scenic platforms are made out of a variety of materials, but they all consist of a frame covered by some kind of top (or skin), all of which is held up by legs. Regular platforms tend to come in 4-by-8-foot sizes (usually abbreviated as 4 × 8), mostly because platforms use plywood for the top, and 4 × 8 is the standard size for plywood sheets from the lumberyard. When you look at the stock platforming that most theaters have, you will see a lot of 4 × 8s. A platform can be built in any size and shape, of course, but, like mobile homes, it is easier and cheaper to build rectangles. If you are renting platforming, it will probably only be available in a few sizes, one of which will most certainly be 4 × 8. Other common rental sizes are 4 × 4 and 4 × 6.
Platforms are combined to build a deck. Stock platforms will sometimes have coffin locks—latches that lock the platforms together—built in. Otherwise, the platforms are bolted together.
Sometimes, for visual effect, a designer will decide to have the deck slant toward the audience. This is called a raked stage, or simply, a rake. There are lots of reasons to use a rake. It makes the performers easier to see, for one thing. A raked stage can also make the upstage area feel closer to the audience and is a good device to improve the intimacy of the audience-actor relationship. It is best used in theaters where the audience seating area is raked very little, or not at all. A rake can also be used to increase the effect of false perspective, the scenic trick used to increase the apparent size of the stage. If the tops of the walls slant downward as they go upstage, the combination of the top of the wall coming down and the raked floor coming up will make the stage appear larger, sort of like that railroad-tracks-coming-together-in-the-distance trick that you learned in fifth-grade art class.
Fig.3. Decks are made of platforms.
The raked stage is firmly rooted in theatrical history. When scenic design was being invented in Renaissance Italy, false perspective was all the rage, and all the stages were raked. The trend continued into Shakespeare’s day, and actors had to get used to playing on a shallow hill. Since the actors were literally climbing up the hill as they walked away from the audience, the term upstage was created for this area. Conversely, downstage meant closer to the audience. As you know, these terms are used today on any stage, raked or not.
Given a bit of rehearsal time, actors can quickly adapt to a slanted playing surface, as long as it is not too steep. Rakes are measured in “inches per foot.” A one-inch-to-the-foot rake, for example, rises one inch in altitude for every foot you walk upstage. This is also known as a “one to twelve” slope, or 1:12. A one-to-twelve rake is quite shallow, almost unnoticeable to the audience and easy to walk on, while a two-inch-to-the-foot (1:6) rake feels quite steep and requires some practice. Good rakes fall somewhere between one inch and two inches to the foot.
For obvious reasons, dancers are not wild about working on rakes. Opera singers are less picky (they sing more and move around less). Surprisingly, runway fashion models seem to be able to work on anything short of a cliff. In heels, no less.
Stairs
The human body is remarkably picky about stairs. If they are too steep, they can exhaust you. Too shallow or too wide, and they will be out of line with your natural stride, causing you to stumble.
The ratio of the height of each step, the rise, to the width of each step, the run, is very important. Architects use a rather complicated formula to determine these measurements, but for our purposes, we can use the “eighteen-inch rule.” Simply stated, this rule says that the rise plus the run should be about eighteen inches. One of the most commonly used ratios is an eight-inch rise for a ten-inch run. This yields a staircase that is comfortable to climb but rises fairly quickly. A six-inch rise and a twelve-inch run gives a more ceremonial look, suitable for a ballroom scene, an awards ceremony, or any scene where women will be wearing long dresses. Anything shallower than six-by-twelve, though, and the stairs start to get awkward. Performers may find themselves lurching up it, constantly trying to decide whether to put one foot or two on each step. Designers of large public plazas seem to get this one wrong fairly frequently, a good example of function being a slave to form. The short, wide steps up to City Hall in San Francisco used to drive me crazy. You really have to pay attention.
If you need a steeper, more utilitarian-looking stair (a scene in a basement, for example, or aboard a ship), or you just don’t have as much space, you can use a nine-by-nine-inch stair, but any steeper and it begins to look and feel like a ladder. As it is, women in long period dresses or heels may need help getting up and down a nine-by-nine. One common use of this steeper stair is for getting actors off high platforms out of sight of the audience. Any staircase with this purpose is called an escape stair.
Another way in which the human body is very choosy is in each stair’s height relative to the others. Put simply: It is imperative that all the risers in a staircase are the same size. As you climb a staircase, you tend to lift your foot only a fraction of an inch higher than necessary to clear each step. Whether this is because of human laziness or just a physiological obsession with efficiency is anybody’s guess, but the result is that, if you make one or more of the steps higher than the rest, you will have created what technicians affectionately refer to as an actor trap, that is, a piece of scenery that lays in wait for preoccupied actors, causing them to trip, stumble, and forget their lines.
When I was in school at Brown University, we used to take our coffee breaks on the patio outside the theater, just above the post office. (It has since been moved.) We would watch the students come up the single flight of hundred-year-old steps from the basement and marvel at how often people would trip on the top step, spilling coffee and books all over the sidewalk. It literally happened every ten minutes. One day, we took a tape measure to the step and, as we suspected, found that it was higher than the rest. How much higher? Less than half an inch. Ever since that experience, I have been impressed by how quickly and firmly the human body adapts to its surroundings. After climbing just a few steps, people’s bodies were cutting the heights so close that a half-inch discrepancy was causing them to trip. I was no exception. Even after I knew the higher step was there, I still lost a cup of coffee to it now and then.
If you really need to have an uneven step in your staircase (if you are using a stock staircase, for example, and it falls a little short), put the odd step at the bottom. There are two reasons for this: First, people tend to pay more attention to the steps at the bottom of a staircase, and second, if they do trip, they don’t have as far to fall. You laugh, you laugh… .
While we’re on the subject of safety, any escape stair with more than two steps should have a hand rail (called an “Equity rail,” after the actors’ union that requires it) on at least one side. Any stair bigger than four steps should have it on both sides. Finally, make sure that you have a strip of white tape along the front of each step so people can see where they are stepping. Don’t use phosphorescent “glow tape,” though. It will never “charge up” in the backstage gloom and thus will not be visible.
Since the risers on your stairs are going to be six, eight, or (rarely) nine inches, it follows that the platforms that they lead to will also be multiples of six, eight, or nine inches in height. Because the eight-inch riser is such a common and comfortable step, stage platforms are often raised to multiples of eight: sixteen inches, twenty-four inches, thirty-two inches, and so on. The rental platform world is usually sized for six-inch-high steps (more platforms are rented for graduations than for Shakespeare), so their platforming tends to be in six-inch increments, that is, twelve inches, eighteen inches, twenty-four inches, and so on.
Ramps
We’ve already talked about a “raked” stage, which is tilted to increase visibility or the effect of false perspective, so what’s the difference between a “rake” and a “ramp”? Excellent question.
While you could make a case that a rake is wider than it is long, whereas a ramp is the opposite, the real difference is in use. A rake is designed to be a playable space that covers most or all of a stage. A ramp, on the other hand, is usually a way to get from point A to point B. For that reason, it can often be steeper than a rake. The 1:6 slope that was awkward for a rake is fine for a ramp. Anything steeper than 1:6 is to be avoided, unless you want actors to slide down on sleds. Who knows? Maybe you are doing A Christmas Carol.
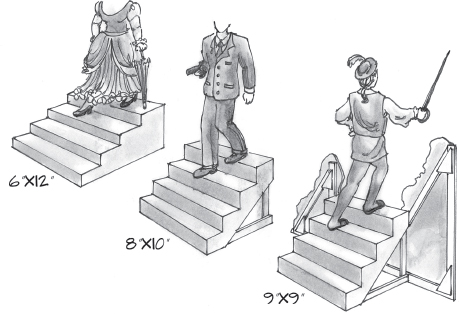
Fig.4. Different staircases for different users
For the record, if you are making a ramp for the audience to use, perhaps to get in and out of your theater, then you should adhere to the Americans with Disabilities Act, commonly called the ADA. This law restricts wheelchair ramps to the 1:12 slope that I mentioned previously.
If your ramp is only used by performers, however, then you are not restricted by the law, and you can make it as steep as your performers can handle.
A Surface to Look at: Walls, Drapes, Fabric, and Paint
Walls
In the theater, walls are called flats. Even if they’re not flat. It’s just one of those things.
Like platforms, flats can be built in any shape or size, but most theaters carry stock sizes in two-foot increments, such as 4 × 8, 2 × 10, and 2 × 8. When the size of a flat is listed, the width is first, followed by the height. A 4 × 8, for example, is four feet wide and eight feet high. People have been known to violate this rule, however, so if you’re renting, be sure to check which is which.
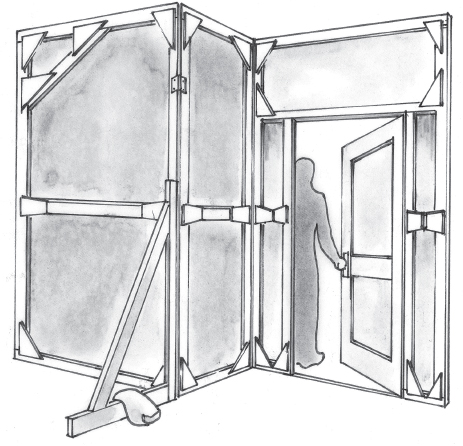
Fig.5. Walls are made of flats.
Unfortunately, few rental houses carry flats of any size, although they might build them for you if you want to buy them. These companies make most of their money off corporate clients, and those clients generally prefer soft draperies.
Flats must be supported to stand upright. The best thing to use is other flats. Set the flats at angles to each other and then nail them together. If that doesn’t do it, you can add braces on the back. Whatever you do, don’t try to suspend the flats from the ceiling with wire or rope. This always sounds like a good idea, but it won’t keep the flats from swinging in the breeze. Attach the flats to the floor.
Flats are made from wooden or metal frames, covered with fabric or plywood. The wooden frames come in two varieties, depending on how you build the frames. If the wooden boards in the frame are placed edge to edge, this is known as a “Broadway” or “theater” flat. If you place the framing boards face to face, it is known as a “Hollywood” or “TV” flat.
Theatrical flats take up less space in storage, which is important if you keep a lot of different flats around. TV flats are easier to attach to the floor, which is great if you just want to build one set of flats and just move them around the studio. TV people don’t care so much about the size of the flats because the camera never sees the sides or the tops. Extra width? Who cares? The camera will never see it. Theater people, however, have to keep flats for all sorts of uses, and they have to be the right size. Hence, theater flats are thinner and easier to store.
Flats are covered with a variety of materials, depending on the use. A traditional theatrical flat is covered with canvas or muslin, which is then painted to make it stiff. However, this is a time-consuming process and the flats have a tendency to flop around whenever somebody slams a door onstage, so there is a trend toward “hard-covered” flats, which are covered in 1/8-inch thick luaun plywood. Luaun costs more than canvas, but the flats can be made more quickly, saving money on labor. Hence, most professional shops these days are hard-covering their flats.
Flats can also be covered with decorative fabric, vinyl, wood paneling, fake brickwork, linoleum, or whatever sort of look you need.
Hard-covered flats are also a good choice if the designer wants to create a textured or “rockwork” wall. Sometimes, bricks of foam are glued to the flat and then carved by scenic artists.
Drapes
What says show more than draperies? From Fellini films to Las Vegas revues, the image of a grand drape slowly parting to reveal a spectacle behind it is a piece of cultural imagery that we can never escape. By the way, did you know that the Romans dropped the front curtain at the beginning of the show instead of raising it? It fell to the ground and was dragged away by slaves. The idea of raising the curtain up out of sight was invented during the Italian Renaissance, when many of the stage crew were former sailors who brought their methods and terminology to the theater. To this day, many of the rigging terms we use backstage—like blocks, clews, and lines—are actually sailing terms. It is also how the superstition about not whistling backstage got started. The sailors climbing around over the stage communicated by whistling. If you were standing below them whistling I Left My Heart in Verona, people could get confused overhead, and you were likely to end up with a sandbag on your noggin. I suspect that this whole don’t-walk-under-a-ladder thing got started the same way. Today a safety rule, tomorrow a superstition.
Like the raked stage, draperies are an old tradition in the theater, and, like anything else that is ancient, the terminology is extensive and rather particular. The fact that each variety of drape has its own name may seem excessive, but it is worth taking the time to learn them, since this kind of terminology can make it easier to communicate with technicians, and isn’t that why we’re here?
Okay, let’s start downstage (closer to the audience, remember?). The first drape is the grand drape, also called the main drape, the grand curtain, or the main rag. It is the one that has to open for the show to start. It often has a decorative valence, a little short drape made of the same material, that runs all the way across the top and does not move. Sometimes a designer will design a main curtain with a logo for a particular show. This is called a show drop, and it is used in place of the normal grand drape. In Britain, the law states that the asbestos fire curtain must be down when the audience enters the theater (to calm their fears, I gather), so many theaters have beautifully painted ones.
Grand drapes come in a few different varieties, all of which basically look the same when they are down. The difference comes in how they are raised. A knife curtain (or guillotine) is pulled straight up. A traveler curtain has two panels that are pulled off into the wings on opposite sides. A tab curtain also has two panels, but they are picked up at the corners and raised diagonally. An Austrian curtain has a series of rings sewn into the back of the drape in vertical lines, with cables running down through the rings. When the cables are pulled up, they gather the rings together, creating folds of fabric with a scalloped bottom edge. Very showy. Even more showy is the Venetian drape, also known as a “contour” curtain, which is a special case of the Austrian with individually controlled lines, allowing the crew to raise the grand drape in a variety of different shapes, which is very grand indeed.
When the grand drape goes up, you usually see a small drape running across the top of the stage behind the valence, hiding the first row of lights. Unlike the valence, this drape is dark (usually black) and is not meant to draw attention. This is called a teaser (I suppose because it “teases” the audience by barely covering the lighting equipment). The sadistic theme continues with the two vertical drapes hanging down from the ends of the teaser. These are called tormentors, or often, torms. Off in the wings, many theaters have another set of drapes that hang perpendicular to the proscenium and help mask the wings. These are called tabs.
Moving upstage, we see several more sets of drapes hanging parallel to the arch—each set with one drape running across the top like a teaser and one hanging down from each end like tormentors. The one above is a border, the ends are legs. Hold it, you say. What’s the difference between the teaser/torms and the border/legs? And the answer is, nothing really, except that the most downstage set of borders and legs is generally referred to as the teaser and the torms. Actually, sometimes the teaser and torms are framed draperies, like soft-cover flats, and they form a portal. What’s more, the teaser and torms are sometimes painted in a design that matches the show, and then they’re put out in front of the grand drape. In this case, they are called a false proscenium. Confused? Check out the diagram:

Fig.6. Names of draperies
Enough terms? I know it is difficult, but language is important when we seek clarity, and clarity can keep you alive backstage.
For those of you who are working in the convention and meeting world, your drapes come as pipe-and-drape. This is a lightweight fabric panel that is pre-sewn with a pocket running along the top. The installers then slip a long pole into this pocket and suspend the whole thing between two vertical pipes on stands. These drapes usually come in ten-foot lengths, stand about eight feet tall, and are completely transparent to all sound. So you have to be quiet backstage. Sorry.
When hanging drapes, you should consider how thick the pleats in the fabric should be. This is called the fullness. A drape that is hanging in “zero fullness” is perfectly flat—no pleats whatsoever. A drape hanging in “100 percent fullness” is pleated, accordion-style, so that it takes up exactly half as much width as it would if it were not pleated at all. In other words, a forty-foot-wide drapery will be twenty feet wide when hung with 100 percent fullness. Drapes may be hung with more or less fullness, as is appropriate. The more fullness, the grander and more regal they look. Drapes, especially grand drapes, are sometimes manufactured with sewn-in fullness, which means that the pleats are sewn in permanently. This makes them nice and crisp and all the same size but does not allow you to ever spread the drape out flat. This is a nice feature for a front curtain, but you should consider carefully before committing yourself to this option for any other drape.
Drops
What’s the difference between a drape and a drop? Purpose, mostly. Drapes are considered part of the masking, that is, the things that you use to keep the audience from seeing what you don’t want them to see. Drapes generally aren’t meant to draw attention to themselves. Rather, they are the part of the stage that says: don’t look here. (Remember The Wizard of Oz? “Pay no attention to that man behind the masking!”) Drops, on the other hand, are part of the scenery and are meant to be looked at.
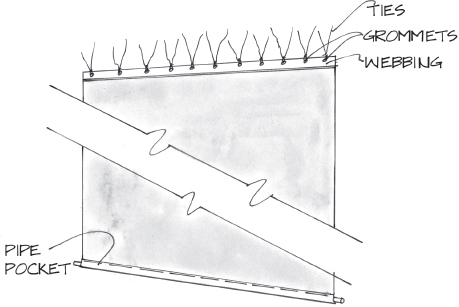
A standard stage drop is made from muslin. It has a strip of very heavy fabric, called webbing, across the top, which is studded with grommets—little brass rings embedded in the fabric. Small pieces of tie line are fed through grommets and then tied to the batten, the pipe above the stage that will hold the drop. The drop should also have a chain pocket running along the bottom, which holds a pipe or chain. The weight of the pipe or chain pulls the drop flat.
Sometimes a designer will elect to cut out part of a drop (a “cut drop”), leaving an opening, if, for example, she wants the drop to look like leaves hanging down. Sometimes, when a drop comes up one side, across the top, and down the other side, it is called a portal.
There are also some special-use drops on stage that have names of their own: A scrim is a drop made from a loosely woven fabric, sometimes called a sharkstooth scrim, and often used for a bit of stage magic. When lit from the front, the scrim appears opaque. When the front light is turned off, however, and objects behind the scrim are lit, the fabric becomes semi-transparent and the people and sets behind the scrim become visible. This effect, known as a bleed-through, can create a layered picture on stage, with the color and texture painted on the scrim laying on top of the action behind it.
The national tour of Les Misérables had a beautifully painted grand drape, but it was also a magical one. The drape was actually a scrim, so they could start each act by bleeding through to reveal the actors going about their business upstage, but overlayed with the texture and color of the front curtain. Then the scrim was raised, the front lights came on, and the show started. Bleeding through is also a good effect for magic appearances (the talking mirror in Snow White is a classic), or for when an actor is onstage thinking (or, more often, singing) about somebody who is not present and that other person needs to be seen. If you’re planning on doing Brigadoon, for example, you’d better start scrim-shopping for the moment when Tommy Albright sits drinking in a New York City barroom, singing about his mythical mistress in the Scottish Highlands. You may want to reveal her magically, upstage of the New York City scrim drop.
For a truly clean effect, a scrim should have a black curtain, called a blackout drop, hanging right behind it until just before the effect happens. Then, at the last possible moment, the blackout curtain flies up out of the way, and the lighting effect happens.
Another type of specialty drop is one that goes all the way across the back of the stage and is used to impersonate the sky—a cyclorama, or cyc (pronounced like “psych”). Cycs are often curved to increase the illusion. They also make use of scrims. In fact, a cyc is sometimes a combination of drops—a scrim hanging in front of a muslin drop. Light is then thrown on the muslin drop, while the downstage scrim “confuses” the audience’s eyes, making it difficult to tell exactly how far away the muslin drop really is, or, in fact, if it is there at all. The whole effect, if done skillfully, can be quite convincing. For situations where the cyc is being used as a background for modern dance, many designers will add a black scrim in front of it. That way, they just turn off the cyc lights and they have an instant black background for the piece about old age and death. There’s always a piece about old age and death in modern dance.
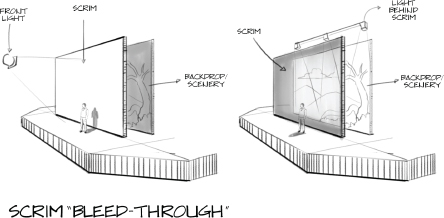
Fig.8. Scrim bleed
In both dance and drama, cycs are often lit from below with a set of footlights. This might necessitate a ground row, a short wall of flats running across the bottom of the cyc to hide the lights. The ground row can be plain black (common in the dance world), or it can be designed as part of the scenery, looking like a distant hill, some shrubbery, a fence, or whatever.
If you are considering projections, you should know that there are drops specially designed for use as projection screens. These highly reflective drops come in two main varieties—front and rear. Rear-projection screens can generally be projected on from either side, while front-projection screens are really only good for what their name suggests (for one thing, they often have seams holding together the panels of fabric, and those seams will show when a projector comes on from behind). A rear-projection screen can also make an excellent sky; try colored light coming from the front and clouds projected from the rear. You can front-project onto a plain muslin drop painted white if need be, but nothing compares with the sharpness and brilliance of a rear-projection screen. Rear-projecting onto muslin doesn’t work; you can see the hot spot of the lamp behind the screen.
Fabric
The most common fabric in the theater is muslin, which is sometimes mistakenly called “canvas.” True canvas is thicker and heavier than muslin, which makes it less useful for the stage. Theatrical muslin, sometimes called “scenic muslin,” is the fabric of choice for backdrops and covering flats. It is lightweight, takes paint well, and comes in widths up to ten feet wide. If you really need a seamless drop, you can even order specialty widths over thirty feet wide, but it’ll cost you.
Muslin is also used by the costume shop to make costume mock-ups and rehearsal clothes.
Muslin comes in flame-retardant and nonflame-retardant versions. The flame-retardant version is slightly more expensive but worth it, unless you plan on painting both sides of your drops or flats with a flame-retardant paint.
For draperies, velour is both traditional and unparalleled. It has a deep pile that looks luxurious under stage lights, it drapes in deep, thick folds, and it moves majestically when pulled aside. It is also quite dense and will not allow light to pass through from backstage, something very few fabrics can claim. Finally, a black velour curtain positively eats unwanted spill light, making it the cleanest, sharpest masking drape available. It is no accident that velour has been the fabric of choice for stage draperies for decades. All of this wonderfulness comes at a price, however. Velour is one of the most expensive fabrics available for stage drapes, and one of the heaviest. A properly sewn velour grand drape can weigh hundreds of pounds and is not something you want to put up and take down on a regular basis.
Duvateen (sometimes known as “commando cloth”) is another commonly used drapery fabric, but it is only really good for small or temporary uses. Although it is cheaper and lighter than velour, it is not very durable and doesn’t hang in folds as well. The fuzzy side, known as the nap, is a pretty good light-eater, though, so it is often used to cover openings in the scenery where a full drape is unnecessary or unavailable, say, behind a door where the audience can just catch a glimpse of the backstage area. Keep a roll of duvateen around to tear pieces off when you need a little bit of fabric to solve a masking problem.
There are dozens of other fabrics that can be used for draperies. Velour and duvateen mark the rough boundaries of the choices, both in beauty and price. Anything more expensive than velour is too expensive for the stage. Anything cheaper than duvateen probably will not hold up. Other fabrics will be a trade-off between price on the one hand and thickness, durability, and attractiveness on the other.
Besides the standard theatrical fabrics, you can also get decorative drapery fabrics, if you want a more “Vegas” kind of look.
Erosion cloth, which landscapers use to cover newly seeded areas, is a loosely woven mesh of twinelike threads. It is usually light tan and looks sort of raglike and medieval on stage. You can use it for backdrops, ground texture, or anything else that you want to look beaten-up and lowlife-like. One hint: after you pick it up from the landscape supplier, hang it up outside and beat it with a stick to get some of the dust and dirt off before you bring it inside.
Felt is a cheap way to make a wall look snazzy. Felt comes in lots of colors and in several widths. Industrial felt, by the way, is a heavier weight of felt that can be used to make props and hats.
A good theatrical supplier will also carry a line of designer fabrics. These glittery fabrics go by names like “Slit Drape,” “Sparkle,” “Shimmer Dot,” or “Glamé” and can be used when you really want a drape to call attention to itself. They range from the glamorous to the cheesy and are worth taking a look at, especially if your show is in need of some bling. Make sure that the fabric is flame retardant before you order.
Paint
Scenic artists are not housepainters, at least not by profession. Painting your house is a completely different task from painting a mystical Shanghai sunrise or a dark Parisian cathedral or an Oklahoma prairie with corn as high as an elephant’s eye. Consequently, scenic painters don’t use much house paint; they tend to use scenic paint. First of all, the paint at the hardware store doesn’t come in the vibrant colors that scenic painters need. Eggshell blue doesn’t cut it for Ariel’s undersea grotto. You need rich, mysterious forty-fathoms-down blue. Not many people want their living room that color, though, so Home Depot doesn’t stock it.
Furthermore, household paint doesn’t dilute well. This is important because sometimes scenic painters need thin washes of paint that will tint, but not obscure, the surface underneath. In some cases, they actually need the painted surface to be translucent, like a scrim or a backlit wall. Scenic paint also needs to be completely “flat,” that is, without any shine or sheen, which can be distracting to the audience.
Finally, hardware store paint doesn’t stay supple when it is painted on a soft surface, like a drop or a drape. Want an exercise in frustration? Paint a drop with household paint, let it dry, then fold it up and stick it in storage for a year. When you pull it out, prepare yourself for an avalanche of paint chips that have worked loose from the fabric. Scenic paint is designed to be flexible, even after it dries.
Having said that, scenic painters do use house paint for simple tasks like base coating and masking, but for the artistic stuff, they stick with paint that is made for the job.
When it comes to scenic paint, there is one company that rules the roost more than any other: Rosco Laboratories. After completely conquering the world of lighting filters, they turned their sights on scenic paint and came up with three different product lines: Supersaturated, Iddings, and Off Broadway. These three brands have different uses (and different price ranges), but a pro shop will most likely use all three.
Rosco’s Supersaturated paint, the one at the top of the price scale, is so rich with pigment you can dilute it with water up to 15 to 1, making it thin enough to use on a translucent drop. We use to use something called aniline dye, a toxic organic compound that smelled like rotten fish, but it has been mostly phased out. Supersaturated paint is cheaper than dye, nontoxic, and washes out with water, so there you are.
A large variety of non-aniline dyes is heavily used in the costume world, however, where even scenic paint will flake off fabrics when they are worn or washed.
Saturated paints are based on a binding agent, like acrylic polymer or polymer resin, that is saturated with a large amount of powdered artist’s pigment. Because of the large amount of pigment, you can add large quantities of water and still have strong colors. These paints are more expensive than hardware store paint, but keep in mind that cutting a gallon of saturated paint with a gallon of water has almost no effect on the color. Thus, you can extend one gallon into two and cut the price in half without even breathing hard.
The Iddings line of paint is based on a traditional binding agent known as casein, which has been around for hundreds of years. Scenic artists like it because it is extremely flat, meaning that it has no gloss or sheen, and it stays very flexible. It can even be rewetted and reworked later, which can be a positive or a negative. You can make changes to an existing paint job (positive), but if you try to paint over it, the underlying paint will become active and blend with the new paint (negative).
The other downside of casein is that, as an organic compound, it will spoil over time, making it difficult to store. All in all, casein is a valuable tool for experienced painters but probably not worth it for the casual painter.
At the low end of the price scale is the Off Broadway brand, which was specifically designed for lower budgets. Highly recommended for community and educational theater shops.
If you do get paint from the hardware store, make sure you ask for “flat latex.” This will ensure that you do not get reflections from the paint and you can wash out your brushes with water.
Painting is not just about color, however. Sometimes painting is about adding texture to a surface, or protecting it from harm, or making it shiny, or making it not slippery, or protecting it from fire. Paint treatments can do all of these things when applied properly. Here are some possibilities:
Adding Texture to a Surface
This is usually done by adding some sort of material directly to the paint and then rolling it on. Sawdust works pretty well and you can’t beat the price, but the best stuff is stucco patching powder (get it at the hardware store). This powder is used by commercial painters to patch stucco walls that have been plastered over and need to have their texture restored. It comes in three levels of coarseness, depending on how much texture you want. It is hard to get too much texture on stage, so go for the coarsest one. Stir it into the paint (follow the directions for amounts!) and roller it onto your flats. You will need two or three times as much paint to cover the same area, so get extra. Get the really thick roller pads for this job (two-inch-thick nap).
Protecting a Surface
In some cases, you might need to put down a protective layer over your paint job. This is particularly true if the show is expected to have a long run, will be heavily danced on, or has a lot of wagons rolling over it. This kind of protection is best done with clear acrylic glaze (a theatrical supplier will have it) or urethane. Urethane is a good deal tougher, but as for washing up the rollers afterwards … you may as well throw them out. It also takes longer to dry. Acrylic will require several coats over several days to really be strong and scuff-proof. Both acrylic and urethane come in gloss, semigloss, or flat. Get the flat, unless you want the floor to shine and reflect light. Talk to the lighting designer before you create a glossy floor. He will have to make changes in how he lights it, so that the audience doesn’t go blind from the glare.
For a truly Fred-Astaire, get-out-your-top-hat floor, use glossy urethane. There are lots of different varieties, so talk to the folks at the paint store. I once used one that was sold as “gym floor urethane,” and it produced the most incredible gloss I have ever seen. Get the opinion of the folks who sell the stuff before buying. As stated previously, if you use urethane, plan on throwing the rollers out, unless you want to spend the evening up to your elbows in paint thinner. Trust me, you would rather be home watching Conan.
Getting Rid of Slippery Surfaces
Plywood, masonite, and other common floor coverings are often slippery when first installed, so try to get them painted before you rehearse on them. This can be a problem, especially if you are in a situation where the technicians are building the set during the day and you are coming in for rehearsal in the evening. One night you will come in and the floor will look beautiful—wonderfully smooth and shiny with a brand new layer of raw masonite on it. Watch it! That stuff is very slippery and dangerous. Anyone in stocking feet or ballet slippers will fall. Try to find out ahead of time when the new covering will be put on the stage, and then do everything possible to see that it gets a coat of paint before you rehearse on it. This is a sticky logistical problem for everybody, since the floor will need several hours to dry. It may mean rehearsing somewhere else that night. After all, paint crews are famous for coming to work in the middle of the night, but they’re not famous for liking it.
Adding Fire Retardancy
There is no such thing as “fireproof” scenery. However, you can greatly increase the fire retardancy of all kinds of scenery by applying a fire-retardant solution, particularly if you have a bare, unpainted surface. This is true of wood frames, draperies, flats, and anything else that isn’t protected. Different materials (natural fabrics, synthetic fabrics, bare wood, and so on) require different kinds of fire retardants. Talk to your local fire department about the local regulations. Fire protection is serious business in the theater, and a firefighter is your best ally.
Not surprisingly, Rosco carries a wide range of fire retardants for various materials.
Real Things: Doors and Windows and So On
Okay, time for an exercise. Get your tape measure (you do have one by now, right?), take this book, and get up from wherever you are. Spend a few minutes walking around your house (your office, your friend’s house, your cave, wherever you are right now) looking at each door that you pass. What’s it made of? How big is it? Are there windows in it? Is there a doorsill across the bottom or is it smooth? Where is the knob? How many hinges are there? Which side are they on? Does the door swing into the room or out? Or is it a sliding door? A rolling door? A folding one? What do the locks look like? What other kind of hardware does it have? A peephole? A mail slot?
Take some time to get familiar with the doors that you encounter. Go through the questions above to remind yourself what you are looking for. Remember to measure each one. It is going to become increasingly important for you to become sensitive to how big things are, because technicians are going to constantly ask you, “How big do you want that to be?” and it will just impress the doggies out of them if you have a precise answer.
Once you have looked at the doors in your home, broaden your research. You don’t have to go to the library or buy a lot of copies of Architectural Digest. As you go through your day, just try to become aware of what kind of doors you go through.
And what about windows? They have just as much variety. They push up like sashes, swing out like casements, and slide open like French doors. Some of them are even round, for Pete’s sake. Take your tape measure to a few, just to get an idea.
What’s the point? The point is, if you’re going to put replicas of real things on stage, you’d better take some time and start looking at what real things look like. Nothing is more valuable in the theater than the ability to keenly perceive the world in all its aspects: mentally, emotionally, and physically. There are other people in the world who can help you with the first two. I’m here to help you with the third one. And although it may seem like an inconsequential thing to you, a little awareness of the infinite variety of everyday items like doors and windows can go a long way toward the creating of something beautiful onstage.
Designing and building doors and windows is a complicated process for two reasons: First, as I said, doors come in almost infinite varieties, and finding the right one takes some effort; and second, because they are practical, that is, they have to really work. “Practical” is a general term for anything, from a faucet to a window that is actually operated by a performer. Building something that is practical is a great deal different (and more expensive) from building something that is only decorative.
When you tell a technician that you want a door or a window, here’s what he will want to know:
• Is it really practical? Does it have to open and close, or is it only decorative? A window that is built “nonpractical” is completely different from a practical one. A practical one is much more complex and expensive, so designating a window as nonpractical can save a lot of time and money. Unfortunately, once the window is built nonpractical, it cannot be changed without rebuilding the entire piece, so, if you are in doubt, have them build it to be practical. The worst thing that can happen is that the practical windows sit there unused during the run, a fact that won’t make the guys in the shop happy, but they’ll get over it. Of course, if you waste their efforts fairly frequently, they may stop asking you and start nailing the windows shut, so try and do your homework and give them the right information to start with.
• What kind of door is it? As I said, there are lots of choices here: swinging, double, rolling, sliding, folding, screen, French, Barn-style, Cross and Bible, the list goes on and on. This is where you really benefit from your research. You don’t have to know them all (there are thousands), but the more you know, the more the tech people can help you. When working with a set designer, try looking through some architectural books and magazines for doors and windows that fit your ideas for the show.
• How big is it? Standard household doors are about two feet six inches (76 cm) wide by six feet eight inches (203 cm) high (have you measured yours yet?), but there is a great deal of variety out there. Interior doors between rooms are smaller than the front door of the house. Closet doors are even smaller. Doors were smaller in older houses, but that was partly because the people were smaller, so you may not want to duplicate them exactly. You may also want to consider wider doors to accommodate period dresses, men with swords, actors in soap bubble costumes, whatever.
Fig.9. Different ways to hang a door
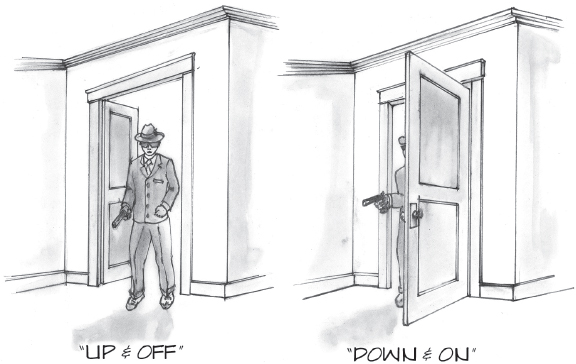
• If it is a swinging door, which side are the hinges on, and which way does it swing? This is a really important question for everybody. A general rule is that doors open up and off. This means that the hinges are on the upstage side, and the door opens toward offstage. A door hinged on the upstage side will cover the sight lines better, and a door that opens offstage will not block an actor entering. Of course, you may decide to break this rule for some reason—a murder scene where an unidentified arm reaches out from behind the door with a pistol, that sort of thing—but as a general rule it holds. Which way the door swings also determines whether the door has be “finished,” that is, painted and decorated, on one side or both sides. If the audience sees both sides, you gotta paint both sides.
• What does it look like? This is where the designer really comes in, but as I said, the more you know … Does it have a window in it? What kind of doorknobs? Plain or ornate? You get the idea.
• What kind of abuse will it get? Any carpenter worth her tool belt can build a stage door that can be closed good and hard, but I know a lot of carpenters who have seen their hard work slammed to smithereens because they weren’t warned ahead of time that the door would have to put up with that kind of abuse. Actors can get very physical on stage and technicians can certainly accommodate them, but the shop needs to be told ahead of time what is expected. Saying, “By the way, Nora is really going to slam that door hard at the end,” can save a lot of tech-week grumbling.
Moving Stuff Around: Gripping, Rolling, and Flying
If you’re doing a show that takes place in a one-room box set and you don’t have a dream sequence, then you probably don’t have to move the scenery during the show. Lucky you. Everybody else will need to think about how they are going to move the set pieces around. Actually, watching a set move and transform into a different location is one of the really magical things about technical theater, so, if you think it through carefully, you can create a set change that adds to the magic of your show, as long as it doesn’t take too long. No matter how beautiful your scenery is, if the audience has time to read the entire program between scenes, the effect of the show will be lost.
A slick, well-choreographed scene change, however, can add life and vitality to a show, keeping the pace and emotion alive from scene to scene, but keep it as simple as possible. When you think about moving scenery, ask yourself this question: “What is the fastest, smoothest way to get from this scene to that scene?”
Fast and smooth doesn’t always mean elaborate or expensive. In fact, it often means just the opposite. In a world of motors, hydraulics, flying hardware, and automation, remember the scenic adage: There’s no tech like low tech.
As suggested by the title of this section, scenery-moving techniques fall into three categories: gripping (moving any direction in the hands of a technician), rolling (moving horizontally on wheels), and flying (moving vertically on cables). Before we discuss the specifics of each technique, let’s decide which one we need. Here are some questions to help you decide which way to go:
• Do you mind seeing technicians? This is a stylistic question and must be answered by the director. We depend on the audience’s willingness to suspend their disbelief, and that willingness can be taxed by the sight of a technician gripping something offstage, even during a darkened scene change. On the other hand, let’s not sell the audience short. The audience knows that they are sitting in a theater and they know that there are technicians backstage, so seeing one is not going to explode anybody’s myth about what’s really going on. Stylistically, however, during emotionally intense shows, it may be better not to force the audience to disconnect from the story. A visible technician may have that effect.
Sometimes, the scene change can be choreographed into the show, and the crew can be given costumes (be sure to warn your costume designer early on). This is particularly effective in big musicals, large-scale period pieces such as the Shakespearean plays, and musical revues. If you want the scene change to be truly “magic,” however, and you don’t want to see the crew, then you will almost certainly need rolling and flying scenery that is operated from offstage.
• What kind of a theater do you have? It doesn’t make sense to spend a lot of time talking about flying scenery when you don’t have a flying system or a fly space. Or storing it backstage when you don’t have any wing space. Go take a look at the theater and talk to the technicians. Go through Chapter 2 and answer as many of the questions about touring a new space as you can. Pay particular attention to what kind of machinery is hanging overhead, and how much wing space is available.
• How big is the scenery? There is a limit to how big of a piece you can fly. Flying systems are generally set up with lots of pipes, or battens, hanging parallel to the proscenium arch, which means that they are very good at picking up scenery that is also hanging parallel to the arch, like drops. There have been a lot of attempts over the years to design more flexible flying systems, but all of their cleverness and flexibility has faded before a tough reality of show business: there is rarely enough time to make an entirely different setup for every production. In order to survive the pressures of money, time, and space, we live by standardization, and standardization means that battens are parallel to the proscenium.
What you can fly also depends on how much space you have available above the stage. Remember, you have to have storage space overhead for anything that flies out. If you want to fly out a thirty-foot-high drop, you must have thirty feet above the masking to hide it. There are tricks that technicians use for folding, or tripping, scenery as it flies out, but those tricks can be complicated and time consuming.
• How fast does the scenery have to move? Flying is hands-down the fastest way to move scenery, so if speed is the greatest concern, think about taking the scenery up in the air.
• How heavy is it? There is a limit to the weight that a flying system can handle. There is also a limit to what a technician can move by gripping, so if your scenery is very heavy, consider rolling. Once in my life, I supervised the flying of an actual covered wagon, and I will never, ever try it again. Flying scenery should be light.
• What’s the big picture? All of your decisions about moving scenery will be affected by other, larger concerns. How is the show designed as a whole? What other pieces are moving and how? Is this show part of a rotating repertory, where sets for other shows must be stored and played on in the same theater?
Gripping
Gripping scenery means just what it sounds like: somebody walks out on stage, grips the scenery in her own hands, and moves it. We spend a lot of time in the design process devising magic movements of scenery, trying to impress the audience with our cleverness, but it is not always necessary. Human beings are remarkably adaptable, capable creatures, and they should be used whenever possible. I have spent countless hours devising effects, only to see the machinery get replaced with a stagehand walking out and picking up the scenery. Once again, “There’s no tech like low tech.”
Of course, gripping scenery is not without pitfalls. If you follow these simple rules, however, you can enjoy years of trouble-free gripping:
Walking up a flat (lifting it up to a vertical position) is a basic skill that every show person should know. First, tip the flat up onto its long side. Then, one person foots the flat by pushing his foot against the bottom corner, while the other person lifts the other end of the flat and walks toward the first person, lifting the flat higher and higher as she walks. The first person’s foot keeps the flat from skittering away, and before you know it, the flat is upright.
Carrying a flat is just as simple but it has a critical rule, known among my friends as “Bernie’s rule,” since we all learned it from Bernie Works, the all-knowing teacher of technical theater at the University of Illinois, Urbana-Champaign. Professor Works is legendary the world over for his constant invocation of the phrase: “One hand high, one hand low! That’s what makes the scenery go!” Each person should reach up as high as possible with one hand and as low as possible with the other. Furthermore, you and your partner should mirror each other. If you have your left hand high, then your partner should reach up with his right. If you both reach as high and as low as you can, and you mirror each other, you can move surprisingly tall flats with little trouble.
Beyond these simple rules, gripping scenery is a matter of common sense, but since we all know that common sense is not so common, here are some things to remember:
• Lift with your legs, not with your back.
• When you have to change direction, turn your whole body. Don’t twist.
• Get enough people. Don’t be a hero. Heroes sit around discussing old wars when they get old because they don’t have the muscles left to do anything else. Stay young, stay mobile, get someone to help you.
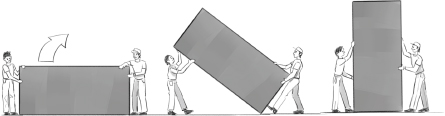
Fig.10. Walking up a flat
What if your scenery is too big or too heavy to grip? Answer: consider using mankind’s second oldest tool (after the flashlight)—the wheel.
First, let’s get our terms straight. A rolling scenic unit is called a wagon, and the rolling thing you attach to make the wagon move is called a castor, not a wheel. A castor contains a wheel as one of its parts, but the whole piece of equipment is called a castor.
Castors come in lots of shapes and sizes, from the small furniture castors on a rolling desk chair to the giant ones underneath your garbage dumpster, but there are two distinct groups of them: swivel (also called rotating) and straight-run (also called fixed). The difference is just what it sounds like: the swivel ones are free to rotate and turn in any direction, and the straight ones are locked down and will not rotate. Stage techs often refer to swivel castors as “smart” castors (I guess because they can head off in any direction they choose), while straight castors are called “stupid” castors (because they can only move forward and backward).
Wagons can use straight-run (fixed, “stupid”) castors if they only have to move forward and backward. This is called, not surprisingly, a straight-run wagon, and it is the easiest type of wagon to use because it addresses both of the two major problems with using wagons on stage: getting them to go where you want them to go, and getting them to stay there. Straight-run wagons, since they are relatively incapable of moving from side to side, are the easiest to steer into place. They roll out, they roll back. End of story. They are also easier to keep in one place, since you only have to keep them from moving in two directions: forward and back. Straight-run wagons sometimes have a metal blade, called a knife, which sticks down into a groove in the floor to keep the wagon on track.
Next time you go to a professionally produced, Broadway-style musical, take a look at the floor. Unless you’re seeing The Fantastiks (the simplest musical ever produced), the floor will probably be crisscrossed with slots. These are the tracks that the wagons will be following. Try predicting where the wagons will end up. Amaze your friends.
Unlike straight-run castors, swivel castors can move in any direction you want. The bad news is, they can move in any direction they want. They are more difficult to drive and more difficult to keep in one place, but they offer more flexibility.
You can also consider using both types of castors on the wagon, swivel castors on one end, and straight-run on the other. This produces a wagon that is only steerable on one end, like your car. Wagons sometimes have this combination for the same reason your car does: it is easier to steer a platform that only has rotating castors on one end. Unlike your car, though, a wagon should have the rotating castors on the rear, not on the front. This makes the platform easier to steer when being pushed from the back, particularly when maneuvering in tight spaces.
There are other kinds of rolling wagons that show up from time to time.
Let’s say you are doing Noises Off, the hilarious farce by Michael Frayn that follows the antics of a touring theater company as they attempt to present a production of Nothing On, a dreadfully flat comedy about … well, it’s never quite clear. Of course, the real comedy comes from the various antics of the cast and crew as they deal with romantic triangles, drunken stars, and a continually misplaced tray of sardines.
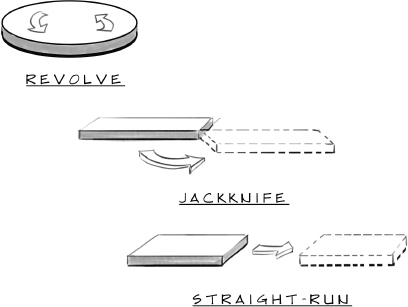
Fig.11. Different ways platforms move
Act One of this comic corker takes place on the set of Nothing On, where we see the show as an audience should see it. Act Two, however, takes place behind the very same set, where we see the frantic attempts to keep the show on its feet as the various backstage dramas unfold. Act Three goes back to the front of the set as the show disappears into a hilarious theatrical nightmare.
So, how to present this farce-within-a-farce, seen from both sides of the same set?
Enter the revolving stage, also known as a turntable or, more often, a revolve. Seen from above, the revolve is cut in two, with the set running down the middle. The front of the set faces the audience during Act One. Then, during the scene change, the revolve makes a half turn, bringing the back of the set around to face the audience. After Act Two, the revolve does its thing again, bringing the front of the set around to … um, the front. Hilarity ensues.
Of course, there are lots of other places you will see revolves, particularly if you attend a modern large-scale musical. Revolves help complex set changes happen faster, so you will see them in high-budget shows like Les Misérables, Wicked, and Spider-Man.
Revolves require a major scenic commitment: difficult and expensive to construct, they are notorious for bogging down tech rehearsals and breaking at key moments. Nevertheless, there is a time and a place for them, so long as you have the money and, most important, the knowledgeable staff to handle them.
One of the trickiest things about revolves is that you have to bury some of the machinery for them under the stage itself, which means that you have to build up the entire stage deck to a higher level, even the parts that aren’t moving, so that there is room under there for the gears, motors, cables, and what have you.
Techies call this a show deck, as opposed to the house deck, the permanent part that was there when you first moved in. Many large-scale touring shows will have a show deck, whether or not they have a revolve, and the first thing they do upon arrival is lay it down over the house deck. The show deck provides a solid, predictable place to attach all the other scenery, so it makes for a quicker setup.
Of course, revolves don’t have to take up the whole stage. They don’t even have to be a full circle. One special kind of revolve pivots around one end: a jackknife platform. Some sadistic designers even put revolves in the middle of other revolves, but now we’re getting out of hand.
As I said earlier, flying scenery goes back to the sailors who were brought in to rig the Italian Renaissance theaters in the 1500s. Actually, it goes back even further than that: right back to the Greek theater a thousand years before Christ. Some Greek plays ended with the entrance of gods who appeared to magically untangle whatever knots the mortals had tied themselves up in. Using their divine powers, they would restore heroes, punish villians, unite lovers, even bring people back from the dead. These gods often entered in a flying box lifted over the set by a giant hand-operated crane, called a machina. The effect became known as a deus ex machina (literally, a “god from the machine”), a phrase that survives today as a term describing any late-entering character who comes with near-divine powers to punish injustice and repeal injury.
The actual machinery that we use today, however, is descended from the Renaissance. The sailors designed a system, known today as a hemp flying system, which was extremely flexible and survived well into the twentieth century. The hemp system consisted of hemp ropes running from the scenery to an overhead grid, where they ran over pulleys, known as blocks. The ropes traveled across the grid, went over more blocks, and then dropped down to the stage level where they were attached to sand bags and tied off to the pin rail. The sandbags provided weight to counterbalance the scenery so that it could be pulled up and down without difficulty. The hemp system was so flexible because the pulleys could easily be moved around, and ropes could be dropped just about anywhere. Once all the ropes for a given piece of scenery were brought up to the grid and down to the pin rail, they were all tied together and attached to the sandbag as one. Thus, one person could move a large, heavy piece of scenery without much difficulty.
The problems with hemp systems were twofold. First, all that hemp rope had a tendency to stretch out, so things had to be readjusted all the time. If the theater was dark for a couple of days, all the lines had to be carefully tied off to prevent slippage. (Theater trivia note: all this tying-off led to the creation of a special knot called a “Sunday,” used to tie off the lines after the Sunday show, the theater being dark on Monday night. The term persists today—if a stage tech wants you to tie off a line temporarily, he will ask you to “put a Sunday” on it.)
The second problem with the hemp system was that it required highly skilled operators. Even with the best technicians, accidents still happened. (How many murder mysteries have you seen where the tenor is offed by a sandbag?) The problem was knots. A hemp system required the constant tying and untying of many different kinds of knots. Knot tying was a life-or-death skill to Renaissance sailors, and they knew what they were doing. In the modern theater, however, a properly tied bowline knot is as rare as a clean-shaven poet. In the absence of this skill, hemp becomes a dangerous, accident-prone system. Furthermore, even well-treated rope degrades over time, becoming brittle and weak.
The first thing that had to happen, therefore, was a switch from rope to a stronger, more durable material: aircraft cable, so called because the main use for it before theater came along was connecting the controls in an airplane cockpit to the various surfaces (rudder, NAME, and so on) that steer the plane.
Changing from hemp rope to cable meant rethinking and redesigning the entire system. After all, cable couldn’t be tied and untied all the time; it had to be permanently attached. And what about all those sandbags? How could weight be attached to the system without endangering anyone? It took some time, but, in the end, the Grand Theater Thinkers came up with the system that the western world uses today: the counterweight flying system.
Conceptually, the counterweight system is built on the same idea as the hemp system: tie a line to the scenery, send it up over a pulley, across the grid, over another pulley, and down to an operator who attaches some sort of counterbalancing weight to it. How all of that is accomplished, however, is substantially different.
First of all, the scenery is attached to a batten. This batten is lifted up by a group of cables called the pickup lines. Okay, get it out of your system: you always thought that a theatrical pickup line was something like, “Is this a dagger I see before me, or are you just happy to see me?” Small theaters may have only three pickup lines; a larger one, as many as seven. It all depends on the length of the batten.
All these lines go up to the grid, where, just like the hemp system, they go over blocks, travel across the grid, over more blocks, and then turn downward. Instead of sandbags, though, the lines attach to an arbor, a metal cage that travels up and down on a track. Rather than tying off sandbags to the lines, the technicians just pile counterweights (also known as bricks) into the arbor to counterbalance the weight. The battens and the pulleys that go with them are installed in permanent locations, and the arbor slides up and down a permanently installed track. No knots to tie and no rope to stretch.
There are two places, called rails, where the technicians go to operate a counterweight flying system. In a hemp system, the ropes were tied off at a pin rail off to the side of the stage. When the piece was first rigged, the call of “Meat to the Rail” went out, and everybody hauled out the piece. When the scenery was in the air, the sandbags were attached at ground level.
As the cables and arbors of the counterweight system were appearing, so was another innovation: the loading rail. Rather than bring the arbor to the technicians, the technicians now go to the arbor, climbing up to the grid while the batten is still on the floor.
Safety Alert! Although loading bricks into an arbor is less dangerous than using a hemp system, even the best technician gets sweaty hands now and then. When weights are being loaded above, keep everybody out from underneath the loading rail! Before loading weights, the technician above should shout, “Clear the rail!” Once everyone is safely out of the way, the technician in charge underneath should shout, “Rail clear!” Only then should loading begin. The rail should remain clear until the technician above yells, “Loading complete!” Stay alert! A forty-pound counterweight dropped from the grid will go through you, the floor, and anything else between it and bedrock.
Once the weights have been loaded, the lines are actually operated from the pin rail, now renamed the lock rail because it holds the locks that keep the scenery from moving at the wrong time.
Cable has replaced rope on all the weight-bearing lines in a counterweight system, but it is not much fun to grab onto. So, hemp rope is still found in one place: on the purchase line. Purchase is a strange word in the theater—it shows up all over the place. Besides the meaning that everybody is used to—heading for the mall with a credit card—it also means being able to hold on to something. If you can “get purchase” on a line, you can grab it hard enough to pull it. The purchase line, then, is the part of the counterweight system that you actually grab onto and pull. The purchase line is attached to the bottom of the arbor, so when you pull down on it, the arbor comes down, as well. Because the arbor is coming down, the scenery will start going up and voilà! You’re flying.
The purchase line is not just attached to the bottom of the arbor, though. It is actually a loop from the bottom of the arbor, down through your hand, through the lock, through a pulley on the floor, back to the grid, and down to the top of the arbor.
This means that when you look at the lock rail on a counterweight system, you will see two purchase lines, one in back of the other. The back one is hanging from the arbor, so pulling that one brings the arbor down (and the scenery up). The front one is attached to the top of the arbor, so pulling that one brings the arbor up (and the scenery down). The rule is, the front rope does whatever the scenery does. If the front rope is going up, so is the scenery, and vice versa. Still can’t keep it straight? Try this: “the Front rope Follows the scenery.”
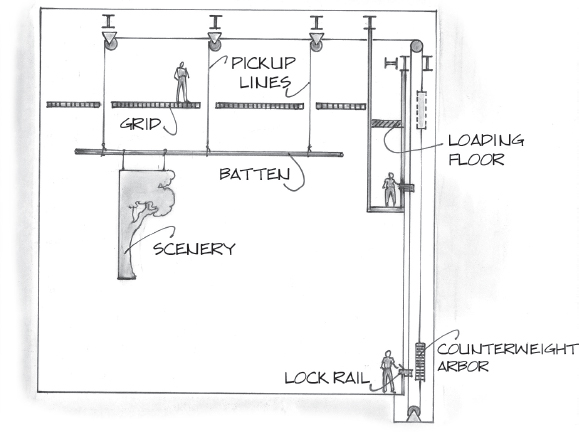
Fig.12. A counterweight system
The whole kit and kaboodle—batten, lines, blocks, arbor, and purchase line—is called a line set. Technicians often talk about the capacity of a flying system in terms of how many line sets it has: the more line sets, the more individual things that can be flown.
When a designer creates a set, she will also write out a line schedule, a list of what goes on which line sets. Besides scenery, this list will also show which line sets hold draperies and lighting instruments.
The Backstage Survival Guide to Scene-Change Choreography
Gripping, rolling, and flying are all possibilities when moving scenery around. No matter how you have it set up, though, you still need to take some time before tech rehearsal to work out who does what and when they do it. All this information should appear on a shift plot, like the one shown on the following page.
Scene changes don’t just happen. They require planning, forethought, and as much choreography as a dance number, especially if they are done a vista, or in front of the audience. Here then, are some things to remember when choreographing your scene change:
• Try not to use the actors. People are often tempted to get away with fewer technicians by having the actors move scenery around, but I try and talk them out of it. Having actors involved in a scene change can lead to mistakes. Actors aren’t stupid, just preoccupied. After all, they have a lot to think about—lines to remember, characters to develop, movements to perform—all the time trying not to bump into the furniture and wondering if they remembered to zip their fly. I say, whenever possible, let the actors be the actors and let the crew be the crew. The exception? Actors with one-line, walk-on parts. Scene changes keep them from getting bored.
• In general, flying scenery moves first and last. The order should be: old flying scenery goes out, then old rolling and gripped scenery goes out, then new rolling and gripped scenery comes in, then new flying scenery comes in. This way, the flying scenery is clear of the rolling scenery and the moving people for as long as possible, making it less likely that something will get tangled or somebody will get bopped on the head.
• Don’t run. Speed is important, but so are accuracy and safety. With practice, a good crew will achieve a swift yet controlled speed that never appears rushed but still gets the job done quickly. If your scene change is visible to the audience, or a vista, keep something happening on stage all the time. A well-choreographed shift can be a treat for an audience, giving them a “behind the scenes” feeling and, if the shift is really clever, adding to the magic of the show. If you are going to do it, though, give the audience something to watch throughout the shift. If there is nothing visible happening on stage, the audience will think the shift is over and begin to wonder why the show hasn’t started.
• Never have anyone on stage doing nothing. An extension of the previous rule. Even if someone has to wait for something else to happen before they can do their job, have them wait in the wings. An idle person on stage makes the audience wonder: “Why is he just standing there?”
• Don’t take too long. Obviously, make it as short as possible. As a general rule, try and get your shift down to under thirty seconds. That’s still a long time, but an audience will sit still for that, especially if they can watch (and you have music playing). If you are doing a musical and have a pit orchestra to play during the shift, you can get away with a little bit more time, but if the shift goes over a minute, you’d better be prepared to sell popcorn (if not drinks) between scenes.
• Be sensitive to the pace and the subject matter of the show. This one is best illustrated by a story. One of the worst scenic mistakes I ever made was during a show called For Benson, at the Height of His Career, an original musical for which I designed scenery at Brown University. Toward the end of the show, there was a funeral scene, complete with an ornate black casket on a marble slab center stage. The next scene was down left in a pool of light, where a narrator spoke, tying up the last threads of the show. During the narrator’s monologue, the stage had to clear completely, since he was supposed to exit through an empty theater. The casket was big and bulky, but not too heavy. Since we did not want to see technicians onstage during the show, I decided to fly the whole thing out, slab and all. It sounded like a fine idea during the build and even through tech week. It wasn’t until the resounding laugh from the audience on opening night that we realized that the sight of the casket “flying up to heaven” after the funeral just wasn’t going to work. So, be aware of the moments before and after the shift as well as the general pacing of the show. You don’t want to come on like gangbusters when the next scene is a lullaby.
• Use your intermissions. They are gold mines of time—at least ten minutes when the audience is not really paying attention. You can also get away with making more noise during intermission. Don’t just think about the next scene, either. Try and use the intermission to set up anything else that you can. Playwrights, take note: if you must have huge scene changes, try and put the biggest one during intermission. Whether or not you are the scene-change choreographer, here’s one rule that everybody in the theater should pay attention to:
• If it doesn’t work at first, don’t freak out. It always requires several tries to get it right, and the shift will get faster every time. The crew and their chief should constantly be on the lookout for ways to speed things up:
• Is somebody standing around for a moment with nothing to do?
• Could something move faster if an obstacle were removed?
• Would it work better to do things in a different order?
• Could things that travel together be attached to one another?
• What else can we do ahead of time?
• How about attaching wheels to something that’s being gripped?
• Can any offstage changes be put off until after the scene starts?
• Listen to the crew, right down to the lowest ASM. They may have suggestions that will speed things up. Most of all, remember: there is not a crew in the world who will do it perfectly the first time, and some of them won’t even come close. With practice, however, speed will probably increase dramatically. So, if it looks impossible at first, don’t despair. Take a deep breath. This is fun.
Playing with the Audience: Special Effects and Illusions
Just in case you haven’t yet picked up my feelings on the matter so far, let me say as clearly as I can here: there is no greater effect than a well-crafted script and no greater illusion than fine acting. No amount of fog or fire or strobe lights will ever save you if the basic show itself is faulty. So don’t look in this chapter for quick fixes, and for God’s sake, don’t start here. This stuff is the frosting. Make sure your cake is more than half-baked before you start frosting it.
Now that I have that out of my system, there are several simple effects that people can (and do) use all the time.
Magic Disappearances
When it’s time for Dracula to make his exit in a puff of smoke and a whir of bat wings, it is probably time for a counterweight trap. This nifty little device is a small lift, built into the stage and painted to match the rest of the floor. Under the stage is an arbor full of weight that matches the actor’s weight. The lift and the arbor are mounted on either end of a long lever, which can be easily moved up and down when the actor is onboard. If the effect is a disappearance, the actor steps onto the lift onstage, the lock is removed, and the stagehand moves the lever so the weight goes up and actor comes down. The actor steps off the lift, it flies back up to seal the hole in the stage and is locked in place. Alternatively, another panel can slide in from the side to fill the hole in the stage. It can all happen very fast, and with a puff of smoke and a light cue, the audience will never know what hit ’em. Obviously, for a magic appearance, you do the reverse.
Note that a counterweight trap can be hazardous to your health, so it should only be constructed by experienced technicians who know how to build it safely.
Fire
Real flames, like real running water, seem to have an almost magical effect on an audience. It is almost as if, up until the flame is lit, the audience has just been playing along, like benevolent parents. Suddenly, the real flame appears, and the audience realizes that the kids weren’t just playing around: they actually put something real onstage.
Real fire onstage can range from a single candle to giant propane-fired torches. Unfortunately, I can’t go into much depth in this area because of the great differences in fire regulations throughout the country. What is acceptable in one state may be unheard of in another. When I went to work at Seattle Rep, I was amazed to see a prop brazier on stage with flames a foot high jumping out of it. In Illinois, where I attended grad school, any flame at all—even a candle—required a fire inspector’s visit and a crew member stationed on each side with a fire extinguisher. Local fire laws and their application are usually a function of history. If the theater business in a particular area has a good safety record, fire laws tend to be more relaxed. If, however, there has been a large disaster in the past, the laws (and the inspectors) are a good deal tougher. In 1903, the horrendous Iroquois Theater fire killed over a thousand people in Chicago, mostly because the theater owners had ignored local codes and commonsense practice. (Among other things, the descent of the lifesaving fire curtain was blocked by improperly placed lighting equipment.) This completely preventable tragedy caused the state’s fire regulations to be overhauled and strengthened. Even now, over a century later, the fear of another disaster remains deeply rooted in the local consciousness.
The reader should not interpret the above, however, to mean that fire safety should only be maintained to the limit of local regulation. On the contrary, it is up to us to protect the performers and the audience at all times. If you are thinking about using a flame onstage, contact the local fire authorities to find out what the regulations are. Anytime a flame is used, fire extinguishers should be readily available on both sides of the stage, with crew members standing by them.
In any case, it is highly recommended that you maintain a positive relationship with your local fire department inspectors. Remember, they do have the ability to shut you down—a possibility that should not be taken lightly. More than that, though, you should consider this relationship to be a partnership, the outcome of which should be the safety of everyone in the theater. There is no compelling reason whatsoever to put performers or audience in a potentially dangerous situation, and the fire department can help you avoid doing that.
If you make the very logical decision to fake a fire effect onstage, there are several ways to go. Silk flames are a longtime theatrical tradition. This effect is created by tying pieces of red and yellow silk to a fan buried in a fireplace. When the fan blows the silk up in the air, the effect is rather remarkable, particularly if you light it from beneath. Disney has been using this effect in the Pirates of the Caribbean ride for almost fifty years. Several lighting effect companies market commercial forms of this effect as well.
If you just want to fake the light coming from a fire, you can invest in a flicker generator, a nifty little device that flashes a series of red, white, and yellow lamps in a random series, creating a believable flicker that makes you want to get out the bearskin rug. This effect can also be done by combining several chase effects on a computer lighting console.
Look in Chapter 5 for other ways to fake firelight.
Smoke, Haze, and Fog
These three effects are often confused with one another, but they are actually three very different processes and results.
When theater people say “smoke,” they mean something that billows in the air, tends to rise over time, and is clearly seen. When they say “haze,” they mean a substance that makes the air itself catch light but is not really visible in itself. When they say “fog,” they are talking about a colder-than-air substance that hugs the ground. Smoke rises, haze floats, fog stays on the ground. The three effects require different processes to create.
Smoke is fairly easy. Rent or buy a commercial smoke machine, fill it with fluid (often, confusingly, called “fog juice”), plug it in, wait for it to heat up, and then push the button. Whoosh! Smoke fills the air. Smoke machines use a fluid that is, somewhat disingenuously, referred to as “water-based.” In fact, around 15 to 20 percent of the fluid is an organic compound known as glycol, which, when heated and vaporized in the machine, creates the smoke effect.
There have been several large studies in recent years about the safety of glycol-based fluids in theatrical use, most notably by the Professional Lighting and Sound Association (PLASA) and Actors’ Equity. The studies have basically shown that extensive exposure to glycol fog, while not toxic, can irritate mucous membranes, such as eyes and lungs, and should be limited. Check the websites of these organizations for details, particularly if your show has high smoke volumes or a long run.
Smoke machines come in different sizes and are rated by how many cubic feet of smoke they put out. For most applications, a 1500 smoke machine will be adequate, unless you want a lot of smoke. There are smoke machines large enough to fill a gymnasium, but these are used more often to train firefighters and airline flight crews than for the stage.
If you are using a smoke machine, make sure you allow yourself enough time to let it warm up. Ten to twenty minutes should be adequate. Make sure you test the machine in rehearsal with all of your air-handling equipment (heating, ventilation, air conditioning) operating as they will be during the show and with all the stage lights on. Lamentably, between the ventilation blowing through the house and the hot lights over the stage, smoke has a tendency in most theaters to flow out into the audience. You may want to consider using fans to keep it on stage, or even a low-tech solution like a stagehand waving a sheet of cardboard in the wings. Also, try opening a few doors backstage. Experiment. Adjust the airflow any way you can until the smoke goes where you want it to. Most machines also let you alter the rate at which smoke comes out, so play with that as well. Smoke is tricky stuff sometimes, and it can have a mind of its own. Of course, when you get an audience full of warm-bodied people, the smoke may decide to go someplace else entirely.
Finally, a trick: if you are using smoke for the beginning of a scene and the curtain is down before it, pump the smoke into the air a few seconds before the curtain opens and then have a technician run through it right before the curtain goes up. The audience will be treated to a swirling cloud of smoke that will seem to have a life of its own. Pretty cool.
Sometimes, instead of billowing smoke, you just want a hazy atmosphere that will show off beams of lights and/or lasers. For this purpose, you want a hazer, a device that continually puts out a stream of particles that disperses evenly throughout the theater. Get it going thirty minutes or so before the show, and you will be rewarded with a dusky mist that will show off the beams of light, particularly those coming from upstage. Most hazers use a glycol-based fluid, similar to smoke fluid, that can leave a sticky residue on floors and equipment over time; but a few years back, the Le Maitre company released a new haze fluid that is actually made from sugar, so I recommend checking that out.
Unlike smoke, fog lays on the ground, well away from the eyes and mouth, so it won’t prompt the coughing reaction. It does, however, have problems of its own. The most popular way to create fog is to heat up a barrel of water and then drop dry ice into it. The dry ice, which is actually frozen carbon dioxide, vaporizes in the water and produces a colder-than-air fog that flows out of the machine and crawls across the floor like a passing vampire. A fog machine (which you can rent, build, or buy) is a fifty-five-gallon drum with a heating coil in the bottom to keep the water warm and a fan on top to blow the fog out. A fog machine is bulky and must be kept plugged in, since the water must be constantly heated. If the water is not constantly heated, the effect will last just a few seconds because the intense cooling effect of the dry ice will cause the water to lose all its heat rapidly. If you only need a few seconds, you might be able to get away with dropping the ice into a pan of hot water, but the effect will be ultrabrief. Even with a proper machine, the effect will gradually fall off, since the heater coil in the bottom of the drum can’t keep up with the dry ice. Fog is best used to create an impressive opening to a scene, and then to add a little atmosphere as the scene goes on.
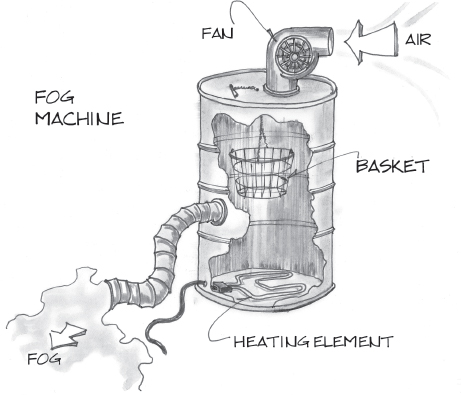
Fig. 14. A fog machine
Besides getting the machine, you will also have to get hold of the ice itself. There are two places to get it: ice companies and welding supply houses (dry ice is used to quickly cool metal that has been welded). Dry ice is not expensive, but you usually have to buy it in thirty-pound to fifty-pound blocks. Even though you’ll only need a few pounds every time you do the effect, you’ll need to buy a new block every two days or so, because the remainder will melt away. You can slow down the melting process a little by placing the ice in a cooler or some other insulated space; but, basically, dry ice is so cold that, no matter where you put it, it won’t stay cold enough to prevent melting. Don’t put the dry ice in your freezer, either, or everything else in there will become a solid block of ice and be ruined. Believe me. I’ve tried. If you are going to use dry ice, plan on getting a fresh supply every other day or so.
The other problem with dry ice is handling it, but I’d better say this emphatically:
Safety Alert! Dry ice is much colder than ordinary ice, and it can adhere to your skin and burn you. When handling dry ice, never let it touch your skin! Use gloves whenever handling it and keep it away from children and animals.
Operating a fog machine is relatively simple. Take out a chunk of dry ice about the size of a cantaloupe and break it up into golf ball–sized chunks. The more surface area you provide, the faster the ice will vaporize, and the more fog that will be produced. This theory should not be taken to extremes. I know of one technician who completely chopped the ice into dust and threw it into the hot water. It produced so much fog that it blew the fog machine’s heavy metal top twenty feet straight up in the air. It became known as the “Orville Redenbacher” effect and was not repeated. Keep the chunks between golf ball and baseball size, and things will go smoothly.
Fill the basket with dry ice, close the lid, drop the basket, and be prepared for a big whump! as the machine begins to spit out fog. Depending on how small you chopped the ice, and how hot you are keeping the water, the result could be anywhere from an anemic little puff of fog to a ground-eatin’, actor-chillin’, Hunchback-of-Notre-Damein’ fog fest that folks will talk about all year. As with all effects, E-X-P-E-R-I-M-E-N-T.
Two other ways to get fog are a cool fogger and liquid nitrogen. A cool fogger uses both fog juice and CO2 to produce chilled smoke. This effect is halfway between a theatrical smoker and a dry ice machine. In fact, it is sometimes called “low smoke.” It works well but is the most expensive of the do-it-yourself options, both because the machines are expensive and you have to provide both fog and CO2.
Liquid nitrogen, or LN2 (pronounced “ell-en-two”), is not a do-it-yourself option. It is dangerous to handle and should only be handled by trained technicians. It’s also very expensive. It creates, however, the most spectacular effect. Liquid nitrogen vaporizes even more dramatically than dry ice, producing a cloud of low fog that would put the entire city of London to shame. The effect is produced by spraying LN2 out into warm air, using valves that are specially designed to handle both high pressure and extreme cold. Sometimes this stream is combined with a blast of steam for maximum effect. If you see a huge, billowing cloud of low fog in a film or a theme park, you are probably looking at LN2.
One final safety note: if liquid nitrogen is being used in small, enclosed spaces, great care must be taken to ensure that concentrations are not too high where people are present. LN2 displaces oxygen, and, in a small space, this can cause loss of consciousness. As I said, this is a spectacular effect that should be left to trained pros.
Breakaway Glass
Breakaway is a general term for anything that has to break, or appear to break, on stage. Breakaway glass bursts easily into hundreds of tiny pieces without sharp edges. Breakaway glass is sometimes called “candy glass,” because it used to be made from sugar. For some reason, breakaway glass is always depicted in the theatrical supply catalog as beer bottles being broken across a cowboy’s head. I guess the barroom brawl is a necessary part of every Western. Breakaway glass, however, is available in lots of different styles, including bottles, glasses, and plates and can be purchased from a theatrical supply house. It has two problems: cleanup and expense. Because it bursts into so many pieces (sometimes almost like dust), it is tiresome to sweep up (particularly during a darkened scene change).
As far as the expense goes, be sure to check out the price before you commit yourself to the effect. If the expense is too great, do not be tempted to use real glass. I spent one rather unpleasant evening driving to the hospital with an actor who had sat on real broken glass on stage. The sight of this poor guy kneeling on all fours in the back seat, bloody rump to the sky, made me determined never to make that particular mistake myself (even if it did lead to the longest continuous string of butt jokes I have ever heard in my life). Don’t skimp. If you cannot afford the breakaway glass, then cut the effect, fake it, alter the scene, or do without. It is not worth the risk.
Rain
Ninety-five percent of the time, rain onstage is done with just a sound cue. The sound of a thunderstorm outside can go a long way toward giving the audience the idea that it is raining. (Does everybody know that you can get the sound of rain by recording bacon frying?) Now and then, however, you do need real rain, either because a scene takes place outside (Singin’ in the Rain, Night of the Iguana) or the set has a window and the rain needs to be seen through it. Either way, the effect is basically the same. A pipe is perforated with lots of holes on one side. Then, the pipe is installed over the stage with the holes facing upwards. A hose is connected to one side and a catch basin is put underneath it. Water is pumped into the pipe, where it flows up out of the holes, dribbles around the pipe, and rains off the bottom. Because the holes are pointed up, the water flows everywhere over the pipe and comes down in irregular drops, instead of steady streams like a shower head.
Large-scale installations, like Singin’ in the Rain on Broadway, use recirculating pumps to send the same water back up and through the system. Great care must be exercised with water effects onstage, since they will easily short out lighting and sound systems.
Snow
Technology is moving forward in wonderful ways, and one of those ways is snow. Up until recently, the only way to get convincing snow was with a snow bag, which we’ll talk about below. Now, however, you can actually buy or rent a snow machine, which spews out “flakes” of wet soap that look and feel just like snow, right up until you taste them. They work in any temperature, both inside and out, making them perfect for “Christmas in July” parades or an indoor production of A Christmas Carol.
Fig. 15. Making rain
There are three downsides to snow machines. One is that they are expensive and require a constant supply of snow-making juice. The second is that they have loud fans, which are clearly audible, even over music. Finally, if you let them run for a long time in an enclosed space, they will leave a slippery, gunky residue behind. They are perfect for outdoor use, but problematic indoors.
Dance presents a more difficult problem for snow. Snow machines will make a dance floor slippery, especially for ballet shoes. If you’re doing the “Waltz of the Snowflakes” in The Nutcracker, for example, a snow machine might be a ticket to a sprained ankle. The best dance-friendly snow effect requires a flying system, so if you are in a theater without movable battens, you can’t do this one. Do the “Waltz of the Sunspots” or something. People will marvel at your creativity.
If you do have movable battens, then you need a snow bag and two adjacent battens. A snow bag is not really a bag; it is a piece of canvas about two feet wide and as long as your battens. The canvas has holes cut in it about a foot from one side and tie lines along both long edges. Tie the bag between the two battens like a long cradle (some people refer to this as a snow cradle).
Next, the bag is filled with snow. (I recommend that you spring for commercial snow: it is flameproof, it flutters beautifully, and it even looks good sitting on the stage.) Then the cradle is gently rocked, causing the snow to sift through the holes on one side of the cradle and gently float down to the stage. This technique is whisper-quiet, won’t stain the stage, and is not as slippery as soap, although the dancers should step cautiously around those little slips of paper. The best way to avoid falls is to rig the snow bag either all the way upstage or downstage, avoiding the main dancing area.
By the way, keep in mind that sweeping up paper snow takes some time and is almost impossible to do during a fast scene change. If you really are doing The Nutcracker, though, you’re in luck: Tchaikovsky was no fool about technical theater. The “Waltz of the Snowflakes” is the Act One finale, and you’ve got the whole intermission to clean it up.
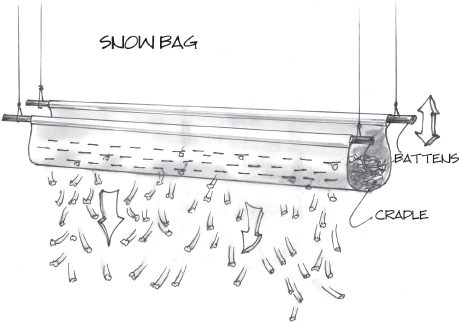
Fig. 16. A snow bag
Most scenic effects have two things in common: first, they work best if other distractions are reduced, and second, combinations are the most effective. Take away as much other stimulus as you can: get rid of all the unwanted light and sound so that attention is focused on the effect. Then try combining the effects—sound with light, smoke with projections, and so on. Unlike virtually everything else in the theater, in scenic effects, more is more.