The Tools of Sound: Source, Signal, and SPL
People often assume that theatrical technology is more complicated than it really is. People shy away from scenery and lighting because they appear overly complex. People assume there are lots of complicated things they would have to learn when, in fact, the actual process is fairly simple.
With sound, however, the opposite is often true: people underestimate the complication. They don’t realize what it takes to produce really good sound. What makes this especially tragic is that good-quality sound is absolutely critical to a successful production. In its ability to stir emotions, sound has no rival. Furthermore, for a budget-conscious theater company, sound can be the financial miracle worker, producing the deepest experience for the least amount of money.
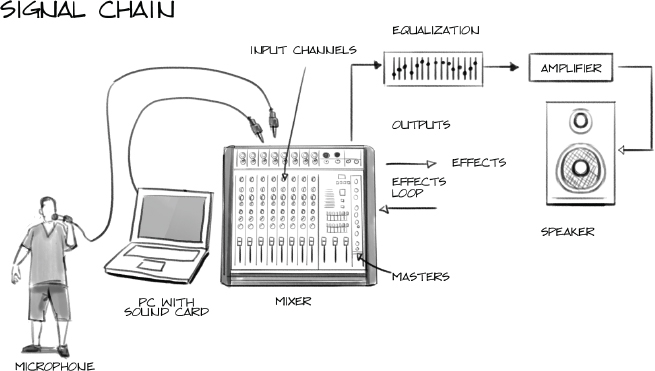
We’ll start this discussion with an overview of the entire sound system, known as the signal chain. Then we will enter the system at the microphones, explore the mixer, get pumped up by the amp, and head back out into the air through the speakers.
The Signal Chain
Sound is something you hear. It is what your mouth produces and your ears pick up. When a sound enters a sound system (through a microphone, for example), it is translated into electrical energy, an energy that goes up and down as the sound gets louder and softer. This energy is called a signal. The signal continues through the system until it gets out the other side, where it is changed (in a speaker) from electrical energy back into audible sound. While it is inside the system, however, it is an inaudible electrical force—a signal.
Every sound system, from your iPod to a high-end Broadway show, is a set of links, a chain that this signal moves through. This signal chain has four essential links and one optional one. Sometimes, one piece of equipment may do more than one thing. In a portable CD player or “boom box,” for example, one piece of equipment does all five. The five links in the chain are as follows:
• A source: The sound has to come from somewhere. If the sound is something audible in the outside world, then the source is the microphone used to capture it. If the sound is already recorded, then the source is the CD player or computer or iPod that is playing it back. Whether it is created live or stored on a digital device, the sound has to come from somewhere.
• Mixing: The signal has to be sent to the proper place at the proper volume and often combined with other signals. This is done by some sort of mixer. On your home stereo, you choose “Aux” or “CD player” on the front panel and turn the volume up. Believe it or not, that huge mixer at the back of a theater does pretty much the same thing. It just does it better, more quietly, and with a lot more options. On a mixer, for example, you can have input from several sources playing simultaneously, and you can set the volume for each one separately. Imagine that your home stereo allowed you to play a CD player and the output from your computer at the same time, while also letting you talk over a microphone, setting a separate volume control for each one, and you can start to see what a mixer does.
• Processing: This is the sort-of-optional step. In fact, almost every sound system has some sort of signal processing going on, whether it is the “Bass” and “Treble” knobs on your home stereo or the massive pile of electronics that makes that Broadway singer sound like she is sitting right next to you. Technically speaking, however, this link is not a requirement to get the sound out the door—it just makes it sound a lot better.
• Amplification: The signal coming from the source (the microphone, the laptop, whatever) is not powerful enough to drive the speakers. If you were to plug your iPod directly into your speakers, you would not hear anything. For the signal to be loud enough, you need amplification. On your home stereo, this is usually built into the same unit that routed your signal. In most theater sound systems, however, it is a separate unit that takes the output from the mixer and pumps it up to a strong enough level for the speakers.
• Output: There must be some way for the sound to get out of the system so that people can hear it: speakers.
As the signal travels through the sound system, it goes through some changes. Some of the most important changes it goes through are changes in strength, or signal level. A signal may appear in various places in the system at various levels. Let’s look at the different levels:
• Mic (pronounced “mike”) level signal: When you speak into a microphone, the air pressure from your voice causes a small magnet inside the microphone to move, creating a tiny electrical charge. That electrical energy travels down the microphone cable to the mixer. At this point, the electrical signal is very faint, a sort of electronic whisper. The input on the mixer must contain a “pre-amplifier” or pre-amp in order to boost the mic-level signal up to where the mixer can actually “hear” it. That is why you cannot take a microphone and plug it in to the “Tape” input on your stereo and expect it to work. The “Tape” input is designed for a higher level signal (see more on “line level,” coming up) and it has no pre-amp. If there is an input on your stereo marked “Mic,” then that input is equipped with a pre-amp. On a mixer, there is often a switch by each input that allows you to make that input a “Mic” input. Turn it to “Mic” if you are plugging in a microphone.
Sometimes, a mixer will have a knob that allows you to set the input level for a channel. What you are doing is setting the amount of pre-amplification for the input signal. You will need to turn it up higher for a mic-level signal or lower for a …
• Line-level signal: CD players, electronic musical instruments, iPods, and laptops all put out line-level signals, so they do not need to be boosted when they get to the mixer. In fact, line level is the level that all electronic devices use to talk to one another. If you are plugging two electronic devices together, the signal traveling down the wire is at line level.
The mixer may adjust the volume up and down, but the signal level that it puts out remains the same. This distinction may be hard to understand, because sound people sometimes use the terms level and volume interchangeably. Just remember, both mic level and line level refer to a range of volumes. A high mic level is still less powerful than a low line level. Think of it this way: a high school teacher’s salary may fluctuate up and down over the years, but it is still in the range of high school teacher salaries. The CEO of General Motors has a much higher salary, which may also fluctuate up and down. The range of the teacher’s salary, however, will never be anywhere near the CEO’s (which is a crime, by the way). In the same way, mic level, though it may fluctuate, will always be much lower than line level.
• Speaker level: Once you are done combining the signals and adjusting their volumes, the resulting signal is sent to the amplifier. Here, it is pumped up to a level that will actually drive the speakers. This level is way way above either line level or mic level, so you definitely don’t want to plug the output of an amp to anything other than a speaker. If a line level signal is a CEO’s salary, then a speaker level signal is like the budget of the Pentagon.
Okay, so now that you know the five basic links in the chain, let’s look at each one in more detail.
Sources: Where It All Begins
As I said above, the first thing you need in a signal chain is a source. The world of signal sources can be divided into two distinct groups: microphones and everything else.
Microphones: The Testy Toddlers of Sound
If it were not for microphones, sound design would be the easiest dollar in show business. It is not that the rest of the equipment lacks complication. It is simply more predictable. Microphones are unpredictable to the point of rebellious. A sound engineer who can keep microphones happy is a valuable person indeed. What’s the deal? Why are microphones so skittish? Well, first let’s explore what they are and how they work, and then talk about how to keep them happy.
Sound, when it is traveling around the real, non-electronic world, is composed of waves of vibration in the air. If there is no air, there is no sound. That is why “in space, no one can hear you scream.” That’s not a scary thought, it’s just a practical one. Sound needs air.
As I said in the last chapter, when I slap my hand against the table, the impact of my hand causes the table to oscillate back and forth very quickly. When the table moves away from my hand, it creates an area of low pressure in the air immediately next to the table. When the table rushes back toward my hand, it squeezes the air, creating an area of high pressure. As the table continues to oscillate back and forth, it creates waves of differing air pressure that travel outward from the table, filling the room, just like throwing a stone into water creates ripples that travel outward, filling the pond. The ripples are composed of peaks of high water level separated by valleys of low water level. The sound waves are composed of peaks of high air pressure separated by valleys of low air pressure.
When those waves of pressure run into something, they cause that something to move. The high-pressure waves cause that thing to move away from the air. The low-pressure waves cause that thing to move back toward the air. In this way, the vibration of the table is carried through the air until it meets another object. If that object is very dense and heavy, like a concrete wall, it will vibrate very little. If that object is very light, like your eardrum, it will vibrate quite a bit. This is how we hear sounds. Our eardrum is extremely light and susceptible to the vibrations caused by air movements. When the waves of air pressure strike our eardrum, it vibrates at the same rate as the wave of air pressure. The eardrum, in turn, is attached to a number of nerve cells, which pick up those vibrations and transmit them to the brain, which figures out that you just “heard” something.
Think about that for a moment. When a week-old kitten across the room from you lets out a tiny little “meow,” the vocal cords of that newborn animal are vibrating a tiny amount of air and creating minuscule waves of air pressure that travel across the room and strike your eardrum, which is sensitive enough to not only register them, but also to pick out the pitch, timbre, and direction of the sound so that the brain can put them all together and conclude “kitten in the corner.” Truly, the human ear is a marvel.
That’s one reason why a microphone is designed a lot like a human ear. In essence, a microphone is an artificial ear, but instead of an eardrum, it has a tiny little strip of material called a diaphragm, which vibrates when struck by pressure waves in the air. The diaphragm is attached to a magnet, which moves whenever and however the diaphragm moves. The magnet, in turn, is floating inside a wire coil. The movement of the magnet inside the wire coil creates tiny fluctuations of electrical current, which are sent down a wire into an electronic device of some sort, like a mixer, which “hears” the sound.
Like your ear, the microphone converts sound from a wave of pressure into a series of electrical impulses. The mixer and the amp amplify the sounds in turn and pump them out to a set of speakers. The problem is, the microphone is innocent and naive, like your basic toddler. And just like a two-year-old who doesn’t know Cheerios from rat poison, a microphone will pick up whatever is around and happily put it in its mouth, sending it off to be amplified and broadcast. And, just like a toddler, some of the things that it will pick up are not good for it. If the sound system gets a taste of these unappetizing tidbits, it may respond with anything from persistent static to an ear-splittin’, equipment-fryin’, I-want-my-mommy wail. It is not without logic that Jimmy Thudpucker (Doonesbury’s fictional rock-and-roll star) considered naming his new baby “Feedback.” If you don’t go out of your way to feed your microphone only what is good for it, the whole sound system is going to call you a bad mommy.
Choosing a Microphone
If you have ten dollars, you can buy a microphone and still buy lunch. If you have ten thousand dollars, you can buy a different microphone and not have a quarter left for the parking meter. Microphones come in an almost incomprehensible variety, from the inexpensive ones at Radio Shack to the multithousand-dollar ones that studio engineers treat better than their girlfriends. There are microphones specifically designed to amplify guitars, drums, or saxophones. There are mics that attach to your body, to your clothes, and in your hair. There are even mics that sit on the floor and look like mice. Let’s talk about what makes them all different.
Dynamic versus condenser mics
Dynamic mics are simple and robust: these mics have a lightweight, suspended diaphragm that vibrates when sound hits it. Dynamics are the tougher style of microphone and will put up with more abuse than the other kinds. Live shows and speeches rely heavily on them, and virtually every rock-and-roll show uses them exclusively.
Condenser mics are more sensitive and reproduce sound more accurately, but are less durable and convenient. Condenser mics use a more complicated mechanism that involves generating an electrical field inside the mic. Incoming sound waves create disturbances in this electrical field, generating a signal. Because the electrical field is easier to disturb than the physical diaphragm, the mic is more sensitive. That electrical field requires a power source, however, so condenser mics will often have a power cord hanging off of them. Some condensers can get power through the audio line, through a trick called phantom power, but the mixer must be equipped to provide it. Because of their fragile nature, as well as their need for external power, you will find fewer condenser mics backstage.
Low impedance versus high impedance
Impedance is a fairly mysterious audio phenomenon that even some professional sound engineers do not understand. They do understand its importance, however. Put simply, impedance is the amount of resistance an electrical circuit puts up to an incoming signal.
Why is impedance significant? Three words: Noise, noise, and noise.
Remember how I said a microphone is like a toddler crawling around stuffing sound into its mouth? Well, one of the unsavory things that it will wrap its chubby little fists around is electrical noise. Lots of backstage gear creates electrical noise: extension cords, lighting equipment, fluorescent lights, even wall sockets. Video monitors are particularly notorious, as are refrigerators. Where there is electricity, there is electrical noise. This noise isn’t audible to us, but it can be deafening to a microphone circuit. Remember: everything the microphone sends to the sound system is going to be amplified, first by the pre-amp, and then by the amplifier. Silent electrical noise will become clearly audible by the time it gets through the amplifier.
Here is a little secret, though. Electrical noise does not create sound pressure, so it is not really the microphone that picks it up. It’s the cable. A mic cable operates like a big radio antenna, sweeping up any kind of electrical impulse it can get its hands on. Actually, it is not like an antenna, it is an antenna (the radio antenna on your car is just a cable), so do not be surprised when passing police cars start broadcasting into your theater.
Audio engineers shut out noise by using balanced lines. Basically, a balanced output splits the audio signal into two signals and then flips one of them over, making a “negative” version of the original. The balanced output sends the two signals, one positive, one negative, through the cable in side-by-side wires. If some kind of interference, like a stray electrical signal from a power cable, hits the wire, it distorts both the positive signal and the negative signal equally. When the signals get to the other end, however, the balanced input flips the negative signal back to the right way, thus reversing the effect of the distortion. When the two signals are added back together, the distortion in the positive signal is canceled out by the flipped-over distortion in the (previously) negative signal. Result: a clean signal.
An unbalanced line sends out the signal on a single cable, so any noise that gets picked up is sent onward to be amplified. Result: the noise enters the sound system.
The catch is, in order to use a balanced line, you have to use a low-impedance microphone. Better-quality mics are always low impedance, and it’s easy to tell the difference. Look at the plug coming out of the end. A low-impedance mic will have a three-pin XLR plug coming out of it. This kind of plug is required for a balanced line, because it sends out two signals—one normal and one reversed—plus a ground wire, to deal with short circuits.
A high-impedance mic will generally have a phono, or quarter-inch plug. This kind of cable only has two wires, ergo, it is unbalanced. Without the balancing effect, the cables will tend to pick up extraneous noise.
Bottom line:
• Low impedance = Balanced line = XLR plug = Better
• High impedance = Unbalanced line = ¼-inch plug = Cheaper
Don’t understand it? You are not alone. Impedance boggles a lot of people’s minds, including mine. Here’s the real bottom line: All mics should run on balanced, low-impedance lines using mics and cables with XLR plugs.
And don’t try to beat the rule by putting an adapter somewhere in the stretch of cable between the mic and the mixer. Any piece of unbalanced line will cause you trouble. Maybe not today, maybe not tomorrow.
All of this impedance and balanced-line nonsense only applies to microphone lines. Any line-level device can be happily plugged in with quarter-inch or RCA plugs on unbalanced lines. The higher level of signal effectively wipes out the noise.
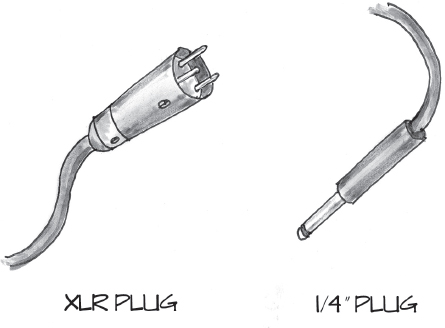
Fig. 41. Different kinds of audio plugs
Types of Microphones
Here are some questions to help you decide on a mic, whether you are renting or buying. Knowing the answers to these questions will help you talk intelligently to a salesperson or a sound designer:
• What are you mic’ing? Some mics are especially designed to pick up voices. Some are better for instruments. Some are better for picking up sound from a large group, such as an orchestra or a chorus. Some mics are built for specific uses, such as lavalier mics that attach to your clothing, or mics that are designed for a particular musical instrument.
• How much do you want to spend? The eternal question. You may not have to spend an incredible amount to get what you need, but skimping will come back to haunt you. A run-of-the-mill, solid microphone will cost you at least a hundred dollars to buy, and unless you want to be climbing the walls later, you should put the money out. A dime-store mic can be had for five dollars, but it won’t be worth the aggravation. I heavily recommend, if at all possible, that you spend the money for a low-impedance mic.
• Does it need to be wireless? Sometimes the mic cord will get in the way of something. Sometimes you just want the performer to have more mobility. In situations like these, you may want to get a wireless mic. Wireless mics have their own set of problems, though, so read the section on them before you decide.
• What do you like? You probably won’t be able to answer this one right off, but spend some time listening to mics. Some will pick up sound more accurately than others. Some will produce more low end, or bass sound. Some will produce more high end, or treble sound. If you find a favorite mic, ask for it by name.
• What are other people using? I steal other people’s secrets whenever possible, and I suggest you do the same. Ask people what they use. Get the benefit of their experience.
Once you know the answer to these questions, you can look at specific types of microphones. When in doubt, however, go for …
Regular old mics
If you don’t ask for a specific mic by name, people will assume you want a mic shaped like an ice cream cone. It will not be wireless, and it will be designed to stick into a holder or be carried around with the cord trailing behind. The most common R.O.M. is the Shure SM-58. If you are ordering a mic for a podium, an emcee, or a vocal performer, you can just tell the rental company that you want an “SM-58 style” mic, and they will know what you mean: a regular old mic.
Wireless mic
Wireless microphone systems continue to improve, and more theaters can now afford to rent or buy them. Wireless mics work by producing a radio signal that is picked up by a receiver offstage or in the back of the house. The receiver contains a pre-amp, which creates the line-level electrical signal that is sent to the mixer. Each microphone requires its own receiver and its own radio frequency. This can get pricey if you have a lot of mics, so many theaters try to get by with just a few.
Wireless mics come in three varieties: hand-held, headset, and body. Hand-held mics are the ones you see being carried around by rock-and-roll singers. They are now so accepted by audiences that it is surprising to see a performer with a mic cord any more. This is especially helpful in situations when the performer is lip-synching, or in less polite terms, faking it. It’s gotten so you don’t even have to run a cord to a lip-synching performer any more. You just put something approximately mic-shaped in his hand and the audience will believe that it is a wireless mic. Some people don’t even realize that a mic cord actually has a purpose. I had a student recently who was singing into a regular wired mic mounted on a podium. Once he got rolling, however, he decided that he needed some freedom to move, so he whipped the mic out of the stand, pulled the cord out of the mic, and dropped it on the floor. Of course, the mic quit working, a fact that confused him mightily.
Even with all the advances in technology, sound designers still lose a lot of sleep over wireless mics. They are battery-operated, so the batteries must be constantly checked and changed. The radio frequencies they use can pick up interference, and it is not uncommon for police and fire department radio transmissions to slip through from time to time. On Broadway, where the use of wireless mics has reached epic proportions, there are now specific frequencies assigned to each show. New show openings can be delayed until another show closes and frees up enough radio channels.
Headset mics
For a while, these mics were known around the business as the “Madonna” mic, because she was one of the first major performers to use them. The great advantage of a headset mic is, not surprisingly, you don’t have to sing into your hand. Consequently, these have become the mics of choice for performers who dance, play an instrument, work a ventriloquism dummy, or do any other activity where it would be really nice to have your hands free. Headset mics are also much easier to rig than hair or body mics, and the element is usually larger and farther away from the actor’s face, which makes sweat-outs (see body mics, below) much rarer.
The first couple generations of headset mics were big, black, and bulky. They weren’t really intended to be hidden. Part of the whole “Madonna” effect was that she was wearing a mic that was high-tech and cool, so no one cared if it was visible. Most rock singers still don’t care if the mic is visible, ’cause, let’s face it, the people in the crowd know that Garth Brooks is wearin’ a mic.
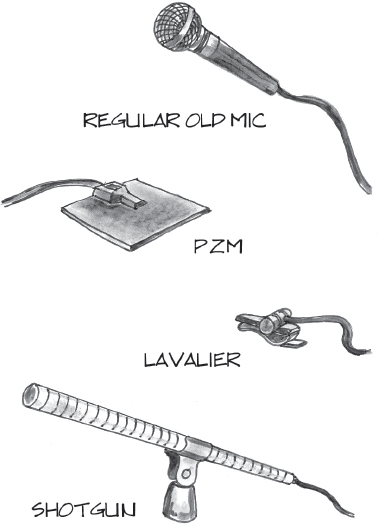
Fig. 42. Different kinds of microphones
There are other performers, however, who are now benefiting from a new generation of near-invisible headset mics. These slender marvels are so tiny that any audience member more than fifty feet away might miss them altogether. They are still not invisible enough to work for “realistic” theatrical shows, but they are very popular in theme park shows, where hair mics are too much trouble, and we really don’t mind if the people in the front row can see the tiny pink mic on Cinderella’s cheek.
Body mics
The human voice is an incredible instrument, and it is capable of astounding depth and volume when properly trained. Unfortunately, the modern theater is trending away from the natural voice and toward artificial amplification. It’s hard to blame the sound designers or the performers, though. The modern, film-oriented theatrical audience is used to being surrounded by a highly immersive and complex soundtrack, something that is basically impossible without amplification and processing. Small wonder that today’s theatrical actors depend on small, nearly invisible mics mounted on their bodies in order to be heard from row one all the way back to the used-to-be-cheap seats.
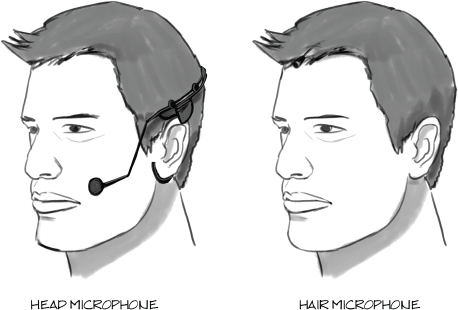
Fig. 43. Headset microphone versus hair microphone
Still, I would like to encourage theater artists everywhere to approach body mics with caution and reluctance. No sound system in the world is a match for the nuance and persuasion of the human voice. Actors should make vocal training a high priority for their careers, and they should seek to develop a voice that can fill a large house without amplification. Even when amplified, that kind of a voice has an effect that can’t be understated. Though the task is difficult, the rewards are immense.
Having said that, we can begin exploring this rather touchy technology. Wireless body mics consist of two pieces: a pencil eraser–sized microphone and a pack of cigarettes–sized belt pack. The two pieces are connected by a cord that runs underneath the costume. The mics are generally concealed in the actor’s hair or over the ear. The over-the-ear placement is used if the actor is balding or if a hat is put on or taken off during the show. In a pinch, the mic can be put on the collar of the costume, although designers tend to avoid that one because it may pick up too much of the low frequencies and lead to a sound that is unnatural. They can also sound hollow if two actors are close together. Plus, a good hug will produce an earth-shaking thump, as the mic gets banged around.
Other circumstances might influence mic placement as well. If you are doing South Pacific, for instance, you’ve got to deal with the “I’m Gonna Wash That Man Right Out of My Hair” scene when the character actually washes her hair on stage, precluding any kind of a mic placement above the neck.
Besides the mic itself, you also have to hide the belt pack, which contains the batteries, and the transceiver, the part that actually sends out the radio signal. Despite its name, the belt pack rarely goes on the belt. In a perfect world, the mic is clipped in the hair, the cord runs down the back of the neck, and the belt pack rides in a pocket in the costume in the small of the actor’s back. This isn’t always possible, however, since a close-fitting or revealing costume may not cover the pack. In fact, belt pack placement may take some ingenuity. Sometimes a costume modification is necessary. Shoulder holsters, which place the pack underneath the arm, are fairly common, as are hip, butt, breast, and, I kid you not, codpiece packs. “Find the Mic” and “Find the Pack” are two games you can play the next time you go see a show with body mics.
Even if you find good places for the mic and the belt pack, you’re only halfway home. Heavy physical action, such as a fight or dancing, can work the mic loose. Perhaps the biggest killer of body mics, though, is sweat. The mic itself is quite tiny, and a single bead of sweat will cover it. If this happens, the mic will begin to sound like someone has a hand over it, and soon after, it will go out altogether. This is called sweating out a mic, and there isn’t much to be done except get the actor offstage and dry it out or change it.
If you are wearing a body mic and you think your mic is out, you aren’t lost. If you can’t get offstage, try standing right next to another actor and say your lines into her mic. It’s not perfect, and it may make for some interesting blocking, but it will get you through a scene.
PZM mics
PZM stands for pressure zone modulation, but who cares? Not me. The PZM mic is specifically designed to sit on the floor, where it picks up not only the sound coming directly from the source but also the sound that bounces off the floor right in front of it, making the microphone more sensitive. You can grasp this by standing in front of the apron during rehearsal and leaning down within an inch or two of the stage. When you get within an inch of the stage floor, you should hear the actor’s voices get louder. While you may have to put up with Indian guide jokes, you will understand why PZMs are so efficient. You often see PZMs lined up across the front of the stage, looking like little black cigar boxes. Sound people sometimes refer to them as “mice.” Careful, don’t kick them. That’s a bad thing.
Lavalier mics
Lavalier, or lav, mics are those black, marble-sized mics you see clipped to people’s lapels on talk shows. Lav mics pick up voices quite well, and they are useful in situations where you don’t want to see a mic in front of someone, or when you don’t want the speaker to be tied to a microphone mounted on a podium. If you are doing video interviews, this is your boy. Meeting planners, take note. Lav mics are great for speakers because they can walk around the stage and gesture up at overheads, and so on. For true mobility, get a wireless lav. They still have all of the radio frequency problems, but at least they don’t sweat out like the tiny body mics. Of course, they are harder to hide than body mics, but you usually use them in situations where you don’t care about concealment anyway.
Shotgun mics
In placing a mic on the stage, proximity is everything. The best way to pick up any sound is to get close to whatever is making it. If you are not using hand-held or body mics, then you may have to get creative about where you put mics onstage. Sometimes you just can’t get a mic close to the source, and it must be mounted farther away. In this case, you want a mic that will only pick up what is directly in front of it, rejecting the sounds to either side, even if the target sound is far away. Enter the shotgun mic. It’s often used by television camera crews when they can’t get close to something they need to record. In the theater, they are used when the only good mic placement is far away: for example, when you have to put a mic high above the stage on an electric pipe. A shotgun mic will tend to reject sounds to the side even if they are closer than the target sound, minimizing unwanted noise.
Even with a shotgun, you may not have the solution. Depending on the quality of the mic, it may only work ten to thirty feet away, and the sound quality may be questionable. At best, this can be a real problem solver. At worst, it’s a low-quality stopgap.
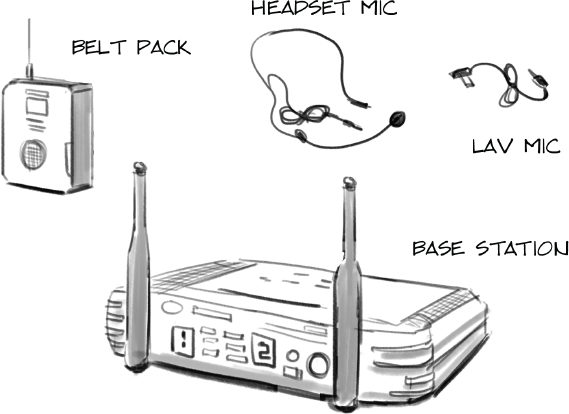
Fig. 44. Headsets, hair mics, and body packs
The Backstage Survival Guide to Keeping Microphones Happy
• Turn the mic on. Many mics have switches, so if your mic isn’t working, look for one. Wired mics have them on the side, wireless on the bottom.
• Use low-impedance mics on balanced lines. It will help you to eliminate noise.
• Do not run mic lines next to power cords, video cables, or lighting equipment. Ditto.
• Don’t blow into a microphone. Hey, we don’t blow into each other’s ears to see if we’re listening, do we? If you want to keep sound people happy, don’t blow into the mic. It may damage the diaphragm. If you need to check if a mic is on, tap it gently.
• When speaking into a mic, put your mouth about a hand’s width away from the mic and keep it at a constant distance. The mic’s ability to pick up your voice drops radically when you move away, even a few inches. Likewise, don’t “eat” the mic. The low frequencies in your voice will be unnaturally amplified and your voice will be distorted. Plus, you’ll slobber on it.
• Don’t point the mic at a speaker. This will create feedback. Want to become the least popular person in your theater? Take a live microphone and stick it right in front of a speaker. If everything is on, you will be rewarded with a deafening squeal that the Brits call “howlround,” the Americans call “feedback,” and everybody calls annoying.
Feedback is the audio version of a short circuit. It happens when a sound comes out of a speaker and immediately reenters the sound system through a microphone. These nearly instantaneous round trips cause the sound pressure level to build rapidly on itself until it reaches the crisis point, and wango! Feedback.
Besides being painful to listen to, feedback is also not a good thing for equipment. It can fry electronics and blow speakers. When feedback starts, you should deal with it immediately, like right now. If you are holding or speaking into a mic, turn the mic away from whatever speaker is closest to you. If there are several speakers, or you do not know which way to turn the mic, then just leave it. There is nothing you can do. The person on the mixer will have to solve it. There is a common myth that, if feedback starts, you should put your hand over the mic. Do not do this. It will actually make it worse. If you are running the sound system when feedback starts, turn the volume down. Try to figure out which mic is the culprit. If the feedback has just started, you may be able to drop the volume just a little bit, and no one will be the wiser. If a feedback cycle really gets going, though, you may have to turn the volume all the way down to break it up.
The most important thing is to listen for it. Except in extreme cases, feedback starts softly, either as a high-pitched whine or as a little ringing sound at the ends of people’s words. Listen for it, and back the volume off before the crisis begins. The best way to fight feedback is to have a good equalizer in your sound system, as well as somebody who knows how to run it. More about that when I talk about signal processing.
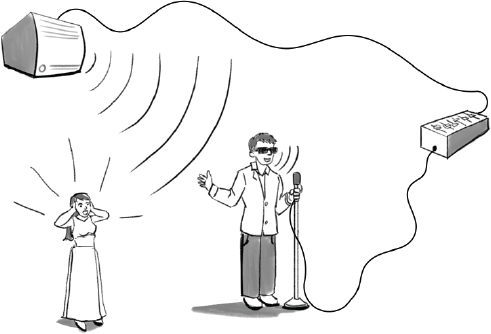
Fig. 45. Where feedback comes from
Line-Level Sources
Microphones put out mic-level signals, but everything else that produces sound—CD players, iPods, DVD players, electronic keyboards, computers, and any other electronic device—produces a line-level signal.
Line-level signals use several different types of plugs, but the phono plug is most common. This is a long, barrel-shaped plug that comes in ⅛-inch and ¼-inch versions. That plug on the end of your iPod headphones is a ⅛-inch phono plug.
Phono plugs come in two varieties: mono, which carries one signal, and stereo, which carries two signals, generally a “left” and “right.” You can tell which is which by the number of rings on the plug. One ring is mono, two is stereo.
The main place you will see the stereo plug is on headphones, where it is inconvenient to have two cables running from the playback device to the headphones. Other than headphones, almost every other line-level cable will have a mono plug.
Besides the phono plug, you will also see the RCA plug, which is often used for consumer electronic equipment like your DVD player. The RCA plug has a round collar, about ¼ inch wide with a stubby little pin in the center. It is used for both audio and video at the consumer level and is always mono.
Pro-level gear will sometimes use XLR plugs, even for line-level signals, to help ensure that no noise is present on the line.
Besides the difference in signal level, microphones differ from these line-level devices in one other critical way: they are really the only analog source left in the theater. When I wrote the first edition of this book in 1997, there was a fairly extensive section on reel-to-reel tape decks and their use on stage. That technology, like all other tape-based technologies, is now completely dead, for better or worse, leaving us nothing but digital sources, so this might be a good time to study how digital audio really works.
A digital audio primer
If you were born after 1985, you may not even remember life before digital audio. Cassette decks, reel-to-reel tape, and even vinyl records might be something that you only heard about from crotchety old uncles complaining, “When I was young, you had to clean the record before you could play it!”
It is useful, however, to remember that the world—the real world that still exists outside of the virtual one where we spend an increasing amount of time—is an analog world.
As I talked about previously, a microphone takes waves of air pressure and converts them to a continuously varying electrical signal. The key phrase here is “continuously varying.” An analog signal is continuous. It is not broken up into increments of time. Both the diaphragm in a microphone and your eardrum move smoothly back and forth as waves of sound pressure land on them like so many waves crashing against the rocks.
Digital signals, however, are broken up into tiny chunks of time. When a microphone sends an analog signal down a wire into an electronic device, like a laptop, that device must first perform an analog-to-digital conversion, often called an A-to-D conversion. The digital device listens to the analog signal for a tiny fraction of a second—a small “sample” of time—measures its average strength during that time, and records that strength as a number. Then, a fraction of a second later, it does it again, which produces another number. And then again and again and again, thousands of times per second. Thus, the continuous analog signal is broken up into a series of numbers, or digits (hence the term digital).
Of course, this sampling process is happening in real time, and very, very fast. A typical sampling device can sample an incoming signal and assign a new number more than 40,000 times per second. The speed of the sampling is known as the sampling rate, and that number is critical for determining the quality of the sampling process. The more samples you take per second, the more accurate your sample is.
Compact disks use a sample rate of 44.1 kHz, or 44,100 times per second. The generally accepted sampling rate for professional work, however, is 48 kHz. Pro audio gear can generally accept either one, and somewhere in the software, there is always a setting where you can choose. The current crop of consumer video cameras (and the current version of the iPhone) usually uses 48 kHz as well.
In their constant attempts to make digital audio closer to reality, many equipment designers now give you the option of doubling the sampling rate, up to 96 kHz. This does give you better resolution, but always keep in mind that the sample rate that the audience will hear is the last one in the system, so there isn’t really too much point in recording at 96 kHz if you are playing back at 48 kHz.18
The single most important thing you need to know about sampling rate is this: it must be the same throughout your system. If you create your files at 44.1 kHz, then you have to play them back at 44.1 kHz. Quick, what will happen if you take a 44.1 kHz file and play it back at 48 kHz?19 What will happen if you play a 48 kHz file and play it back at 44.1 kHz?20 Check the footnotes for the answer, but if all your files sound a bit too high or too low, you might have the sampling rate set wrong somewhere.
When creating digital audio files, sampling rate is one of two important numbers. In order to understand the second one, let’s take a look at the number that the sampler is assigning to the incoming signal over 40,000 times a second.
The most fundamental type of data inside a computer is called a bit, and there are only two kinds: a one and a zero. All other numbers in the computer’s memory are represented by ones and zeros, through something known as the binary numbering system. What you need to know about binary numbers is that the more bits you use, the more numbers you can represent. The numbers from zero to seven, for example, can be represented by three bits.
If the sampling device was using three bits, it could only judge the strength of that incoming electrical signal, and thus assign it a value, on a scale from zero to seven, where zero would mean silence and seven would mean as loud as possible. That is quite a small range of values for the entire signal level spectrum. In fact, it’s basically useless.
The scale starts to get useful at eight bits, when the computer has 256 different values to choose from. The first generation of samplers operated at eight bits, which wasn’t great, but it was a place to start.
The most common samplers these days use sixteen bits, which means that they can represent that signal using numbers from zero to 65,535. In other words, the sampler has 65,536 possible numbers to choose from when assigning a value to a sample. The number of bits that a sampler uses is known as the bit depth.
How much bit depth do you need? More is usually better, of course, and everyone pretty much agrees than anything less than 16 bits—the standard for compact discs—is unacceptable. As of this writing, 24 bits is fairly common in audio devices. Unlike sample rate, you don’t have to worry so much about making sure that your bit depth settings are the same throughout the system. A 16-bit file will play fine through a 24-bit audio card, for example, and the reverse is also true—a 24-bit file will play through a 16-bit card, although it might not sound as good as when it is played through a 24-bit card. Still, it’s a good idea to settle on one bit depth for all files that you create for a particular project, so the equipment doesn’t have to take the time to do a lot of conversion. Personally, I use 16-bit, 48 kHz as my default.
So we’ve got sample rate and we’ve got bit depth. These two numbers form the foundation of digital specifications.
The combination of sample rate and bit depth tells you one other important piece of information: file size. After all, both of these numbers represent a huge amount of ones and zeros, and all that data starts to add up pretty quick. At CD-quality (16-bit, 44.1 kHz), your computer is recording or playing back 44,100 numbers per second, and each one of those numbers has 16 bits. A newer, higher-quality audio interface might be playing back 24-bit numbers at 96,000 per second. It adds up, and it becomes a problem when you are trying to store a large amount of material on a small drive, like a portable music player, or download audio files over an Internet connection.
Take a look at the comparative sizes of these different formats:
Bit Depth |
Sample Rate |
File Size of One Stereo Minute |
16 |
44.1 kHz |
10.1 megabytes |
16 |
48 kHz |
11 megabytes |
24 |
96 kHz |
33 megabytes |
You can see how raising the bit depth and sample rate to the state-of-the-art 24/96 level actually triples the size of the files! These numbers would have been prohibitive a few years back, but hard drives and processors have now gotten so big and so fast (respectively) that we can now enjoy this higher level of quality with no guilt on our desktop computers. Generally speaking, however, these files are still too big for portable music players and Internet downloads.
Audio File Formats
Once an incoming analog signal has been sampled, the data needs to be arranged in some kind of format that a computer can read. You can have a lot of books in your library, but until you have them in some kind of order, you’ll never find what you are looking for.
In order to help the computer organize and play back the data, the sampling device arranges the sound in one of many audio file formats. There are dozens of formats out there, but we are really only concerned about a few for the theater, so this section isn’t as long as it could be.
Formats are divided into two basic groups, depending on whether they are compressed or not, and right there we have our first big confusion.
As I discuss in the upcoming “Processing” section, a compressor is a device that keeps a microphone signal from overwhelming a sound system. In the world of computer file formats, however, it has a different meaning. It is a way of reducing the size of an audio file. Before we get into that particular piece of alchemy, however, let’s talk about uncompressed formats.
Uncompressed formats
The kind of audio that we have been talking about so far is uncompressed. The computer slices up the audio as it comes in the door, assigns a value to each slice, and arranges those values in a line so they can be played back and turned back into audible sound. The sampler writes down all the numbers very faithfully, without skipping any or scrimping on detail.
The two most common file formats came from the two biggest computer software makers: Microsoft and Apple.21 Microsoft came up with the Windows Audio File Format and then invented the V that stands for “file format” so they could call it a WAV file (pronounced “wave”). I guess WAFF didn’t have the same ring to it. Apple, in turn, invented the Audio Interchange File Format but ignored Microsoft’s innovative V-for-FF swapping technology and just called it an AIFF file (pronounced “A-I-F-F”).
In point of fact, both WAV and AIFF files will play on many applications on Windows and Apple computers. Both files are used in both professional and personal arenas, and they actually play back exactly the same data, bit for bit. The difference comes in how the data is stored, not in how it sounds. Despite this simple fact, you will still find people who swear on Bill Gates’s future grave that one or the other is better. They are not. Bit for bit, a WAV file and an AIFF files are playing back the exact same information. They are, however, storing the information differently. To return to our library analogy, imagine two libraries that contain the exact same books. Imagine that one library organizes the books by title, while the other one organizes them by author, and you will have a sense of how WAV and AIFF are different. Same data, different storage systems.
Both WAV and AIFF files can store audio information in just about any combination of sampling rates and/or bit depths.
Although they are acoustically identical, there are small, inaudible differences. AIFF has the ability to carry metadata, which is data about the data. Metadata might include the date of recording, the type of recorder, and information about how it was recorded or processed. The European Broadcasting Union got so whipped up about the lack of metadata in the WAV file that it actually created a version of it that did have metadata, the BWF file, which stands for broadcast wave format. This format has become the go-to format for digital recording devices on film and TV sets, where it is useful to “time stamp” each audio file. This info helps the lab technician sync up the audio file to the film or video footage that goes with it.
You can always tell what kind of files you are dealing with by looking at the extension, those characters at the end of the filename. AIFF files will end with .aif, while WAV files end with .wav. Want to guess what a BWF file ends with?
You clever people.
I would venture to say that, in the normal life of a theater sound person, the only uncompressed audio formats you will probably encounter are AIFF and WAV.
Compressed formats
File compression, like LEDs in lighting and virtually everything in video, is a form of magic that was invented by gray-bearded wizards who live Beyond the Last Mountain and who only visit every seven years to bestow a new file format upon the masses.
Okay, not true, but it might as well be. Compression depends on very finely tuned mathematical formulas called algorithms, which pick apart an audio file and discard information that is thought to be beyond the capability of the human ear, a process known as perceptual coding. By getting rid of sounds that your ears supposedly can’t hear, compression algorithms make a file much smaller.
How those algorithms are written is a dark art, however, and nothing to be trifled with. Better not to ask.
Perhaps the most famous form of audio compression is known as MP3, which was standardized by the Moving Picture Expert Group, an organization that sets a lot of media standards. Its first video standard, known as MPEG-1, had a section of the specification—Part 3—dedicated to audio. MPEG-1 Part 3 became shortened to MP3 and went on to rule the world of portable audio players, even when the video standards moved on to MPEG-2 and then MPEG-4.
And why not? With little loss of quality, converting a file from an uncompressed format to an MP3 can make it one-tenth of the size. Like magic, 90 percent of the file size just disappears, allowing you to put ten songs in the space you used to use for one.
Here’s a bit of geek trivia for you. When one of the designers of MP3, Karlheinz Brandenburg, a post-doc working at AT&T Bell Labs, was tuning up his algorithms, he heard someone down the hall playing Suzanne Vega’s song “Tom’s Diner.” Karlheinz realized that Vega’s nearly monophonic, a cappella recording, so dependent on her subtle vocal inflections, would clearly reveal any flaws in the compression. He listened to the song over and over again to test the algorithm. Some people jokingly refer to Suzanne Vega as the “Mother of MP3.”
You might think that, no matter how good the algorithm, there is no way that you can cut away 90 percent of the data and not hear the difference, and I would agree with you. If you play a song as an uncompressed AIFF or WAV and then play the same song immediately afterwards as an MP3, most people are going to hear a difference if their speakers are any good. However, this isn’t how people listen to music. They don’t play two different formats back-to-back, and their speakers aren’t always that great. My teenage stepsister listens to music all day using the speaker on her phone, for Pete’s sake, and there’s no way that she will hear MP3’s limitations on that minuscule speaker. Unfortunately, there are more people in the world listening to music on small, low-quality speakers than huge, expensive ones, so MP3 was more than good enough to become, for a time, the portable musical format of choice.
Those days are ending, though, courtesy of the biggest thing to hit pop music since the haircut: iTunes. More specifically, the iTunes Store. You see, when you sell ten billion songs in seven years, you have some influence on the Next Big Thing. By throwing its support behind Advanced Audio Coding, Apple made the AAC format hugely popular for downloading and storing music. AAC was designed to be the successor to MP3, and it has been quite successful, reducing file size just as much as MP3 but with better sound quality. How? I don’t know, I don’t care, and neither should you.
I only mention AAC because you may be considering using content from iTunes for your show. Although I don’t recommend using MP3 for music onstage, you can get away with using content that originated in AAC if you have to. Some digital playback programs, however, don’t support the format, so you will have to use iTunes or another audio conversion program to convert those AAC files to AIFF or WAV before you put them into audio editing or audio playback programs.
All of the compression programs I have mentioned so far are lossy—that is, when the file is compressed, some of the data is gone for good. That’s why it doesn’t improve the quality of an MP3 to convert it to an uncompressed AIFF. When that file became an MP3, the data it threw away is gone for good.
There is, however, such a thing as lossless compression. If you refused to believe that compression was actually a magic spell before, lossless compression will make you a believer. Somehow, those gray-bearded wizards figured out how to cut an audio file size in half without throwing anything away. I use the Apple Lossless format to download my CDs into iTunes, and I’ll be a horntooth warbler if I can hear the difference, despite watching a three-minute, 10 MB song become a three-minute, 5 MB song. They are wizards, I tell you! Wizards!
Despite the higher quality of AAC and the uncanny nature of lossless compression, I still maintain, as a general rule, you should avoid using compressed audio to build up your sound cues. One reason: it’s hard to predict what will happen when you start mixing compressed files together in a multi-track audio editing program. One never knows if the compressed files will play well with others. It’s better to start with a full-blown WAV or AIFF file, and don’t compress it unless you really have to. In these days of tiny drives with massive space, audio compression is a bullet we have to bite a lot less often.
Okay, now that we have a handle on how digital audio works, let’s talk about how to use it to create sources for our sound system.
Digital Audio Playback
Let’s be fair. My favorite audio playback device is in my pocket right now. It’s an iPhone. Apple isn’t the only company that makes portable playback devices, but the iPhone (or iPod) does have the advantage of a strong output signal, a good visual interface, and compatibility with many file types, including the most common output formats: WAV, AIFF, MP3, and AAC. Most digital musical players can put out a reasonable-quality audio signal, particularly if the file you are playing back is uncompressed. They can be reloaded or rearranged on any computer and can be easily hooked up to any audio system with a cable adapter. If you are a traveling company, you can carry all your files on it (with a backup on your laptop) and plug it into any mixer in the world with a simple adapter. Simple. Reliable. Acceptable quality. Done.
But let’s say that you want to do something beyond just playing a single file. Let’s say you want the sound of rain to play through an entire scene while, at a specific moment, a car horn honks from outside. Or maybe you want music coming from a speaker in a radio onstage, plus wind whistling through the audience, plus a car horn honking from stage left? Or how about that Halloween maze that you created, the one where you want creaking doors and mysterious knocking to play throughout ten different rooms, plus sound effects when zombies attack and the guillotine drops, for eight solid hours without stopping? Or, what about planes flying overhead and trains chugging past from left to right? How about the sound of a man running around the theater, knocking on every audience door, one at a time?
The iPhone is good, but it isn’t that good. (Not yet, anyway.)22
When you are ready to be truly flexible and creative with audio, you are ready for PC-based playback. Putting your digital audio files on a PC allows you to access them randomly, mix them, send them to different outputs, coordinate with other systems, and change it all in real time without driving your operator completely stir-crazy.
Put simply, the process looks like this:
• Input some audio into your computer through a hardware interface.
• Mix it around, combine it, and change it into what you want using digital audio workstation (DAW) software.
• Create files that you can use to run the show.
• Import those files into a playback program.
• Program the show in the playback program and send the sound out through a hardware interface into your sound system.
So, to put it even more simply, you need four things:
1. A computer
2. A way to create content: DAW software
3. A way to play back content: audio playback software
4. A way to get sound in and out of your computer: audio interface
The computer
All of the things I’ve mentioned exist for both Macs and Windows, so you will survive with either platform. Depending on which software and interface you choose, you may need to upgrade your system with more memory, a newer version of the operating system, or specific kinds of hardware. When you are shopping for software and interfaces, be sure to check the company website for the “System Requirements.” This will tell you, among other things:
• Which version of the system software is required
• How much RAM (system memory) is required
• How much hard drive space is required
• Anything else
For Macs, this last item may include a version of Quicktime or compatibility with something called CoreAudio. For Windows, it may include video cards, processor speed, or compatibility with ASIO, the Windows audio system. Make sure your machine has what it takes to run the software and interfaces. Don’t know where to find that information? Time to find out. Use Google searches, your IT experts, or a fourteen year-old child to help you locate it.
In general, when using a PC for playback, it is best to have a dedicated machine that only does your theater sound. I don’t recommend using your office laptop to run shows. Sure, it will probably work—until that fateful night when the new version of Doom you just installed rewrites your video drivers and the show is starting in ten minutes and you are frantically downloading a fix while the orchestra is tuning up. Trust me, you don’t need the stress. If you are using a PC for your shows, then use it only for your shows.
Digital audio workstation (DAW) software
A good audio production system, known as a digital audio workstation or DAW, allows you to:
1. Import sound from CDs or other forms of digital media
2. Record sound from external sources, such as microphones, guitars, and electronic gear
3. Assemble and edit these sounds in multiple tracks on a timeline
4. Alter those sounds using filters, plug-ins, or other effects
5. Mix the sounds together
6. Create finished files in a range of different formats
DAW software is like a very flexible, multi-track tape deck. Typically, the screen is set up with multiple tracks running from left to right. Audio is represented by colored blocks, often with a visible sound wave running through them. You can move these blocks of sound around, slice and dice them, change their pitch and speed, and apply many kinds of processing to them, like dynamics, EQ, reverb, and lots of other effects. DAW software is where you take raindrops and combine them with traffic, thunder, and children’s voices to make the effect of a city schoolyard during a thunderstorm. It is like an artist’s canvas and paint box for the audio designer.
Many companies put out freeware or shareware products, either because they are ongoing projects supported by a community of users (like Audacity) or because they want to entice you to try the product so that you will eventually pay to upgrade to a version with more features. Either way, there are a lot of good products out there for little or no money, as long as you are willing to deal with fewer features and less support.
For years, the only name in town for professional digital audio production was Digidesign ProTools. Even today, if you walk into a professional post-production studio, the chances are very good that you will see ProTools running on its machines.
ProTools rose to its position partly because, from the beginning, the interface was familiar to anyone who had ever sat in front of a multi-track tape deck. Unlike a regular analog tape deck, however, engineers could manipulate that audio in a “nondestructive” way. In other words, any change that you made to any bit of audio could always be removed, because the original file would always be stored in its original form.
Other DAWs were born as tools for electronic musicians. Cubase (by Steinberg) and Digital Performer (by Mark of the Unicorn) are two examples of DAWs that started as MIDI sequencers, programs that were designed to control musical synthesizers. Over time, they added the ability to record and manipulate actual audio. In turn, ProTools added the ability to control MIDI instruments, so the features of the programs converged. In the minds of many users, however, Cubase and Digital Performer are for music, whereas ProTools is for film and video production.
Besides these complex professional programs, there are many other software programs for creating your content. Here’s a list of important features for a DAW for creating theatrical content:
• Live recording: Recording audio through an audio interface
• Multi-channel recording: Recording multiple tracks at once
• Monitor level: Being able to see the level of the audio input while recording
• Import WAV, AIFF, and MP3 formats
• Import restricted formats, like AAC and WMV
• Non-destructive editing with Cut, Copy, Paste, Trim, Insert, and more
• Unlimited undo
• Large number of tracks (at least sixty-four)
• Ability to alter pitch and tempo
• Filters to alter equalization (EQ)
• Ability to control dynamics (Compressor, Normalize)
• Other effects (Reverb, Chorus, Echo, Hiss Removal, etc.)
• Support for VST plug-ins, a high-quality format for software “tools” that can be added to existing DAW programs
• Ability to create WAV and AIFF files
• Software instruments and MIDI: Essential for those who want to use the DAW software to compose music
• DJ-style controls: Important for people who want to use this software for live performance, like, um, DJs
Audio playback software
In a few cases, like some ProTools setups, you might be using the same software to both create and play the audio, but generally, you will be using a separate piece of software to play the audio for the show. This is because the features that you need for audio playback are completely different from what you need for content creation.
In general, all audio playback software programs work in a similar way. The user imports an audio file (often by just “dragging and dropping”) into a cue list. The cue list is a list of events that will happen in sequence during the show. Files can be programmed to happen when the operator clicks a “GO” button on the screen, when a certain amount of time has expired, or when the computer receives a signal from another device.
Cue lists are very flexible. Audio files can fade up or down, loop, and start or stop at any point in the file. Multiple files can play simultaneously or be daisy-chained so that one file begins playing when another is finished, or after a certain amount of time. Cue lists can be instantly changed if you decide to add, delete, or reorder cues in the middle of rehearsal.
Many programs allow multiple cue lists to play at once, which is very useful if, for example, you want that thunderstorm to rage outside while doorbells, dinner gongs, and barking bloodhounds come and go.
These programs are capable of sending these cues to lots of different outputs, bounded only by the number of outputs in the hardware interface. You might, for example, set up your system with an output to the main speaker cluster over the stage, two more to the left and right speakers, another one to a speaker in the very back of the house, and yet another to the speaker in the radio on the set. The software allows you to assign each cue to any number of outputs.
Let’s go back to that production of Macbeth for a real-life example. In the opening scene of the play, a group of soldiers are reporting the news of Macbeth’s victory on the battlefield. The director wanted the reports from the battlefield to feel as though they were being shouted from hilltop to hilltop, as the news of the battle was being relayed back to the king. At the same time, he wanted the witches to be crawling onto the stage, accompanied by whistling wind, unearthly screeching, and that tribal pounding and wailing I talked about earlier. Then, at the exact instant that a witch raises her arms to the sky, he wanted a bolt of lighting and a huge clap of thunder.
Obviously, this was not going to work with a CD player.
First, I brought all the soldiers into the studio and recorded them shouting their lines. I made each shouted line into a separate audio file. Then I created new sound effects files for the other noises. I found the wind and the thunder at an online sound effects site, recorded the dance company, and convinced some actress friends to scream bloody murder (which was surprisingly easy). I took the screams into my DAW (ProTools) and “dirtied” them with various filters and pitch shifters. I created separate files for the tribal background, wind, thunder, witch screeching, and each line that a soldier shouted.
Once I had all the files, I cranked up my audio playback program (I used SFX this time around because I had a Windows computer). First, I created cues for the background sounds: the wind and the drums. Because I was cueing them separately, I could precisely adjust the volume, in case the director wanted more or less of each one. The shouted voices were all separate cues, so I could use the matrix to assign each one to a different speaker in the theater, giving the sense of voices shouting from all sides. The screeching of the witches was programmed to happen automatically after each set of shouts, but through a different set of speakers.
When it came time for the bolt of lightning, I programmed my audio playback software to send a command to the lighting control board, using a MIDI command. (See below for more on MIDI.) With the cooperation of the lighting designer, that command triggered a lighting cue that simulated a bolt of lightning. A fraction of a second later, my peal of thunder rocked the theater. Because both the lightning and the thunder were being triggered by the same device, they always came exactly together. The entire sequence was triggered by a single “GO” command on the computer, with an additional “GO” that was taken as a visual cue when the witch raised her arms.
Like I said, you can’t do that with a CD player. Or an iPhone.
Because theatrical audio playback is more specialized than content creation, it does not attract the wealth of choices that DAW software does. When choosing software, consider whether you want to be on a Mac or Windows computer, and which interface (covered shortly) you want to use. Beyond that, here is a list of things that your playback software should be able to do:
• Play back multiple files simultaneously
• Play back multiple cue lists simultaneously
• Adjust volume (including timed fades)
• Create loops
• Assign multiple inputs to multiple outputs in a matrix
• Play AIFF and WAV formats
More complex programs will offer more features, like:
• MIDI input and output (for talking to lighting consoles and other gear)
• Support for video playback and/or live camera inputs
• Support for live audio inputs
• Additional output channels
• Support for sending audio over computer networks
• Show-control functions, like controlling external devices, accepting triggered inputs, or following time code
• Scripting of custom functions
Some playback programs, like SFX and QLab, come in more than one version, allowing you to get the level of features that you need, without paying for stuff that you don’t.
If you are using your computer to create the audio content, then you need a way to get audio into it. If you are using your computer to play back audio in the theater, then you need a way to get content out of it. If you are using the same computer for both, then you need an interface that does both.
Almost any computer on the market today comes with an audio interface—that is, a way to get audio in and out of the computer. They are known as the mic and headphone plugs. My advice: ignore them.
The mic and headphone plugs are rarely good enough for theatrical use. Relatively speaking, they are fairly low-quality interfaces, suitable for inputting voices for online chats and outputting music to earbuds. The mic input can’t take a balanced signal, which is particularly important if you are going to be recording from microphones, and the output doesn’t have the clean, powerful signal you need. If you are going to be amplifying your audio to fill a theater, you need better quality. Audio interfaces also have higher-quality pre-amps (to pump up those mic-level inputs to line level) and additional features like a headphone jack that lets you monitor the input directly. The built-in headphone jack will only allow you to monitor the sound after it has passed through the computer hardware and software.
Moreover, your computer only gives you a single mono input and a single stereo output, and, trust me, you will outgrow that in a heartbeat.
The audio interface is sometimes referred to as a sound card, because some of them are designed to fit into a card slot in a desktop computer. The higher-quality interfaces still work this way, but this doesn’t work for a laptop, which lacks those card slots. Many interfaces, therefore, are actually external devices, known as plug and play. These devices plug into your computer’s USB or Firewire port, so they work fine for laptops. Opinions rage about whether Firewire or USB is better, but the cooler heads will tell you that they are quite similar. If you have a newer Mac, you can now use the Thunderbolt port, which is fast and reliable.
When shopping for an audio interface, pay attention to what platform it supports. Macs can use most PC interfaces, but frankly, it’s best to get an interface that is specifically designed for your platform. Pay attention to how many and what kind of inputs and outputs it has, and how it plugs into your computer.
If you are using the same computer for both content creation and playback, then the interface will have to serve two masters, which isn’t a huge deal. Just make sure you have enough input and output channels. When shopping for the interface, have the specs for both your audio playback software and audio creation software available. If you are using two different computers—one in the theater and another dedicated to a recording studio—then you can buy audio interfaces for each one separately.
MIDI
I have mentioned MIDI in two different contexts: as a way to connect audio creation software to musical keyboards and as a way to connect playback software to external devices.
The Musical Instrument Digital Interface was developed in the early 1980s by a consortium of music equipment companies to help electronic music equipment, like keyboards, talk to each other and to computers. When a musician plays a note on a MIDI-equipped keyboard, the keyboard sends out a command to play that note on a MIDI cable that runs between the keyboard and another device, such as a sound module that stores audio files. In this way, a musician can use one keyboard to control lots of different instruments. The user can also record those commands on a computer, where they can be stored, edited, and played back. MIDI messages are not notes; they are commands to play notes. Besides the name of the note, MIDI can also send a value at the same time. This value is most often used for the volume (or velocity, as MIDI calls it23) of the note.
MIDI information is sent out on sixteen different “channels.” This is a bit like having a sixteen-channel television set. The computer can send out sixteen different strings of commands to sixteen different machines at the same time. You set each device to listen to a particular channel of information, just as you change the channel on your television. Each machine will only listen to the commands coming in on the channel to which it is assigned. In some cases, a machine might be set to “omni” mode, which means that it listens to all the channels at once.
Soon after MIDI appeared, composers began using MIDI sequencer programs to record thousands of notes of music on separate tracks and play them back on stacks of different keyboards and sound modules. A great deal of film and TV scoring is done this way today, as well as most of what you hear on pop music radio stations. If you are hiring a composer to score your show, chances are good that he will be working on a MIDI setup.
Because it is simple and reliable, MIDI is sometimes also used as a way for non-musical devices to communicate. Lighting consoles can often receive commands in the MIDI format, allowing other devices—like audio systems—to send light cue commands.
Mixing: Telling the Sound Where to Go
Mixers are among the most visually daunting objects in technical theater. Their considerable width, carpeted with buttons and knobs, gives them a menacingly complicated appearance. I think technicians get into the fact that the mixer looks so, well, technical. But let’s face it: a mixer is just a big freeway interchange where sound enters from all different directions, gets shunted around, and gets spit out in new directions. Whatever else you forget about mixers, remember this: a mixer just takes in sound, reorganizes it, and sends it out somewhere else. That’s all.
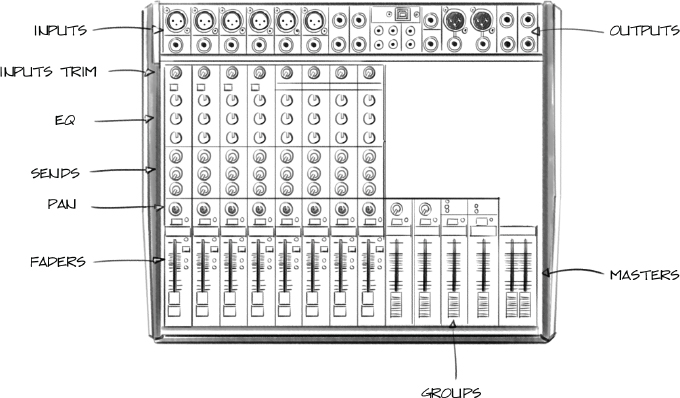
Fig. 46. A typical mixer
Most mixers are made up of four parts: input modules, equalization, auxiliary sends and returns, and output channels. Big words for simple things. Actually, equalization and auxiliary sends are contained within the input module, so let’s do that first. Then we’ll do the returns and the outputs. This section is best enjoyed if you are sitting in front of a mixer, so go sit in the sound booth, if you have one.
Input Modules
Any source of sound that I have mentioned so far can be fed into a mixer. A mixer has a number of places to plug things in—inputs. In fact, the first way in which we usually describe a mixer is by saying how many inputs it has. A sixteen-channel mixer has sixteen places to plug things in. A microphone would take up one of those places. A tape deck or CD player would take up two places each, since these items put out a stereo signal. Stereo signals need two inputs, a left and a right.
Looking at a mixer, we see that the input modules are laid out in columns, each column containing a set of identical controls. One of the reasons that mixers have so many knobs is that each of its functions is duplicated for each input module. Each input module may only have six knobs (for example), but multiply that by sixteen inputs (for example), and suddenly you have a forest of ninety-six knobs.
The controls for each module are laid out in a vertical column. You can think about the sound entering the module at the top and flowing downward. There are exceptions to this idea, but let’s not muddy the pool.
An input module begins with an input where you plug in the incoming signal. This input may be on the top, front, or back of the mixer. This input may be a quarter-inch plug or an RCA plug (for unbalanced input); for a microphone input, it may be an XLR plug (balanced input).
After the sound enters the module, the first thing it meets is an input level control, also known as the input trim. Remember when I said that there were different levels of signal—mic level and line level? The input trim (sometimes called input gain) allows you to boost a mic signal up to where the mixer can use it. This control may just be a switch between “Line” or “Mic,” or it may be a rotating level control that you adjust. If you are feeding the mixer a mic-level signal, you turn the input level up. Turn it down for a line-level signal.
After going through the input control, the signal hits the equalization, or EQ, controls, if there are any. EQ is just like the treble and bass controls on your stereo. Mixers may have two controls, one for the high end (treble) and one for the low end (bass), or they may have three or four, all to shape the color of a sound, boosting it or cutting it wherever necessary.
After EQ, it’s time for the sends. Remember how I said that a mixer is like a traffic interchange? Well, these are the first exits. A sound engineer will often want to send some sound somewhere else, like into an effects processor, to mess with it, or a monitor system, so people backstage can hear the sound. For these purposes (and many more), the engineer opens up an “exit” (a send). It’s important to understand that turning on a send does not mean that all the sound goes out that way and none of it continues down the input module. In that sense, it isn’t like traffic at all. Making some of the sound turn off the freeway doesn’t reduce the amount that continues onward. Then again, traffic seems like that sometimes, too.
The next thing that the signal usually encounters is some sort of routing that tells it which output it is destined for, that is, which way it is going to exit the mixer. Depending on how many outputs you have, there may be several switches and knobs here, or only one. There might be buttons for various Master or Submaster outputs, but no matter what it says, it’s basically just telling the sound which way is out. One control that is common in this area is a pan control. A mixer is usually sending out a stereo signal, and a pan control tells the sound which side of that stereo signal the sound is going to. The pan knob might be turned all the way to the right (known as “hard right”), which means that the sound is only going out the right channel, or it might be set all the way the other way (“hard left”), which means that it is going entirely to the left. Or it may be set anywhere in between, including right in the center. In this last case (“panned center”), the sound would go equally to the left and right sides.
Two other controls that may be found in this area are Mute and Solo. Mute simply turns this channel off. Solo turns every channel off except this one. Solo is often used during setup to hear a channel by itself in order to set volume, EQ, or search out a problem. In most cases, the Solo switch doesn’t affect the main output, only a monitor signal that the engineer is listening to.
Way down at the bottom of the module is the volume control for that module, generally known as the fader.
The input modules will take up the majority of the space on the mixer. Over to the side (usually the right side) is another set of knobs and sliders that control the levels of the sound. These controls vary quite a bit between mixers, but the next section talks about the usual suspects you can expect to see in this area.
Groups
As I mentioned earlier, the output from each channel can be sent to various outputs, depending on what your mixer has. A smaller mixer might only have two outputs (left and right), but many mixers provide group outputs that allow the operator to control (you guessed it) a group of faders. This is very useful if, for example, you have a bunch of mics on a drum set or a choir and you want to control them all at once.
Aux Sends
I mentioned earlier that each input module has a knob where you can siphon off sound for a send. Each send will have a volume control off to the side of the mixer, marked Aux Send, which is short for auxiliary send. This knob controls the volume of all of the signals that are sent to that send from the input modules. If there is more than one send in each input module, then there will be more than one aux send knob.
Aux Returns
Sometimes when you send some signal out of the mixer, it goes off to do something and never comes back. This is true of monitors, for example. In other cases, the signal will go somewhere, such as to an effects processor, and then come back to the mixer to be mixed in with the rest of the signals. The place where it comes back is called an auxiliary return, marked as Aux Return.
The entire journey of that signal—going out the send, traveling thorugh the procecessor, and coming back to the return—is called an effects loop. The sound travels from the input module, out the send, through the processor, and back to the mixer through the return.
Monitor Output
Many mixers have a separate output which is designed for the person operating the mixer to listen to. This is really useful if the operator wants to test or change something without disturbing the main mix that is going out to the stage. This monitor output (sometimes called control room) has its own volume control as well.
Main Outputs
Finally, there will be some faders (usually two) that control the master mix that is going out to the stage. They are almost always in the lower right-hand corner of the mixer. They control the overall mix of sound that you have created by combining faders, groups, and returns.
Processing: Sculpting the Sound
Besides simply amplifying sound or recording it, audio equipment is capable of performing a dizzying variety of tricks on the sound itself before it spits it out.
Ever record yourself talking, singing, or playing an instrument and then wonder why it doesn’t sound as good as a recording on the radio or an album? Of course, the pros record on higher-quality microphones in acoustically friendly rooms, but another big reason is that professionally recorded sounds are processed. If you want to experience a quick example of processing, try listening to your local public radio station for a while, preferably an NPR newscast or something like that. Once you have gotten used to the quality of the voices, switch the dial over to your local rock-and-roll station and listen to the DJ. Sound different? It should. The rock-and-roll DJ’s voice is being processed to make it more dynamic, richer, and more in line with the voices on the records he is playing. NPR processes announcers’ voices as well, but in more subtle ways.
Processing comes in various forms, discussed in the next sections.
Reverb
If you’ve sat in a large church or a well-designed concert hall recently, you’ve experienced reverb in its natural state. Reverb is just sound bouncing around in a space—caroming off hard surfaces and coming at your ears from all directions. The more places it has to go, and the fewer absorbent places that exist in the room, the longer the sound bounces around. We refer to the span of time that the sound bounces around as the reverberation time. The reverb time is the time it takes a sound to completely die out in a particular space. A good theater, where the clarity of the spoken word is all-important, will have a relatively short reverb time—from one to two seconds. A concert hall, where we are more concerned about the richness of the sound than the intelligibility of speech, should have a longer reverb time, two and a half seconds or more. Large churches will have reverberation times of four, five, even ten seconds.
In the early days of recording, it was common to have a “reverb room” in the studio. This was a room with a speaker at one end and a microphone at the other. Sound was played into the room through the speaker and rerecorded through the other microphone. In this way, sound engineers added the natural reverberations of a space to the voices. These days, this effect can be recreated electronically by an effects processor. The circuitry inside this magic box uses various mathematical formulas, or algorithms, to electronically alter the sound, adding reverb, depth, and other frequencies to it. When the sound comes out of the box, it sounds as though it were created in another kind of space. Most processors let you choose what kind of space you would like to imitate, both in size and quality. It might have options like Small Room, Ensemble Hall, or Concert Stage, as well as Warm, Dark, or Rich. By adjusting the processor, you can choose what kind of reverb you want. Want more reverb time? Dial up a larger room. Want to make a voice sound cold and distant? Try the Dark setting. Some boxes provide literally hundreds of options, like Wood Concert Hall and Empty Gymnasium. It can get pretty fun. By altering the balance between the dry, unprocessed, sound and the wet, processed, sound, the engineer can decide how heavy to make the effect. Too dry, and the effect may go unnoticed. Too wet, and the performer will be singing in Carlsbad Caverns.
An effects processor is something every medium-size-and-up theater should own. It will help you produce better sound effects tapes and make offstage voices sound more interesting. Other organizations may also choose to own them in order to make their sound systems more flexible. Rock-and-roll bands can’t live without them.
Of course, no processor can approach the acoustics of a large concert hall or, best of all, an old-style cathedral. Many classical artists take advantage of these spaces and record their albums there. Please attend these concerts so that you can bask in the best thing the Laws of Physics ever did for music—rich, natural reverb. For some reason, modern church designers always put in carpets. From a musical perspective, that’s a sin.
Equalization
Anyone who has ever made a sound cue at home and then played it back in the theater will understand the need for equalization, or EQ. The tape sounds different in different spaces. Acoustically speaking, every room in the world is different, depending on the textures it has (carpets, furniture, paneling, and so on), as well as the shape of the room itself. Every room will kill certain frequencies and accentuate others.
But wasn’t there EQ in the mixer? Yes, there was, but with only a few controls. A true equalizer is a separate unit that lives outside the mixer. It has a long row of sliders or knobs that increase or decrease the amount of sound at each frequency. It takes time and experience to set up, not to mention a certain amount of trial and error. It also takes a sharp-eared technician. Once the sound is optimized for a space, you should put a lock on that EQ and leave it forever, or at least until you get different carpets.
Besides this kind of colorization, EQ also provides an important function in getting rid of feedback. This is because the shape of the room will cause some frequencies to bounce back more than others, meaning that certain frequences are more likely to find their way back into the microphones and cause feedback. By decreasing those specific frequencies, EQ can allow you to push the overall volume a bit higher without getting feedback. Live music depends heavily on EQ for this reason.
EQ comes in two very different varieties. A graphic EQ may have a dozen or more sliders, each assigned to a specific frequency. By moving the sliders up and down, the operator can shape the sound, which helps to address the particular “sound color” of a room. If you call up the equalization on iTunes, you will see a graphic EQ. A parametric EQ allows the operator to select certain frequencies and cut or boost them. She can also select the width of the cut or boost, that is, how many frequencies above and below the target frequencies are affected. Parametric EQ targets certain frequencies and thus is best for addressing feedback problems.
Compression and Limiting
Ever go to an amateur night and listen to a bunch of people who don’t really know how to use a microphone? As they sing or speak, they pull the mic away from their mouth, or get it too close, causing the sound to die away or boom out like Moses. An overexcited performer might yell into the mic, causing the sound system to overload and distort. Compression and limiting help audio people to deal with these problems.
A compressor and a limiter are two different versions of the same thing. Both devices follow the sound level and, when it climbs above a certain volume, pull it down. A compressor uses a ratio to determine how much to reduce the sound. If it is set at 4:1, then it will drop the volume one decibel for every four decibels it is over the limit. A limiter is less subtle: you give it a volume level, and it prevents the sound from ever getting louder than that level—an audio “line in the sand.” Because they reduce the really high sound levels, compressors and limiters help guard against overloads. This means you can bring the overall volume up without worrying about distortion ruining your speakers. The softer voices will be more audible, and the louder voices won’t be so annoying.
Because they are so similar in function, compressors and limiters are often built into the same unit.
Amplification: We Are Going to Pump You Up
Having been pre-amplified, routed, and processed, our heroic sound wave now exits the mixer and heads for the gym to build some real muscle.
Remember, up to this point, the sound has only existed at mic or line level. While these levels are good enough for the electronics in your system, they are not strong enough to really create audible sound. Therefore, the sound has to go through some kind of amplifier before the audience can hear it.
Amplifiers come in lots of different sizes but only two common types: mono and stereo. A mono amp has one input and one output. A stereo amp has two separate inputs and two separate outputs. In fact, it’s really like having two separate amplifiers. The manufacturers just package them in one box for convenience.
When you play an album on your home stereo, the sound going to the left and right speakers is slightly different because studio engineers go to great lengths to make it that way. After all, you have two ears, and by giving those ears slightly different sound, the engineers can give the illusion that all the instruments you are hearing are located at different places in space. Therefore, every home stereo is … um, stereo.
In the theater, though, this does not work and here’s why: in order for stereo imaging (the two-dollar name for this effect) to work, the output from the two speakers has to reach your ears at approximately the same time and volume. This is not too hard in your living room: your speakers are about the same distance from you most of the time. In the theater, though, the vast majority of the audience is not sitting dead center in the middle of the auditorium where both speakers would be the same distance away. Most of them will hear one speaker much more strongly than the other, and the stereo imaging will be lost. For this reason, most sound in the theater is mono, not stereo. This means that you will not have to have two separate audio signals, even if you have speakers on both sides of the stage.
You might still need a stereo amp, however. Because theater speakers are quite large, each speaker needs its own amplifier. You can use one side of a stereo amp for one speaker and the other side for the other speaker. Just make sure they are both getting the same signal.
A stereo setup can still be useful for sound effects. Directors often want an effect to appear to be coming from one side of the stage or the other. Having a stereo setup allows you to send part of the audio signal (a car starting, a barking dog, gunshots, whatever) to one speaker and not the other.
One final note about keeping your system happy: when turning your system on, always turn the amp on last. When turning your system off, always turn the amp off first. Other kinds of electronic equipment—such as mixers, decks, and processors—can send dangerous “pops” through the system when they turn on or off. Making sure the amp is off when this happens will prevent damage to your speakers. So, remember: amplifiers are last on, first off.
You can remember this by thinking of your amp as the most dangerous element in the system. Because it is the most dangerous (at least to the other equipment), it should be on the least amount of time.
Speakers: The Bottom Line
If you are buying a new sound system, my advice is to be economical everywhere except the speakers. The quality of your sound system is more dependent on your speakers than anything else.
Here’s how speakers work: in your speakers, there is a curved piece of cardboard-like material called the speaker cone. This cone has a magnet attached to it. Remember the magnet in the microphone—the one that moved and created an electrical signal? This one works the same way, only backwards. Instead of the magnet creating the electricity, here the electricity moves the magnet. The magnet in a speaker has to be a lot bigger than the one in the microphone, since it has to physically move the cone enough to create large waves of pressure in the air (sound waves).
Speakers have one statistic that you should be aware of: resistance. Resistance describes what kind of opposition the signal is going to run into when it gets to the speaker, and it is measured in ohms. There are two common kinds of speaker: 8 ohms and 4 ohms (occasionally you may find a 2-ohm speaker). All you need to know is that the resistance of the speaker should match the amp. Your amp will probably say on the back which kind of speaker it is calibrated for. Look for something that says “100 watts into 8 ohms” or something like that. If the resistance is mismatched, it can cause a variety of problems, some of them potentially damaging.
If you are plugging in speakers, make sure they are in phase. The positive terminal on the amp must be attached to the positive terminal on the speaker. Same with the negative terminal. Plus sign to plus sign and minus sign to minus sign. If you are not sure which is which, try it one way or the other. Hooking up speakers out of phase will not damage them—they will just sound bad. The most common symptom is a lack of bass. If your system uses quarter-inch plugs or “banana” plugs for the speakers, you’re in luck. They only go together one way.
One final thing about speakers: proper speaker placement within the space is critical. Speakers are directional: they are made to throw sound in a particular direction. High-end signals, like flutes, cymbals, and violins, are more directional than low-end ones. The high-end signals will go in whatever direction the speaker is pointed, and they will stop when they hit a wall. The low-end signals will go in all directions, regardless of which way the speakers are pointed, and they tend to seep through walls. That is why, when the guy in the apartment upstairs turns on his stereo, you only hear the bass. Bass notes are less directional. Take a moment to notice the effect before you ask him to turn it down. You might get peace and quiet just by asking him to turn down the bass a little. Worth a try, anyway.
Some lucky theaters have speakers specifically designed for very low-end sounds. These are called subwoofers, and they are wonderful for creating rich, full sound. Because low-end sounds are nondirectional, you can put a subwoofer anywhere in the theater, and every one will hear it. Dance clubs almost always have subwoofers—it sends the beat right into your bloodstream.
Proper speaker placement is also critical to avoid feedback. Try not to put speakers where they will pump sound into microphones. It is not always that simple, however. If you have lots of speakers and/or lots of microphones, you may get stuck with some feedback-prone positions. For another thing, singers in bands want to be able to hear themselves, so it is necessary to install speakers, or monitors, pointing directly at them, which means directly at the microphones. Sound engineers use equalization to deal with these problems. If you have consistent feedback, try adjusting your speaker placements.
Because theater sound is generally mono, you do not have to worry about getting a good stereo setup, but you do want the sound to appear to come from the direction of the stage. It usually isn’t practical to put the speakers right in front of the performers, though, so there is some trickery involved.
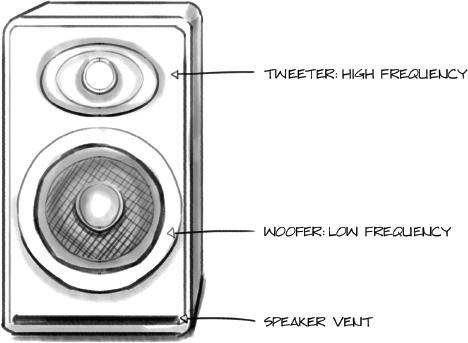
The most common trick is to put the speakers directly over the stage. We determine the location of a sound by hearing it arrive at our two ears at different times. (Our brain is capable of distinguishing differences as little as three thousandths of a second, which is the time it takes for a sound to travel from one side of our head to the other.) Since our ears are on the sides of our head, not the top or the bottom, we distinguish left and right much better than up and down. If you have ever stood on a balcony over someone’s head and tried to get his attention, you know what I mean. You keep shouting his name and he keeps looking around, trying to figure out where you are. “No, you ninny, look up!” you shout, and round and round he goes, trying to figure out where you are. It’s not his fault. Our ears have evolved to find things that are on the same level as we are. I guess sabered-tooth tigers didn’t drop down from above very often.
By putting the speakers directly over the stage, then, we fool the audience a little. It’s difficult to distinguish between sounds coming from straight in front and those coming from a higher position.
From the source to the mixer, through the processors, the returns, the outputs, the amps, and the speakers, all in thousandths of a second. It is a strange and wonderful journey.
18Fights will break out in audio geek bars when they read this, of course, as some engineers passionately insist that there is still a benefit to sampling at 96 kHz, regardless of what happens afterwards: “OK man, just put down the thumb drive and we can talk this over like reasonable people …”
19It will have a higher pitch, because you are playing it faster than it was recorded.
20It will have a lower pitch, because you are playing it slower than it was recorded.
21Neither company did it alone, just for the record. Microsoft worked with IBM and Apple worked with Electronic Arts, so you audio geeks can just cancel that email you were about to send me.
22As this edition went to press, I discovered an iPhone app called PlayFadePause that does a lot these things but is still limited to the iPhone’s single, stereo output.
23MIDI uses the term velocity because it actually refers to how fast a key travels from its top position to its bottom position. A key that is struck harder will travel faster and, presumably, make a louder sound.