To start chives from seeds, freshness counts. Stick with seeds from this year’s crop from a reliable supplier and discard that packet of 1987 seeds you just found in your basement.
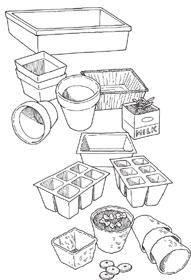
You can start seeds anytime, but most people sow them in spring. When it comes to planters, you have several options. Some gardeners enjoy the simplicity of peat pots, which are little pots made of compressed peat moss that can be planted directly into the garden when the plant is ready to move out into the big, bright world. Others invest in multiflats — plastic planting trays consisting of a large, rectangular base trough for proper drainage and irrigation and a top nesting tray with lots of potlike indentations, each of which gets one or two seeds. Seedlings grown in multiflats are easily popped out of these reusable trays, along with the little “cup” of soil in which they were planted — their root structures hold the soil in place while you plant them. Multiflats have the advantage of being very tidy and self-contained. Peat pots and small plastic pots need to be set into trays and can be more awkward to handle.
If you already have a few empty 2- to 3-inch (5–7.5 cm) plant pots, press them into service for starting your seeds. If you have saved the six-pack plastic flats that most purchased seedlings come in, use them — they work like a charm.
Seeds need special soil to sprout and grow. Most garden suppliers carry seed-starter mixes, so you needn’t mix your own. These potting mixes are formulated to be high in organic matter, such as peat moss and other moisture-holding ingredients; this keeps seeds moist and their environment hospitable to growth. Seed-starter mixes have a finer texture than ordinary potting or garden soil. They are not very rich nutritionally because a sprouting seed does not use as many nutrients as a growing and flowering plant does.
Any shallow container can be used to start chives from seed. Choose whatever is most convenient for you — and try to recycle old containers whenever possible!
Step 1. Fill your plant pots or planting trays by sprinkling soil over them until they are overfull.
Step 2. Scrape excess soil off the top, leaving the soil level with the tops of the pots, and lightly tap the pots to make the soil settle. The soil should settle somewhere between ¼ and ½ inch (6–13 mm), depending on the depth of your pots. Use a piece of scrap wood to even out the surface.
Step 3. Water gently with a watering can.
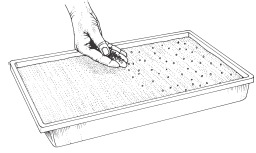
Step 4. Sprinkle chive seeds onto the prepared soil, with a density of about four seeds to each inch (2.5 cm) of surface. The seeds need light to germinate, so don’t cover them with soil.
Step 4
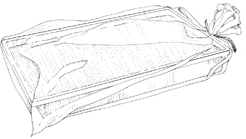
Step 5. Many seed-starter kits come with clear plastic covers that transform the setup into a miniature greenhouse. If you are using a multiflat with a “greenhouse” top, place it over the tray and put it in a warm spot to germinate. If you don’t have such a top, you can purchase one separately or rig up a similar system with household and salvaged objects. Commercial bakery boxes for cakes and cookies often come in clear plastic, and small plant pots can be put inside them to keep moisture and warmth. Small flats and plant pots can also be placed in a plastic bag; close lightly and cut small vent holes.
Step 5
Step 6. Put your starter pots in a warm place away from direct light and wait for the seeds to germinate, keeping the soil moist but not soaking wet.
Step 7. When you begin to see small shoots of green peeking up through the soil (be patient, as this may take anywhere from 2 weeks to several months), open up the “greenhouse” to allow air to circulate.
Step 8. Keep the soil moist and grow the chives until they are about 1 or 2 inches (3–5 cm) tall. It is now time to transplant them to your garden or to a growing container.