Chapter Eight
FOOD
Almost everybody who travels, it seems, worries about starving in a survival situation. In reality such concerns are largely overblown: you can survive for a month (or longer) without putting any food in your body. This is hard for some people to wrap their heads around, since most who live in developed nations are comfortably used to eating three or more meals a day. The thought of going days—or even hours—without a substantial meal is a scary proposition. But though it’s not necessarily comfortable to go for a stretch without food, it is possible.
Your quest for food will be easier if before you leave you research what you can eat, how to catch or pick it, and how to make it edible. There may be food in abundance all around you in the wild, but you have to know it’s there, and if necessary, how to prepare it. And there’s danger in consuming something without knowing if it’s edible.
The first time I saw star fruit was in Costa Rica. As I stared, wondering if they were poisonous, my survival buddy and military survival expert Mike Kiraly was stuffing his face with them. Had it not been for him, I might never have tried them, thereby missing out on an important and abundant food source.
Many early explorers died from scurvy while sleeping on beds of spruce boughs, which when boiled into tea would have provided all the vitamin C they needed.
Manage Your Energy
THE MAIN EFFECT YOU’LL NOTICE FROM LACK OF FOOD is a significant decrease in your energy level. In many survival situations, I’m fine without eating for a week, but I really notice the loss of energy. As my energy fades and I tire quickly, I can work for only an hour or so at a time, and then I have to sit down and rest for 20 or 30 minutes. Then I work a little more, only to have to sit or lie down again. I repeat that pattern throughout the day.
So forget about needing massive quantities of food on which to feast, accept the stomach growling as part of your ordeal, and focus on getting something, anything, into your system that will increase your energy.
Closely manage your activity level so that you require less food than usual. This means sitting down if you don’t need to stand, lying down if you don’t need to sit, and sleeping if you don’t need to be awake. Anything you can do to slow your heart rate and relax will preserve your energy for the things you need to do to stay alive. The major risk you run from lack of energy is that it can lead to listlessness, apathy, and ultimately, depression.
STROUD’S TIP
The more food you eat, the more water your body needs for digestion. So if you are short on water, then eat less food, or you’ll speed up the dehydration process. On the other hand, if you’re near a large source of fresh drinking water, force yourself to drink every half hour. This not only keeps your system flushed and clean but also makes your stomach feel like something’s in there. This is a trick I use all the time while filming survival ordeals.
The Myth of Wild Edibles
PERHAPS NOTHING IS AS OVER-ROMANTICIZED IN THE world of survival as the notion of gathering and eating wild edibles such as plants and mushrooms. Many people envision the wilderness as providing a bounty of plants to feast upon. Don’t be fooled; the search for plants to eat can be fraught with danger. These are the some of the challenges you’ll encounter.
Identification
Plant identification in various parts of the world is difficult at the best of times, even if you have a book telling you their Latin names and accompanied by photos. The same plant may look different depending on your location or the time of year, and this is not easily gleaned from most guidebooks. Some plants are safe to eat, abundant, and easily identified, but for the most part reading a book is not the way to learn about most wild edibles. You really need an expert on the local vegetation to offer you first-hand education on location: you should smell it, touch it, taste it. Then, when the time comes, you’ll know it.
Availability
Contrary to popular notion, wild edibles often are not plentiful. There are some regional exceptions, such as coconut trees on tropical islands or prickly pear cacti in the Sonoran Desert. But even with coconuts, once you’ve eaten what’s fallen on the ground and knocked down what you can reach with a stick, you’ve got to climb 30 to 60 feet (9 to 18 m) up the tree to get at the rest, and that’s not easy to do.
The truth is, you might have to walk for miles before you find a single wild edible. When I was in the Amazon, the only significant source of fruit I found was in an overgrown jungle area that had previously been a farm. Otherwise there was nothing but big green leaves everywhere, which my Waorani teachers didn’t eat.
Even while spending a year in the wilderness in northern Ontario, my wife, Sue, and I found only one or two places where the blueberries and raspberries grew so thick that we couldn’t eat all of them in one sitting.
Season
Most wild edibles, especially fruits, grow only at certain times of the year.
Latitude
The availability of wild edibles is region-specific. As a rule, the farther you are from the equator, the less abundant wild edibles become. So if you’re in the Rocky Mountains, the best time to find wild edibles is really limited to spring and berry season. Everything but berries is unpalatable and difficult to digest.
The farther you get from the equator, the more you have to rely on meat or critters for food. That said, it seemed peculiar to me that the Waorani of the Amazon could not teach me about very many wild green edibles. It turned out they believe that because greenery is eaten by the small animals it will make them weak, so they stick primarily to meat, manioc (a potato-like root), and a few fruits.
Personal Sensitivities
You may have a severe allergic reaction to a plant you’ve never before eaten. Given this risk and the many other variables in identifying and eating wild edibles, your best bet is to know two or three that are plentiful and easily identified for each of the world’s regions. These are listed later in this chapter as my Top Three Wild Edibles and Top Three Critters.
The Edibility Test
IF YOU HAVE NO CHOICE BUT TO EAT WILD PLANTS that you cannot identify, you should employ a last-ditch effort called the edibility test, which exposes your body to the plant in slow increments.
Since the edibility test requires a lot of time and effort (and potential risk), make sure there is enough of the plant available to make the test worthwhile. Note that it does not work with all poisonous plants! Here are the steps to follow:
- 1. Test only a single plant type at a time; don’t eat anything else during the test period. Rub the plant on a sensitive part of your body such as your wrist; wait
- 2. 45 minutes to an hour for signs of any adverse effects like nausea, hives, dizziness, or shortness of breath.
- 3. If there’s no negative effect, take a small part of the plant and prepare it the way you plan on eating it.
- 4. Before eating, touch a small part of the prepared plant to your outer lip to test for burning, tingling, or itching.
- 5. If there is no reaction after five minutes, place the plant on your tongue. Hold it there for 15 minutes.
- 6. If there is no reaction after 15 minutes, chew a very small amount for 15 minutes; observe for any adverse effect. Do not swallow.
- 7. If you still feel fine after chewing for 15 minutes, swallow it.
- 8. Wait eight hours. If you begin to notice any adverse effects, induce vomiting and drink as much water as possible. If there are no adverse effects, eat a small handful of the plant.
- 9. Wait another eight hours. If there are still no negative effects, you are likely safe.
STROUD’S TIP
In almost all parts of the world most grasses are chewable. Don’t swallow the grass itself, just chew it and swallow the juice. It’s a good way to get some nutrients into your system.
Critters and Creepy Crawlies
THE GOOD NEWS ABOUT CRITTERS is that they are plentiful in many parts of the world. From worms to ants to frogs, there are usually lots of items on the menu. The problem, obviously, is that most of us find the prospect of eating bugs and slugs and snails downright disgusting, a phenomenon known as plate fright. Believe me, after a few days without food, you get over plate fright pretty quickly.
Almost every culture on the planet has either an active or recent history of eating critters as part of its diet, whether it be tarantulas in the Amazon, chocolate ants in India, or grubs in northern Ontario. We’re not alone, either: most predators and big-game animals will eat bugs too. If you’re at risk of starving, the fact that these creatures are almost universally high in protein and fat may make them more appealing. Don’t forget that insect larvae are also edible.
To successfully eat critters, follow a few basic rules:
- Get over plate fright. Remember, your ancestors feasted on slimy, wriggly creatures. Why can’t you?
- Recognize these warning signs of potentially poisonous creatures. Avoid those that
- >> are very hairy
- >> are brightly colored
- >> give off a strong odor
- >> sting or bite
- >> may carry diseases from parasites such as flies, mosquitoes, and ticks
- >> move very slowly and out in the open. Poisonous creatures are not afraid because they know they are poisonous!
Though generally you should stay away from poisonous creatures, there are some that you can eat, provided you remove their dangerous bits. In the desert, I survived almost exclusively on scorpions. Once I cut away the stinger, they tasted like shrimp. Of course you’ll have to consult a local expert beforehand, as attempting to eat something known to be poisonous should only be a last resort.
If you lack the knowledge, perform an edibility test on anything you suspect might make you sick.
Gathering and Catching Critters
Many edible creatures, such as frogs and snakes, prefer damp, dark places like rotting logs and rock crevices. Just make sure you don’t shove your hand into one of these places without first inspecting it.
If you’re close to a body of water such as a lake, you have only to sit by the shore to see how many critters there are. For example, you may see a dozen or more leeches swim by in a matter of minutes; reach down and scoop them out. They do taste better cooked, by the way—kind of like little anchovies.
When I was in the Kalahari Desert, I trapped dozens of scorpions with something akin to a bottle trap. All I did was dig a little hole about an inch (2.5 cm) from the scorpion hole and drop a jar into it. When a scorpion came out of its hole, it would fall into the jar and get stuck.
Cooking and Preparing Critters
The safest way to eat critters is to cook them first, since this kills the parasites carried by many, particularly those with a hard outer shell.
First you should get rid of as much waste as possible. This means eliminating the entrails or squeezing out the waste, provided you know where the critter’s anus is. Worms will clean themselves out naturally if you submerge them in water for a few minutes. Grasshoppers can be cleaned by holding on to the head with one hand, the body with the other, and pulling.
All edible critters should be verified by a local expert. Taking a chance on some harmless-looking frog in Costa Rica, for example, could result in death.
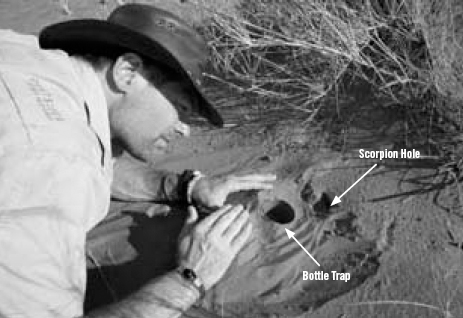
This bottle trap will work wherever scorpions are found. It even works with just a hole, if you make the sides steep enough. Scorpions can’t climb vertically very well. The trap needs to be placed right at the opening of the small scorpion hole, as shown.
Fish
FISH ARE A FANTASTIC SOURCE OF SURVIVAL FOOD. You can leave your hook in the water 24 hours a day and let it work for you while you rest or do other things. But don’t think that catching fish is easy, no matter how remote your location and how abundant they may be. Luck is definitely part of the equation.
When I was in Alaska, I fished from my sea kayak with a long line, a well-made fish hook, and a big chunk of bait. Though the salmon were jumping all around my kayak, nothing would take my bait. During that same time I had a fishnet in the water for 48 hours and saw schools of salmon running by, and still couldn’t catch a fish dinner.
Although there are no poisonous freshwater fish, the skin of some saltwater fish is poisonous when eaten raw. Several species of tropical fish are also very poisonous; the only way to identify these is to have consulted a local expert. Without that knowledge, you have to decide if eating a fish is worth the risk. Try the edibility test on fish you suspect of being poisonous.
As with any creature you catch in the wild, try to eat all parts of the fish. The skin (provided it’s not poisonous) has lots of nutritional value, so eat that too. Many experts advise against eating fish that appears spoiled (sunken eyes, strong smell, strange color), but I believe that as a last-ditch effort, it’s okay to eat. If you become ill after eating what you suspect to be a rotten fish, however, either consume some charcoal or induce vomiting.
Catching Fish
Of the various fishing methods available, the most common is the hook and line. You need only some type of basic cord or rope, the thinner and more transparent the better (and, of course, some kind of hook). If you don’t have any thin line, you can unravel a piece of clothing, such as a sweater, or unwind a piece of cord or rope to use the component threads.
To greatly improve your chances with hook and line, use bait. If your food supply is limited, using it for bait is a trade-off: you may have to sacrifice some of what you have for the prospect of acquiring something larger. Insects, raw meat, and worms are all good bait. In all cases, fish are much more likely to take bait that is native to their waters.
If you don’t have bait, you can try your hand at making lures. An effective lure can be anything that moves and therefore catches the fish’s attention: a piece of credit card, the zipper off your pants, a piece of thread, a coin, or a key. Obviously, the more hooks you have in the water, the greater your chances of catching something. If you’re near a moving body of water, consider stringing a line across (tying it to a couple of trees or rocks) and attaching to it several other lines and baited hooks.
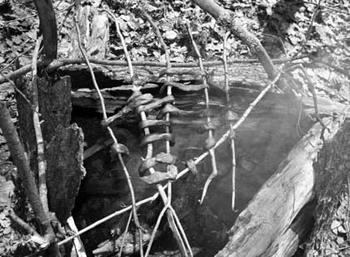
More elaborate than hook and line are fish traps. These take time to build, but can also reap greater rewards under the right circumstances. The most common type of fish trap is essentially a stick fence that helps to corral the fish or move them in the direction you want them to go.
If you don’t have fish hooks with you, they’re easy to make from bones and thorns; metal objects such as safety pins and nails work well too. Ironically, fish bones are great to make into fish hooks because they are easily carved.
To make a simple fish trap, tie a series of sticks together with rope or cord (you want the water to flow through, not the fish). You can make one or more sections, depending on your needs. Push the sections into the soil bottom of the waterway. Ideally, the fish will be channeled into an area where you can then spear or net them.
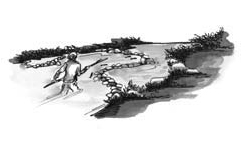
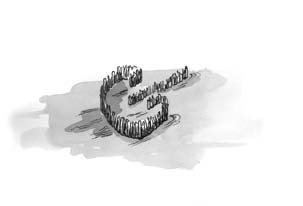
In coastal regions, you can use the tide to help you trap fish. Build a circle of rocks on an area of beach that is covered by water only at high tide. The tide brings small fish in with it. As the tide recedes, fish may get caught in the trap.
Although fish trapping is possible, I have yet to be in a survival situation where I’ve had the time or energy to do it. Fish-trapping methods are closer to being traditional living skills than survival skills. They are not as easy as they look, take a long time to accomplish, require a lot of energy, and you must have all the necessary supplies (or be able to adapt what you do have). You also have to be in the ideal place to attempt these methods during the right season. There are a lot of ifs in this scenario!
Ranking pretty high in the realm of romanticizing wilderness survival is the idea of drugging fish. Though it is possible to introduce concoctions of certain plants to water sources to stun or kill fish, this is an exercise better left to experts in plant identification. Even if you have a local teach you which plants to use, your chances of catching fish this way are slim.
Fishing Techniques
Build walls in narrow channels to trap fish in one area. Then, you can spear them (but beware—it’s not easy!).
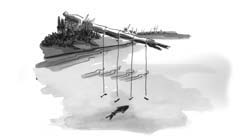
Build a rustic “fishing pole” that has several lines instead of just one. This way, you increase your chances of catching a fish.
Use sticks and logs to create a fish trap. Once you corral the fish, they are easier to catch.
And although Tom Hanks made it look easy in Cast Away, there is nothing easy about spearing fish. If by some lucky coincidence you find yourself in an area where many fish congregate in a small pool, however, consider making a barbed fishing spear. Take a long piece of wood, no more than an inch or two (2.5 to 5 cm) in diameter. To be effective, you first have to whittle the tip to a very sharp point. Carve a few barbs (curved upward) into the top of the stick to prevent a fish from sliding off after you spear it.

The barbed fishing spear is made from a long piece of wood, no more than an inch or two (2.5 to 5 cm) in diameter. For the spear to be effective, you first have to whittle each tip to a sharp point.
Carving a few upward-curving barbs into the top of your spear will pre vent the fish from sliding off after you spear it.
If you have a net or can make one, you can either set it in or drag it through the water to catch fish and other creatures such as freshwater shrimp. Another effective fishing method with a net—particularly in smaller bodies of water such as streams and creeks—is to build a border around the perimeter of the net, usually with sticks. Attach a series of ropes or cords around the edge of the net, all of which come together at a central point about a foot or two (30 to 60 cm) above the net. Attach another (lead) rope to these and drape it over a nearby branch. Hold the far end of the lead rope in your hands. Dangle the flat net in the water. When fish swim over the center portion, quickly raise the net.
Finally, fish are attracted to light at night. If you have a light source, try pointing it at the water while using your primary fishing method.
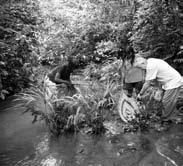
Waorani women are masters of net fishing, as seen here in the feeder streams of the Amazon.

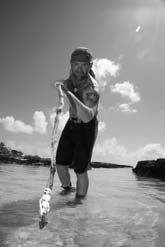
Torch fishing in the South Pacific increased my chances of catching fish, because fish are often attracted to bright light. It also allowed me to see sleeping fish. The task was not without danger, however. Accidentally stepping on a stonefish could have proved fatal.
Game
THE NOTION OF CATCHING GAME IN A SURVIVAL SITUATION is an attractive one, mostly because you can end up eating something substantial that tastes like the meat many of us eat on a daily basis. The reality, however, is that catching game is difficult, especially if you’re talking about anything larger than a rabbit.
Without a gun, ammunition, and hunting experience, the idea that you might kill big game is wishful thinking at best. So what does that leave us with? Small game.
Trapping and Snaring Small Game
Once you accept the reality that nabbing big game is an exercise limited to only a handful of survival situations, the world of small game opens before you. The advantage of trapping and snaring small game is the same as that of fishing: you can set a series of traps that work while you don’t. Done properly—and in the right location—these simple devices can add enough sustenance to your diet to keep you going for a while.
In addition to (hopefully) providing you with food, the other benefit of creating traps and snares is that it is proactive and enables you to feel like you’re doing something to better your situation. When you build these tools, you’re concentrating for hours on a specific survival task. This helps to occupy your mind—and to defeat boredom, apathy, and depression—thus helping to keep you alive.
Another benefit of traps and snares is that they’re effective anywhere in the world. A figure-four deadfall, for instance, will work just as well in the African savannah as in the northern boreal forest.
There’s strength in numbers when it comes to traps. The more you set, the more luck you’ll have. If you can set 45 rabbit snares, do it. You’ll have to invest more energy at the front end, but you’re also setting yourself up for greater rewards at the back end.
Although many people tout the benefits of complex traps and snares, my philosophy is to follow the KISS method: Keep It Simple, Stupid! The elaborate ones require tremendous effort and expertise and often don’t yield any more than the basic ones.
You’ll increase your chances of success if you use bait in your traps and snares. Begin by scattering some of it around your trap. This will encourage the animal to develop a taste for the bait. When the outer supply is exhausted, the animal likely will venture into the trap, its desire for more of the bait overcoming its natural sense of caution. Keep in mind that most types of traps and snares do not always kill the animal, and a trapped animal that’s still alive (and probably injured), no matter how small, can be a formidable opponent, clawing, biting, and scratching. In these cases, you must hit the animal on the head with a club or some other heavy object to kill it. It won’t be pretty. Survival never is.
If you are lucky enough to snare or trap an animal, remember that you’re not looking for a few choice pieces, the way you might when you shop at the butcher. In a survival situation, you eat everything on the animal, with the exception of the bowels and excrement, and (of course) any known poisonous bits.
Snares
A basic snare is a simple device: a looped cord or rope that tightens around an animal as it walks through. Getting a snare to work exactly as designed often requires a bit of fine-tuning, though. The loop must be big enough for the animal’s head, not so big that the animal walks through unscathed, and at the right height off the ground for the animal’s head.
A variation on the simple snare is the drag noose. Place forked sticks on either side of the animal trail and lay a crosspiece from one to the other across the trail (well above the height of the animal’s head). Dangle the noose from the crosspiece. If the animal becomes ensnared in the noose, the crosspiece becomes dislodged and caught in surrounding vegetation. The animal tires quickly as it struggles to get free.
Where to Set Snares and Traps
Never set traps and snares too far from your shelter. You don’t want to have to travel a great distance to reach them, for two reasons. First, you waste energy going back and forth to check the traps. More important, if the distance is prohibitive, you may not travel to the location every day. And if you are lucky enough to trap something but wait too long to retrieve it, you may find that some other animal has come along and eaten your catch.
Always position any trap or snare in a location where there is evidence of animal activity: runs and trails, tracks, droppings, chewed or rubbed vegetation. Try to disturb the area as little as possible when setting the trap, otherwise you will tip animals off as to your presence.
The best areas to set traps and snares for small game are where different types of forest meet, such as where an old-growth forest turns into a swamp. The big animals come there for the small animals, which are there for the smaller animals, and they are all there for a drink.
A simple snare is nothing more than a noose positioned along an animal’s path and attached to a stake. The idea is that the noose tightens around the animal’s throat as it passes through the snare. As the animal struggles to get out, the noose tightens.
STROUD’S TIP
A simple noose is all you need to make an effective snare. To make one, tie a small loop at the end of the rope. Pass the working end of the rope through the loop to form the noose.
Rabbit snare: Use a rope or cord to make a noose; drape it loosely over some foliage growing close to the ground. Attach the lead rope of the snare to a bowed branch overhead, then continue the lead rope to a trigger mechanism that will release at the slightest movement. If you’re lucky, the rabbit will walk through the noose but catch the rope with a leg or paw. This releases the trigger, sending the bowed branch skyward and catching the rabbit in the noose.
The catch mechanism is a critical part of the rabbit snare. It must be tight enough that it doesn’t release accidentally but sensitive enough to release when the rabbit passes through it.
The cord shown here is attached to a bowed branch. The branch needs to be strong enough to support the weight of a rabbit.
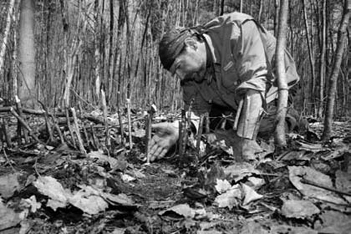
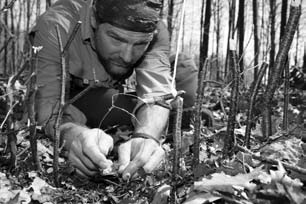
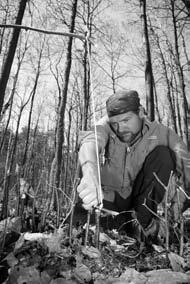
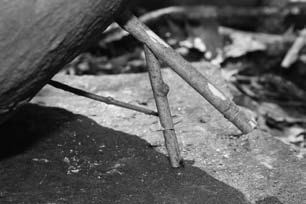
Squirrel snare: Since squirrels are relatively plentiful in many parts of the world, squirrel snares can be a huge boost to your survival efforts. A squirrel snare is a long pole or branch that you lean against a tree at approximately a 45-degree angle.
The idea behind the squirrel snare is that the squirrel will use the pole to climb the tree. Should it feel the noose on its neck, it will try to leap to safety and hang itself.
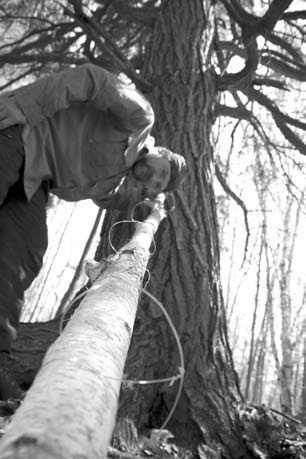
To build a squirrel snare, loosely wrap three or four wire nooses (a few inches in diameter) on the top and sides of the pole. You want the squirrel to pass through at least one of them when going up or down the pole. Placing bait between the snares is effective.
Traps
Even without snare wire or some kind of string or rope, you can catch game by building traps. These run the gamut from very simple and basic to extremely intricate and may include the use of rope. As with so many things in survival, the simpler the better…and often the more successful.
Figure-four deadfall: A figure-four deadfall works by crushing its prey. To be effective, the weight must be heavy enough to kill, or at least immobilize your intended prey.
To make the trap, gather three sticks of approximately the same size—anything from a few inches to a couple of feet (7.5 to 60 cm) if you are going after big game—and notch them as shown in the picture.
Note that making an effective figure-four deadfall takes practice; the skill with which you cut the angles in the sticks will determine how effectively it releases.
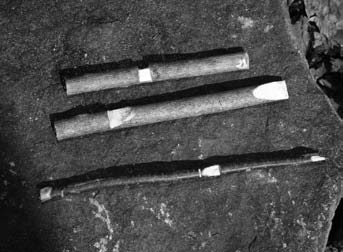
Figure-four deadfall sticks (top to bottom): the upright stick, the release stick, and the bait stick.
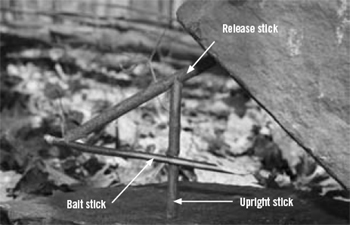
Bait is set on the bait stick first. The sticks are then placed together in the shape of the number four, with the weight leaning against the (release) top stick. When the animal begins to nibble on the bait, the trap releases, crushing the animal.
Doug’s deadfall: This is similar to the figure-four deadfall. To build this trap you need three sticks of varying length (two short ones and one longer one) and a heavy crushing object such as a flat stone.
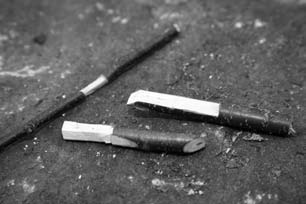
Doug’s deadfall uses components similar to those of the figure-four deadfall: two upright sticks and a bait stick.
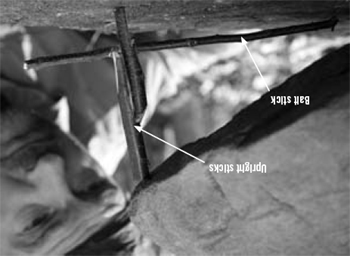
For Doug’s deadfall, bait is placed on the end of the longer stick. When an animal disturbs the upright sticks, the rock or trap should fall, crushing the prey beneath.
Paiute deadfall: Similar to the figure-four deadfall (but easier to set), the Paiute deadfall incorporates a piece of rope into its design. You need three long sticks of approximately equal length, and one short stick. See photo captions on the next page for detailed instructions.
Bottle trap: Similar to the scorpion trap I used in the Kalahari, a bottle trap is effective in catching small rodents such as mice and voles.
Dig a hole about a foot (30 cm) deep, making sure it’s wider at the bottom than the top and that the hole in the top is as small as possible, but big enough to fit your prey. Place a long piece of bark or wood an inch or two (2.5 to 5 cm) off the ground and over the hole; you can use rocks or bark to elevate the wood.
Small rodents will seek shelter from danger under your bark or wood and fall into the hole. They will not be able to climb out because of the angle of the walls. Use caution when checking this trap, however: snakes like holes too!
Making a Paiute Deadfall
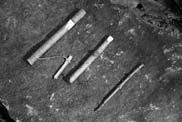
1. Gather and whittle Paiute deadfall sticks: (from top to bottom) the diagonal stick, the catch stick, the upright stick, and the bait stick.
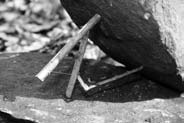
2. To set up a Paiute deadfall, bait the stick, then set up the trap as shown. The diagonal stick holds the weight of the rock.
3. Here is the Paiute deadfall from another angle. If an animal disturbs the bait stick, the catch stick will release. The diagonal stick will fly up, the rock will fall, and dinner will be served.
Birds
ALL SPECIES OF BIRDS ARE EDIBLE, but I do not consider them an important part of my small-game diet, for two reasons: birds are very difficult to catch, and bird traps tend to be complex and hard to build.
If you hope to have any chance of catching birds, you must make tracking them a significant part of your trip preparation and planning, and have extremely good luck. When I was in the Cook Islands, for example, I happened to be there during the one or two weeks when Brown Booby hatchlings were trying to take flight. They were practically falling out of their nests right at my feet! Had I been there a couple of weeks earlier or later, however, I would not have seen them.
Believe it or not, the easiest birds to catch are songbirds, because you might find several dozen of them together in a tree or bush. The throwing stick is the best primitive hunting tool for nabbing songbirds.
If you have a net (or can make one), one method of hunting birds is to string a net between trees near their nests. Birds tend to use the same flyways, and you may snare one this way. If you find some nests, bird eggs are also a good food source.
Tracks and Other Signs of Animal Activity
IS IT NECESSARY TO KNOW THE DIFFERENCE between squirrel and mouse tracks? No. You couldn’t care less whether the animal you’re after is a shrew or a vole or a pika; all you want to do is eat it. All you need to know about tracks is where they are, which indicates where the animals are, and consequently, where you should set your traps and snares.
In addition to watching for tracks, you can determine where animals spend their time by keeping an eye out for trails or runs, droppings, nests or burrows, holes, and scratchings.
Hunting
UNLESS YOU’RE AN EXPERIENCED HUNTER and have a weapon with you, you won’t have much success hunting for your food. I have yet to meet someone who can run down and catch a deer with their bare hands. In North America more than half of all people who get lost in the wilderness are hunters. But remember that hunting is labor-intensive, and as your energy level dwindles, so will your ability to hunt effectively.
Making Hunting Tools
The best hunting tools, like the best traps and snares, are the ones you can create simply and easily. For this reason you won’t find me explaining how to make bows and arrows. Not only are they extremely difficult to make but learning how to use them effectively takes practice. A person can’t, without years of experience, take a bent branch, attach a rope to it, and bring down a deer.

A throwing stick is used intuitively: you throw it at an animal or bird in the hope of dazing or killing it. In essence, the throwing stick is opportunistic hunting. You should always have one with you, so that if you spook a bird or small animal while walking, you have the stick ready.
The simplest yet most versatile hunting tool in a survival situation is the throwing stick. A throwing stick is a wrist-thick piece of hardwood in a curved J shape that looks like a miniature hockey stick, about 1.5 to 2.5 feet (0.5 to .75 m) in length. Some people sharpen one end of the stick, though that’s not necessary. The throwing stick can be used for protection from wild animals and can also double as a digging stick.
A throwing stick does you little good, however, if it’s not at hand when you need it. In the African plains, I was hiking with my throwing stick strapped to my backpack. A few minutes into the walk, I stirred up some ground birds about 5 feet (1.5) away from me. Of course, I missed the chance to kill them because by the time I got my throwing stick out, they were gone. That’s a mistake I won’t make again.
You do not want to travel long distances with the throwing stick looking for game; this requires too much energy and the stick is not accurate. Use it only when an opportunity presents itself.
Skinning and Dressing
IF YOU ARE CONCERNED ABOUT PREDATORS, make sure you clean game some distance from your camp, preferably near a water source. To skin large game, lay the animal on its back and split the hide from throat to tail, avoiding the sex organs. Turn your knife blade up to ensure that you cut only the hide and stomach muscles, not the internal organs, as cutting internal organs such as the stomach or kidneys can sometimes introduce foul-tasting liquids, effectively spoiling your catch.
Smaller game is easier to skin. Cut the hide along the bottom or back legs and across the anus. Insert your fingers under the hide on both sides of the cut and pull it apart, using the knife to cut away places where the skin is holding on. The skin should slide back quite easily.
Carefully cut through the stomach muscles. The exposed internal organs can now be cut or pulled out; they are attached only at the throat and anus. Don’t throw them away, though: most are edible. At the very least, they can be used for bait. You can eat the lungs, heart, kidneys, and liver (but be wary of liver that appears discolored or diseased). Avoid stomach and intestines, and although the stomach contents may be edible (such as crawfish inside fish) they should be considered a last-ditch food source.
Cooking
AS FAR AS I’M CONCERNED, there is only one way to cook food in a survival situation: boil it. Boiling food is most effective because many of the nutrients remain in the cooking liquid, and there is also something comforting about drinking warm broth.
It’s true that boiled food can taste pretty bland, but I’d rather put up with bland flavor in an emergency than eat something that was grilled or cooked on an open fire, with many of the nutrients and fat dripped away.
If you don’t have the option of boiling because you lack a pot, then you must use an alternative method. Spit cooking can be accomplished by skewering your meal on a green sapling and suspending it over a small fire. The hot coals of a fire work best here; high flames will only singe your meal without cooking the inside. Turn the spit regularly to cook the meat through.
Another effective method is rock frying. Heat a couple of flat rocks in your fire, then place your food directly on the rocks to fry it.
Preserving Food
IF YOU ARE FORTUNATE ENOUGH TO HAVE MORE FOOD than you can eat at any given time, the greatest tragedy is to see it go bad. For this reason, it’s important to know the various methods of preserving food in the wild.
First, cut away all the fat. Fat can be rendered on its own and used as a food source, as bait, as grease in a qulliq (candle), as waterproofing, and more.
If weather allows, the easiest technique is to hang your food to dry. Find a sunny, windy place, and set up a few sticks and logs to create hanging racks. Cut the meat into thin strips and hang it over the racks. After a couple of days it will be dry. You may find the meat turns black and crusty, and this is not necessarily a bad thing. In fact, it prevents flies from laying their eggs in the meat and becoming maggots. (But if they do, keep the maggots—they’re edible too!)
A better way to dry meat is to smoke it. Hang thinly sliced meat from your racks, but also build a small, smoky (punky wood works best) fire underneath. Smoking not only gives the meat great flavor, it prevents the flies from getting at it. If you have cloth among your supplies, you can wrap some of it around the racks to make an enclosure, which speeds up the process by keeping the smoke and heat in. For generations, Native North Americans have used tip is as smokehouses.
When meat has been properly smoked, it will look dry, shrunken, and brittle. It doesn’t need to be cooked to be eaten. Here the meat is drying in the sun while the smoke keeps the flies away.
Finally, you can preserve meat by soaking it in salt water. Salt water must cover the meat completely. If you happen to have lots of salt, you can layer the meat, covering each layer in salt. In both cases, be sure to wash the salt off the meat before cooking it.
Eating Carrion
CARRION—THE CAR CASS OF A DEAD ANIMAL—is something many of us would never consider eating. Until we’re trying to stay alive in the wild, that is.
Most readers of this book live in a society where the only interaction they have with rotten food is when they throw it in the garbage. And in an age when food has spent time on a truck, train, or ship, has traveled between continents, and has been handled by dozens of people before it hits the grocery store shelves, that’s probably smart.
But in the wild, it’s amazing what kinds of rotten (or seemingly rotten) foods our stomachs can handle. That’s why I ate a rotting fish when I was in Alaska. Even though it had been out in the sun all day, I figured it wouldn’t hurt me, and I was right. Most cultures in the not-too-distant past included raw or rotting meat as a staple of their diet. For example, the Montagnais of northern Quebec fill the stomach of a woodland caribou with its internal organs and let it hang in the heat of summer in a tree for a couple of weeks. Then, when it has turned into what can graciously be described as stinky mush, they eat it as a delicacy.
If you resort to eating carrion, you should cook it whenever possible. But if I were presented with the choice between uncooked carrion and starvation, I’d eat the carrion.
Eating Charcoal
IF YOU FIND YOUR STOMACH BECOMING UPSET because of your new diet, eating charcoal (pieces of burnt wood from your fire) may help cure what ails you. Charcoal will absorb many drugs and toxins from the gastrointestinal tract.
African survival expert Douw Kruger uses charcoal extensively for stomach problems. He grinds charcoal into a teaspoonful of fine powder, mixes it with water, and consumes this a few times a day as necessary. Don’t take too much, though, as it can cause constipation. And don’t ever eat charcoal made from poisonous wood.
Region-Specific Food Considerations
THE KEY TO SUCCESS IN GATHERING AND CATCHING FOOD in a wilderness environment is knowing a few plants and creatures native to each region. The wild plants and creatures listed below are safe to eat, easy to identify, and found in relative abundance.
Arid Regions, Deserts, and Canyons
Top Three Wild Edibles:
- pads of the prickly pear cactus
- fruit of the prickly pear cactus
- mesquite beans
Top Three Critters:
- mice and rats
- grasshoppers and scorpions
- rattlesnakes: Be sure to cut o? and bury the head and its potentially lethal fangs.
Boreal and Other Temperate Forests
Top Three Wild Edibles:
- cattails
- berries (in season)
- wild teas (from needles, leaves, and fruit): spruce, blueberry, blackberry, raspberry, Labrador
Top Three Critters:
- creepy crawlies (earthworms, grubs, grasshoppers)
- rodents (including squirrels)
- rabbits
The Arctic and Polar Regions
Top Three Wild Edibles:
- caribou lichen (reindeer moss)
- berries (in season)
- willow shoots
Top Three Critters:
- rodents
- bird eggs (in season): The Arctic is one of the few places where you can find entire colonies of bird eggs.
- fish: Fishing in a place like the boreal forest is an uncertain undertaking. You could walk through miles of thick bush without finding a lake. In the Arctic in the summer, however, there are all kinds of running streams. (There aren’t always fish in them, but checking streams is worth a shot.)
On the Sea or Open Water
Top Three Wild Edibles:
- bull kelp
- seaweed
- any other type of greenery
Top Three Critters:
- barnacles and other crustaceans that attach themselves to the bottom of your vessel
- small fish that follow in the shade of your vessel
- plankton: You can catch plankton by trailing an open sock behind your vessel. The plankton collect in the sock, giving you a teaspoonful of salty mush.
(Of course, you should also try your hand at catching big fish from your vessel, but this isn’t easy to do. Some have sustained themselves by killing birds that occasionally landed on their vessels.)
Jungles
Top Three Wild Edibles:
- fruit
- palm nuts
- palm hearts
Top Three Critters:
- fish from feeder streams (small, shallow, muddy little runoffs from rainfall):
- If you have a net, you can often scoop small fish and crustaceans from these streams.
- fish from rivers
- insects and grubs (as long as you can distinguish the benign ones from the poisonous ones)
Coastal Regions
Top Three Wild Edibles:
- bull kelp
- bladderwrack seaweed
- sea lettuce
Top Three Critters:
- creepy crawlies (earthworms, grubs, grasshoppers)
- rodents (including squirrels)
- rabbits
Mountains
Top Three Wild Edibles:
- berries (in season)
- wild teas
- mushrooms (only if an experienced mushroom hunter has taught you which ones are safe)
Top Three Critters:
- rodents (including squirrels)
- rabbits
- creepy crawlies (earthworms, grubs, grasshoppers)
Swamps
Top Three Wild Edibles:
- cattails
- pond lily tubers
- wild teas
Top Three Critters:
- frogs and leeches
- snakes and turtles
- rodents
Africa
Top Three Wild Edibles:
- wild cucumbers
- wild melons
- gemsbuck (marama) bean roots and bulbs
Top Three Critters:
- snakes, lizards, and tortoises
- ground birds and sociable weaver birds (found in big nests in trees)
- rodents and mongoose
Group Versus Solo Survival
BEING PART OF A GROUP THAT’SSTRUGGLINGFORSURVIVAL can be both a blessing and a curse when food is an issue. There is the obvious advantage of having more people to collect food and identify food sources. But when it comes to rationing food, you may find that the other members of your group have vastly different opinions about the proper proportions.
Another benefit of being in a group is that you may find it easier to eat things you might otherwise consider disgusting. If you’re hungry and see your buddy eating maggots, for example, you just might do it too.
And with more people in your group, there’s a greater chance that at least one of them is a proficient hunter or angler, which could radically change the food landscape for everyone.
On the downside, there can be endless discussions about favorite foods and what you miss the most (as you feast on a slug or two). These conversations can lead to a couple of hours of euphoria but are inevitably followed by depression as the reality of your situation becomes clearer.