Chapter Nine
SURVIVAL TRAVEL AND NAVIGATION

When you’re struggling to survive, most of your decisions revolve around prioritizing your immediate needs: should you search for water, food, or shelter? Should you make a signal or a fire? All are vital to your well-being; the only decision to make is which one should come first, and the answer usually becomes obvious when you take into account your circumstances, the region, and the weather in which you find yourself. But perhaps the single most important (and difficult) decision you will face in the wilderness is whether you should move or stay put.
There may be instances, for example, in which you have to move at least a short distance to escape an immediate hazard, such as a rockfall or an avalanche. Barring that, however, the choice to stay or go is never an easy one. There are pros and cons to each.
Should You Stay or Should You Go?
MANY PEOPLE—PARTICULARLY THOSE who have attended survival classes—have had it drummed into their heads by their instructors that they should stay put no matter what the circumstances. Unfortunately, this is not always the best advice.
You may find yourself in a spot that offers you ample food and water, protection from the elements, and even wood for a fire. But at the same time, you’re in a remote location and nobody is going to come looking for you, so there’s only one hope of seeing home again: you’ve got to make it out on your own.
Here are some crucial questions to ask yourself before moving on:
- Do you know which way safety lies and how to get there?
- If not, do you run the risk of getting even more lost?
- How far will you have to travel to reach safety?
- Are you or any of your travel partners injured, and do you have the physical strength to walk out?
- Do you have enough supplies to make it to your destination?
- Does anybody know where you are, and is there a chance they’ll come looking for you?
- If so, how long before they even start looking?
- Are you on a well-used trail that might have other travelers and potential rescuers heading your way?
- Which is more dangerous: where you are now, or where you have to travel?
- Does the current location offer necessity-of-life benefits such as water, shelter, fire/fuel, and food?
- Are you now with a vehicle or other large object that may be seen easily from the air?
In many situations, staying in one place is the best thing you can do. After all, there’s no guarantee that there’s anywhere better just around the bend. As a general rule, if you don’t have any idea where to go or how you will provide for yourself along the way, then staying put makes sense. Most studies show that people walk in circles when they are lost, due to the unfamiliar terrain and land features in their way. As a result, they become even more lost and make it harder for searchers to find them.
Here are some reasons to stay:
- You’re injured and run the risk of getting more hurt while on the move.
- Moving may take you into more dangerous territory.
- You’re with a large vehicle, which not only offers shelter but is a lot easier to spot (especially from the sky) than you would be walking alone through the bush.
- You can build a better camp, create a signal fire, and maybe even start hunting and scavenging for food.
- Some individuals (friends, family, or official personnel) were informed of your route and destination. Chances are they’ll begin searching for you shortly after you don’t show up at your destination or return home. If you head o? down a different path, you may miss them—and rescue—completely.
Your chances of being rescued are better if you left behind a trip or flight plan. Within the first 24 to 72 hours, there’s a high probability of rescuers finding you alive. After five or six days, they are more likely to find bodies.
Yet as good an idea as staying put may seem, there are times when moving is the best option. On one occasion I was searching for a place to teach a survival course in a swampy part of Algonquin Provincial Park, a well-known Ontario park. I was at the peak of my teaching days and starting to get overconfident. I headed out into the bush, off the established trails, without telling anyone where I was going. Even my wife was not expecting to hear back from me for at least three days.
After finding the perfect spot to teach—in a swamp a few miles into the bush—I started my hike back to my hidden and waiting canoe. Not more than 30 feet (9 m) away, a beautiful cow moose was grazing in the setting sun. I decided to try out my moose call and see how she would respond. I cupped my hands in front of my mouth and made the sound of a female moose.
It was the rutting season, and during this “season of love,” the bull moose may be the most dangerous animal on the continent. These creatures have been known to attack and destroy tractor-trailer trucks. So I didn’t make a bull sound for fear of bringing an angry male around.
This gentle cow moose just looked up once and then went back to eating. So I made the call again. This time, no response at all. I shrugged and turned to continue on my merry way. That’s when more than half a ton of angry male moose, his truck-destroying antlers pointed at me, came charging out of the bush beside the female. Clearly, he was not amused.
I ran for all I was worth through the thick boreal forest. Several hundred yards later I spotted a partially fallen tree and scrambled up, out of reach of the bull. He stayed below the tree grunting, snorting, and stomping, all the while trampling down the small trees in the area.
I suddenly remembered (and this is the point of the story) that nobody knew where I was, and nobody was expecting me anytime soon. If I didn’t do something quickly in the failing fall sunlight, I would be there for the night…or longer. I realized I had to move.
After several minutes, I climbed down and hit the ground running, and with the bull moose still giving chase, eventually wound my way back to the lakeshore, where I slipped quietly into the water (fully clothed) and swam as stealthily as possible back to my canoe. To this day, that experience remains the most frightening and dangerous situation I have ever faced in the wilderness.
Planning and Preparing for Survival Travel
SURVIVAL TRAVEL IS VERY, VERY DIFFERENT from any other kind of wilderness travel. For that reason, it is imperative that you take the time to prepare for the journey that lies before you. Leave only when you’re completely ready to do so.
Before you head out, set up some kind of sign that tells anyone who’s looking for you or comes upon your camp that a) you were there, b) how long ago you left, and c) which direction you went. You can leave a note, leave a marker pointing in your direction of travel, or conspicuously mark your trail. Orange surveyor’s tape is the best for marking, if you have it. If you’re writing a note, the more details you can include, the better, such as the status of your supplies and your health.
If possible, before you go, build up a stock of food and water, and pack any protective clothing you think you’ll need. Make at least a couple of tinder-balls to take with you and store them in a dry, protected place for the journey. If possible, also bring signaling gear.
Real-World Survivors
Life-or-Death Decisions
When it comes to getting out of a survival situation alive, the toughest choice facing any of us is the one between staying put in the hopes of being rescued or venturing out for help. Often, it’s a life-or-death decision.
This was the dire predicament facing Thomas and Tamitha Garner, a suburban couple from Salt Lake City, when they found themselves stranded in a snowstorm in a secluded part of southwestern Utah. A sudden winter storm paralyzed their vehicle, cutting them off from civilization and virtually all hope of immediate rescue. Stuck in the snow-blanketed mountains for 12 agonizing days, the Garners struggled to survive in their pickup truck, with two boxes of granola bars, some frozen bottled water, a can of spray deodorant, some carburetor cleaner, a lighter, and Medusa, the family dog.
Dressed only in jeans and light coats, they kept warm by starting the truck from time to time. For nine frigid days and nights, Thomas and Tamitha carefully rationed the granola bars and water, but eventually, when they were reduced to eating Medusa’s remaining kibble, they knew they had to make a choice: stay where they were and hope rescue teams would find them in time or leave the cold comfort of the truck to set out in search of help.
Thomas, a former Eagle Scout, got to work. Recalling an episode of “I Shouldn’t Be Alive: The Science of Survival,” in which I fashioned a set of makeshift snowshoes from seatbelts and foam car-seat padding, he created boots using the truck’s seat cushions and a few bungee cords. With his wife in sneakers behind him and Medusa in tow, he blazed a trail through snow well over two feet deep. When night fell, all three huddled around a fire, which they made by lighting carburetor cleaner. When the fire waned, they kept it going with spray deodorant.
The couple and their dog continued hiking—despite dehydration, exhaustion, and frostbite—for an astonishing three days and nights, covering 15 miles (24 km) in deep snow. When in doubt, Tamitha repeated her mantra, “One more day and I’ll be home.” On the 12th day of their ordeal, the couple spotted a bright yellow snowplow in the distance and flagged it down.
Because of their resourcefulness and sound decision-making, the Garners—and Medusa—made it out alive. At that critical moment when they were forced to choose, they weighed their options carefully and chose well.
Travel Considerations
ONCE YOU MAKE THE DECISION TO HIT THE TRAIL, there are many factors you need to consider.
Weather and Climate
How will short-term weather conditions affect you? This is a vital consideration. If a violent storm is brewing in the distance, stay put, at least for the time being. Most big weather—especially violent weather—comes and goes fairly quickly. Traveling all day in the rain with poor rain gear is a sure recipe for hypothermia.
Carrying Gear
When you’re on the move, you’ll likely need a way to carry the things that will help keep you alive on the journey (hopefully your survival kit is one of them). The less equipment you have to carry in your hands, the better off you’ll be. You’re going to need your hands to protect you from falling, to move obstacles from your path, and to mark your trail. If you’re fortunate enough to have a backpack, great. But what if you don’t?
With a few raw materials and a little time and effort, you can construct a makeshift carry bag. All you need is a blanket or similar item and some rope. Make your carrier sturdy so that you can travel as fast and as far as possible. It would be tragic to arrive at your destination after a grueling day of wilderness travel to find that you’d lost your lighter because it fell out of your makeshift bag.
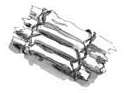
Making a Makeshift Carry Bag

1. To construct a makeshift carry bag, lay all your equipment out on a blanket or similar ground cover.
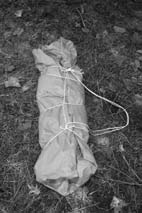
2. Roll up and tie as shown.

3. Using this roll-up method, you can carry your supplies on your shoulder and have your hands relatively free.
Carrying People
You may find yourself in an emergency where you need to carry an injured person. Injured travelers pose a real challenge, one that is nearly impossible for a single able-bodied person to handle. Transporting another person is much more manageable when two or more are doing the carrying.
If you need to carry small children, you can put them in a backpack frame or makeshift carry bag. For larger children or adults, you can make a chair or stretcher out of poles. A rough stretcher can be carried by two people, although it is an exhausting task. If you are the sole able-bodied person, your only option for transporting your injured partner is to make a sledge that can be dragged. This type of device is a stretcher with crossed front handles that point (or curve) upward, allowing the carrier to pull without having to crouch too low. See “Survival First Aid,” Chapter 13, for more advice on coping with injuries.
Rate of Travel
THE STAKES OF SURVIVAL TRAVEL ARE HIGH, so you can’t afford to make any mistakes. Know that your rate of travel will be considerably slower than normal. Move deliberately, carefully, and at a medium pace; it is not a race. Most important, know where you are headed!
Set realistic travel goals for yourself. Pick a destination that you’re pretty sure you can reach without exhausting yourself. It can be demoralizing to set a goal and then not attain it. The faster you go, the greater the risk that you’ll hurt yourself and the more likely you’ll bypass a route or trail that may lead you to safety. You may even miss the cave that could provide shelter for the night, or the cabin tucked in the woods. Go at a reasonable pace and the world will open up in front of your eyes; you’ll begin to see the possibilities before you, possibilities that may make all the difference to your survival.
STROUD’S TIP
While you’re traveling, look backward often to see where you’ve come from so that you can recognize that view if you have to return. Few people do this, but it’s well worth the mere seconds it takes.
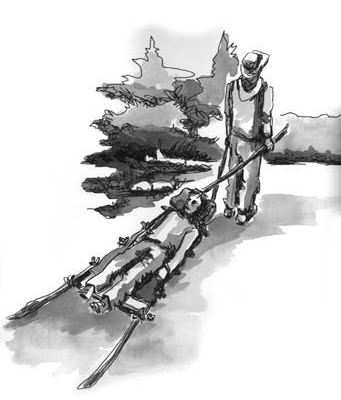
If you’re traveling in pairs and one of you becomes injured, fashioning a stretcher with crossed handles will allow you to walk upright as you pull the stretcher.
Traveling at Night
Traveling at night is a risky undertaking and one I don’t generally recommend. The greatest—and most obvious—danger here is that you can’t see where you are putting your feet, so you risk stepping on a poisonous snake, or falling and injuring yourself. Furthermore, unless you know the area like the back of your hand, your ability to see in the dark—a fork in the trail or a possible shelter—is almost nil. And most predators are more active at night than during the day, so you may be exposing yourself to the possibility of attack. Finally, traveling at night may force you to sleep during the day, which is the time when rescuers (if there are any) will be looking for you.
On the rare occasion when you absolutely must keep moving at night, it can be safe to travel on certain flat-water rivers or lakes. However, I would recommend this only if you are proficient at canoeing.
The main exception to the “don’t travel at night” rule is when you are in the desert, where daytime temperatures may be too high to allow a safe journey. Nighttime travel in the desert can be glorious; when the temperature drops, the heavens open up above you, and you can use the stars or a full moon for navigation.
I have traveled at night in the Amazon jungle. As I stepped outside of an old, abandoned native hut in the failing light, I looked up to see a large jaguar staring back at me. I knew it would take me a while to follow the dense jungle trail back to my destination, a tiny Waorani village, but I weighed the risks and took my chances. Using the light from my video camera to guide me and with the jaguar on my heels the entire way, I finally made it back to the village (which, incidentally, was surrounded by a chain-link fence…to keep out jaguars!). I learned the next morning that my stalker had been a male jaguar weighing more than 200 pounds.
STROUD’S TIP
When traveling, take particularly good care of your feet. If you have extra socks, change them regularly, and avoid walking in wet footgear.
Traveling by Water
Whether it be a swamp, river, lake, or stream, traveling by water may be the best route to safety if your only other alternative is to hack through dense and tangled bush. As you may suspect, however, water travel comes with its own set of risks. That body of water may seem calm and peaceful now, but what will you do if you encounter rapids or if a wind storm kicks up while you’re in the middle of the lake? You also need to consider the possibility that the water may be home to dangerous creatures such as (depending on where you are) alligators, crocodiles, hippopotamuses, polar bears, walrus, sea lions, sharks, or elephants. And then there’s the additional responsibility of waterproofing your gear.
When it comes to exactly how you travel by water, there are few options. Clearly, it’s best if you have your own vessel, like a boat or canoe. Barring that, you’re limited to making something, which usually means a raft. And as romantic as Huck Finn may have made it seem, making a raft—and traveling with it—is not easy to do. If this is your only option for safe travel, or you are convinced that making your way down a certain watercourse will lead you more quickly to safety, then it will be worth the effort. Just be sure to test your creation before loading it and setting out; never trust your survival to a flimsy raft.
If you can’t swim or have little boating experience, stay as close to the shore as possible. When approaching bends in a river, keep to the inside edge where the current is less forceful. Swift-moving rivers can pose a variety of hazards, including snags (submerged trees and other foliage that can grab your vessel), sweepers (overhanging limbs and trees), rapids (portage around them; don’t attempt to run them), and waterfalls.
If you’re following a river on foot and come to an impasse that forces you to take to the water with no vessel, there are a couple of last-ditch ways to float downstream, but these are extremely dangerous. You could try to hang onto some sort of inflatable waterproof container (such as your trusty orange garbage bags), or if you have something buoyant like a food container, try to build something atop it. Cattails are also quite buoyant, and travelers have been known to construct floats from them.
Making Rafts
Rafts can be hard to make in survival situations. Depending on your circumstances, you may be able to tie up a raft that can transport you some distance.
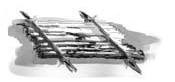
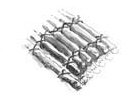
Make a simple raft platform by collecting logs of a uniform size and tying them together in any of the three ways shown.

Construct a rudder pole on your raft, if possible. This way, you’ll be able to steer yourself away from obstacles.
Crossing Water
NEVER UNDERESTIMATE THE POWER OF MOVING WATER. If you can get to your destination without crossing water, you’re better off.
You must find the right spot to cross, and it may not be where you first reach the water. Look for the shallowest or slowest-flowing section (sometimes the most frothy, white-water section is actually the easiest place to cross as that is where the water is shallow enough to expose rocks you can step on). Make sure that you know you can get up the opposite bank before you enter the water.
When crossing moving water such as a river or stream, you should always face the current and lean your body upstream against it. Never turn your back to the current and never lean downstream, or you run the risk of being swept away. Use a stick, branch, or other aid to help you maintain your balance. It only takes 6 inches (15 cm) of moving water to knock down a full-grown man.
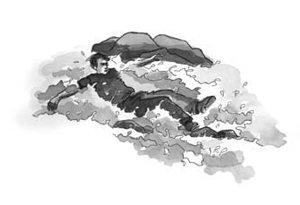
If you have to swim in rapids, keep your hind end as high as possible to avoid injuring your spine. Use your feet to repel any rocks you hit, and keep your feet high so they don’t snag in a rock crevice, flip you over, and turn you face down. Paddle backward with your arms to reach a safe exit point.
Slide your feet along the bottom rather than taking large strides, which would leave you on one leg for much of the crossing time. If you’re wearing a backpack, undo the hip strap and loosen the shoulder straps so that you can slip it off if you get knocked over. Don’t let go of it if you can help it; but you also don’t want it to take you under. Never attempt water crossings in bare feet. It’s a rough compromise to make, especially if your boots or shoes are dry, but wet shoes are less debilitating than a twisted or broken ankle or severely gashed foot.
If you’re crossing in a group, the strongest person should face the current with the rest in line behind, each holding the person in front by the waist. The stronger members of the group break the force of the river for the weaker ones. You can also cross as a group with each member in line locking arms. The strongest person is always in front, with the weakest in the middle. Yet another option is to secure a rope to objects on either bank; people can work their way across while holding the rope from the downstream side.
If you do slip and fall and find yourself being swept away, make sure you’re floating on your back with your feet facing downstream. Your toes should be pointing out of the water (or as close to the surface as possible), and your rear end should be lifted as high out of the water as you can manage, to prevent your cracking your tailbone.
There are thousands of horror stories of travelers who fell out of their boats and subsequently drowned because they let their feet dangle under the surface and catch on trees or rocks or other debris in the water. Once this happens, the force of the flow throws you face first, and holds you under until you drown. Keeping your feet in front of you prevents this from happening and allows you to push yourself away from rocks and other obstacles as you float downstream.
There may be times when you need to cross frozen water. Although this can be an easy way to shorten your journey, it’s not without risk. Falling into water in the middle of winter can be deadly. A pair of ice picks bought at any sports store and a flotation survival suit could save your life.
Expect weak ice in the following places:
- where objects protrude through the ice
- in straight sections in rivers
- where snow banks extend over the ice
- at a confluence of water courses
- wherever you see sinkholes
- where you see darker sections under the snow
Basic Survival Navigation
IF YOU VENTURE INTO THE WILD without basic navigation skills such as how to use a compass, you put yourself at unnecessary risk. The essentials of navigation are fairly straightforward and easy to master, and can be learned by anybody. As you learn how to paddle a canoe, build a campfire, or set up a tent, also learn to read a map and use a compass. I highly recommend that you get some hands-on experience well before venturing out on your own. Many colleges offer night courses on the subject.
The Map
A topographical map improves your chances of survival many times over, but only if you know how to use it and always protect it from damage.
Before setting off, check the date of your map. Depending on its age, you may find that some features have changed, which could drastically throw off your perception of where you are. I have seen entire lakes disappear (and new ones appear) on old maps.
Make sure that you can interpret the map’s symbols and identify major terrain features.
To correctly use any map, you first need to orient it. In simplest terms, a map is oriented when it is placed flat on a horizontal surface, and its north and south markings correspond with north and south on your compass (or at least with your understanding of where north, south, east, and west lie).
If you’re not sure where north is, you can still orient the map using terrain association. To do this, you must know your approximate location on the map. Seek out the major terrain features in your vicinity (such as hilltops, valleys, and ridges), and identify them on the map. This is more difficult in “close” places such as the jungle and the forest, so you may need to wait until you reach something more easily identified. Some topographic maps also mark different types of vegetation, which may help you to determine your location.
Knowing your map-based route is noted as a major priority in “Trip Planning and Preparation,” the first chapter of this book. If you are on a charter trip, sit down with your guide on the first day to familiarize yourself with the map.
The Compass
The compass course I took at my local college always ended with an orienteering race. It became tradition that those of us who also took survival courses were under big-time peer pressure to win. Fortunately for me, I avoided much teasing by winning the year I took the course. My time, however, was not as good as my survival buddy Doug Getgood’s had been a few years earlier, so I felt it appropriate that he join me in writing this, and the next, section.
In a world where the techno-savvy are all too used to having electronic gadgets flash and beep at them, the simple compass sometimes seems almost boring. After all, it just sits there, pointing north. Yet, simple though it may be, the compass is the one instrument above all others that will help you find your way out of the wilderness. Basic compass understanding is vital to your survival.
If you can comfortably and effectively use a compass, you can stand in the middle of nowhere, pick a destination off in the distance and be confident that no matter how many obstacles lie in your path, you will get there.
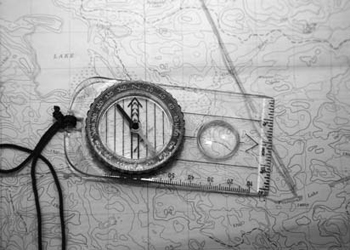
Parts of a Compass
To use a compass, you first have to understand its various parts. The compass shown below is an orienteering compass, a very practical one when used with a topographic map.
The compass has three basic parts:
Base plate: Shows the direction-of-travel arrow, parallel orienteering lines that are used in conjunction with a map, and the index mark.
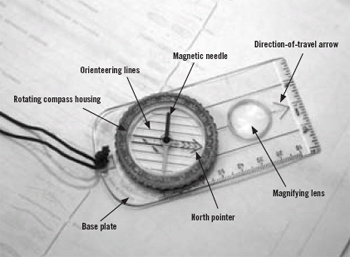
Parts of a compass.
Rotating compass housing: Rotates in either direction. Its border is inscribed with numbers and markings. It begins with N for north and ends where it began, 360 degrees later. On the bottom of the compass housing is the red orienteering arrow, as well as parallel orienteering lines.
Magnetic needle: Balanced inside the compass housing, the magnetic needle is usually red and always points to magnetic north (as long as the compass is held flat and is not placed near certain types of metal).
Taking a Bearing Without a Map
In simple terms, a bearing (one of the 360 points on a compass) is the direction you want to travel in relation to magnetic north. The idea behind taking a bearing is that it allows you to travel in a chosen direction using landmarks as navigational aids. Hillsides, big rocks, unique-looking trees, ponds, and lakes can all be used for this purpose. See the picture captions and other steps that follow for instructions on taking a bearing.
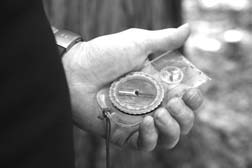

- 1. Face the direction you want to go. Level the compass to allow the magnetic needle to swing freely, and point the direction-of-travel arrow in the direction that you have chosen.
- 2. Now spin the compass housing until the orienteering arrow is directly underneath the magnetic needle. The bearing is shown at the index mark (e.g., 148°). Choose a topographical landmark in that direction that you can easily differentiate from others around it.
- 3. Keeping your compass at the chosen setting, take your eyes away from the compass and make your way toward the object. Once you reach the object, find another landmark in your path in the same direction. This is done by doing the “compass shuffle.” As before, put the compass flat in your hand. Make sure the bearing still reads 148° (or whichever bearing you’ve chosen) and shuffle your body until the red end of the magnetic needle is directly over top of the red portion of the orienteering arrow. The direction-of-travel arrow will point to where you want to go.
- 4. Always place the back end of the compass near or against your stomach with the direction-of-travel arrow pointing ahead. This way both you and the compass will always be facing the same direction. Don’t simply stare at your compass and walk, as you could easily sway to one side and not actually head in a straight line. If you choose a landmark in the right direction, you can put the compass down and make your way to that landmark, walking around obstacles en route. Adventure racers use this method very effectively, noting a landmark in the distance and running between landmarks at top speed.
To reverse your steps you can do one of two things:
- 1. Align the white (south) end of the magnetic needle with the red portion of the orienteering arrow and follow the direction-of-travel arrow back, OR
- 2. Add 180 degrees (half of the 360 degrees of a circle) to your original 148-degree setting (180 + 148 = 328) and travel back to where you started. Ensure in this case that all red arrows are aligned.
The Map and Compass
THE BEST MAP TO USE in conjunction with an orienteering compass is a topographic map. The following is a basic introduction to working with a map and compass. As I explain above, it’s wise to further your studies in the field of orienteering with a local educator.
The Topographic Map
A topographic map is a scaled replica of an outdoor location. The average topographic map has a scale of 1:50,000, where 1 inch equals 50,000 inches. It shows contour lines, grid lines, man-made objects, and natural features such as lakes, swamps, and rivers.
The contour lines are to help you to decipher various terrain features such as peaks and valleys, cliffs and slopes. Grid lines run both north and south (up and down, called grid north) as well as east and west (left and right). On a 1:50,000 scaled map, the grid lines represent one square mile. The north/south lines run almost the same direction as true north, but not necessarily the same direction as magnetic north. The difference between the map’s grid north and magnetic north is called the angle of declination.
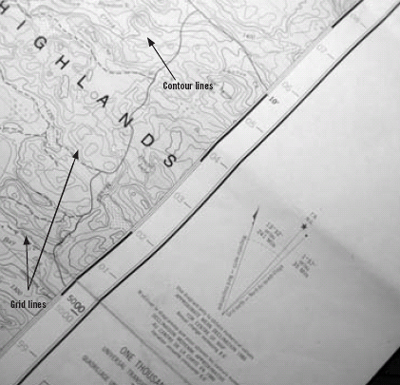
A topographic map gives you geographic detail about the landscape you’ll encounter.
Taking a Bearing with a Map
Using a pencil, mark on your map (a) the location from which you want to take a bearing and (b) your chosen destination Then draw a straight line connecting the two. Place the side of the compass along this line with the direction-of-travel arrow pointing in the direction that you want to proceed. Rotate the compass housing so that one of the orienteering lines runs exactly parallel to or completely covers one of the north/south grid lines on the map.
To achieve the correct reading, it is imperative that the orienteering arrow end points toward the top of the map. The correct bearing is shown at the index mark.
Adjusting for Declination
Now that you have taken the bearing, an adjustment must be made to correct for declination. Using the diagram on the side of the map, find the degrees of difference between the map’s grid north and the compass’s magnetic north. Notice that the map below shows magnetic north, true north (T.N.), and grid north. (For the purpose of map-and-compass work, T.N. should be ignored.) The degree of declination is also shown. Because the bearing was established using the map’s grid line, the grid north marking on the diagram dictates which direction the compass housing should be rotated. If the diagram shows magnetic north toward the left of grid north, turn the compass housing to the left (counter-clockwise). If the diagram shows magnetic north toward the right of grid north, turn the compass housing to the right (clockwise). In either case you will rotate the compass housing the number of degrees indicated on the map.
Keep in mind that magnetic north changes slightly each year. The map will indicate how far it moves each year and how you can adjust for the difference. The compass should now be adjusted for declination, and will give you a true indication of what direction to travel.

A topographical map showing declination.
Adjusting for Declination from Field to Map
If you want to convert a bearing taken in the field to a map, use the magnetic needle as your starting point. Using the topographical map’s diagram for declination as a reference, rotate the compass housing toward grid north.
STROUD’S TIP
When transferring from map to field, rotate the compass housing toward magnetic north. When transferring from field to map, rotate the compass housing toward grid north.
Making Improvised Compasses
ALTHOUGH IT MAY BE DAUNTING TO SEE YOUR COMPASS FLOAT down the river or plummet to the bottom of a crevasse, don’t panic. There are ways to determine north, south, east, and west from ordinary materials that you may be carrying or that you can find in your immediate surroundings. None of these methods is very accurate, but each will give you an idea of where the major directions lie.
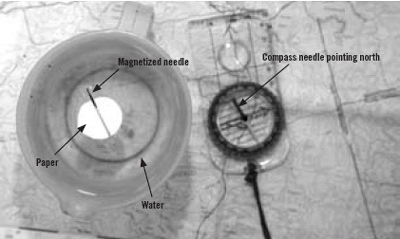
Magnetized needle and paper in water method. A magnetized needle will always point north/south. See tip to learn how to magnetize a needle.
Shadow stick: The shadow stick method uses the sun to determine direction. Stand with the west mark to your left. North is in front of you, east to the right, and south behind. This method cannot be used effectively in regions above 60 degrees latitude.
Using a Shadow Stick to Determine Direction
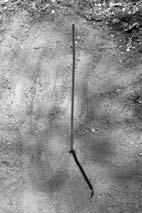
1. Start by poking a stick or branch into the ground. Choose a level spot where you know a distinctive shadow will be cast. Mark the tip of the shadow; this mark will always be west.
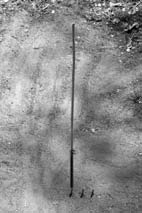
2. Wait about 15 minutes, during which time the shadow tip will move. Mark the new position of the tip. Repeat.
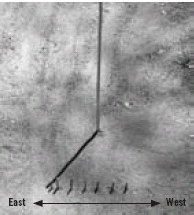
3. Draw a straight line through the marks; this is an approximate east/west line.
Watch method: Although it can be off by as much as 24 degrees and doesn’t work everywhere on the planet, a watch can sometimes be used as a makeshift compass. If your watch is digital, draw a watch (with hands) on a circle of paper with the correct time on it and use the following method to determine your direction.
This method should be used during standard time; in daylight saving time, the north/south line is found between the hour hand and 1 o’clock. If it is before noon, use halfway to the right side of the hour hand; if it is after noon, use halfway to the left of the hour hand.
In the south temperate zone (the area between the Tropic of Capricorn and the Antarctic Circle), point 12 o’clock toward the sun. Halfway between the 12 o’clock position and the hour hand will be a north line. During daylight saving time, the north line lies midway between the hour hand and 1 o’clock. Note that this method becomes less accurate the nearer you are to the equator.
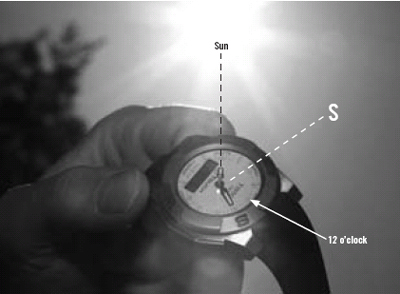
If you are in the north temperate zone (the area between the Tropic of Cancer and the Arctic Circle), point the hour hand of your watch directly at the sun. Then draw an imaginary line halfway between the hour hand and 12 o’clock. This imaginary line points south.
Using Natural Features to Navigate
WEATHER CAN BE A VERY IMPORTANT TOOL when navigating through the wilderness, but remember: don’t ever rely on just one sign. Rather, use as many as you can in combination to reduce the risk that you’ll make a mistake.
If your trip preparation and planning has told you the direction of the prevailing wind, you can use that knowledge to help guide you, since wind has pronounced effects on vegetation and land forms. The growth of certain trees, called flag trees, is largely affected by wind patterns. The branches of these trees (such as white pine) will not grow into the wind but rather in the same direction as the prevailing wind. Flag trees generally point either east or west, but this is subject to regional variation.
Moss tends to grow on the north side of trees because there’s less sunlight. But that doesn’t mean you won’t find moss on the south side of a tree or even all around the trunk. Again, it’s best to look for such signs in combination. The melt-off around boulders is usually on the south to southwest side.
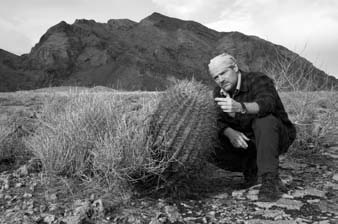
In the northern temperate climate, many flowers will face either south or east to maximize their exposure to the sun. The barrel cactus in the Sonoran Desert does the same.
Celestial objects are good navigation tools, particularly the North Star. Although you may think that the stars are constantly moving across the night sky, in the Northern Hemisphere, the North Star always holds its position. To find the North Star, first find the Big Dipper. Draw an imaginary line connecting the two stars that form the right-most part of the ladle. Continue the line a distance about five times greater than the depth of the ladle, which will lead you to the last star in the handle of the Little Dipper. This is the North Star. Make a marking or lay a stick on the ground pointing north (to the star). Once daylight comes, you can use this to establish your direction.
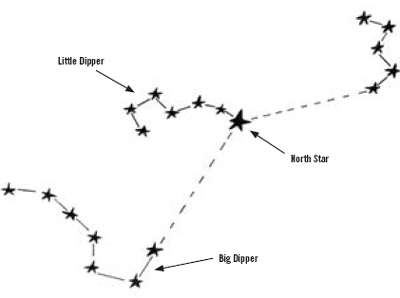
You can find the North Star by locating the end stars of the Big Dipper. Follow the line they make diagonally north and you’ll find the bright light of the North Star.
In the southern hemisphere, you can use the Southern Cross (and its two pointer stars) to determine south. Start with the star that marks the top of the cross and draw an imaginary line through its long axis. Now draw a line that starts midway between the two pointer stars and comes out at a right angle to it. This line should cross your first imaginary line through the long axis of the cross. The intersection of these two lines is close to the South Pole.
You can also use the moon to navigate or at least gain a rough idea of where north and south lie. If the moon is a crescent, draw an imaginary line through the ends of the crescent down to the horizon. If you’re in the northern hemisphere, the point where it touches is south; if you’re in the southern hemisphere, it’s north.
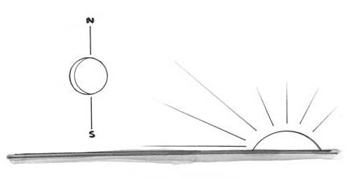
If the moon rises before the sun sets, the illuminated side will be west. If it rises after mid night, its illuminated side will be east.
Following beside a stream or river may seem like a logical plan, since it can lead you to civilization…or into endless wilderness. You can walk along gravel riverbanks with ease or find that the forest on the edge of the river is too thick to penetrate. Only solid knowledge of an area, gained during your planning and preparation stage, will help you decide what to do.
Nor are train tracks or power lines necessarily the path home. You could find a town just around the bend…or walk through miles of nothingness along a line no longer in use. Power lines also have a nasty habit of leading to a swamp or lake across which the wires have been strung.
While making one of my survival films, I once came upon a set of train tracks. Although I later received a lot of mail chastising me for not following the tracks to safety, at the time, I had been certain there was a highway only a few miles east of the tracks. Since I didn’t have a clue where the tracks would take me, I went with the sure thing, crossed the tracks, hit the highway, and found my way home.
Global Positioning System (GPS)
GPS IS A SATELLITE-BASED NAVIGATION SYSTEM that can provide accurate locational data anywhere, at any time. A GPS unit displays your current location in latitude and longitude coordinates; if you enter the map coordinates of your destination, it will also tell you the direction you should travel. Most GPS units also have an electronic compass. Purchase one with a coil antenna that gets good signals under tree canopy and a memory card with topographical maps, so that you can track your movements and easily use the “go-to” feature to find any place on the map.
Remember, though, that GPS units run on batteries, which may die at the worst possible moment. Never rely on a GPS. You should also know how to use a map and compass.
Trailblazing
THOUGH OFTEN OVERLOOKED, an important aspect of survival travel and navigation is marking the surrounding natural features (also known as trailblazing) while you move. Other travelers may see these indicators that you’ve left behind, increasing your chances of being rescued. These markings are also useful if you decide that the path you’re taking is wrong and you want to go back.
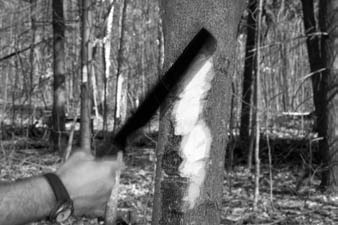
The best way to blaze a trail is to use a sharp object, such as a belt knife, axe, or machete, to cut a small piece of bark off a tree. You can also use the orange surveyor’s tape from your survival kit.
The best choice for trailblazing targets are young green trees whose bark has not yet hardened. The bark of older trees is much harder and will quickly dull your knife.
When trailblazing, make sure you mark both sides of the tree (the direction you came from and the direction you’re going). This way you’ll see the marks if you have to turn around. Many adventurers have gotten hopelessly lost because they forgot to do this.
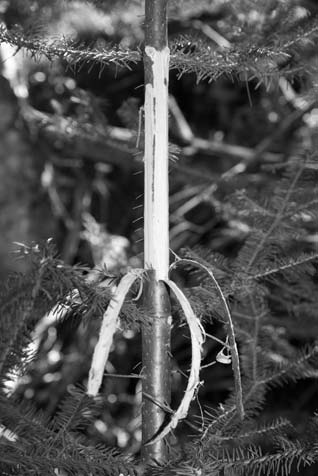
If you don’t have an object on hand that will slice pieces of bark, you can also blaze your trail by bending or breaking branches. Make sure you bend the branches at eye level and point them in the direction you’re traveling.
Blazes are most effective when placed at eye level so that you can see them from a distance without actually looking for them. Make as many as your physical strength and circumstances allow.
Traveling in a Straight Line
MOST PEOPLE WALK IN CIRCLES WHEN LOST, generally clockwise. We often move to the right because that is the side that people usually keep to when walking down a hallway and climbing stairs. A right-handed person’s right leg is usually less flexible than the left, causing the left leg to take longer strides.
As a result, traveling straight in a survival situation is not as easy as you may think. Here’s a good strategy: Consciously move in alternating directions around obstacles in your path. Go around them sometimes to the right, and sometimes to the left.
Region-Specific Travel and Navigation
Arid Regions, Deserts, and Canyons
In these regions, the decision whether to move depends primarily on your current supply of water and the likelihood of your finding it somewhere else. If you don’t think you have enough water to complete the journey and are not likely to find some on the way, you shouldn’t go at all, unless you have no choice.
Anyone who has ever hopped their way across a scalding beach with an ice cream cone in hand will understand that walking on desert sand—no matter how good your footgear—is just as difficult. It’s best to stick to brushy and grassy places where the ground is a bit firmer. Snakes and spiders also seek grassy places, so you increase your risk of being bitten, but this is still the best way to go. If there are no shrubby or grassy areas, travel on the hard valley floor between dunes, not on top of them.
If you are unlucky enough to get caught in a desert sandstorm, stop moving immediately or try to get to the leeside of a natural shelter. Mark your direction of travel, sit or lie down in that direction, cover your head (especially your mouth and nose) with a cloth, and wait until the storm abates.
When traveling through canyon country, you have to be extremely cautious around slot canyons (narrow canyons with high walls), which have seen the deaths of many unsuspecting travelers. The danger here is flash flooding, which happens with little warning. Flash floods can rip through slot canyons on perfectly calm, blue-sky days, generally because a major storm has occurred elsewhere and all the surface runoff is collecting in the canyon. The wall of water can be as high as 60 feet (18 m). A strong breeze or a sound like thunder are signs that a flash flood is approaching.
Boreal and Other Temperate Forests
The denseness of the trees often complicates travel in boreal and other temperate forests by preventing the traveler from gaining a good long-distance view of the surroundings. Your skill with a compass will come into play here, as you’ll need to take frequent bearings to make your way out. You can also climb a tree to get a better view.
The rivers, streams, swamps, and lakes common in boreal and temperate forests open up the terrain and provide an excellent means of travel and navigation, provided you have a boat and the skill to travel on water.
The greatest danger in traveling in the boreal forest is overestimating how fast you’re moving. It is common to travel barely a mile and feel like you have traveled several.
STROUD’S TIP
When moving through the forest (and the jungle) in a group, chances are the person in front of you will hold the branches, to prevent them from whipping back into your face. This may be a considerate gesture, but don’t rely on it. There will invariably come a moment when the person in front gets distracted and fails to hold the branch. If you’re not paying attention, you’re going to get it in the eye, which can be serious. Always hold a hand up for protection or stay well enough back.
The Arctic and Polar Regions
Those who have not had the opportunity to travel in the world’s polar regions are missing some of the greatest scenery on earth. The problem, especially when ice fog sets in, is that you can feel like you’re traveling inside a giant ping-pong ball.
The ping-pong ball effect can be extremely disorientating and make it nearly impossible to tell the sky from the ground; everything is white. In the Arctic, I once nearly walked off the edge of a 30-foot (9-m) snow cliff. It was only at the last minute that I realized what I was about to do and stopped. I had to get down on my hands and knees before I could actually detect the difference in the landscape a few feet in front of me!
Generally, the wide-open vistas make traveling in the Arctic enjoyable and the natural land features (if there’s no fog!) easy to distinguish. But bear in mind that whenever you’re in a region with heavy snow cover, you run the risk of snowblindness on bright, sunny days. Snowblindness is a sunburn on your retina, and it’s a debilitating injury that can last for several days.
Do not, under any circumstances, travel if a heavy snowstorm or blizzard is approaching. You should also avoid traveling when the wind, which can create bitterly cold temperatures, is strong.
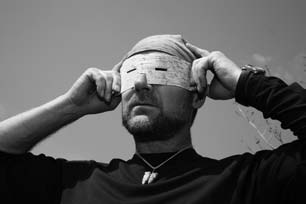
Protect your eyes from the sun’s UV rays with either sunglasses or ski goggles. If you don’t have protective lenses, fashion what you can out of birch bark, paper, or any other fabric. Just leave a couple of horizontal slits to see through.
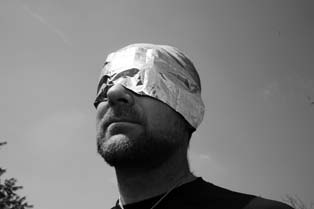
Because you can see through a solar blanket, you can use a piece of one to protect your eyes if you don’t have sunglasses.
On the Sea or Open Water
When traveling on open water, it helps to be aware of the subtle signs that land may be near: stationary cumulus clouds in a clear sky (or in a cloudy sky where the other clouds are moving); a greenish tint in the sky in the tropics; lighter-colored reflection on clouds in the Arctic; and increased bird life (and sounds). Lighter-colored water also indicates shallow water, as does an increased amount of floating debris.
Jungles
The jungle is probably one of the toughest ecosystems in the world to travel through (hence the popular phrase “It’s a jungle out there”). You often don’t know exactly where you are or where you’re going, nor do you always have the luxury of a trail or river to follow. Where possible, stick to traveling near water, as you are more likely to come upon a village.
As part of your planning and prep, bring a good machete. Slashing and cutting the growth in your way opens up a path and also keeps the many creepy crawlies from biting you or hitching a ride on you.
You also need to be vigilant about looking up as well as down while you walk. Snakes are found as often in trees as on the ground.
Walking across logs is very different in the jungle than in the temperate forest. In the forest, I would advise you to step over logs or around them to avoid slipping and twisting an ankle. In the jungle, the opposite is true: you’re better off stepping on a log rather than over it. Many poisonous snakes like to hide just under the crux (small space or hole underneath) of the log. Snakebites occur when travelers step over a log and place their feet down on the other side, exposing their ankles to snakes.
Mountains
Streams will eventually lead you off a mountain, but this does not mean that you won’t at some point find yourself at the top of a 100-foot (30-m) waterfall—that’s the downside. As long as the water course is lined with trees, however, you will likely find handholds and footholds to help you make your way down.
Avalanches are the main travel hazard you’ll face in the mountains, although rockslides can also occur after heavy rainfalls. Avoid ridges and mountaintops during lightning storms, and because of the risk of flash flooding, stay away from low-lying areas after major storms.