Chapter Fourteen
ESSENTIAL SURVIVAL SKILLS
Like your prehistoric ancestors, you have the ability to harness those great human qualities of adaptability and ingenuity that could save your life during a survival situation. Whether it’s making a fish hook from the bones of a decaying animal or a crude knife from a piece of rock, the ability to improvise and create survival tools from materials at hand will help you when you’ve got nothing else with which to work.
Think Like a Sculptor
ALTHOUGH MOST OF US ENVISION WILDERNESS as being completely untouched by humankind, the world is not that big anymore. In many ways, this is not a good thing, but it may help you in a survival situation because you are more likely than you think to come across abandoned junk that may be useful.
Some of the best places for finding useful odds and ends are coastal regions, where the sea often washes up intriguing bits. You should look upon this stuff as if you were a sculptor: Don’t consider what it is, but what it could be. That piece of scrap metal might look like a piece of garbage, but if you change your lens you might see six fish hooks, a knife blade, and a pot for melting water. When I was in Labrador, I came upon an empty can of naphtha gas. After a little cutting, bending, and reshaping, I had changed it into a simple wood stove.
In the Kalahari Desert, the most effective “junk” I found included a few jars and cans in an old truck. They worked like a charm to trap scorpions, which were the basis for my diet there. In Alaska, the roof of my shelter was two big pieces of plastic that I discovered under a couple of rocks. All of it started as garbage, but for me it meant survival.
Think Simplicity
ALTHOUGH THERE IS A DESIRE AMONG HARD-CORE SURVIVALISTS to make elaborate and sophisticated tools in the bush, I’ve found that the best man-made survival tools are the most basic. A simple snare, a simple fish hook: these are often the most effective things you can make. Creating complex traps, snares, and shelters is fine when you have time and energy, neither of which you typically have in abundance in an emergency!
Survival is a humbling situation. Any notions you may have entertained about building incredible tools will be swept away quickly (right behind those ideas you once had about the importance of staying clean).
Attempting to construct complex survival tools can lead to immense frustration as well. The worst thing you can do in a situation like this is spend hours trying to build something, only to find that it doesn’t work. A simple version often suits the purpose but takes only a fraction of the time to make.
While my wife, Sue, and I spent the year living off the land in northern Ontario, we wanted to make a blanket of rabbit pelts. We figured we’d need about 100 pelts, and my first thought was to build an elaborate set of snares and traps. In the end, though, over a few weeks, I set out a couple dozen simple snares, which were really effective and took very little time to construct. I’m sure I wouldn’t have had any better luck with a more elaborate setup.
Get Over the Squeamishness of Destruction
ONE OF THE THINGS THAT MANY PEOPLES TRUGGLE WITH, even under the most dire Roll or rough up strands circumstances, is destroying something they cherish to make a survival tool. But there’s really no other choice: if it’s ultimately going to save your life or limbs, do it. Whether this be cutting your credit card into pieces, filing your house key to a point, cutting up your car seats, or burning the spare tire in your car to attract attention, recognize that these are actions born of necessity.
At the same time, however, you must have the foresight to visualize whether the object you’re destroying may be more useful to you later in its original form. You don’t want to sacrifice your snowmobile’s windshield, only to get the machine going later and suffer frostbite or hypothermia on the way home because you’ve got no protection from the wind.
During the winter of 2008, a Utah couple got lost with their vehicle and was trapped in the snow in a remote area. Following their 12-day ordeal, they explained at a news conference that they had seen one of my shows, in which I explained how to cut the stuffing out of car seats to make “snowshoes.” They did exactly that and walked through the deep snow to safety without losing their toes or feet to frostbite. They had had a decision to make: keep their car seats intact or survive. They chose life.
Tools You Can Make
ONE OF THE MOST OFTEN IGNORED BUT SIGNIFICANT BENEFITS of making your own survival tools is not the purpose they are meant to serve, but how the act of creating them prepares you psychologically for your ordeal. The creative process will keep your mind focused, distract you from the misery of your circumstances, and generally improve your mental state. Sure, you may make a snare or a trap and not be successful with it at first, but making the effort is much better than doing nothing at all, because doing something, anything, gives you hope that your efforts may bear fruit. This all ties into the all-important will to live: if you have a reason to survive, you likely will make it through alive.
STROUD’S TIP
In a survival situation, you must exist in a constant state of hope if you are to make it out alive.
Making Rope
Making your own rope from natural materials may sound complex, but it’s easier than you think. And having rope will greatly improve your chance of survival because it can be used in so many different ways.
Rope helps build traps. It fixes clothing, ties off wounds, holds shelters together, and binds your stuff together when the time to travel comes. My favorite rope-making materials are milkweed stem, evening primrose bark, spruce roots, and cedar bark. Rope from trees is typically made from the shredded inner bark. As with finding plants to use for tinder, your efforts here will helped immensely if you understand characteristics rather than memorize names. Quite simply, you are looking for anything fibrous.
The problem with rope making is that it’s not always easy to find the right materials, especially because they are seasonally dependent. In other words, some plants become most fibrous in late fall or early winter, when they have dried to the point that they’re no longer green. For others, such as tree bark, the best time is early spring.
If you are fortunate enough to have caught a large game animal, sinew and rawhide work well as rope (particularly for binding and lashing things together), although these are fairly involved undertakings. Sinew is the product of the tendons (strands lying flat against the leg bones). To make sinew, first dry the tendons, then rub them on a rough surface (or smash them with a club or rock) so they separate into fibers. These fibers can then be used as rope; they work better when moistened.
Rawhide is thin strips cut from the animal’s hide and can be used even if the fur is still on.
Twisting Rope
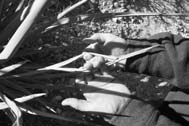
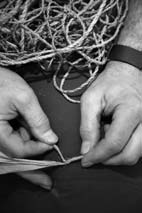
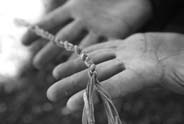
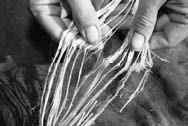
1. It may sound complicated, but basic rope twisting is simple. Start with fibrous material, such as husks from the yucca plant. Separate the husks into strands.
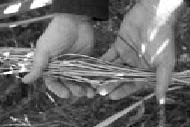
2. Gather sufficient strands to be able to build a rope as thick as you need it. Roll or rough up strands together to get separate pieces.
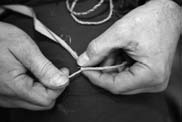
3. Twist each piece between two fingers in a clockwise motion. Then, wrap the two pieces together in a counter-clockwise motion.
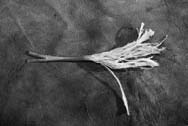
4. This simple method works with many different types of materials.
5. Once you’ve completed winding the pieces together, you will have a strong rope to use for many purposes.
Making Rope from Sinew
1. Rub the sinew on a rough surface to separate it into strands.
2. These fibers can be woven together to form a durable rope.
Making Knots
A NATURAL PARTNER TO ROPE MAKING is the ability to tie knots. Like many survival skills, this one can be overlearned, because there are hundreds of different types of knots, some of which have very specific uses.
You don’t need to learn hundreds. I’ve found that knowing just a few simple knots will help you through almost any survival situation, enabling you to make more effective shelters, fishing implements, snares, and traps.
Les’s Top Three Knots
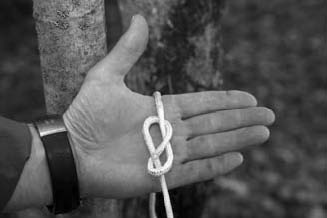
Bowline: The bowline is a perfect survival knot because of its great strength and the ease with which it can be tied. It forms a loop (though not a noose) at the end of a rope, and it is typically used for securing a rope to an object.
To tie a bowline, start by making a loop a short distance from the end of the rope. Pass the working end of the rope up through the loop, wrap it around the base, and pull it back down through the loop to finish the bowline.
Clove Hitch: The clove hitch is nothing more than two loops “stacked” on each other. It’s a great simple knot for securing rope between trees or poles, and for hanging things from a horizontal pole. Be aware, though, that to be effective it requires a load on each end, and it has been known to slip.
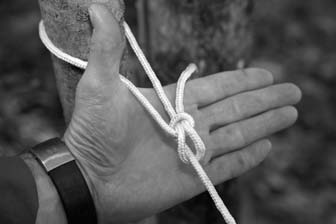
A bowline knot is a simple one to learn, and it’s very strong.
To tie a clove hitch, work from left to right. Make a loop somewhere along the length of the rope. Then make a second identical loop to the immediate right of the first. Stack the second (right) loop on top of the first. Place both loops over the pole and pull the free ends of the rope to tighten.
If you’re tying a clove hitch to a standing object such as a tree, begin by wrapping the rope once around the tree. After the working end of the rope passes around the tree, it should cross over the main stem of the rope. Wrap the working end of the rope around the tree again, this time passing it through the loop you’ve just created. Pull both ends of the rope taut to finish the knot.
Figure Eight (and Double Figure Eight): Though traditionally used in climbing, the figure eight and double figure eight are also great for tying rope to other objects. They bind so well, though, that untying them can be a real chore. Make a long loop by passing the working end of the rope back under the main rope stem. Cross the working end over the main rope stem and pass it up through the loop from the bottom. Repeat this procedure for the double figure eight.
Clove Hitch
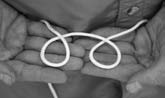
1. Form two loops as shown.
2. Stack one on top of the other.
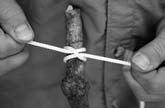
3. When tied properly around a tree or pole, this knot will self-tighten.
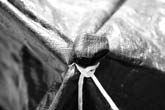
4. Here I used a clove hitch and a small stone to secure a tarp corner.
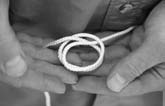
Figure Eight
To make a figure eight knot, the string goes around the tree and then follows its own path back.
1. The figure eight: first stage.
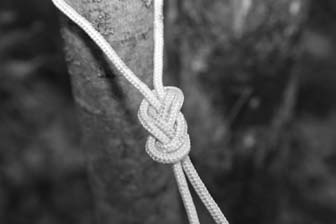
2. The double figure eight: second stage.
Making Knives
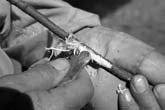
KNIVES COME IN TO PLAY in almost every aspect of survival. If you’re without a knife, there are ways of making basic knives that will do the job. All you need is a semi-sharp edge. That edge can be made from a number of materials, including rock, metal, bone, or even wood.
Knives from Rock
One of the oldest skills known to humankind is taking a piece of solid rock and breaking it to form a cutting edge. Over time this became a complicated and refined skill, now referred to as flint knapping. The good news is that you need only learn the basics to fashion a knife edge sharp enough to get you through most situations. No, it won’t be as sharp as a steel knife, but a survival blade will give you a rough, serrated edge for cutting or scraping.
The most useful blades I have made while surviving have come from throwing a rock—one I hoped would break—against another rock (while carefully protecting my eyes) until I had sheared-off edges sharp enough to cut into wood.
Refined flint knapping is a useful primitive living skill, but too advanced for the survival situations to which this book is dedicated. Like bow making, flint knapping takes much time and mentored practice to master. With that in mind, the following pictures illustrate the most rudimentary methods for breaking a rock down to a usable edge.
Knives from Metal
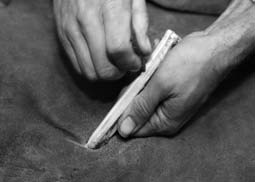
When making survival knives, there is simply no substitute for metal. The biggest challenge is finding a piece that’s roughly the right size and shape. Rub the metal against a hard surface to sharpen the point and blade (this will take a long time, so sit down and be patient). Unlike most survival knives, a metal blade will require a handle to protect your hands. Tape, cloth, or rope can all be used as knife handles.
Knives from Bone
Bone knives work better for puncturing than for cutting or scraping because they don’t hold an edge very well. To make this type of knife, you need to start with a decent-size bone, such as a leg bone from a large mammal.
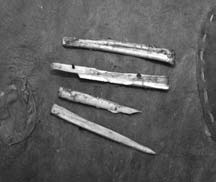
Splitting a Rock to Make an Edge
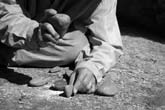
1. Splitting a rock in two can be a relatively easy undertaking, provided you find the right rock. Use a larger rock to hammer the smaller one.
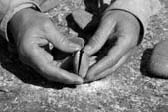
2. Here, I’ve made a perfect split.
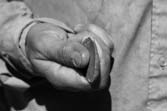
3. Given the right material, a split rock can be used effectively as a cutting or scraping edge, and can be further sharpened by rubbing it against another rock.
4. Your rudimentary rock knife has many uses, so keep it safe. Here, I’m making tinder by cutting into a dry branch.
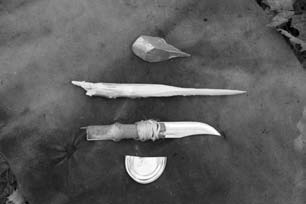
You can use a variety of materials to make cutting edges and knives, as well as handles for any metal blades you are lucky enough to salvage.
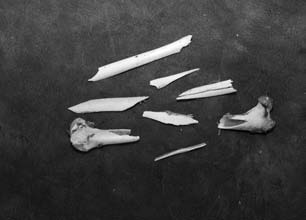
Shards of bone are useful as knives in a pinch, though they need refinement after shattering.
Lay the bone on a hard object and shatter it by striking it with a heavy object. Chances are you’ll find a suitably pointy piece among the shattered bits. You can refine its shape by rubbing the bone piece on a rough rock. If you have only small bones or shards to work with, before rubbing, tie one to a piece of wood or other similar object.
You can also make a bone blade by scoring the bone along its length until you can insert a chisel of sorts and split the bone lengthwise.
Scoring a bone.
Bone blades of various shapes and sizes made by scoring.
Knives from Wood
As with bone, it is difficult to get a sharp edge from wood, so wood knives are best suited for puncturing and scraping. This is certainly a last-ditch knife-making method, as it requires time, patience, and diligence. To make a wood knife, start with a piece of hardwood about 12 inches (30 cm) long and 2 inches (5 cm) in diameter; the blade should be 6 inches (15 cm) long. Shave the wood down to a point by rubbing it against a rough, hard surface, such as a rock.
You can further harden the blade by drying it over a fire until it’s slightly charred. The drier the wood, the harder the point will become.
STROUD’S TIP
To sharpen a real knife, use a clockwise circular motion and push the blade away from you across the stone while applying consistent pressure on the blade. Try to keep it at a constant angle, say, 45 degrees. Do not drag the knife toward you under pressure, as this may create burrs on the blade. Regularly add water to the stone, if you have it. Reducing pressure gradually while you work will produce a finer edge.
My Favorite MacGyverisms
AS MANY OF YOU KNOW, the hit TV show MacGyver (1985–1992) was based on the exploits of secret agent Angus MacGyver, whose claim to fame was his uncanny ability to use common items (and a Swiss Army knife) to improvise often-complex devices. During the many survival ordeals I’ve experienced, I’ve often tried to emulate MacGyver, with varying levels of success. Here is a short list of MacGyverisms I’ve managed in the field.
Using Underwear as a Hunting Tool
Desperate to catch fish, I cut the elastic strap from my underwear, combined it with a common ballpoint pen and a found piece of bamboo to make a Hawaiian sling spear.
Fishing with Gum
In the swamps of Georgia, I made a fishing lure out of a credit card that I cut into pieces. Then I used bubble gum to make a very thick bubble, pinched it off at the bottom, and used it as my fishing float. Had I been successful—there are 100-pound (45-kg) catfish in those swamps!—I could have enjoyed a very substantial meal.
Making Goggles out of a Snowmobile Cushion
One of the most insidious dangers in the Arctic is snowblindness. While surviving there, I cut a strip off my snowmobile’s seat cushion to make goggles. All I needed was a knife to make the cut. In that survival situation, the goggles saved my eyes.
Purifying Water with a Plastic Bottle
In Africa, I suspended a plastic water bottle over a fire, letting the flames just lick the bottom of the bottle but not consume it. I was able to boil water without significantly melting the plastic.
Making a Flashlight from Car Parts
Use wire to connect the battery directly to the leads on the headlamps.
Making Rope from Car Parts
Wire from any vehicle’s engine makes great rope.
Making Signals from Reflective Objects
Anything shiny is enough to flash sunlight at a passing airplane to attract rescue.
Making Knives from Glass
Broken glass can be used as an effective cutting tool.
Using Hand Sanitizer as a Fire Starter
Just about anything with a high percentage of alcohol can be used to make a fire.
Making a Throwing Stick
A THROWING STICK is a solid chunk of hardwood, approximately 18 inches (45 cm) long, that you can grip and throw efficiently, much the way you would a boomerang. Your purpose is to aim it well enough to stun or kill a rabbit, squirrel, or bird that’s within range. It can be very effective when thrown at a group of roosting songbirds (see “Food,” Chapter 8).
Making Clubs and Spears
ALTHOUGH SPEARS AND CLUBS were used by our prehistoric ancestors for hunting and warring, you’ll likely find that they are most useful for protection and reassurance when you’re in a place where there might be dangerous or predatory animals around. If you are surviving in a jungle, for example, and you know there might be 7-foot (2-m) cobras underfoot, a long piece of wood feels mighty good in your hands. You can make the tip of the spear itself quite sharp, or tie a handmade blade to the end.
To put a little distance between me and possible predators in Africa, I attached a handmade spear to a hunting knife.
But the usefulness of spears and clubs doesn’t end there. Like ropes and knives, these are versatile items that can be used for just about anything, from digging holes to knocking fruit from nearby trees to pounding stakes in the ground. So go ahead and make one even if you don’t think you have a use for it at the time. Eventually, you will.
Like the throwing stick, a club is simply a tree branch. Size matters. Too long and you won’t be able to swing it easily or quickly. Too short and it won’t do any damage to whatever you’re trying to hit. Hardwood is the best material, if you can find it. You can make a club more effective (especially for killing newly caught small game in your snare) by weighting one end. Tying a rock or similar heavy object to the end is the most common way to do this.
Making Eye Protection
SUNGLASSES ARE MORE THAN A FASHION STATEMENT. In the wild, exposure to the elements wreaks havoc not only on your body but also on your eyes. Unfortunately, sunglasses are not particularly robust items, and even if you bring a pair along with you, chances are they will get broken or lost during your survival ordeal.
You must protect your eyes against sunblindness (when you’re on open water), and snowblindness (when you’re surrounded by snow). In essence, both of these conditions are sunburns on your retina, causing discomfort and blindness for up to three days. Worse yet, being blind in an emergency—no matter how long the episode lasts—can mean the difference between life and death.
The Inuit protected their eyes by making sun goggles from caribou or walrus bone. When I was in the Arctic, I didn’t have the luxury of these materials, so I made my own from a slit cut in a strip of vinyl. You can use almost anything for sun goggles as long as it limits the amount of sun beating against your eyes.
Making Packs
WHEN YOU’RE ON THE MOVE, there is nothing worse than trying to carry all your vital survival materials in your hands or arms. It’s not only slow, cumbersome, and frustrating, it’s also dangerous because it impedes your ability to use your hands at a moment’s notice.
You can use almost anything to make a pack on the fly, including plant fibers and bark, wood, rope, animal skins, or any other type of material you may have on hand.
To make a pack, lay a piece of square material on the ground, with your relevant items on one edge. Roll the material and the items toward the opposite edge. Once the bundle is cylindrical, securely tie off each end with one long piece of rope, about 6 feet (1.8 m) long. You can now use the long rope to drape the pack over your shoulder. Add extra ties along the length of the bundle to prevent contents from falling out (see page 221).
Making Snowshoes
Good for a multitude of uses, spruce boughs also make great snowshoes. Clump them together into the approximate size and shape you need, then tie the bundle together with some rope or cord. Lash the shoes to your feet, and you’re off (see page 339).
Making Torches
As you may suspect, in a wilderness emergency there are many times when you will need to see in the dark but don’t have a flashlight. As long as you have a fire, you will have light. Although there are many different ways to make a survival torch, the bark torch is one of the simplest yet most effective. You’ll need a stick for the handle and a fairly thick strip of flexible bark (birch bark works very well) about 2 feet (60 cm) long and 6 inches (15 cm) wide.
Wrap the bark around the stick, and tie the base of the bark coil to the stick to secure it. Now wrap some cord or rope around the bark coil to prevent it from opening. You can burn the bark itself, but the torch will burn better if you fill the coil with flammable material, such as grass, small sticks, or small pieces of bark. Once you’ve lit the material inside the coil, it should last a good, long time (see page 339).
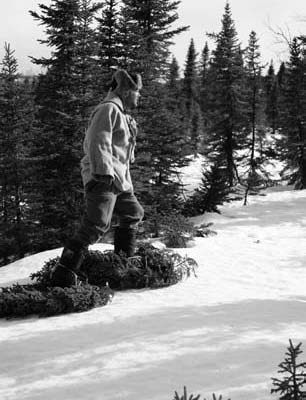
Here, I’m wearing snowboots and spruce-bough snowshoes, which make walking on top of snow a lot easier.

You could simply light some cloth on fire, but a correctly made torch will last much longer, increasing your chances of nighttime survival.
Group Versus Solo Survival
BEING IN A GROUP CAN BE A REAL BENEFIT when it comes to creating and sharing tools. You will have not only the benefit of a wider range of expertise and skills, but more people on hand to make the tools you need to survive. Your group will likely need only one good knife, for example, but three people can make it more easily than one!