CHAPTER 16
Database Basics
Understanding Database Basics
Access is a popular database program that you can use to catalog and manage large amounts of data. You can use Access to manage anything from a simple table of data to large, multifaceted lists of information. For example, you might use Access to maintain a list of your clients or a catalog of products you sell.
If you are new to Access, you should take a moment and familiarize yourself with the basic terms associated with the program, such as database, table, record, field, form, report, and query. This section contains definitions of all these key terms.
Databases

Simply defined, a database is a collection of related information. You may not be aware, but you use databases every day. Common databases include telephone directories or television program schedules. Your own database examples might include a list of contacts that contains addresses and phone numbers. Other examples of real-world databases include product inventories, client invoices, and employee payroll lists.
Tables
The heart of any Access database is a table. A table is a list of information organized into columns and rows. In the example of a client contact database, the table might list the names, addresses, phone numbers, company names, titles, and email addresses of your clients. You can have numerous tables in your Access database. For example, you might have one table listing client information and another table listing your company’s products.
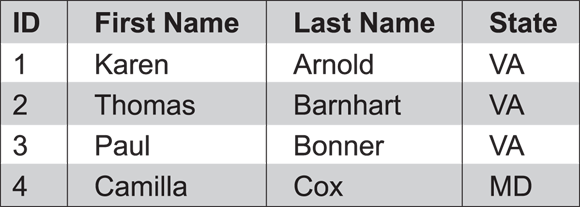
Records and Fields

Every entry that you make in an Access table is called a record. Records always appear as rows in a database table. Every record consists of fields, which are the separate pieces of information that make up each record. Each field of a record appears in a separate column. For example, in a client contact list, each record (row) might include fields (columns) for first name, last name, company name, title, address, city, ZIP code, phone number, and email address. Field names appear at the top of each column.
Forms
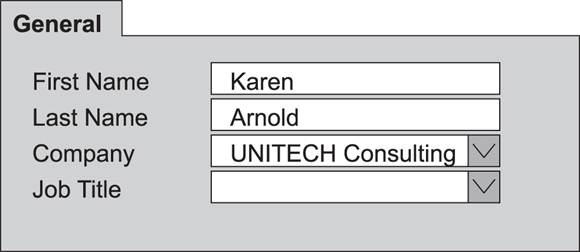
You can enter your database records directly into an Access table or you can simplify the process by using a form. Access forms present your table fields in an easy-to-read, fill-in-the-blank format. Forms enable you to enter records one at a time. Forms are a great way to ensure consistent data entry, particularly if other users are adding information to your database list.
Reports and Queries

You can use the report feature to summarize data in your tables and generate printouts of pertinent information, such as your top ten salespeople and your top-selling products. You can use queries to sort and filter your data. For example, you can choose to view only a few of your table fields and filter them to match certain criteria.
Plan a Database

The first step to building an Access database is deciding what sort of data you want it to contain. What sorts of actions do you want to perform on your data? How do you want to organize it? How many tables of data do you need? What types of fields do you need for your records? What sort of reports and queries do you hope to create? Consider sketching out on paper how you want to group the information into tables and how the tables will relate to each other. Planning your database in advance can save you time when you build the database file.
Create a Database Based on a Template
You can build web apps — a kind of database designed with Access and published online — or desktop databases based on any of the predefined Access templates. For example, you can create databases to track contact lists, assets, and task management. You can also search Office.com to find new, featured templates. This book focuses on building desktop databases.
When you create a new database using a template, the database includes prebuilt tables and forms, which you populate with your own data. You control the structure of your database by modifying or eliminating preset tables and fields and adding database content such as tables, forms, and reports.
Create a Database Based on a Template
 Start Access.
Note: You can also create a new database from within Access; click the File tab and then click New.
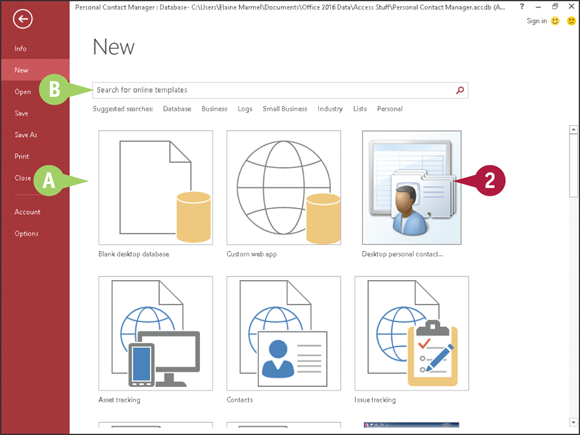
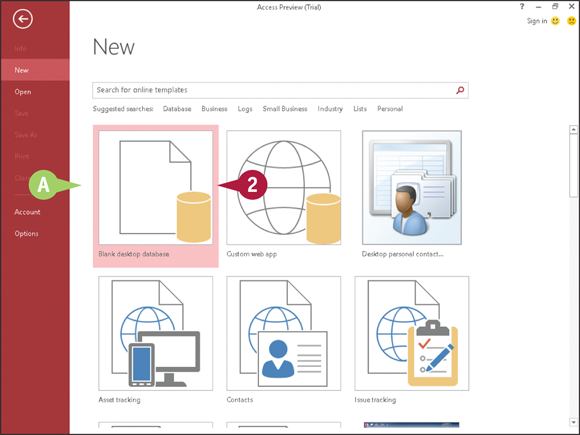
 On the Access Start screen or the New screen, templates appear.
 You can search for additional templates online by typing keywords here.
 Click a template.
Note: To build a database, select a template that contains “Desktop” as the first word in its name. Web app template names do not contain the word “Desktop.”
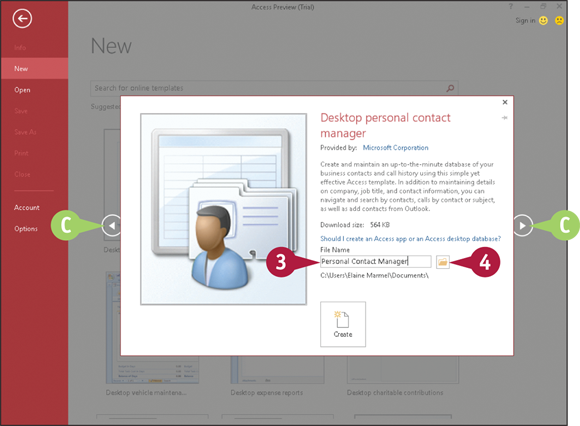
A window appears, displaying the template information.
 To view the previous or next template, click these arrows (
 and
and  ).
).
 Type a new name in the File Name field.
 To change the folder in which you store the database file, click the Open file button (
 ).
).
Note: If you are satisfied with the folder Access suggests, skip to Step 7.

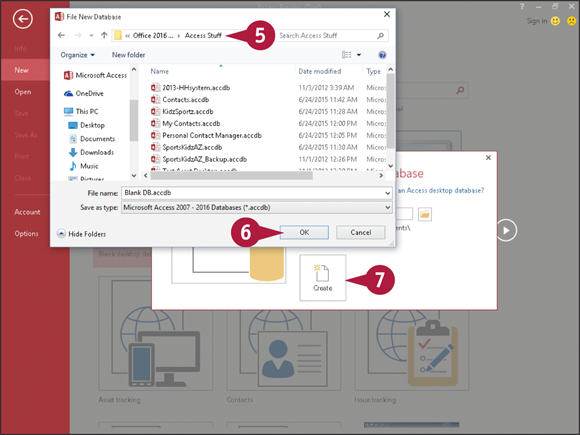
The File New Database dialog box appears.
 Locate and select the folder in which you want to store the database file.
 Click OK.
 Click Create.
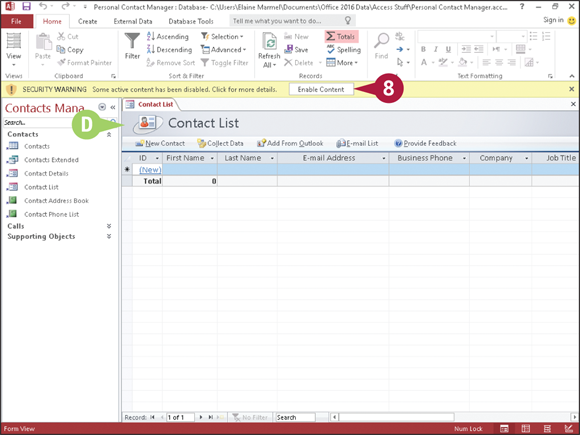
 Access downloads the template and creates a new, blank database, ready for data.
 A security warning appears; to hide the warning and enable the macros in this template, click Enable Content.
Create a Blank Database
Access includes many predefined database templates, including templates for creating contact lists, assets, project management, task management, and more. You can also find additional downloadable templates online.
If you determine that none of these predesigned Access templates suits your purposes, you can create a new, blank database and then decide on the tables, fields, forms, and other objects your database will include.
Create a Blank Database
Start Access.
Note: You can also create a new database from within Access; click the File tab and then click New.
On the Access Start screen or the New screen, templates appear.
Click Blank desktop database.

A window appears, displaying the template information.
To view the previous or next template, click these arrows ( and ).
Type a new name in the File Name field.
To change the folder in which you store the database file, click the Open file button ().
Note: If you are satisfied with the folder Access suggests, skip to Step 7.
The File New Database dialog box appears.
Locate and select the folder in which you want to store the database file.
Click OK.
Click Create.
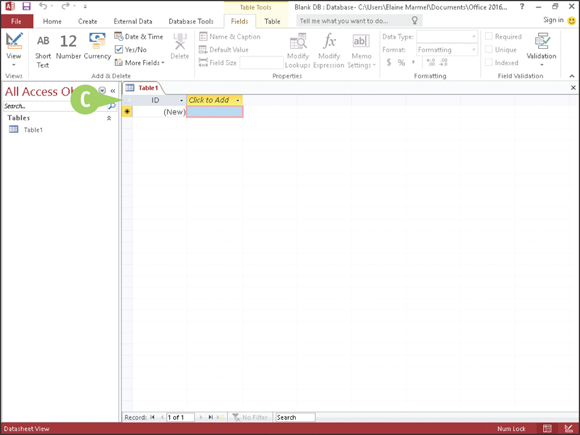
Access creates a new, blank database and opens a new table, ready for data.
Create a New Table
Access databases store all data in tables. A table is a list of information organized into columns and rows. A table might list the names, addresses, phone numbers, company names, titles, and email addresses of your clients. Each row in a table is considered a record. You use columns to hold fields, which are the individual units of information contained within a record.
If you need to add a table to a database, you can easily do so. All table objects that you create appear listed in the Navigation pane; simply double-click a table object to open it.
Create a New Table

With your database open in Access, click the Create tab.
Click Table.
Access creates a new table and displays it in Datasheet view.
Note: See the next section, “Change Table Views,” to learn more about Datasheet view.
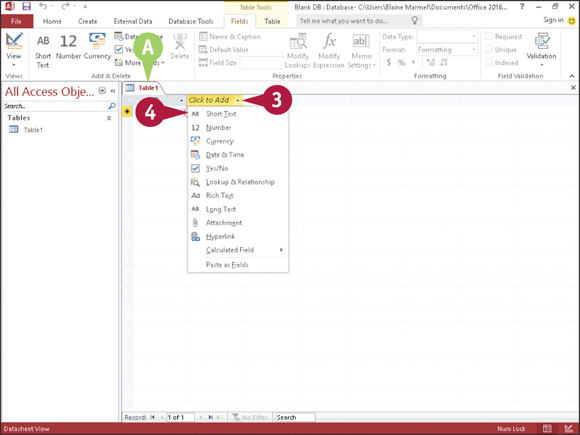
To name a field, click the Click to Add link at the top of the field column.
Click the type of field you want to add.
In this example, a Short Text field is added.
Type a name for the field and press  .
.
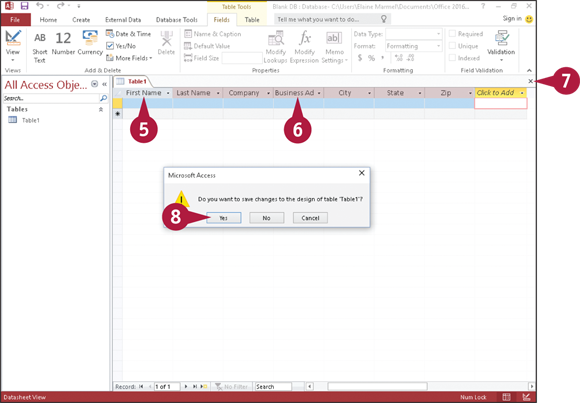
Repeat Steps 3 to 5 to create more fields for the table.
When you are finished adding fields, close the table by clicking the Close button ( ).
).
Access prompts you to save the table changes.
Click Yes.
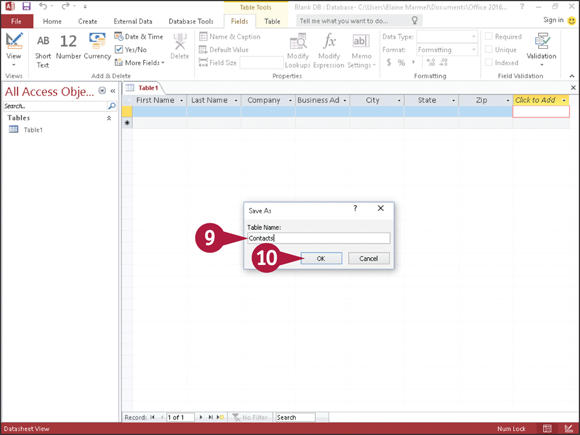
The Save As dialog box appears.
 Type a name for the table.
 Click OK.
Access lists the table among the database objects in the Navigation pane.
Note: After you save a table, you can reopen it by double-clicking it in the Navigation pane.
Change Table Views
You can view your table data using two different view modes: Datasheet view and Design view. In Datasheet view, the table appears as an ordinary grid of intersecting columns and rows where you can enter data. In Design view, you can view the skeletal structure of your fields and their properties and modify the design of the table.
In either view, you can add fields by typing new field names in the Field Name column, or change the field names. In Design view, you can also change the type of data allowed within a field, such as text or number data.
Change Table Views
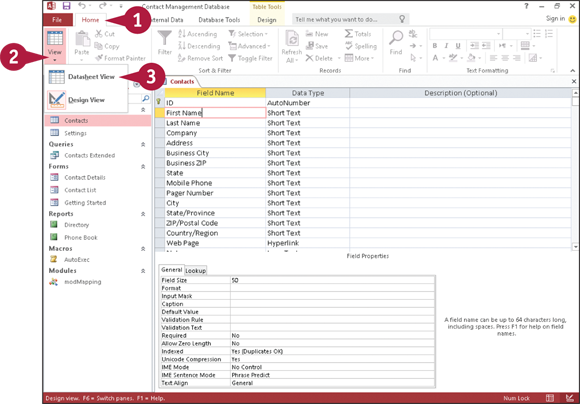
Switch to Design View
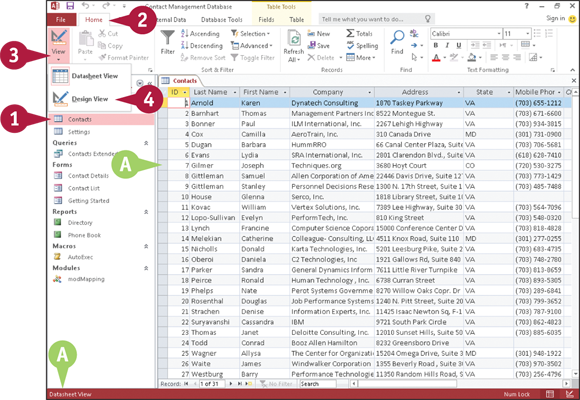
Open any table by double-clicking it in the Navigation pane.
Access displays the table in the default Datasheet view.
Click the Home tab.
Click the bottom half of the View button.
Click Design View.
Note: You can quickly switch from Datasheet view to Design view by clicking the top half of the View button.

Access displays the table in Design view.
The bottom of the view displays the properties of the field you select in the top of the view.
Access displays the Table Tools Design tab.
Switch to Datasheet View
Click the Home tab.
Click the bottom half of the View button.
Click Datasheet View.
Note: You can quickly switch from Design view to Datasheet view by clicking the top half of the View button.
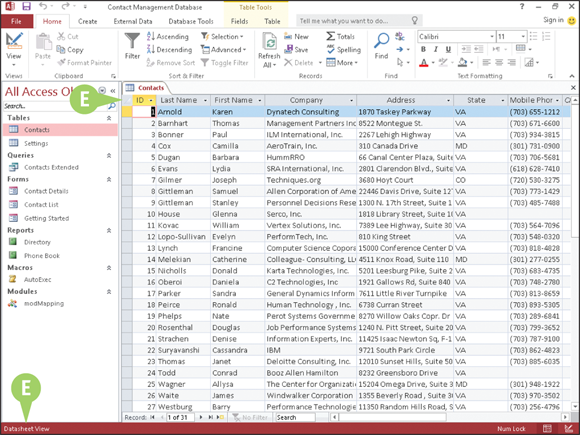
 Access displays the default Datasheet view of the table.
Add a Field to a Table
You can add fields to your table to include more information in your records. For example, you may need to add a separate field to a Contacts table for mobile phone numbers. Or, you may need to add a field to a table that contains a catalog of products to track each product’s availability.
After you add a field, you can name it whatever you want. To name a field, double-click the field label in Datasheet view, type a new name, and press . Alternatively, you can change the field name in Design view.
Add a Field to a Table
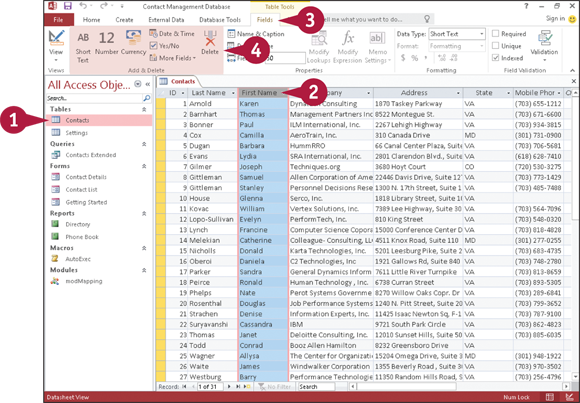
Double-click to open the table to which you want to add a field in Datasheet view.
Click the column heading to the left of where you want to insert a new field.
Note: Access adds the column for the new field to the right of the column you select.
Click the Fields tab.
In the Add & Delete group, click the button for the type of field you want to add.
In this example, a Short Text field is added.
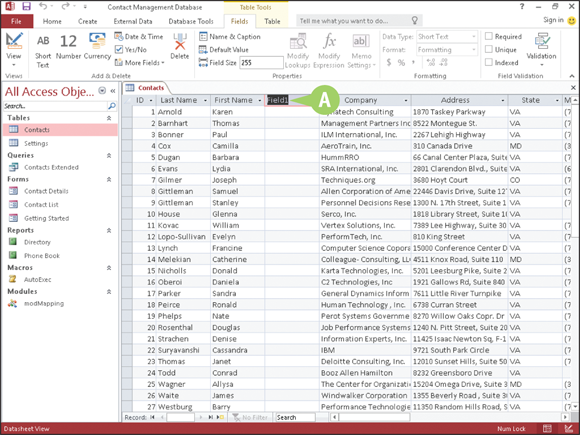
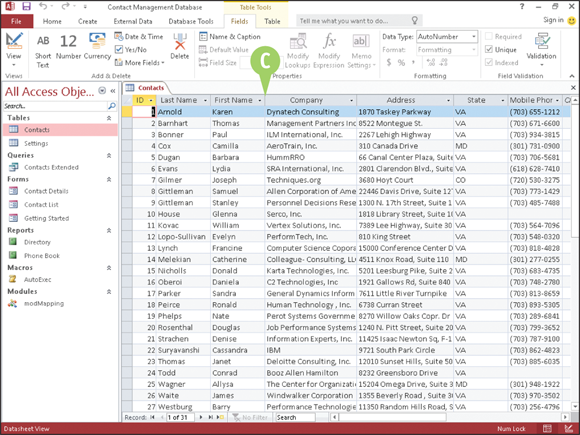
Access adds the new field to the right of the column you selected in Step 2.
Note: You can rename the field by typing a new name and pressing .
Delete a Field from a Table
You can delete a field that you no longer need in a table. For example, if your employee contact information database contains a Pager Number field, you might opt to delete that field.
When you remove a field, Access permanently removes any data contained within the field for every record in the table. If you do not want to delete the information in the field, you might choose to hide the field. For information, see the next section, “Hide a Field in a Table.”
Delete a Field from a Table
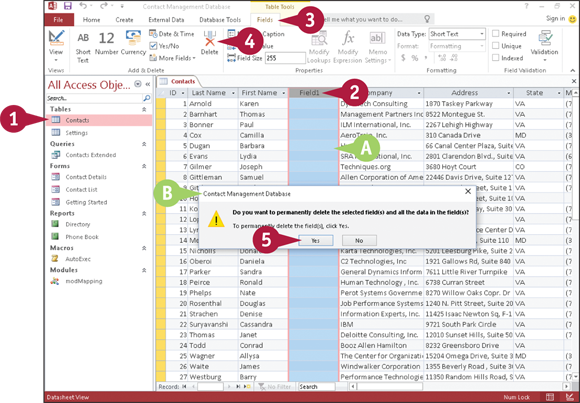
Double-click to open the table that you want to edit in Datasheet view.
Click the column header for the field you want to remove.
Access selects the entire column.
Click the Fields tab.
Click Delete.
Access prompts you to confirm the deletion.
Click Yes.
Note: You might also see a message warning you that deleting the field will also delete an index; click Yes.
Access removes the field and any record content for the field from the table.
Hide a Field in a Table
Suppose your table contains fields that you do not want to view on a regular basis, but that you do not want to delete from the table. For example, a table containing a catalog of products might include a field indicating the country in which the product was manufactured — information that you might not need to view on a regular basis but still need occasionally. You also might hide a field to prevent another user on your computer from seeing the field. Whatever the reason, you can hide the field. When you are ready to view the field again, you can easily unhide it.
Hide a Field in a Table
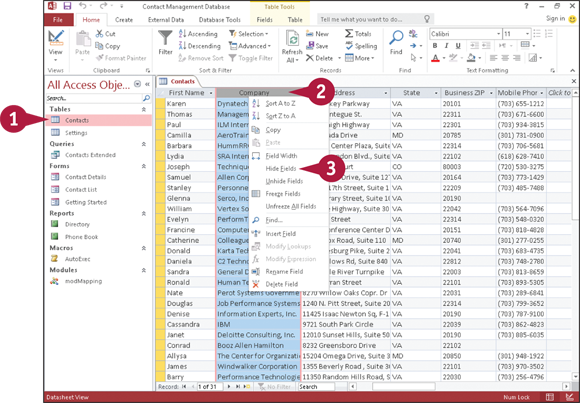
Double-click the table that you want to edit to open it in Datasheet view.
Right-click the column heading of the field you want to hide.
Click Hide Fields.

Access hides the field.
Note: To view the field again, right-click any column heading and click Unhide Fields. In the Unhide Columns dialog box that appears, select the column that you want to display again ( changes to
  ) and click Close. Access displays the hidden field as the last column in the table.
Move a Field in a Table
You can change the order of fields in a table. Moving fields is particularly useful if you built your database from a predesigned template, because you may find that the order in which fields appear in the table does not suit your needs.
It is important to understand that moving a field changes its position in Datasheet view but does not change the order of the fields in the table design. If you create a form after reordering fields, the form fields appear in their original position.
Move a Field in a Table

Double-click the table that you want to edit to open it in Datasheet view.
Click the column heading of the field you want to move.
Access selects the entire column.
Drag the column to a new position in the table ( changes to
  ).
).
A bold vertical line marks the new location of the column as you drag.
Release the mouse button.
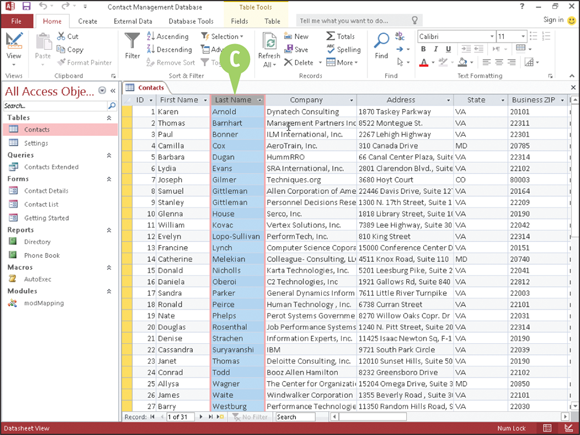
Access moves the field to the new location.
Create a Form
Although you can enter data into your database by typing it directly into an Access table, you can simplify data entry, especially if someone else will be entering the data, by creating a form based on your table. Forms present your table fields in an easy-to-read, fill-in-the-blank format. When you create a form based on a table, Access inserts fields into the form for each field in the table.
Using forms is a great way to help ensure accurate data entry, particularly if other users are adding information to your database.
Create a Form
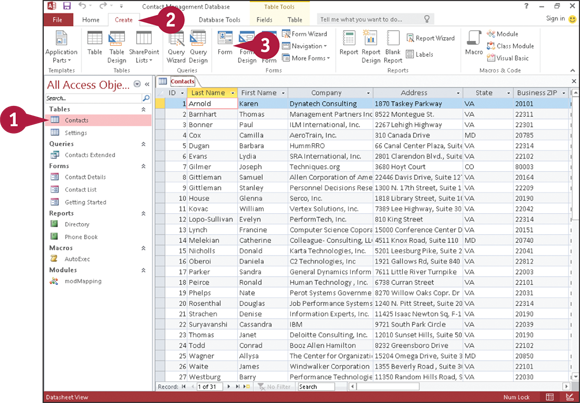
Double-click the table that you want to edit to open it in Datasheet view.
Click the Create tab.
Click Form.
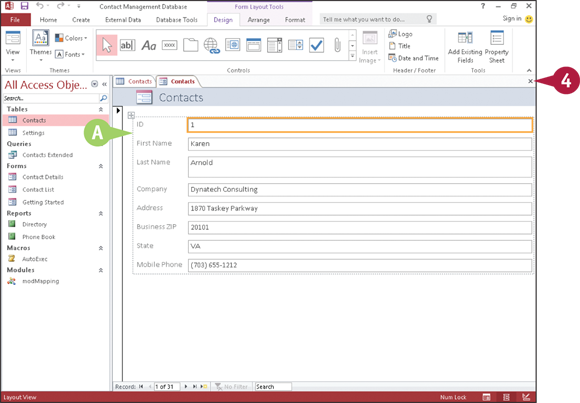
Access creates the form.
Click the Close button () to close the form.
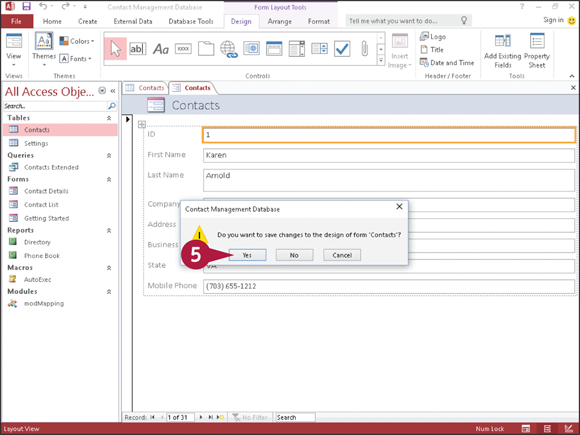
Access prompts you to save your changes.
Click Yes.
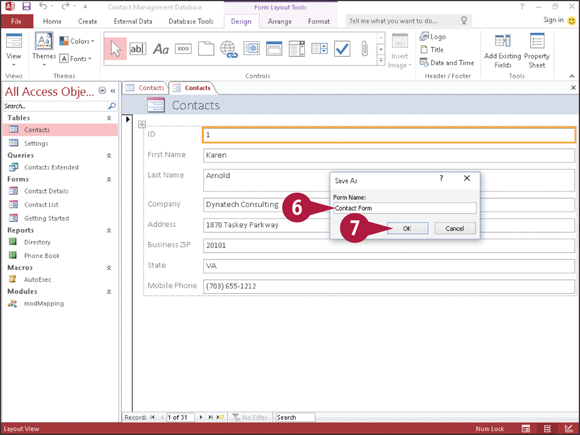
The Save As dialog box appears.
Type a name for the form.
Click OK.
Access lists the form among the database objects in the Navigation pane.
Note: After you save a form, you can reopen it by double-clicking it in the Navigation pane.
Change Form Views
You can view your form using three form views: Form view, Design view, and Layout view. Form view is the default; in this view, you can simply enter data. In Design view, each form object appears as a separate, editable element. For example, in Design view, you can edit both the box that contains the data and the label that identifies the data. In Layout view, you can rearrange the form controls and adjust their sizes directly on the form. Access makes it easy to switch from Form view to Design view to Layout view and back.
Change Form Views
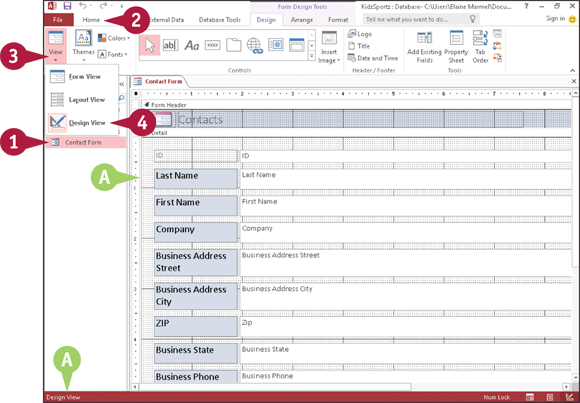
Switch to Design View
Double-click the form that you want to edit to open it in Form view.
Click the Home tab.
Click the bottom half of the View button.
Click Design View.
Access displays the form in Design view.
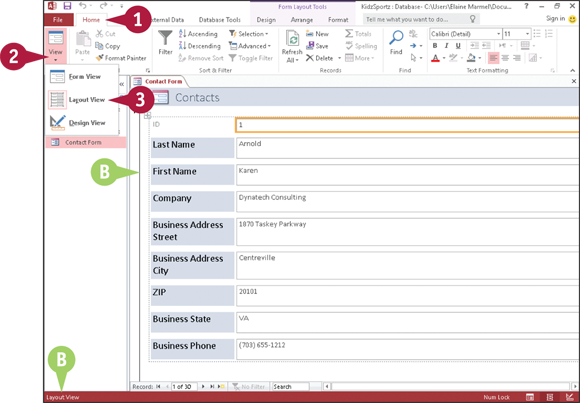
Switch to Layout View
Click the Home tab.
Click the bottom half of the View button.
Click Layout View.
Access displays the form in Layout view.
To return to Form view, you can click the bottom half of the View button and then click Form View.
Move a Field in a Form
You can move a field to another location on your form. For example, you might move a field to accommodate the order in which data is entered in the form. To easily move both a field label and the field contents, select both at the same time.
Although you can move a field in either Design view or Layout view, you might find it easier to make changes to your form in Layout view.
Move a Field in a Form
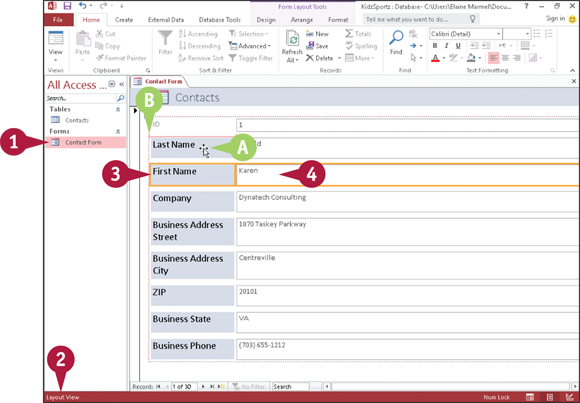
Double-click the form that you want to edit to open it in Form view.
Switch to Layout view (see the previous section, “Change Form Views,” for details).
Click the label of the field that you want to move.
changes to  .
.
Press and hold  as you click the contents of the field.
Click and drag the field label and contents to the new location on the form.
This symbol (a pink line) identifies the proposed position of the field label and contents.
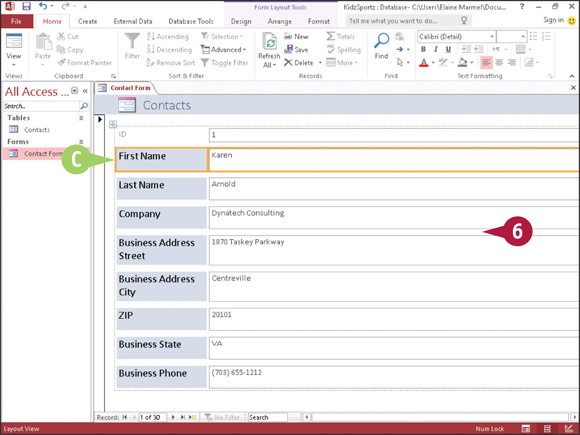
When you release the mouse button, Access repositions the field.
Click anywhere outside the field label and contents to deselect them.
Delete a Field in a Form
You can delete a field that you no longer need in a form. When you remove a field, you need to remove both the data box and the field label. Although you can delete a field in Design view or in Layout view, you might find it easier to do this in Layout view.
Note that removing a form field does not remove the field from the table upon which the form is originally based or any of the data within that field; it simply removes the field from the form.
Delete a Field in a Form
Double-click the form that you want to edit to open it in Form view.
Switch to Layout view (see the section “Change Form Views” for details).
Click the label of the field that you want to delete.
changes to .
Press and hold as you click the contents of the field.
Press  , or click the Home tab and then click Delete.
Access removes the field and label from the form.
Apply a Database Theme
A theme is a predesigned set of color schemes, fonts, and other visual attributes. Applying a theme to an Access database adds polish to it and makes it more visually appealing. When you apply a theme to an Access database, that same theme is applied to all forms and tables in your database.
Themes are shared among the Office programs; you can use the same theme in your Access database that you have applied to worksheets in Excel, documents in Word, slides in PowerPoint, or publications in Publisher.
Apply a Database Theme
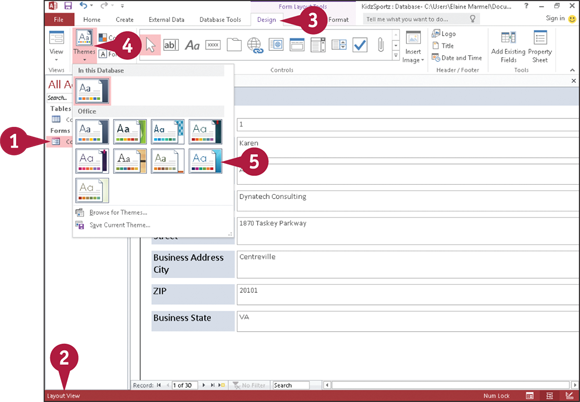
Double-click the form that you want to edit to open it in Form view.
Switch to Layout view (see the section “Change Form Views” for details).
Click the Design tab.
Click Themes.
Click the theme you want to apply.
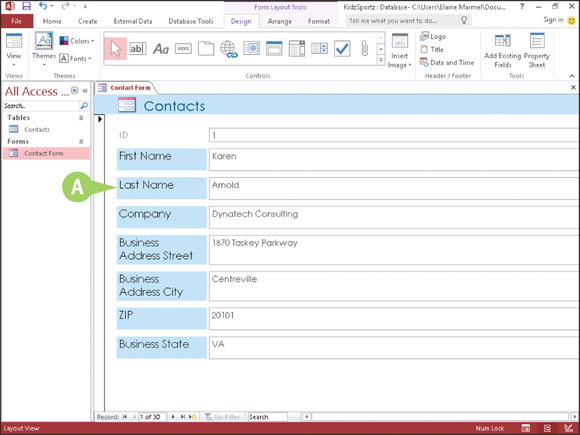
Access applies the theme to all forms in the database, changing colors and, if appropriate, fonts.
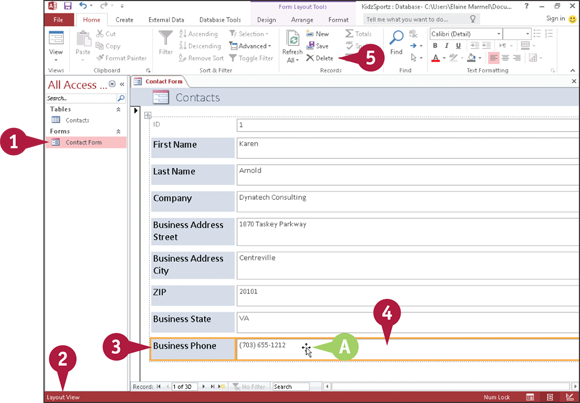
Format Form Fields
To change the look of a form, you can apply formatting to fields in the form. You might format a form field to draw attention to it in order to make it easier to locate that field for data-entry purposes. Or, you might opt to change the font of all field labels, make them larger, and change their color to make them stand out on the form for those who enter data.
You can apply the same types of formatting to form fields that you apply to words in Word documents, PowerPoint presentations, Publisher publications, Outlook messages, and Excel cells.
Format Form Fields
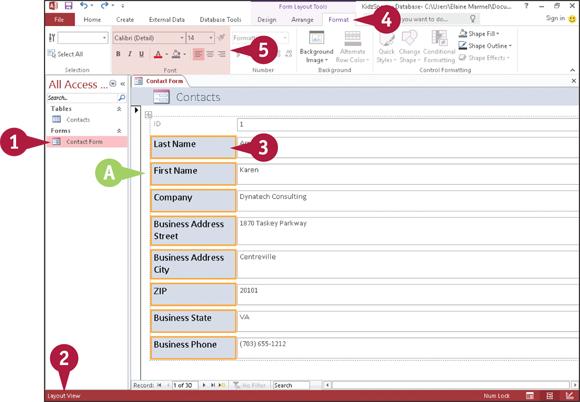
Double-click the form that you want to edit to open it in Form view.
Switch to Layout view (see the section “Change Form Views” for details).
Click to select the field whose text you want to format.
To select multiple fields, you can press and hold as you click additional fields.
Click the Format tab.
Use these tools to format the fields:
Click the Font  and choose a font.
Click the Font Size and choose a font size.
Click to the right of the Font Color button ( ) and choose a color for text.
Click to the right of the Background Color button ( ) and choose a background color.

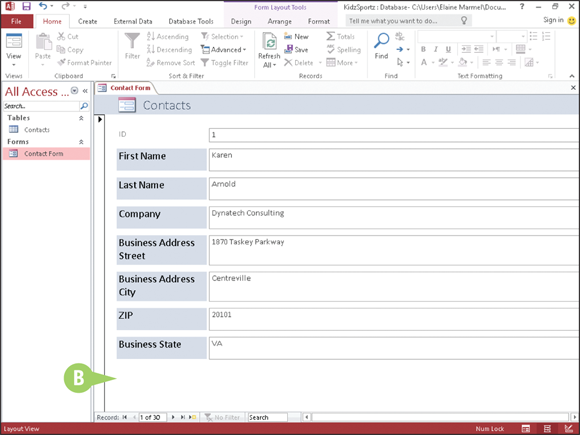
Access formats the text in the selected fields.
Click anywhere outside the selected fields to deselect them.
Add a Background Image
You can add a background image to a form to make it more pleasant to view. For example, you could add a company logo, or a photograph that appears in your company’s marketing materials. A background image, while not necessary or essential to a form, can make data entry a bit more interesting, simply because the form looks less formlike. A background image on a form remains fixed, even as you change records.
Add a Background Image
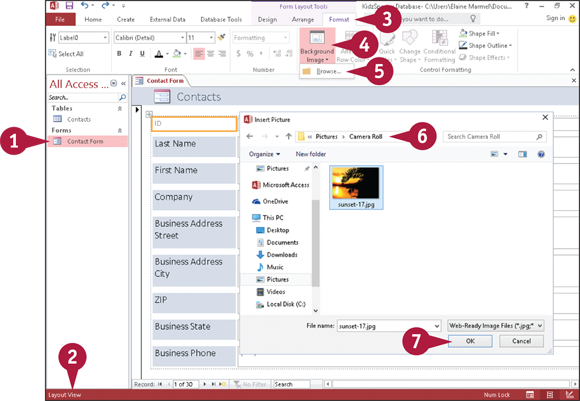
Double-click the form that you want to edit to open it in Form view.
Switch to Layout view (see the section “Change Form Views” for details).
Click the Format tab.
Click Background Image.
Click Browse.
The Insert Picture dialog box opens.
Locate and select the image you want to use.
Click OK.
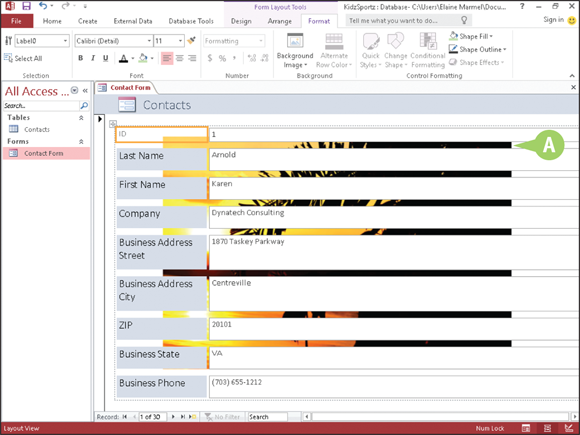
Access adds the image to the form background.