PREPARING

Set Up for Success
USE THE LARGEST CUTTING BOARD POSSIBLE
Get the largest cutting board you can fit on your counter. Think of it as your culinary desk. I prefer the feel of my knife on wood or bamboo to plastic or resin. I use a damp piece of natural burlap underneath my board to prevent it from slipping when I’m prepping ingredients.
SEEK OUT HIGH-QUALITY POTS AND PANS
I use the same approach for pots and pans that I do with ingredients: Buy the simplest, highest quality I can afford. The simple cast-iron skillet is an inexpensive, indestructible pan that conducts heat well and lasts practically forever. You want cookware that can go from the stovetop right into the oven, so steer clear of anything with plastic, synthetic, or wood handles.
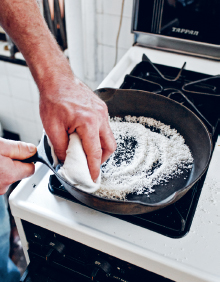
SEASON YOUR POTS, PANS, AND GRILL
Omelets and crepes were cooked for centuries before nonstick pans were around. If you take the time to season your pans, food will rarely stick to the bottom and pans will be easier to clean. Ceramic, enamel, glass, and nonstick coatings shouldn’t be seasoned, as it can damage the pan. Steel and iron pans should always be seasoned.
To season a pan, place ¼ cup of inexpensive coarse salt (like kosher salt) in the bottom. With a kitchen towel, scrub the entire inside of the pan, using the salt as an abrasive. This will remove any particles of food and old oil that may be stuck to the pan. Continue to scrub until the salt feels smooth against the bottom of the pan. Wipe out the salt and use it to season other pans until it becomes gray or discolored. Add 2 tablespoons of high-temperature cooking oil, like avocado or coconut, to the pan. Swirl the oil in the pan, coating the bottom and sides, and heat until it just starts to smoke. Remove the pan from the heat and pour the oil into a heatproof container—it can be used a few more times to season pans. Wipe the pan with a kitchen towel. The pan should be shiny and very smooth. If it doesn’t feel as slick as a sheet of ice, repeat the process. This should be done every few times you use the pan.
A seasoned grill holds the same importance as a well-seasoned pan. Carbon and burnt food can build up, which makes food stick, decreases conductivity, and imparts bitter flavors. For an outdoor gas or charcoal grill, first scrub your grill clean of any buildup. Next, get your grill hot, as instructed. Make a seasoning rag by rolling a tight-knit, 100% cotton cloth into a cylinder easily picked up with tongs. Tie it with natural butcher twine and lightly soak it in ¼ cup of high-heat cooking oil, such as avocado or safflower oil. The cloth should be lightly saturated, but not dripping with oil. Using tongs, quickly swipe the seasoning rag once down the grill rails. Reuse it until it becomes very dirty.

CUT WITH SHARP BLADES
Regardless of what knife you make your own, if it’s not sharp, it won’t work. Hand sharpening is better than machine sharpening because your knives won’t be ground down as quickly (and so will last longer).
The blades of vegetable peelers, food processors, and blenders are often overlooked. Using a dull peeler is like trying to mow your lawn with a dull mower blade. If they are not sharp, buy new ones.
CALIBRATE YOUR OVEN AND THERMOMETERS
It’s important to check the accuracy of your oven and thermometers every few months. For a probe thermometer, the easiest way to do this is to boil water and make sure the thermometer reads 212°F. To check on your oven, buy an inexpensive oven thermometer and use it to compare to the set oven temperature. It should be accurate within 5 degrees. If your oven temperature is off, adjust the temperature accordingly or check with the manufacturer about how to fix it. 