The Germans made extensive use of local materials to build fortifications and obstacles. Concrete (Beton) was always prized for any fortification. Its value was realised after the Allies began bombing the Atlantikwall defences in 1943: field positions and trenches were destroyed while reinforced concrete (Stahlbeton) positions were virtually unscathed. However, concrete and reinforcing bar were rarely available in the field, as these were being diverted to the construction of the Atlantikwall, Westwall, Ostwall, U-boat pens, flak towers, bomb shelters, command bunkers and underground factories. Other available construction materials were insufficient, and were diverted to priority installations. The available local materials were dependent on the area of operations, with some offering abundant supplies (as in north-west Europe, Italy and parts of the USSR) and others (such as North Africa and the steppes of Russia) barren.
Timber (Holz) was abundant in Europe and parts of Russia. Many of the plans for field fortifications, shelters and obstacles provided in German manuals called for the extensive use of logs. 20–25cm-diameter logs (Rundholz) or 16 × 16cm cured timbers (Bauholz) were recommended for overhead cover, horizontal support beams (stringers), and vertical support posts. Dimensioned wooden planks (Holzbrettern) was used sparingly for revetting, flooring, doors, shutters, duckboards, ammunition niches, ladders and steps. Pioneer and construction units operated portable sawmills to cut lumber. Bunks, tables, benches and other furniture were also made from this and discarded ammunition boxes. Nails, especially the large type required for timber construction, were often scarce.
The exterior of timber fortifications was banked with earth or buried below ground level. However, large-calibre penetrating projectiles could create deadly wood splinters. To reduce the risk of this, branches and saplings were woven horizontally like wicker (Fletchwerk) through 10cm vertical stakes or bundled brushwood fascines (Faschinen) to create supporting revettments (Verkleidung). The vertical stakes could be reinforced by securing anchor wires (Drahtanker) near the top and fastening them to shorter driven stakes a metre or so from the trench’s edge.

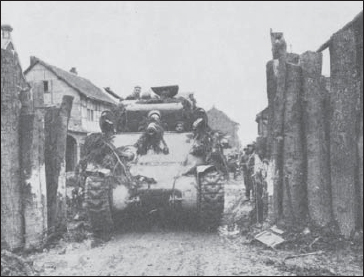
An M4 Sherman tank passes through a vertical log armour barrier inside a German village. The logs were buried as deep as 2m, and angled logs were sometimes set on the enemy’s side to deflect any tank aiming to ram the German barriers. They required large quantities of demolition charges to breach them, as has been accomplished here.
Like all other armies, the Germans shipped munitions, rations and other matériel in robust wooden boxes and crates of all sizes. Wicker basket containers were also used, especially for artillery ammunition and propellant charges. These were often filled with earth and stacked like bricks to form interior walls of fortifications and for parapet revetting. They were braced by logs or timber or bound together by wire (Draht) to prevent their collapse when the fortification was struck by artillery. Boxes were also disassembled and the boards used to construct firing ports, doors, shelves, and the like. Nails removed from these boxes became a valuable commodity. German munitions (including grenades, mines and mortar rounds) were often transported in comparatively expensive metal containers (Muntionsbehälter). While they were supposed to be returned to the factories for reuse, they were sometimes filled with earth and used for shoring up parapets. Steel fuel and oil drums were available, although they too were supposed to be returned. British three-gallon petrol tins were much used in North Africa, being filled with earth and used to revet parapets.
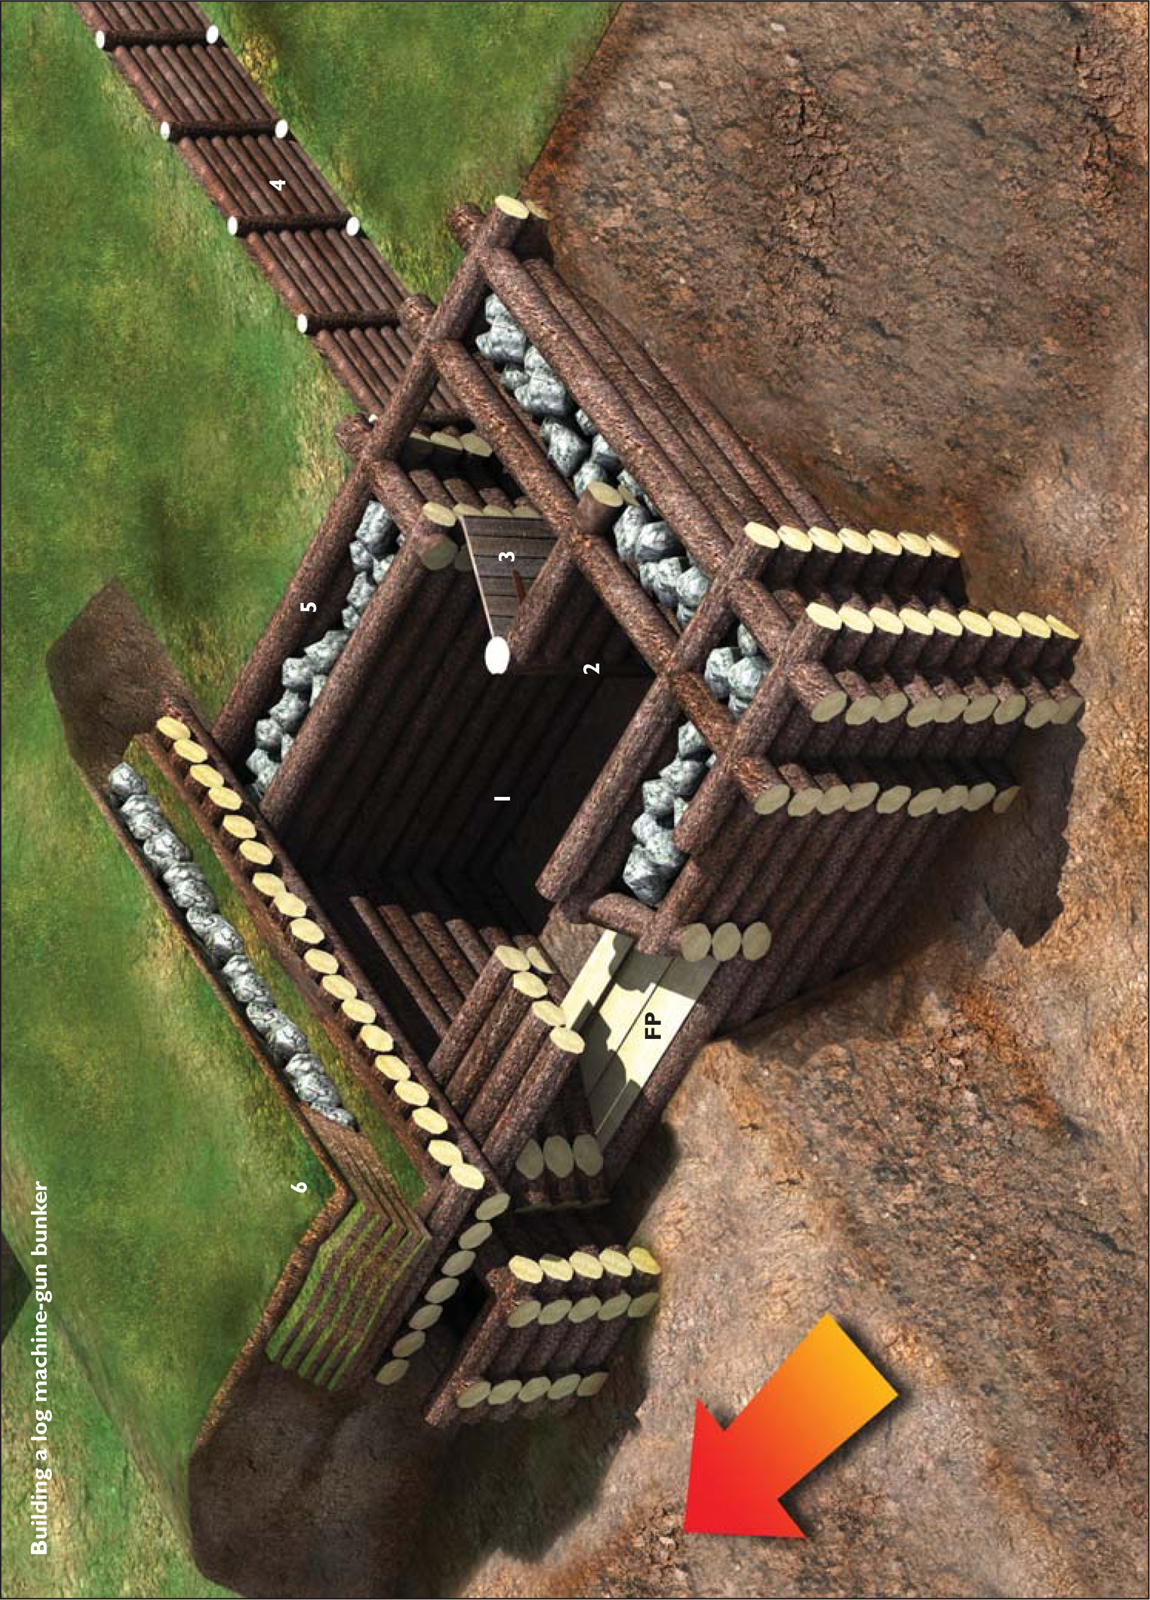
Building a log machine-gun bunker
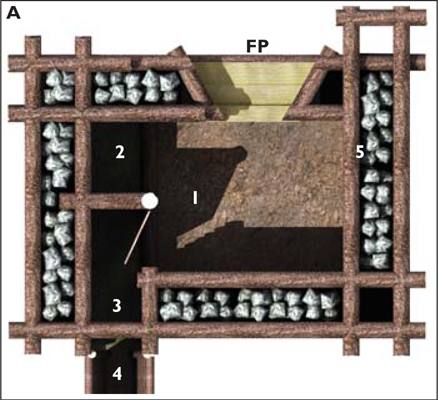
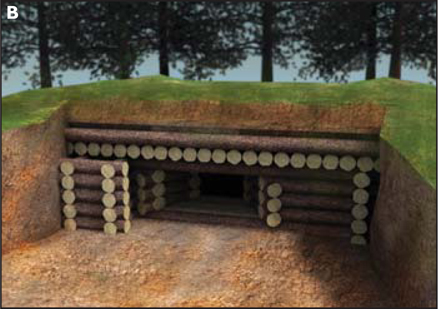
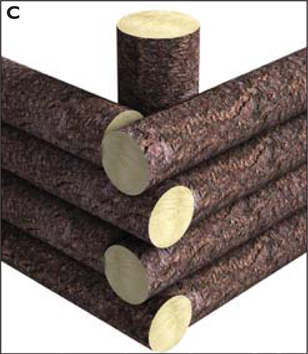
The log machine-gun bunker (Machinegewehr-Schartenstand aus Rundholz) was loosely based on larger concrete fortifications on the Westwall. The bunker’s firing port (FP) was oriented perpendicular to the enemy’s expected line of advance in order to engage him from the flank. This allowed positions to have a thicker than normal wall on the enemy side, and to inflict a surprise attack from an unexpected direction: it also made it much easier to conceal the bunker. The interior included a battle room (Kampf-Raum, 1) for the light machine gun (a tripod-mounted heavy machine gun could be installed); an adjacent ammunition room (Munitions-Raum, 2); and an entry alcove (Vorraum, 3). A communications trench (4) connected it to other positions. The double-log walls were filled with rock or packed earth (5). The roof was made of multiple layers of logs, clay, rocks and earth (6). The sides and roof were covered over with sods of turf and care was taken to ensure it blended into the terrain. The large red arrow on the main illustration indicates the direction towards the enemy (feindwärts): bunkers of this type were also built with the firing port oriented forward. Image A below shows the bunker in plan view; image B shows the bunker with its full earthern covering in place, without cutaway details; and image C depicts an alternative method used to mate the corners of log walls.
Purpose-made cloth sandbags (Sandsäcke) were scarce at the front as most production remained in Germany and in other rear areas. They were usually burlap tan, brown or grey. Other cloth shipping bags were used instead. Two layers of sandbags were sufficient to stop small-arms fire and provide protection from mortars.
Fortifications with firing ports, which needed to be above ground level, were kept as low as possible. Banked earth was piled high on the sides and angled at a fairly steep slope to absorb armour-piercing projectiles and the blast and fragmentation of high explosives. Layers of logs were sometimes laid just below the surface of the side banking as a burster layer. The above-ground portion of covered fortifications tended to be uniform rather than irregular.
Rocks (Stein) were used for fortifications wherever they could be found, but were especially common in North Africa and Italy, where fortifications were often constructed entirely of this. Rocks and logs were laid in layers beneath the piled-earth overhead covering to act as shell burster material. Rocks were also used as infill between double log walls to detonate projectiles or deform armour-piercing rounds. One particular hazard to the occupants was from fragments caused by bullet and shell strikes. Trenches and positions were sometimes revetted with rock walls, but unless stakes and horizontal bracing or wire mesh were used to anchor this, a near miss artillery round could make it collapse.
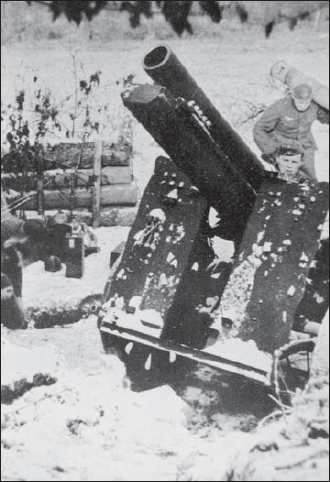
A 15cm heavy infantry gun in a log-revetted firing position. To the left of the weapon a gunner digs an armour protection trench within the position.
Materials such as corrugated sheet metal, lumber, timbers, roofing tiles and shingles, doors, masonry, structural steel, pipes, railroad rails, concrete and steel railroad ties were frequently salvaged from local structures.
On the Eastern Front, ice (Eis) and frozen snow (Schnee) proved to be ideal for fortifications and shelters. The duration and average depth of snowfall varied depending on the region. In the north it began in December, accumulated 100cm or more, and remained into June. In the south it began in January and remained until April with only 10–40cm falling. Temperatures remained 20–50°F below zero through the winter. Ice blocks and packed snow were surprisingly bulletproof, and simple to work. They required no revetting, but bails of hay or straw were sometimes used to support trenches and walls and to provide additional insulation. The protective thickness of frozen materials from small-arms bullet penetration is shown in Table 2.
Detailed and elaborate plans for the construction of field fortifications, shelters and obstacles were provided, and many of the principles on which they were based had been developed in World War I. Even though time and resources did not always allow these ideal positions to be built, they served as guides and their influence can be seen in the design of those actually constructed. A great deal of local initiative was used.
For the most part defensive positions were dug as deep as possible and kept low to the ground in order to present a low profile, both for concealment and to offer less of a target. Positions not requiring firing ports were usually flush with the ground. This was not always possible because of a high water table, swampy ground or shallow bedrock. In such instances the position had to be completely above ground level. In addition, the roof had to protect the position from heavy artillery: its thickness might also mean that the position’s profile was not always as low as desired. In some instances the firing port had to be well above the ground in order to cover its field of fire effectively, especially if firing downhill, which could also raise the position’s profile. Positions dug into the sides of hills, ridges, gorges and the like were usually built flush with the surface if possible, making them difficult to detect when camouflaged.
| Table 2: protective thickness of frozen materials | |
| Frozen material | Thickness |
| Loose snow | 120cm |
| Packed snow | 80cm |
| Snow with ice crust | 40–60cm |
| Ice | 28cm |
| Frozen ground | 20cm |
| Frozen clay | 15cm |
Most covered positions and shelters were built from logs, usually laid horizontally and with the ends notched for assembly, or spiked together. Horizontally constructed log walls were supported by vertical pilings with the ends often held together by steel staples. Wire was sometimes used to bind logs together. The upper ends of vertical load-bearing support posts were sometimes bound by wire to prevent the end from splintering from high explosive impacts. Interior walls were built of logs, planks, woven branches and saplings, rock, sandbags or hay bales to prevent collapse when hit by artillery or bombs.
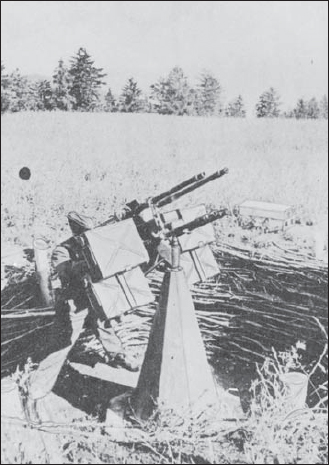
A quad AA machine-gun position protecting an airfield from low-level attack. The sides are revetted with tree branches and the gun mounted on a concrete pedestal. The position is about 2.5m in diameter and 1.5m deep. This expedient weapon was assembled in large numbers during 1944–45 from surplus 7.92mm MG.17 aircraft machine guns.
Overhead cover (In deckung) comprised a layer of large-diameter logs with a second layer laid perpendicular to them on top. Manuals called for no more than two or three layers, but in practice up to half a dozen layers could be used to ensure protection from heavy artillery. Waterproof roofing felt (tarpaper, Dachpappe), if available, was laid atop the roofing logs before they were covered with earth. A 5cm layer of clay was sometimes laid over the logs providing marginal waterproofing. If above ground, sods or peat blocks were stacked brick-like to shore up the angled sides. The whole fortification was covered over with sods removed from the site before digging began. If needed, additional sods were brought for the rear. This was supposed to be removed from areas beneath trees and brush so that it was undetectable from the air. While the manuals provided precise dimensions for fortifications, they often did not specify the thickness of overhead cover. This depended on how deep the position could be dug: the deeper it was, the thicker the overhead cover. Examples of specified overhead thickness are 160cm for a below-ground squad bunker and 130cm for an above-ground machine-gun bunker. The spacing of vertical support posts and stringer logs varied from approximately 1m to 1.5m.
Light mortars (US 60mm, UK 2in., USSR 50mm) did not possess the ability to penetrate most bunkers. Medium mortars (US 81mm, UK 3in., USSR 82mm) were more effective, but heavy mortars (US/UK 4.2in., USSR 120mm) were best suited, especially since they sometimes had delay fuses. Light artillery (75mm, 105mm, 25pdr) had limited effect, whereas medium artillery, like the 155mm, could destroy a well-prepared bunker.
Firing ports or embrasures (Schießscharte) were kept small to make them more difficult to detect and hit. A 60° field of fire (Wirkungsbereich) was recommended, but the angle could be narrower or wider. The ports were made of smaller-diameter logs, planks or sandbags. There was usually only one firing port; seldom did additional ports exist to cover alternate sectors. These were usually placed very low to the ground, if not flush with it.
Open-topped (offen) fighting positions such as rifleman’s holes, trenches and holes for machine guns, mortars, infantry guns and anti-tank guns, were kept as small as possible. Small positions, just large enough to accommodate the weapon and crew and allow them to function effectively, required less construction time and camouflage, were more difficult to detect, especially from the air, and made a smaller target. Manuals called for trenches to be 60–80cm wide at the top and 40cm wide at the bottom, providing slightly sloped sides. In practice they tended to be narrower if the soil was stable enough to support it, with the sides almost vertical. They were either without an earth parapet (Brustwehr) or had a very low parapet for concealment. Parapets were used if the hardness of the soil, a lack of time, or a high water table did not allow the positions to be dug sufficiently deep. It also required significant time and effort to remove the spoil, conceal it, and return the ground around the position to a natural state.
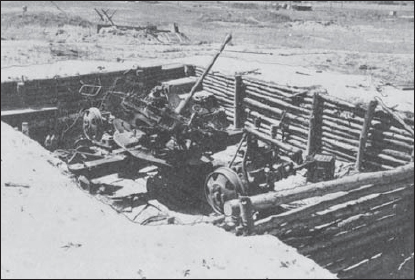
This 3.7cm Flak36 gun emplacement was located outside a forced-labour camp at Waldorf, Germany. It remains mounted on its wheeled carriage, although its precious tires have been removed, probably for use on trucks. Revetted with saplings and banked with earth, no effort was made to camouflage the position.
The idea of removing soil and keeping the position level with the ground was learned from the Italians in North Africa. On flat, barren desert floors natural features and vegetation were non-existent and concealment was achieved by blending the positions into the ground. For machine-gun positions the Italians developed an underground shell-proof shelter and magazine with a small circular chamber. Its ceiling tapered to a neck, serving as the machine-gun position. The ‘Tobruk pit’ (Tobukstellung or Ringständ) provided a small, circular, difficult to detect opening with 360° fire for the machine gun. Separate entrances were provided or they were connected to central bunkers by tunnels. The Germans developed similar positions for the 5cm mortar and one mounting a tank turret, the Panzerstellung. While they were often built of timber, concrete ones were sometimes encountered in critical front sectors, as they required little cement. These and similar small concrete positions were categorised as reinforced field works. Concrete Tobruk pits were common on the Atlantikwall.
Entrances to positions were normally in the rear, but in some instances they might be on the side of a position depending on the protection and concealment afforded by surrounding terrain. Entrances were often protected to prevent direct fire, blast fragmentation, grenades and demolitions from entering. This might be in the form, of a blast barrier inside the position, or a similar barrier or wall on the outside. A trench with at least one right-angle turn usually formed the entry passage. Many positions though had only a straight, unprotected entry way. This often proved to be the srongest defensive point: if the attackers gained the position’s rear, they would usually come under fire from adjacent positions. Larger positions often had a vestibule or entry hallway (Vorraum) separated from the main compartment by a log wall. This helped protect occupants from grenades and demolition charges as well as from external blast overpressure and chemical agents. This also served as a changing area for wet clothes and helped keep out cold draughts as troops entered and exited for guard duty and patrols.
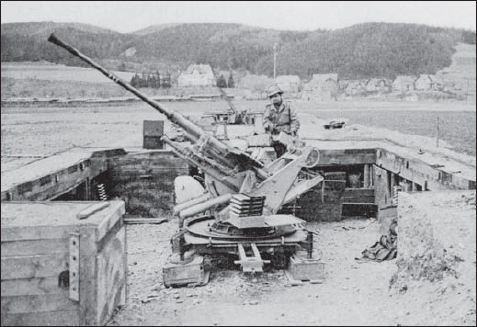
A square 3.7cm Flak36 gun emplacement made of concrete, with much of the formation planking left in place. Some effort was made to camouflage-paint the emplacement’s sides. Ammunition and gun equipment niches were built into the interior sides. The gun’s wheeled carriage was removed and the jack-stands set on earth-filled ammunition boxes. A second emplacement can just be seen in the background, to the left of the US soldier. Such weapons were usually employed in threes.
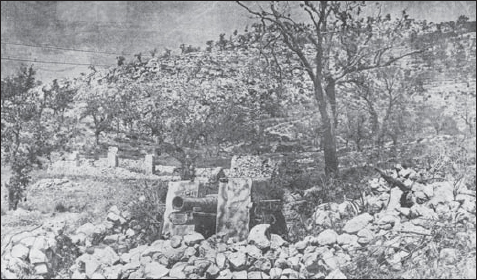
This 15cm s.IG.33 heavy infantry-gun position blends well with the surrounding rocky Italian terrain. The haphazardly constructed rectangular rock parapet looks like just another pile of rocks. The gun was painted dark yellow, common after 1943, and sprayed with green paint. The camouflage pattern actually calls attention to the weapon though, as it outlines rather than disrupts the shape of the shield.
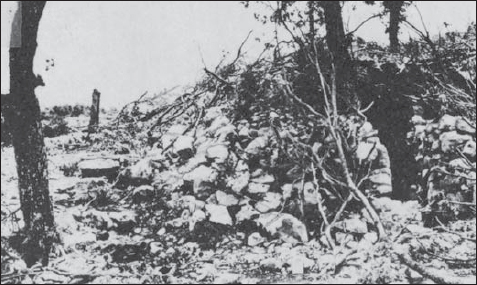
This rock and log personnel shelter was to the rear of the 15cm infantry-gun position shown in the picture above. Its narrow entrance and the fact that it has been built around a couple of trees made it difficult to detect.
Eingraben!
Infantrymen were issued a small entrenching tool (kleines Schanzzeug), with a fixed square blade and short wood handle. The folding spade (Klappspaten) had a longer wood handle and a pointed blade, and it saw less use: the 1943 US folding entrenching tool was based on this model. Both types were carried in leather carriers attached to the belt over the left hip. The signal for showing ‘We are dug in’ was to hold one’s entrenching tool above one’s head with the back of the blade facing forward. The signal for showing ‘We are digging in’ was to hold the front of the blade forward. Troop units were issued long-handled rounded spades, pickaxes, axes, hatchets and hoes for building field fortifications. Since there were often shortages, confiscated civilian tools and captured items were also employed. Wire-cutters, handsaws, hammers and mallets were also provided. Pioneer troops were issued similar spades and pickaxes with detachable handles. The blade or pickaxe head was carried in a leather carrier: both this and the handle were attached to backpacks. Pioneer troops occasionally used two-man petrol-powered chainsaws.
Frontline open positions for crew-served weapons were provided with armour protective trenches (Panzerdeckungslöchern), or simply ‘armour trenches’ (Panzergraben). These were narrow, deep slit trenches on either side of the position – ‘wings’ that provided cover for the crew if overrun by tanks. Often they would be dug with an angled turn, in the form of a wide ‘V’. For protection from the crushing action of a tank, the trench had to provide 75cm of clearance above the crouching occupants. They were also used if the position came under artillery or mortar fire, or air attack, as well as for firing positions for close-in defence. Ideally these would be covered if time and resources permitted.
Ammunition niches (Munitionslöchern) were dug into the sides of trenches and other positions, and usually a wooden box was inserted there. Anti-armour gun, infantry gun, and artillery positions had ammunition niches dug into the ground at an angle and lined with a box with a lid. These were located a minimum of 10m to the rear of the position.