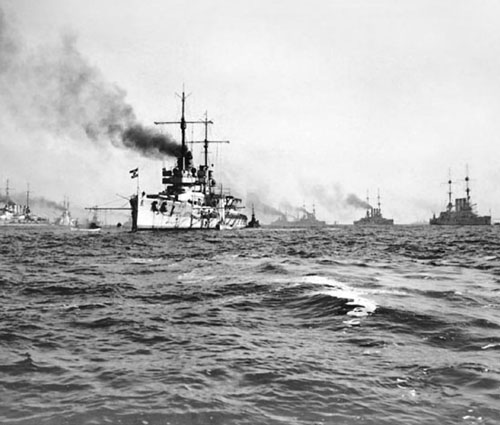
The German High Seas Fleet manoeuvring off Heligoland in 1914. The German Navy confidently expected to be able to fight a decisive battle on its own terms against the British Grand Fleet. Instead, the early months of the war saw the two fleets play a cat-and-mouse game, seeking out advantage.
While naval operations around the world had an impact on the war, they were something of a sideshow in comparison with the main event in the North Sea. It was here that the battlefleets confronted each other, and where the war at sea would be decided – and if Britain lost here, then Germany would win the war.
The British Grand Fleet, under Admiral Sir John Jellicoe, comprised 21 Dreadnought and eight pre-Dreadnought battleships, together with four battlecruisers under the command of Vice Admiral Sir David Beatty. Its base was Scapa Flow in the Orkney Islands, north of Scotland. The Channel Fleet, with 18 pre-Dreadnoughts, was based at Portland. There were various forces of light cruisers, destroyers and submarines based at other ports including Rosyth, Invergordon on the Cromarty Firth, the Humber, Harwich and Dover. The German High Seas Fleet comprised 13 Dreadnoughts and 16 pre-Dreadnoughts, under Admiral Friedrich von Ingenohl, with four battlecruisers (plus one armoured cruiser often counted with them) under Admiral Franz von Hipper. They were mainly based at Wilhelmshaven on the Jade River in the North Sea, behind the heavily fortified island of Heligoland, and Kiel in the Baltic, with a canal connecting the two. There were other bases at Bremerhaven, Cuxhaven and Ems on the North Sea.
While Britain enjoyed a clear advantage in warship numbers, its effect was reduced by the global responsibilities of the Royal Navy. The balance in terms of quality was more favourable to Germany. In general, British warships were faster and had greater endurance at sea than German ships, and also tended to have heavier guns. German warships tended to have better armour and superior underwater protection, and their offensive power was boosted by more accurate gunnery and better quality shells, torpedoes and mines.
The two fleets were more equal in the new asset of air power. In 1914, the Royal Naval Air Service had seven airships, 31 seaplanes (which took off from and alighted on the water) and 40 aeroplanes, while the German Navy had one airship and 36 seaplanes. Other navies had air arms, including the United States, France, Russia, Italy and Austria.
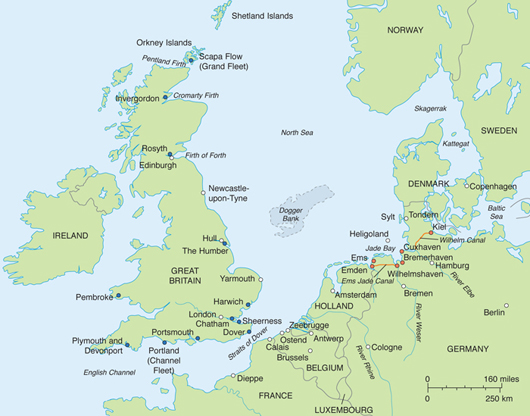
The major North Sea naval bases of Britain and Germany. The North Sea was the principal arena for the surface naval war. It witnessed a number of small-scale engagements in the first months of the conflict, as well as raids conducted by each side against targets on their enemy’s coast.
INITIAL WAR PLANS
Both the Royal Navy and the High Seas Fleet expected the naval war to begin with a major engagement between the two battlefleets. However, there was a critical difference in how they expected such a clash to occur.
The commanders of the High Seas Fleet were conscious of its numerical inferiority, but were confident that the strong offensive tradition of their opponent would see the Royal Navy seek battle close to the German bases. Such a bold move would allow German mines and torpedoes to weaken the British fleet sufficiently to change the balance of advantage.
The British Admiralty, on the other hand, was well aware that changes in naval warfare had made it impossible to attempt the sort of ‘close blockade’, with the fleet poised just off the enemy coast, that it had successfully imposed on its adversary in previous centuries. Modern warships, with their voracious appetite for coal, could not be kept on station for long periods, while new means of attack made it too dangerous to linger near enemy bases. The Royal Navy had therefore secretly abandoned plans for close blockade in 1912.
Dirigible airships appeared in the late nineteenth century, and then in 1903 the Wright brothers made the first powered flight. The obvious advantages of aircraft for reconnaissance led to naval trials, which the German Navy began with Zeppelins in 1906, while the Royal Navy in 1909 acquired the imaginatively named Airship No. 1 for the same purpose. In 1910, an aeroplane took off from an anchored United States cruiser. In 1911, one landed on a United States battleship and took off again; in the same year a seaplane took off and landed. In 1912, an aeroplane took off from a Royal Navy battleship that was underway, and experiments began in dropping bombs and in detecting submarines from the air. Then in 1913, the cruiser HMS Hermes was modified to operate seaplanes, and Britain began the construction of the world’s first purpose-designed aircraft carrier, Ark Royal. Aircraft went to war at a very early stage of their development, and their roles expanded rapidly as their capabilities matured.
While technology closed off one option, geography provided an alternative; the location of the British Isles naturally restricted German access to the Atlantic and made possible a distant blockade. Stationing the main battlefleet in Scotland, with a smaller fleet backed by minefields in the English Channel, would imprison the German fleet in the North Sea. The occasional raider might slip through to threaten overseas trade, but not a whole squadron. This approach would not defeat the High Seas Fleet, but would contain and neutralize it, while leaving open the possibility that it might be brought into an ambush.
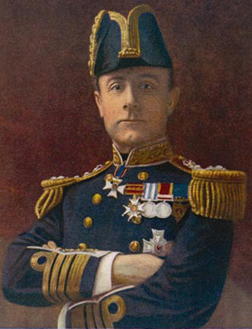
Admiral Sir John Jellicoe took over as commander-in-chief of the British Grand Fleet at the beginning of the war. His force bottled up the German High Seas Fleet and prevented it from both interfering with British trade and breaking the British blockade of Germany.
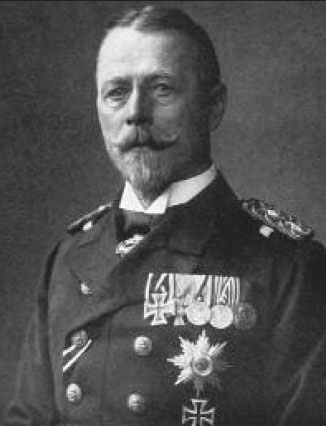
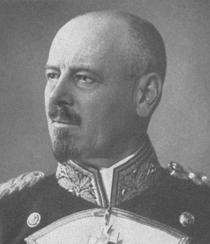
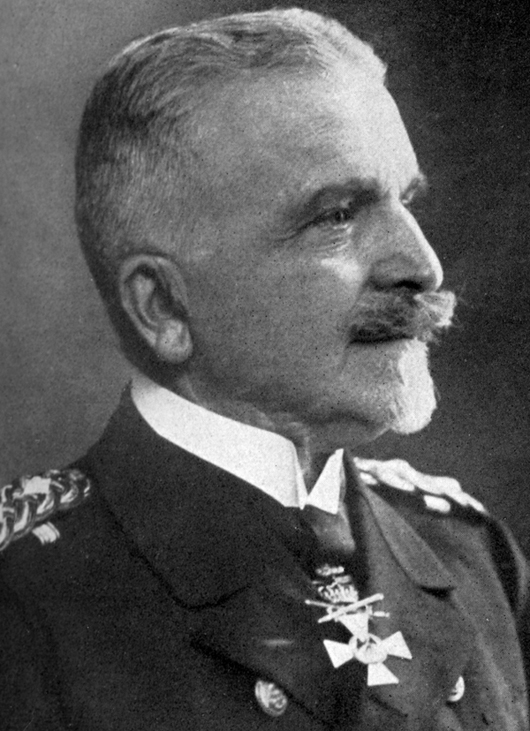
Admiral Friedrich von Ingenohl was commander-in-chief of the German High Seas Fleet at the beginning of the war. He devised a series of raids against the British coast, aiming to entice a small part of the Grand Fleet into battle.
Denied battle on ideal terms, the German battlefleet was held back at the start of the war. While Germany was confident of swift victory on land, there was little point in risking the fleet, which could be preserved as a useful bargaining chip for peace negotiations. As the war dragged on without a victory, Germany’s naval strategy shifted from relying on attrition against attacking British forces, to more actively trying to catch a small part of the British fleet at a disadvantage, thus seeking parity in that way.
The early months of the war therefore saw both sides keen to test their strength in battle, but reluctant to risk losing their expensive battleships and cautious of being drawn into combat on unfavourable terms. The practical effect of this was that the two sides warily circled each other, while undertaking a series of raids that aimed to lay traps for the opponent.
THE BATTLE OF HELIGOLAND BIGHT(28 AUGUST 1914)
The first significant engagement of the war came about as a result of early patrols into the Heligoland Bight, just off the German bases, by British submarines. These revealed the routine of German destroyer patrols. Commodore Reginald Tyrwhitt, commander of the Harwich Force, and Commodore Roger Keyes, in command of British submarines, proposed a plan to attack these forces, aiming to seize the initiative by hitting the German Navy close to home. Winston Churchill, First Lord of the Admiralty, was delighted by their bold suggestion and it was put into effect, albeit in a revised form.
The plan was for a small force of British submarines to draw the enemy destroyers out into the North Sea, where they would be pounced upon by two light cruisers and a flotilla of destroyers from the Harwich Force. Another group of submarines would be in position to attack any heavier German units attempting to assist their destroyers, while a force including the two battlecruisers Invincible and New Zealand would provide more distant support. When Jellicoe heard of the plan on the eve of its execution, he expressed concern that the British force risked being overwhelmed by a sortie of the main German battlefleet. He urged that the Grand Fleet should be committed – as, indeed, the original plan had envisaged. The Admiralty turned down this request, but did permit him to send Beatty with three additional battlecruisers (Lion, Queen Mary and Princess Royal) and Commodore William Goodenough with six Town-class light cruisers, to strengthen the supporting force. Neither of these two commanders had complete information about the planned operation, and the signal informing Tyrwhitt and Keyes of these additional forces never reached them. This failure caused considerable confusion and came very close to having serious consequences.
The plan was implemented on 28 August, in conditions of thickening mist and poor visibility near the coast. The first contact between opposing forces occurred at dawn, when the German destroyer G194 spotted and pursued a British submarine, only to be engaged at 7am by the leading British destroyers. Admiral Hipper believed that no British forces larger than destroyers were present, and hence initially ordered only two light cruisers, Stettin and Frauenlob, to assist, with others ordered to prepare to put to sea. He later requested that heavier units be committed but they were prevented by the tide of the Jade River. By about 8am, the two light cruisers were engaging their British counterparts, and although they were damaged they succeeded in covering the retreat of their destroyers, while also damaging and slowing Tyrwhitt’s flagship Arethusa. The engagement rapidly became confused as reinforcements joined, left and rejoined the battle, fading in and out of the mist.
As Tyrwhitt’s ships withdrew, they cut off and sank the destroyer V187 just after 9am. Goodenough detached two of his cruisers to support the withdrawal of the Harwich Force, but their unexpected appearance added to the confusion: Tyrwhitt’s ships initially believed them to be hostile, but recognized them before opening fire. The British submarines were less quick to realize that they were friendly: E6 fired a torpedo at the cruiser Southampton but missed, while her target’s attempt to ram the submarine in response also failed.
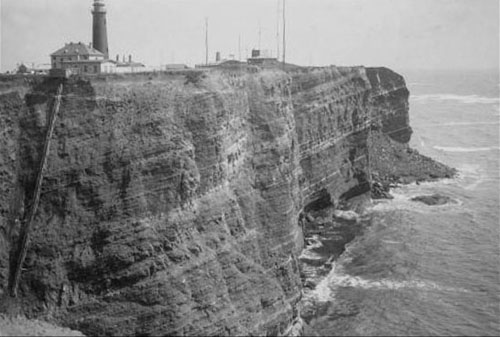
Heligoland had been a British possession until ceded to Germany in 1890. The island was converted into a heavily defended naval base and was used extensively by the German fleet during the war.
Further German light cruisers joined the battle piecemeal rather than as a single force. At about 11am, Strassburg attacked and further damaged Arethusa, but was driven off by the determined attacks of her accompanying destroyers. At 11.45am, Mainz entered the action, but was chased into the path of Goodenough’s cruisers, hit repeatedly by shells and torpedoes and sank at 1.10pm. Meanwhile, the Harwich Force came under increasing pressure, driving off two attacking light cruisers at 12pm, but was then attacked by three more at 12.30pm, which threatened to overwhelm it.
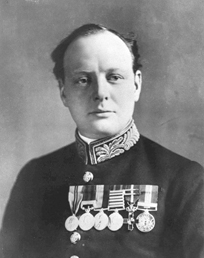
Churchill became First Lord of the Admiralty in 1911. He was often carried away by his enthusiasm and exaggerated his own mastery of naval warfare, exercising excessive control over commanders around the world. He was seen by many contemporaries, both politicians and navy officers, as highly intelligent and a persuasive debater, but also as a nuisance or, worse, a danger. This view seemed vindicated by doubtful schemes such as the deployment of the Royal Naval Division to Antwerp in 1914 (for which he suggested himself as commander, to the considerable amusement of the rest of the Cabinet) and the Gallipoli expedition. However, there were also signs of the characteristics that came to the fore later in his career, notably his boldness, imagination and determination to seize the initiative. He needed the right partner as First Sea Lord, which for a while he had in Jacky Fisher. Though their relationship was rather stormy, there was a core of mutual respect, and Fisher could restrain Churchill’s wilder impulses.
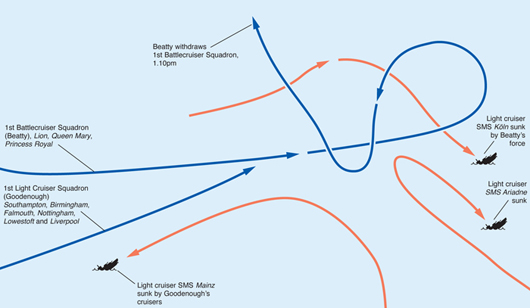
The Battle of Heligoland Bight (28 August 1914). This engagement represented a bold attempt by the Royal Navy to seize the initiative at the outset of the war. In the midst of a confusing engagement, the Germans lost the ships Köln, Mainz and Ariadne plus a destroyer (V187). The Royal Navy, by comparison, lost only one light cruiser. The British victory owed much to Beatty’s bold and offensive-minded disposition, a throw-back to the age of Nelson, and provided a tonic for popular morale. However, a series of errors in planning came close to throwing away this success.
Just at the right moment, however, Beatty’s battle-cruisers appeared on the scene. His squadron had been poised some 50km (30 miles) away from the developing engagement until about 11.30am, when he received an urgent call for assistance. This presented him with a considerable dilemma. On the one hand, he could seize the initiative, rescue the lighter forces and inflict substantial damage on the enemy. On the other hand, committing his squadron to battle so close to the enemy’s main bases would not only risk running into mines or torpedo attack – just as Germany’s initial war plan had hoped – but would also risk falling victim to attack by superior forces should the High Seas Fleet put to sea. Beatty’s temperament inclined him towards the bold, offensive choice, but he was well aware that the loss of one or more of his battlecruisers would represent a serious blow to the strength and the reputation of the Grand Fleet. Nevertheless, at 11.35am, he ordered his force into the Bight at top speed. His battlecruisers overpowered the German light cruisers, sinking two more and driving the others off. At 1.10pm, realizing he had achieved all that he could, he ordered the British forces to withdraw.
The result was a clear victory for the Royal Navy. Germany lost three light cruisers, the Köln, Mainz and Ariadne (which had emerged from the mist just 3500m (3800 yards) from Beatty’s flagship, Lion), with three more seriously damaged, and one destroyer also sunk; a total of 1240 German sailors were killed, wounded or captured. Britain had one light cruiser and three destroyers badly damaged, and lost 35 men killed and 40 wounded. At a time when most of the news from the war was bad, British opinion was delighted by this success in the first encounter between the Royal Navy and its young challenger. The popular reaction was rather more than was justified, but it was a welcome tonic for morale to see a victory that seemed to echo Drake and Nelson, entering the enemy’s back yard and giving him a bloody nose.
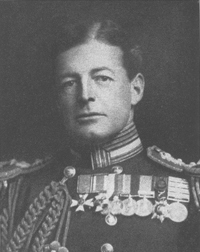
Beatty joined the Royal Navy in 1884, and his qualities of bravery and leadership ensured rapid promotion. He won a medal for gallantry and promotion to commander for his service in Nile gunboats during the Sudan Campaign (1896–98). Further heroics in China hastened his promotion to captain and then, at 39, he was promoted to rear admiral, becoming the youngest flag officer since Nelson. A period as naval secretary to the First Sea Lord, Winston Churchill, helped him to the command of the 1st Battle Cruiser Squadron in 1913. Beatty was dashing, a keen sportsman and devotee of fortune tellers, a socialite who enjoyed his fame and cultivated his popular image, always wearing his cap at a jaunty angle and flaunting a personalized uniform jacket with two buttons fewer than the regulation version. He was a decisive and offensive-minded commander, more willing to take a risk than Jellicoe, but far from reckless. He expected his subordinate captains to be as swift as he was to appreciate a situation, and to act on their own initiative. In November 1916, he became commander-in-chief of the Grand Fleet on Jellicoe’s appointment as First Sea Lord (a position that Beatty would take on after the war).
There was a considerable degree of good fortune involved. Disjointed planning, poor coordination and a failure to keep all commanders fully informed caused great difficulties, and could easily have had far worse consequences. Disaster was averted, but the chance of greater success was thrown away: Keyes believed that if the British forces had been properly united, they could have sunk twice as many German cruisers. Beatty’s rapid calculation of the risks and decision to press on into the Heligoland Bight, in full awareness of the danger he faced, proved critical. Had Hipper’s battlecruisers sortied earlier, or had German U-boats been able to intervene, the outcome could have been quite different.
While the result of the battle was not the triumph the British press believed, it had a great psychological impact on the German Navy, not least because their enemies had done exactly what it had hoped, taking offensive action near the German bases. Unaware of how lucky its attackers had been, the German Navy was perhaps more impressed by the British performance than it should have been. The Kaiser further restricted the deployment of his precious High Seas Fleet, confirming its cautiously defensive strategy. There were later attempts by the Royal Navy to repeat the operation, but they were found not to be feasible due to the increasingly dense defensive minefields laid – another reaction to this battle.
THE LOSS OF THE CRESSYS
The high morale enjoyed by the Royal Navy did not last. Submarines had already had an impact on the war: on 5 September 1914, U21 torpedoed and sank the cruiser HMS Pathfinder to become the first U-boat to sink a British warship. A bigger shock was to come.
On 22 September, three old armoured cruisers, Aboukir (whose captain, John Drummond, was the senior officer and hence in command of the small force), Cressy and Hogue, were patrolling against enemy minelayers off the Dutch coast. They lacked supporting destroyers because of earlier bad weather, though some were en route to join them. They were steaming on a straight course, at a speed of less than 10 knots to conserve coal, and could not have been easier targets for submarine attack. Suddenly, at about6.25am, Aboukir was badly damaged by an underwater explosion and began to sink. Her captain, assuming she had hit a mine, ordered her sister ships to close and pick up survivors. The warship had actually been hit by a torpedo fired by the U-boat U9. Its captain, Lieutenant Commander Otto Weddigen, was surprised to see the other two cruisers presenting themselves as such easy targets, but this did not prevent him from taking advantage of this opportunity, and he torpedoed and sank them both. The Royal Navy had lost three cruisers, together with 1459 officers and men.
Hipper joined the Imperial German Navy in 1881 and followed a career path more characterized by ship command than by staff appointments ashore. In 1912, he was promoted to rear admiral and in October of the following year became commander of the Scouting Group of the High Seas Fleet. Like Beatty, Hipper seemed to have the ideal qualities for a commander of battlecruisers: he was bold and brave, and often hugely frustrated by the restrictions placed on his actions by his superiors. Criticized by some for his actions at the First Battle of Heligoland Bight and reviled by the British press as a ‘baby killer’ for his attacks on towns in eastern England, he did well to extricate his battlecruisers from the clutches of the British ships at the Battle of the Dogger Bank, albeit at the cost of the armoured cruiser Blücher. His most celebrated achievement was his command of the Scouting Group at the Battle of Jutland in May 1916. In August 1918, he replaced Scheer as commander-in-chief of the High Seas Fleet, and had the melancholy task of overseeing mutinies and then surrender.
As is standard procedure when a Royal Navy ship is lost, a Court of Inquiry was held. It criticized Drummond for failing to take the normal precaution of following a zigzag rather than a straight course, to complicate the aim of any U-boat, and also for ordering in the other two cruisers when he did not know whether his ship had been hit by a mine or a torpedo. Tragically, concern had previously been expressed about the danger to these old, slow cruisers. It was widely believed that they were vulnerable to attack – hence their nickname of ‘the live bait squadron’ – although the threat envisaged was from surface warships. These concerns had led Churchill to recommend that their patrols be ended, but the change of policy had not been implemented: there were not enough light cruisers to take over the role and the predominantly bad weather prevented destroyers from fulfilling it. While it is true that the three cruisers were not following the precautions that they should have been, the formidable threat posed by submarines could no longer be doubted.
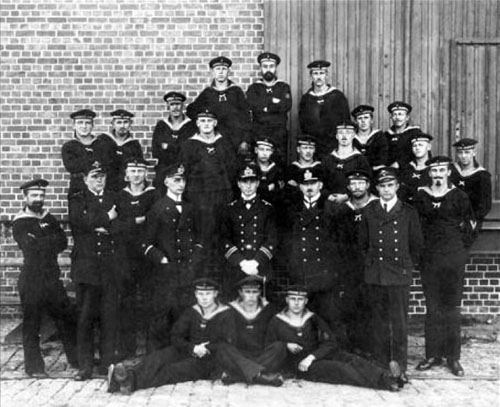
The crew of U9 with Lieutenant-Commander Otto Weddigen at centre. The main impact of the German U-boats was against merchant shipping, but there were some striking successes against allied warships. U9 sank three old Cressy-class armoured cruisers in a single day.

HMS Audacious. When this new battleship was sunk by a mine on 27 October 1914, the Admiralty took the unusual step of keeping her loss a secret, to conceal the worrying decline in the strength of the Grand Fleet.
The German submariners were not the only ones to make their mark. On 13 September, the British submarine E9 sank the German light cruiser Hela, and on 6 October a destroyer. Overall, though, submarines caused more concern to the Royal Navy, not least because it had more warships at sea and hence offered more targets than its opponent. The main cause of alarm on the British side was the uncomfortable awareness of the poor defences of the main base at Scapa Flow against submarines. For much of September 1914, and then again between mid-October and late November, this vulnerability caused the Grand Fleet to beat an undignified retreat from Scapa Flow to the west of Scotland and then to the north of Ireland. Such concerns seemed to be vindicated on 23 November, when U18 managed to penetrate the defences of Scapa Flow, although she was sunk on the way out. By mid-1915, British bases were far better defended against submarines.
There was also a considerable threat to shipping from naval mines. In contrast to the hesitation over its use of U-boats, from the very start of the war Germany laid mines in international waters, which resulted in loud protests from neutrals. The Royal Navy’s capabilities for laying mines and also for countering them were very limited, but they gradually improved. Mines constrained the activities of the fleet, not least due to the concern that reducing speed to allow minesweeping would make ships more vulnerable to submarine attack. Then, on 27 October, came the most significant loss of a warship to date in the war, when the new super-Dreadnought HMS Audacious was sunk by a mine laid by a surface raider.
Shortly afterwards, a familiar face returned to the Admiralty. On 29 October, Admiral Prince Louis of Battenberg was replaced as First Sea Lord by Jacky Fisher, returning at the age of 74 to a position that he had left in 1910. He quickly created a more businesslike atmosphere and initiated a new building programme, focusing particularly on submarines, destroyers and smaller anti-submarine vessels, which would become critical later in the war.
Fisher’s counterparts had begun to look to a more ambitious strategy. Rather than simply waiting for the Royal Navy to dash itself against the defences around the High Seas Fleet’s bases, the German commanders now embraced a more active policy of seeking to tempt isolated elements of the Grand Fleet into action against superior forces. This new approach was initiated on 3 November 1914, when four German battlecruisers, with two battle squadrons providing distant support, bombarded the town of Yarmouth in Norfolk, in part to test the Royal Navy reaction. Little damage was inflicted, and on the way home the armoured cruiser Yorck sank after blundering into a German minefield.
Ingenohl now devised a plan for a larger-scale repeat of the raid on Yarmouth. Hipper’s battlecruisers would attack Scarborough and Hartlepool, with the battle squadrons of the High Seas Fleet in the North Sea for support, despite the Kaiser’s order to avoid risking high losses. The British battlecruisers would be drawn out to respond to the raid, allowing Hipper to lead them across a newly laid minefield and then onto the waiting guns of the battlefleet. The operation was delayed in November due to technical problems. Then in December, the defeat at the Falkland Islands made a compensating success more urgent, while also providing an opportunity, given the absence of two British battlecruisers. However, when the plan was put into effect, the British had been forewarned by progress in what was to become an increasingly central element of modern warfare: wireless.
BREAKING THE GERMAN CODES: ROOM 40
The use of wireless presented considerable benefits, but also opened up new vulnerabilities. One was the excessive central control it made possible, not least when the First Lord of the Admiralty was a character like Churchill. Others were the various ways in which the enemy could exploit one’s own use of wireless.
In November 1914, a motley group of civilians and a few naval officers moved into modest new accommodation in the Admiralty. This small office gave its name to their nascent organization: Room 40 OB (Old Building). During August 1914, the Royal Navy had established a body to work on intercepted enemy signals and to break their codes. It answered to Rear Admiral Sir Henry Oliver, the Director of the Intelligence Division of the Admiralty, who appointed as its nominal head the Director of Naval Education, Sir Alfred Ewing. He in turn recruited a number of staff from the naval colleges at Greenwich, Dartmouth and Osborne and also from Oxford and Cambridge universities. They became the initial staff of Room 40.
Its pioneering work was greatly assisted by three windfalls that helped to reveal the secrets of the principal German codes. First, on 11 August, a German steamer was captured in Australia. This yielded a copy of the code-containing Handelsverkehrsbuch (HVB), a book used by the German naval staff to communicate with German merchant ships and also by some German small craft, U-boats and Zeppelins. It reached the Admiralty by the end of October. Second, on 25 August, the German cruiser Magdeburg ran aground off Estonia. The crew failed to destroy their confidential papers, and the Russians acquired copies of the Signalbuch der Kaiserlichen Marine (SKM), which contained codes and current keys, as well as the map grids used by the German Navy. By the middle of October, Britain had been given a copy. Third, on 17 October, four German destroyers sent to lay mines in the Thames estuary were attacked and sunk. According to some sources, this interception was itself the result of information from Room 40. It certainly led to a further intelligence gain: on 30 November, the lead-lined box for code books thrown overboard from S119, one of the sunk destroyers, was found in the nets of a British trawler. This box contained a copy of the Verkehrsbuch (VB) and its code used to communicate with naval attachés and warships stationed overseas, and also by senior officers at sea.
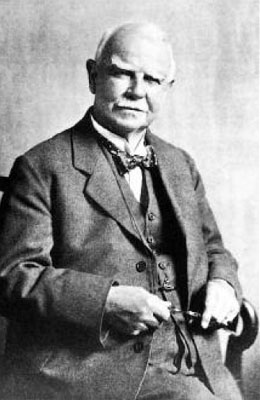
Sir Alfred Ewing (1855–1935) had been a professor of engineering at the universities of Tokyo, Dundee and Cambridge before becoming director of naval education in 1903, implementing Fisher’s reforms. Early in the war he became the head of Room 40, a position he held until 1916.
These captures helped to make nearly all German wireless signals vulnerable to deciphering. Two other factors increased Germany’s vulnerability to this process. First, all their telegraph cables were cut early in the war, forcing them to rely on wireless communication. Second, they were careless with security: they failed to acknowledge the likelihood that their codes had been compromised, they failed to replace codes often enough and they made remarkably promiscuous use of wireless. The result was that Room 40 was provided with a wealth of material from a chain of listening stations established early on in the war. The expertise built up meant that when the captured codes were eventually replaced later in the war, their successors were also swiftly broken. The German Government had a vague awareness that the British were probably reading some of its signals, but had no idea of just how well they were doing. There were some German successes against British codes, but, in general, British security was considerably better with codes frequently changed and the use of wireless limited.
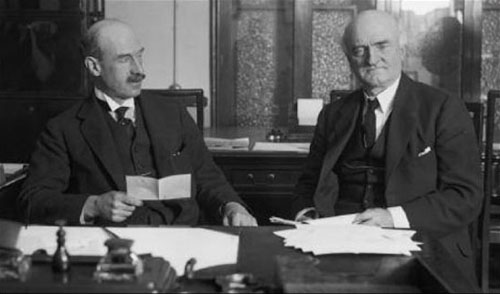
Captain Reginald ‘Blinker’ Hall (right), Director of Naval Intelligence. The nickname ‘Blinker’ stemmed from a noticeable mannerism. He oversaw the work of Room 40 and often used its product to great effect. The US ambassador to Great Britain described him as ‘a clear case of genius’.
Signals intelligence is easily misunderstood. Only in the rarest cases does it provide an all-seeing clarity comparable to turning on a light in a darkened room. Rather, it offers limited, partial clues as to what is going on; there will be gaps and uncertainties, things one does not know and questions that one does not even know to ask. These limitations are the best case: there will also be missed messages, delays, incorrect inferences and, critically, instances where information is available but is not passed in a timely fashion to those who can best act upon it. Signals intelligence can deliver great successes, but just as often it proves tantalizingly incomplete and inadequate. Some useful information will result not from individual dramatic decryptions, but rather from the general picture, built up by painstaking work over a long period, of enemy organization and procedures. Some of the work of Room 40 did not even involve cracking codes and ciphers: much information was gained from direction finding, using Y Stations, or listening posts, to triangulate the position of German ships using wireless. Moreover, even if signals could not be read, studying changes in their pattern (known as traffic analysis) could also produce valuable intelligence.
The natural limitations of signals intelligence were worsened by some of the teething problems that were inevitable in such a new craft. First, there were inefficiencies in the organization. Room 40 was too closely under the control of Oliver, and for a while it lacked naval expertise to provide the specialist understanding necessary to make sense of the intercepted signals. The former problem was never solved, but the latter was by attaching naval officers, such as Commander Herbert Hope, and also by the closer involvement of the new director. In November 1914, Oliver became chief of staff and was replaced as Director of Intelligence by Captain Reginald ‘Blinker’ Hall, who proved to be truly outstanding in this role.
Second, there were problems in using the information gleaned from intercepts. There is always a trade off in signals intelligence between, on the one hand, maintaining the secrecy of one’s activities and, on the other, making practical use of the product. Too little secrecy and one jeopardizes the stream of intelligence; too much, and the value of having the material is greatly reduced. The appropriate balance to strike, as well as the most effective means of bringing together intelligence and operations, took some time to develop; initially, the Admiralty erred on the side of caution, restricting access too severely to the product of Room 40.

A light cruiser commissioned in 1912, Magdeburg was operating in the Baltic in August 1915 when she ran aground. Her crew failed to destroy her code books, which were seized by the Russians and later passed on to Britain, greatly assisting the work of Room 40.
On 16 January 1917, the German foreign minister Arthur Zimmermann sent a telegram to the German ambassador in Mexico. The latter was instructed to offer Mexico a military alliance directed against the United States, for which Germany would give financial support and territory in Texas, New Mexico and Arizona. Mexico politely declined this offer, but the damage was done: the telegram was intercepted and deciphered by Room 40. Concealing the source of the message from the Americans as well as the Germans, London passed on its contents to the United States Government, which published it as its own work. There was some initial scepticism that it was genuine, until Zimmermann himself publicly confirmed it. There was already growing hostility in the United States towards Germany, largely due to unrestricted submarine warfare, but the Zimmermann telegram, and hence Room 40, helped to tip the balance and bring about the entry into the war of the United States.
The Zimmermann Telegram, which helped provoke the United States entry into the war, was intercepted, decrypted and brilliantly used by ‘Blinker’ Hall.
Nevertheless, over the course of the war Room 40 provided a vast amount of invaluable intelligence, not least making possible the operation to intercept the German forces conducting the Scarborough raid and also placing the Royal Navy in a favourable position for the Battle of the Dogger Bank. It also played a crucial role in the Battle of Jutland, the campaign against the U-boats and even helped to nudge the United States towards entry into the war. After the war, Room 40 was to merge with its army counterpart to form the Government Code and Cipher School, which, from its new location at Bletchley Park, would play an even more significant role in World War II.
THE SCARBOROUGH RAID (16 DECEMBER 1914)
The raid was to be conducted by Hipper’s 1st Scouting Group, consisting of four battlecruisers plus the armoured cruiser Blücher, with a screen of light cruisers and destroyers. They would arrive off the Yorkshire coast at dawn on 16 December to bombard Scarborough and Hartlepool and to lay mines. They would be supported by the High Seas Fleet, which would patrol about 200km (125 miles) east of Scarborough, on the eastern edge of the Dogger Bank.
However, on the night of 14/15 December Room 40 intercepted and deciphered signals revealing that the battlecruisers were to attack the British coast on the 16th. The information provided was accurate but incomplete. First, the precise targets were not known, so it was decided to seek to ambush the attackers as they returned home rather than scatter the fleet in an attempt to defend all possible targets. Second, and potentially more significant, the intelligence did not reveal that the German battlefleet would be at sea to support the raid. Thus, in addition to Hipper’s battlecruisers, any British force would also be facing Ingenohl’s fleet of 22 battleships (14 Dreadnoughts and eight pre-Dreadnoughts), with supporting armoured cruisers, light cruisers and destroyers. This critical gap in the Admiralty’s awareness of the enemy order of battle was a reminder of the limitations of signals intelligence. In the event, both sides were hindered by imperfect information and a major action did not occur.
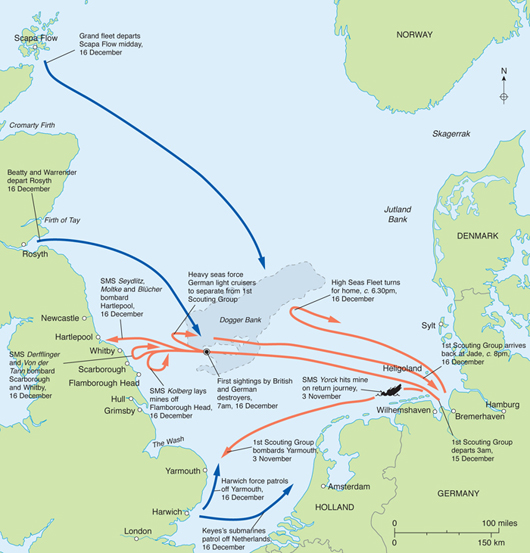
The 1914 east coast raids. The early months of the war saw the German High Seas Fleet conduct a series of raids on British coastal towns, aiming to draw part of the Grand Fleet into a trap. Due to the work of Room 40, it was the German fleet that came close to suffering series setbacks.
Jellicoe wanted the Grand Fleet deployed to meet the raid, but the Admiralty, unaware that the German battlefleet would be at sea, refused and committed only one of its battle squadrons, albeit the most powerful. Even given the incomplete information on which it rested, this decision represented a failure to concentrate strength against the enemy. The forces sent to meet Hipper (as was believed) were Beatty’s four battlecruisers, six Dreadnoughts of the 2nd Battle Squadron under Vice Admiral Sir George Warrender (the overall commander), with his flag in HMS King George V, four armoured cruisers under Rear Admiral William Pakenham and five light cruisers under Commodore William Goodenough. The plan was for these forces to meet in the North Sea, to the southeast of the Dogger Bank, before dawn on 16 December. Keyes’s submarines would patrol off Holland, in case Hipper should head south, and Tyrwhitt’s light cruisers and destroyers were off Yarmouth.
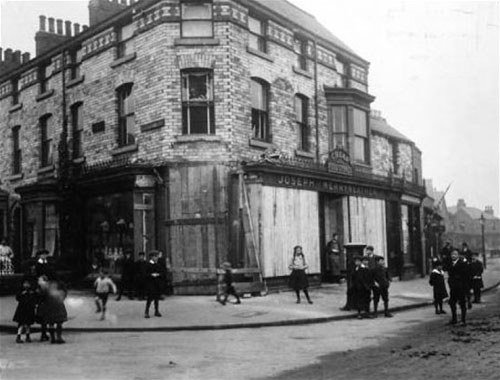
The German bombardment of the British east-coast towns, such as Scarborough (shown here), did little material damage but caused much public anger, directed both against Germany, for bombarding civilians, and against the Royal Navy, for failing to protect the public.
During the night, Hipper’s force and the British passed close by each other (the nearest elements of the two forces being just 16km or 10 miles apart at about 1am) without discovering the other’s presence. Meanwhile, the High Seas Fleet headed for its own rendezvous, which happened to be remarkably close to Warrender’s. At about 5.15am, before dawn, the lead British destroyers happened on the German destroyers acting as the forward screen of the High Seas Fleet. This was one of the potentially decisive moments of the engagement and, indeed, of the entire war at sea. Had Ingenohl only realized it, he was within touching distance of exactly what he had sought since the start of the war: 16km (10 miles) away was part of the British Grand Fleet, which his far larger force (22 capital ships against 10) comfortably outgunned.
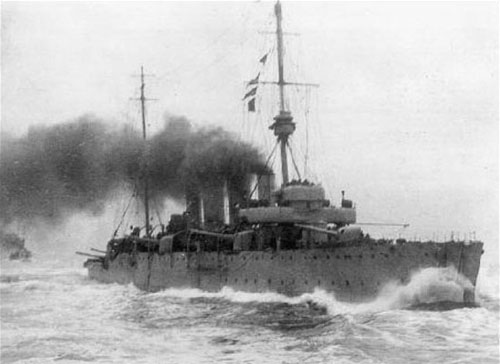
HMS Southampton, a Chatham-class light cruiser of the Royal Navy, at sea in 1917. The role of light cruisers was to scout ahead for the main elements of the battlefleet.
His reaction was cautious, however, as he assumed that the British destroyers were the vanguard of the entire Grand Fleet. He feared a night attack by destroyers and was also painfully aware that he was acting against the orders of the Kaiser in risking a battle against superior forces. Hence, at 5.30am he ordered his fleet to turn away from the British, and shortly afterwards headed for home at high speed. If his decision to withdraw to safety was understandable, it is rather more difficult to comprehend his failure to inform Hipper, still heading for the British coast, either of his own withdrawal or of the presence of a powerful British force along the line of retreat.
The High Seas Fleet therefore let slip a potentially advantageous situation, while leaving the battlecruisers of its Scouting Group in a very perilous position. They were saved by similar confusion on the British side. For their part, the Royal Navy warships initially gave chase to the German light forces – unaware that they were pursing the main enemy battlefleet – before breaking off when they received word of the attacks on the Yorkshire coast.
Commodore William Goodenough was given command of the 1st Light Cruiser Squadron in 1913, with his flag on HMS Southampton. He fought at the battles of Heligoland Bight and Dogger Bank, and during the Scarborough Raid, for which he has been criticized for some errors. His performance at Jutland was highly praised, described by one historian as ‘the model for scouting admirals’.
Between 8am and 9.15am, Hipper’s battlecruisers shelled Scarborough, Whitby and Hartlepool. The three 6in guns defending Hartlepool (which made it the only legitimate target of the three according to international law) returned fire to some effect, hitting Moltke and Blücher. The German bombardment had little success, missing all of the defending guns as well as the submarine and the destroyers based there. It did inflict light damage to some facilities in the docks and shipyards and also hit various churches, public buildings, hotels and houses. Similarly light damage was done to the two seaside resorts to the south and over 120 civilians were killed. Hipper then headed for his rendezvous with the High Seas Fleet, unaware that it was well on its way home.
The first naval aircraft strike against a target ashore took place on Christmas Day 1914. The target comprised the Zeppelin sheds at Cuxhaven; this was the third time it had been targeted, following two abortive attempts in October and November. Three British cross-Channel steamers, Empress, Engadine and Riviera, had been converted to carry seaplanes. They headed across the North Sea, escorted by destroyers and submarines. Nine seaplanes were hoisted out from the carriers, but two were unable to take off due to the sea state and the rest were unable to attack their target due either to failure to recognize it or to fog, with four shot down (all the crews being rescued). In response, German Zeppelins and seaplanes conducted the first ever air attacks against warships, albeit unsuccessfully. Although the results of the operation were disappointing, it was a boost for British morale. It also indicated that the early use of aircraft from ships was beginning to foster some creative ideas.
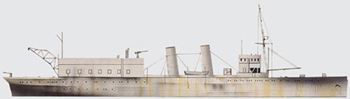
HMS Engadine, a converted seaplane carrier, took part in two of the great events of the war: the Cuxhaven Raid and – serving with the Battlecruiser Fleet – the Battle of Jutland.
At about 11.25am, HMS Southampton (Goodenough’s flagship) sighted Hipper’s light cruisers and destroyers. The German commander had detached them from his battlecruisers at 6am to head back to the High Seas Fleet because they were having difficulty keeping up in rough seas. This turned out to be an enormous stroke of luck, since it meant that they were far enough ahead of his main force to provide sufficient warning time for him to change course and avoid the British trap.
Goodenough turned to engage, reporting to Beatty the presence of one light cruiser with destroyers. He then spotted two more German light cruisers with accompanying destroyers, but failed to inform Beatty, leaving the admiral unaware that he had encountered Hipper’s screening forces. Hence, when three additional British light cruisers moved to assist Goodenough, Beatty ordered two of them to resume their position as his own screen, to continue searching for the main enemy force. His signal was poorly drafted by his flag lieutenant and was misunderstood: contrary to Beatty’s intention, all of the British light cruisers broke off the action at 11.50am. This represented another error by Goodenough, who should have used his initiative to act on his more accurate understanding of the situation, continuing the engagement.
At about 12.15pm, Warrender’s Dreadnoughts, which were some 25km (15 miles) away from Beatty, were next to spot Hipper’s light forces but the latter were fast enough to evade him. At this time, Beatty was heading west on an ideal course to intercept the eastbound Hipper. At 12.30pm, on hearing of the further contact with the German light forces, however, he reversed course eastwards while Hipper (who at the closest had been fewer than 20km or 12 miles from Beatty), now alerted to the presence of British capital ships, turned north and then northeast. The British squadrons continued to seek their quarry, but as the weather deteriorated further, Hipper’s force was able to complete its journey home. At just after3.45pm, Warrender called off the search.
The reaction of the British press was a mixture of angry condemnation of the German Navy for killing civilians, and criticism of the Royal Navy for allowing the attacking warships to escape. The episode only heightened a popular feeling of disillusionment that the war at sea was not going well, as inflated expectations of a new Trafalgar were dashed. There was also considerable disappointment within the Royal Navy at having missed the chance to inflict a serious blow on the enemy. Jellicoe, in particular, regretted that he had not been authorized to bring down the whole Grand Fleet. There was similar anger on the German side, with commanders feeling that Ingenohl had deprived them of a good opportunity by turning away as soon as British forces were sighted.

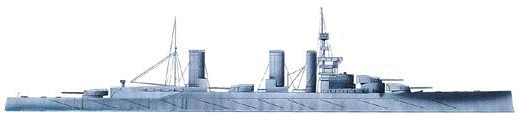
Derfflinger was the lead ship in the second, improved generation of German battlecruisers, having a heavier armament than Moltke, with a 12in as opposed to 11in main armament. She was a new ship, being commissioned just a month after the start of the war.
This battle that never was provides a useful indication of some of the constraints imposed on both sides by uncertainty, poor weather and the aversion to risk that characterized the activities of the major fleets. Chance and human error saw the advantage move from one side to the other, with neither seizing it. Although the capital ships of the two battlefleets had still not faced each other, this was about to change.
THE BATTLE OF DOGGER BANK(24 JANUARY 1915)
After the narrow escape following the Scarborough raid, the commanders of the German Navy were keen to achieve some success, regain the initiative and stem the decline in morale around the fleet. They were also aware that the Royal Navy seemed to have some kind of intelligence advantage, but were unsure as to the source; suspicion fell on the possibility of spy vessels disguised as Dutch trawlers on the Dogger Bank. Further, it was known that Britain occasionally sent unsupported light forces there on patrol, which offered an additional tempting target.
The Blücher was an old armoured cruiser and should not really have accompanied the German battlecruisers, lacking their speed, protection and firepower. She was slowed and sunk at the Battle of the Dogger Bank, though in doing so she bought time for the battlecruisers to make their escape.
A plan was therefore devised for a raid, which would lead to the war’s first clash of capital ships. It involved three battlecruisers of the Scouting Group, the flagship Seydlitz, Moltke and Derfflinger (the fourth, the Von der Tann, was in dock for repairs) with their usual companion, the large armoured cruiser Blücher. They were to make a swift attack on the fishing vessels and warships on the Dogger Bank while the rest of the High Seas Fleet remained back in the Heligoland Bight. The operation was delayed by bad weather until, at 10am on 23 January 1915, Hipper was ordered to proceed with the operation.
At about the same time that he was leaving port that evening, so was Beatty; once again, Room 40 had provided warning of the German fleet’s activities, intercepting and deciphering the signal to Hipper. Beatty was in command of a powerful force, including three of the newer 13½in-gun battlecruisers Lion (his flagship), Tiger and Princess Royal, with two of the older 12in-gun battlecruisers, New Zealand and Indomitable, under Rear Admiral Sir Archibald Moore. They were accompanied by Goodenough’s light cruisers and were to be joined by three light cruisers and two flotillas of destroyers from Tyrwhitt’s Harwich Force. The objective of the German operation was not known, but it was assumed to be another attack on the east coast. Hence, the British forces were to rendezvous to the northeast of the Dogger Bank, with the aim of getting between Hipper and his base to cut off his line of retreat.
Later on the evening of 23 January, the Grand Fleet left Scapa Flow to be ready for a sortie by the High Seas Fleet, should it emerge. Jellicoe complained that he had not been alerted earlier; this appears to be another error by the Admiralty, resulting in a failure to concentrate potentially overwhelming force, just like that of 16 December.
At about 7.10am on the morning of 24 January, Beatty’s force was joined at the rendezvous by the lead elements of Tyrwhitt’s squadron, in conditions of good visibility and calm seas. Just 10 minutes later, gunfire was seen to the south. This was from the initial exchanges between some of the ships of the Harwich Force, the departure of which had been delayed by fog, and Hipper’s light cruiser vanguard. Once again, the German screening forces seemed to have done their job and, albeit with another considerable stroke of luck, provided the Scouting Group with enough warning to avoid the main British force. Hipper turned away and headed homewards, confident that he had the speed to outrun what he believed to be British battleships.
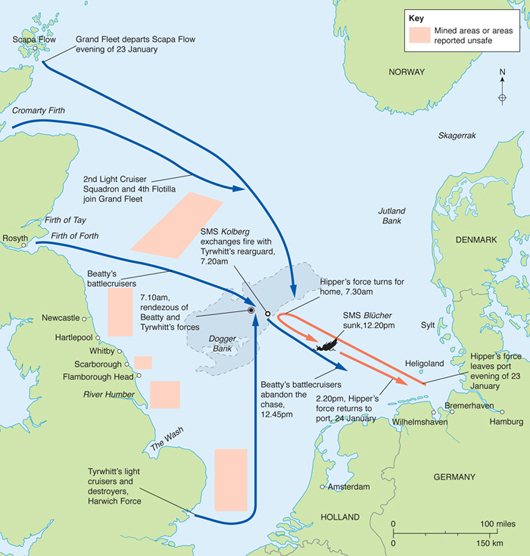
The Battle of the Dogger Bank. This engagement saw the British coming close to shattering the German battlecruiser fleet. Beatty’s force was chasing the retreating Germans but was confounded by poor signalling, inaccurate gunnery, damage to the flagship and errors by commanders.
In fact, like Spee at the Battle of the Falkland Islands the previous month, his pursuers were the faster battlecruisers. Beatty gave chase, ordering his squadron to increase speed to 25 knots, then to 26, 27, 28 and finally, at 8.52am, to 29 knots – though the ships never quite reached this speed – by which point the older New Zealand and Indomitable began to fall behind despite attaining higher speeds than they had managed in their trials. Beatty was aware that this separation would occur, but accepted it in his eagerness to get at the enemy. By now, Hipper realized that he was facing battlecruisers and increased speed, but was held back by Blücher, which could only make 23 knots.
Shortly before 9am, the British battlecruisers began to fire from about 18,000m (19,500 yards) at Blücher, the rearmost of Hipper’s force. Within five minutes they had the range and began firing salvoes, with the German ships returning fire at about 9.15am. The latter sought to damage and slow the leading battlecruiser, which was the easiest and most visible target, and hence concentrated their fire on Lion. Beatty, on the other hand, wished to spread the fire of his force to damage and slow all of the enemy vessels. At 9.35am, when he had reduced the enemy’s lead enough for most of his battlecruisers to open fire, he signalled, ‘Engage the corresponding ships in the enemy’s line’. This order could have been more clearly expressed, with five ships fighting four, and was misunderstood by Captain Henry Pelly of Tiger. His ship should have fired on Moltke, but he focused on Seydlitz instead – inaccurately, to make things worse – with the result that Moltke was not engaged and could fire undisturbed at Lion.
A shell from Beatty’s flagship hit Seydlitz, causing a cordite fire that knocked out her two after turrets and came close to destroying the ship; luckily for Hipper, it did not slow her down. Lion, though, was suffering badly, taking a series of hits that knocked out her electricity generation and caused serious flooding that gradually affected her engines and slowed her down. At 10.40am, two hits on Blücher destroyed two turrets and damaged her engines, further reducing her speed. Shortly afterwards, Hipper realized that she was lost and ordered his ships home, abandoning Blücher. His squadron looked to be in a desperate situation, with it being only a matter of time before more of his ships were slowed down to be picked off. At this moment, though, he was saved by errors and confusion in the British force.
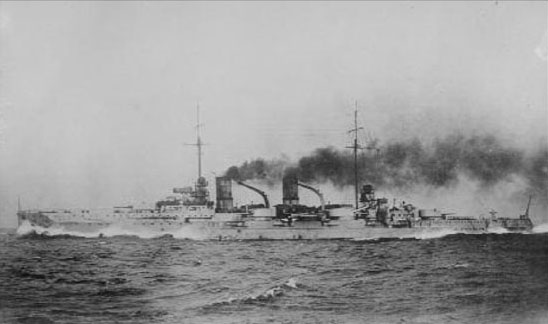
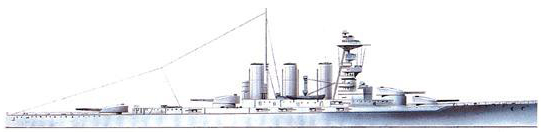
HMS Lion was the lead ship of a British class of improved battlecruiser, with heavier guns – 13½in as opposed to 12in – than her predecessors, as well as better armour and a higher speed. She served as Beatty’s flagship at Dogger Bank, where she was damaged, and at Jutland.
HMS Tiger was another of the ‘splendid cats’, a slightly modified version of the Lion-class battlecruisers; the arrangement of her turrets was altered to improve her firing arcs. She was involved in the thick of the action at the battles of Dogger Bank and Jutland.
Admiral Hugo von Pohl (1855–1916) began the war as the chief of the naval staff, and replaced Ingenohl as commander-in-chief of the High Seas Fleet in February 1915. He served less than a year in the post before ill health compelled him to retire.
To be fair, Beatty was experiencing serious practical difficulties. Not only was his flagship slowing down due to flooding, but further battle damage meant that her wireless was out of action. He could only communicate with the rest of his force by flags, difficult anyway in high winds, and could only send two groups of these at a time as the other halyards had been shot away. Just when these problems were limiting his ability to command the squadron, at about 10.54am what seemed to be a U-boat periscope was spotted off Lion‘s starboard bow. It later transpired that there were no U-boats in the area, but the commander could only act on what he believed to be true. Beatty reasoned that where there was one U-boat, there could be several and feared that he might have been drawn into a submarine trap. He therefore ordered his force to turn. This was crucial because it not only allowed the German fleet to extend its lead, but since the signal was not accompanied by a warning of submarines, it also further confused his captains as to his intentions. Further, the new course meant following the wake of the German destroyers and it was feared that they might drop floating mines behind them, so Beatty signalled, ‘Course N.E.’
As Lion fell out of the chase, Beatty sought to confirm to his captains his intention that they should leave Blücher to be finished off by the lagging Indomitable and continue after Hipper’s battlecruisers. He therefore hoisted the signal ‘Attack the rear of the enemy’ (there being no established signal for ‘Engage the main body of the enemy’). Unfortunately, in the confusion caused by the changes of course and the limited communications, this signal was read together with the previous one as a single order; his captains inferred that they should attack the enemy’s rear to the northeast – the already doomed Blücher. Beatty could only watch in frustration as his battlecruisers slowed and turned to finish off this single ship, allowing the rest of the German force to escape. He tried desperately to save the situation by making Nelson’s classic signal, ‘Engage the enemy more closely’, only to find that this, too, was lacking from the signal book.
Beatty transferred his flag to the destroyer HMS Attack and then at 12.20pm to the Princess Royal, by which time Blücher had finally capsized and sunk, fighting to the end. He briefly resumed the chase but called it off at 12.45pm, realizing that Hipper had enough of a lead to make it back to the main battlefleet before being caught.
The Royal Navy had won a clear victory, sinking Blücher and badly damaging Seydlitz, leaving over 950 German sailors dead and 300 wounded or captive. The cost was damage that kept Lion out of action for four months and minor damage to Tiger, with 15 men killed and some 40 wounded. The British press was overjoyed that the attacks on the coastal towns had been avenged, and much of the pressure on the Admiralty was eased. Within the Royal Navy, though, there was bitter disappointment and a widespread awareness that it was a success achieved but a triumph missed; the battle represented a wonderful opportunity that could have led to the annihilation of the German battlecruisers – one that was squandered.
Beatty did commit some errors, notably in failing to make his intentions clearer to his captains, so that they would know how to respond to the unexpected in the confused conditions of battle. Most historians agree, however, that the greater mistakes were made by his subordinates. Pelly of the Tiger has been criticized for failing to engage his opposite number as ordered, while all of the captains failed to press on against the rear of the enemy force. Most of the blame has been directed at Rear Admiral Moore, who took command when Beatty was incommunicado. He should have exercised more initiative and responsibility, acting according to what he should have known to be his superior’s intent, rather than following what must have seemed a very strange order. Beatty was reluctant to criticize him, but Fisher, as always, was not so diplomatic, writing a series of splenetic letters, sprinkled with his usual capital letters and multiple exclamation marks, describing Pelly as a ‘poltroon’ and Moore’s action as ‘despicable’. Still, the public and the press were delighted and an unwillingness to puncture this bubble of optimism explains why Pelly emerged unscathed and Moore suffered no worse than being transferred to a command in the Canary Islands.
Other worrying lessons should have been drawn from the battle. The accuracy of British gunnery had once again been poor, even allowing for the very high speed, the smoke from German battlecruisers and the thick smokescreen laid by their covering destroyers. This problem was tackled by speeding up the installation of new fire control apparatus. Some changes were also made to the signal book, including restoring a signal for the Nelsonian ‘engage the enemy more closely’. However, the opportunity was missed for a more thorough overhaul of the signalling system, or for greater scrutiny of long-range gunnery or of the inadequate armour protection of the battlecruisers.
As is often the case, the defeated side proved more willing to identify and act upon lessons from the battle. The German Navy, despite believing wrongly that it had inflicted serious damage on Beatty’s ships, concluded that it had been unwise to send Blücher with the battlecruisers and that the operation had not been coordinated with the U-boats (though it was a misplaced British fear of submarine attack that allowed Hipper’s force to escape). One fortunate side effect of the battle for the High Seas Fleet came from the hit on Seydlitz that had started a fire; if this had spread, it would have reached the magazine, destroying the ship, but the flooding of two compartments prevented this. The correct conclusion was drawn from what Vice Admiral Reinhard Scheer called ‘a very valuable lesson’: all capital ships were provided with better arrangements to protect against flash from a hit in a turret reaching the magazine. Further, while German gunnery had been more accurate than that of its adversary, insufficient effort had been devoted to practising long-range firing. Hence, while the German battlefleet did not put to sea for a year, it used this time well to improve its armour, fire control and gunnery. The Royal Navy was perhaps lulled into complacency by success, and did not undertake such a rigorous programme of self-evaluation. The critical reaction of the German Navy served it well when the main fleets met at Jutland.
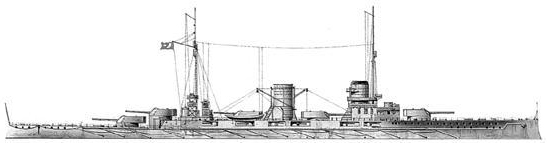
Moltke was one of the German battlecruisers, the heavy scouting forces which, like their British counterparts, saw more action than their compatriots in the battle squadrons of the main fleets. The German battlecruisers had better armour protection than their British opponents.

HMS Lion in action. The early skirmishes of the surface naval war in the North Sea left both sides feeling dissatisfied. The respective battlecruiser fleets had tested each other’s mettle, but the main fleets had yet to come into contact.
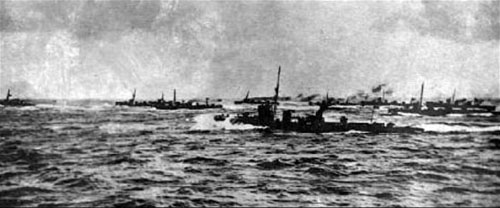
Destroyers at Dogger Bank. Although larger warships receive more attention, destroyers were the true work-horses of much of the naval war. They supported the fleets, hunted U-boats and fought some lively small-scale actions themselves.
The other longer-term effect of the Battle of the Dogger Bank was that criticism of Ingenohl increased still further, in the light of what seemed to be the latest in a series of errors. He was replaced on 2 February by the Chief of the Naval Staff, Admiral Hugo von Pohl. While the latter was bolder than his predecessor, he still had no intention of hazarding his battlefleet in an engagement with superior forces, and continued the attempt to whittle away the strength of the Grand Fleet. While this preserved the existence of the German battlefleet, it also eroded morale, the effect of which would not become apparent until later in the war.
The fact that the High Seas Fleet had, once again, only narrowly escaped disaster helped to tip the balance in a long-running dispute over a possible alternative strategy. Since attrition of the Royal Navy did not look like giving Germany command of the sea, a number of influential voices – notably Tirpitz – had long been urging the greater use of submarines to impose a full economic blockade on Britain. Dogger Bank tipped the balance, and the new commander-in-chief of the fleet added his voice to those calling for the unleashing of the U-boats.