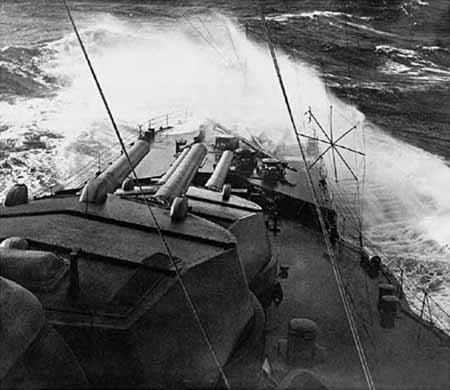
HMS Iron Duke, Admiral Jellicoe’s flagship at Jutland, at sea; she was named after a great soldier, the Duke of Wellington. The battle would finally see the test in action of the great Dreadnought battleships that made up the main battle fleets of Britain and Germany.
Both the Royal Navy and the Imperial German Navy had long anticipated the day when they would finally meet in battle. The British were confident of putting the young challenger in its place, while the Germans looked forward to their fleet establishing its reputation against what had largely been its model. When this long-awaited clash finally occurred, on 31 May 1916, it was the culmination of a rivalry that had grown over 20 years.
The Battle of Jutland – or the Battle of the Skagerrak, as German sources call it – was by far the largest engagement of the war, with 250 warships involved, and was the only occasion on which the main battlefleets fought each other. It was also the last of the great clashes between surface battleships alone, with only the most marginal role played by submarines or aircraft.
In January 1916 Admiral Reinhard Scheer took command of the High Seas Fleet. While Scheer’s strategy was the same as his predecessor’s – seeking to bring about equality between the opposing fleets by defeating an isolated part of the Grand Fleet – he sought more actively to engineer an engagement in which this could be achieved. Admiral Jellicoe, the British commander-in-chief, was keen for battle, but was well aware that his adversary would do his utmost to avoid a clash with the whole Grand Fleet. He too aimed to create an ambush for the opposing force, far enough from its bases that it could not escape, as the battlecruisers had done at Dogger Bank.
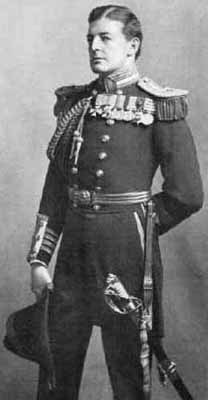
Vice Admiral David Beatty, commander of the Battlecruiser Fleet at Jutland. He bore the brunt of the fighting in the early stages of the battle. In general, he acquitted himself well, but made some important errors of judgement that had an important effect on the outcome.
Each side conducted further raids, similar to those discussed in the chapter on the North Sea Raids, in the hope of bringing about an engagement on its own terms. The Royal Navy launched carrier air strikes against Zeppelin bases and the German fleet attacked British patrols and bombarded Lowestoft. All such efforts were frustrated by poor weather or ill luck, or because one side or the other sought to avoid battle. At the end of May, however, a situation arose where each believed that it was ambushing the enemy.
Scheer devised a variation on previous plans. Hipper’s force would bombard Sunderland to draw out the British battlecruisers. They would be attacked by U-boats, pre-positioned off their base, and then finished off by the battlefleet before the Grand Fleet could provide support. The operation was postponed to allow repairs to some capital ships, but began on 17 May with the U-boats taking up their positions. However, as so often in the North Sea, deteriorating weather prevented the planned Zeppelin reconnaissance flights on which Scheer was relying for warning should the Grand Fleet approach. Unwilling to call off the operation and with the U-boats reaching the limits of their patrol endurance, Scheer revised his plan. Rather than bombarding Sunderland he would entice Beatty’s battlecruisers by attacking British forces patrolling the Skagerrak, where there was less danger of surprise and which was closer to home should it arise. Accordingly, the German battlecruisers left port at about 1am on 31 May. The British fleet had put to sea some four hours earlier, alerted once again by Room 40.
THE OPPOSING FORCES
Beatty’s command had been upgraded to the Battlecruiser Fleet in 1915, and comprised three squadrons. One of these had been sent to Scapa Flow to undertake the gunnery practice that was not possible at the battlecruisers’ base at Rosyth. To replace it, Beatty had been strengthened with the temporary attachment of the 5th Battle Squadron of the main battlefleet, under Rear Admiral Hugh Evan-Thomas. These were the Queen Elizabeth class (minus the lead ship of the class, which was in dry dock), the most powerful warships in the world with the striking power of eight 15in guns, very strong armour and a high speed of 24 knots – although this was still below that of second-generation battlecruisers such as HMS Lion. The British scouting force therefore included six battlecruisers and four super-Dreadnoughts, comfortably out-gunning Hipper’s five battlecruisers. His role, however, was not to engage in a gunnery duel with the British, but rather to lead them towards the rest of the High Seas Fleet.
The main German force comprised 22 battleships, but six of these were the older, pre-Dreadnoughts of the 2nd Battle Squadron, which were no match for the modern British ships and slowed down the rest of the High Seas Fleet. Scheer initially intended to leave them behind, but relented because he did not wish to humiliate the crews of a squadron with which he himself had previously served. The addition of the Queen Elizabeth-class ships to Beatty’s force made it a more lucrative target for Scheer, should he be able to bring it to battle in the absence of the rest of the Grand Fleet.
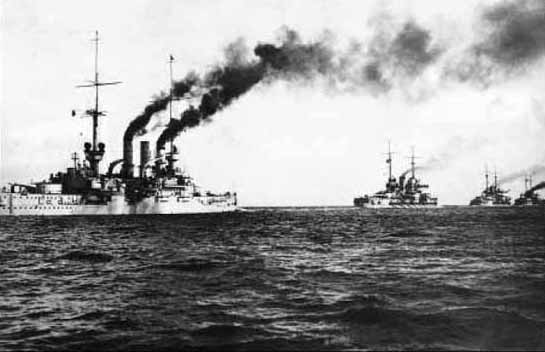
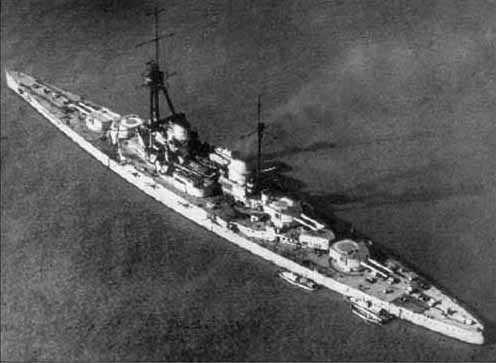
The German High Seas Fleet at sea. The Imperial German Navy was eager to prove itself against the British. At Jutland, it believed that it had finally created the conditions in which it could defeat an isolated part of the Royal Navy, thereby changing the balance of advantage at sea.
Beatty, of course, would seek to avoid this situation and to draw Scheer onto the guns of the main Royal Navy battlefleet. With 24 modern Dreadnoughts, Jellicoe’s fleet was by some margin the most powerful naval force that had ever put to sea. These battleships were accompanied by the three battlecruisers of the 3rd Battlecruiser Squadron under Rear Admiral Horace Hood. Also included were eight old armoured cruisers, which, like the German pre-Dreadnoughts, were an obsolete type that should have had no place in such a battle. The Grand Fleet not only included ships that should not have been there, but also lacked one that should. It was to have been accompanied by the seaplane carrier Campania, which had the speed to keep up with the fleet, as well as a lengthened flight deck to allow her to launch aircraft without having to stop to hoist them onto the sea. However, she was late receiving the order to depart, and when she did put to sea Jellicoe falsely believed that she would be unable to catch his fleet and sent her home. This was regrettable, since her aircraft might have provided Jellicoe with the vital information he was to crave.
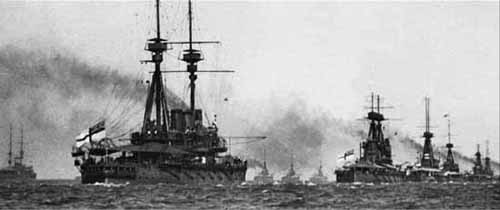
The British Grand Fleet at sea. After a series of near misses, the Royal Navy had high hopes that it would this time be able to pounce on the High Seas Fleet, prevent its escape, and give the British public the new Trafalgar that it craved.
The stage was set. The outcome of the battle would be determined by the success of each side in springing its trap. If Scheer could concentrate against Beatty’s strengthened force, he could inflict a serious blow to the Royal Navy, bringing the High Seas Fleet closer to numerical parity. Yet if, in turn, he had to face the full power of Jellicoe’s Grand Fleet, the German Navy could face catastrophe.
THE PRELIMINARY STAGES
As the British forces headed for their rendezvous on the morning of 31 May 1916, an error was made at the Admiralty in the handling of intelligence that would have major repercussions. Captain Thomas Jackson, Director of Operations, went to Room 40 – of whose work he had a low opinion – and asked where intercepted signals showed a particular German wireless call-sign to be. The staff informed him that it was in harbour at Wilhelmshaven, which was correct. Jackson actually wished to know where Scheer was; had he explained this, the intelligence experts could have told him that the German admiral only used the particular call-sign about which Jackson had asked when in port, changing to a different one when at sea. The fact that this call-sign was signalling from the harbour did not mean that Scheer was still there. Unfortunately, Jackson asked the wrong question, added his own assumption and wrongly deduced that Scheer and the main body of the High Seas Fleet had not yet departed. This misinformation was passed on to Jellicoe at about 12.30pm, with serious consequences. First, Jellicoe steamed south slowly, delaying his encounter with the German fleet and hence wasting precious daylight – though he had not been hurrying before the signal, so the impact was not as great as is sometimes suggested. Second, and far more significant, when Jellicoe later discovered that the High Seas Fleet was actually at sea, he became inclined to treat subsequent Admiralty intelligence with great scepticism.
Scheer’s reconnaissance proved similarly unhelpful. Only one of his carefully deployed U-boats managed to launch an attack on a British warship, and its torpedoes missed. Moreover, the U-boats failed in their equally crucial task of keeping their commander informed: they sent Scheer a series of sketchy reports that left him believing that the Grand Fleet was dispersed, and hence with no inkling of the danger into which his fleet was heading.
There were four main forces involved in the Battle of Jutland. Admiral Beatty commanded the British Battlecruiser Fleet, from his flagship HMS Lion. It consisted of six battlecruisers and the seaplane carrier Engadine, together with the attached 5th Battle Squadron of four modern super-Dreadnoughts, with light cruisers and destroyers. Admiral Hipper, from his newly built flagship Lützow, was in command of the 1st Scouting Group of five battlecruisers and the 2nd Scouting Group of light cruisers, also with attached destroyers. Admiral Scheer’s battlefleet comprised 22 battleships – 16 Dreadnoughts (including his flagship Friedrich der Grosse) and six pre-Dreadnoughts – which, like the British, were divided into three battle squadrons and were accompanied by light cruisers and destroyer flotillas. The main body of the Grand Fleet, under Admiral Jellicoe on HMS Iron Duke, comprised 24 Dreadnoughts, organized in three squadrons. It also included the three-ship 3rd Battlecruiser Squadron, as well as armoured cruisers, light cruisers and destroyers.
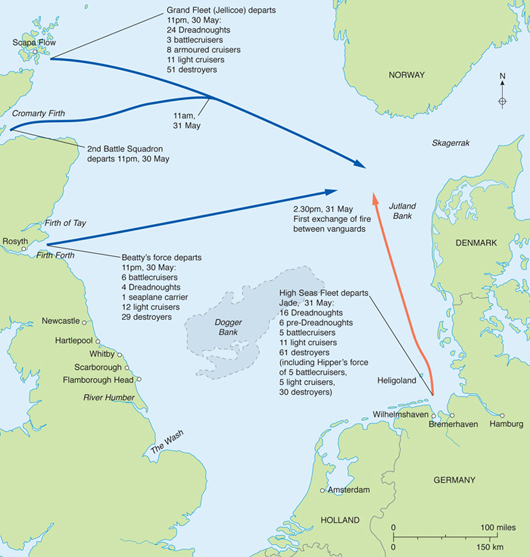
The Battle of Jutland – the approach to battle. The complex movements of many different naval forces would eventually see them converge for the long-awaited clash of the British and German battlefleets. The battle would see fortunes ebb and flow, but ended indecisively.
At around 2pm the main bodies of the two battlecruiser fleets were about 80km (50 miles) away from one another, with their light cruiser screens some 25km (15 miles) apart. At this point, a small Danish steamer, the N.J. Fjord, played a walk-on part in history. She was spotted at about the same time by the furthest west of Hipper’s light forces and the furthest east of Beatty’s, both of which changed course to investigate. Warships from both sides therefore sighted each other, reported the presence of the enemy back to their superiors and fired the first shots of the battle just before 2.30pm.
Beatty turned east to support his light cruisers. His force was already separated, as he had allowed the Dreadnoughts of the 5th Battle Squadron to take up a position 8km (5 miles) behind his battlecruisers. In the chase that was likely, their slower speed would see this gap increase. Beatty has been widely criticized for this failure to concentrate his force. His error in stationing was compounded by the failure of Evan-Thomas on Barham, in poor visibility, to see the flags ordering the turn towards the enemy; instead of following, his battleships turned onto the next leg of their anti-submarine zigzag, heading away from Beatty. Blame for this incident is shared between Beatty for not awaiting acknowledgment of his order, HMS Tiger for not relaying the initial signal as she was supposed to and Evan-Thomas himself for hesitating to follow his commander without explicit orders, even after it was obvious that his squadron was on the wrong course and despite being urged to turn by his staff. (It should be noted in passing that the wireless communications of the day could not transmit voice messages but only Morse code, slowing and complicating the process.) The result of this fiasco was that the most powerful squadron in the world ended up 16km (10 miles) behind Beatty and was therefore delayed in getting into battle.
HMS Invincible was the first battlecruiser to be built anywhere in the world. She had participated in the battles of Heligoland Bight and the Falkland Islands in 1914. At Jutland she was the flagship of Admiral Hood, leading the 3rd Battlecruiser Squadron.
The most shocking losses for the Royal Navy at Jutland were those of the battlecruisers, which had been the real heart of Jacky Fisher’s vision. For some, these losses stemmed from the fact that the ships were not employed as intended: their proper use was demonstrated at the battles of the Falklands and the Dogger Bank, and they should never have been exposed to prolonged fire from heavy guns. Others, however, argued that they had always been envisaged as having a supporting role in a fleet action, so their lack of protection was a serious flaw in their design and in the whole battlecruiser concept. While their armour was considerably weaker than that of their German counterparts, the main problem was more avoidable. Aware that the accuracy of their gunfire was poor, the crews – with the tacit approval of their commanders – ignored safety measures for the handling of ammunition in order to improve their rate of fire. The result was that a hit on a turret carried a great risk of the flash from the explosion detonating a magazine, with catastrophic consequences.
As soon as contact was confirmed, Beatty ordered Engadine to send up a seaplane for reconnaissance. This she did shortly after 3pm, but the carrier was unable to pass on the pilot’s reports to the flagship. Engadine, which lacked the speed of Campania, then proved unable to keep up with the battlecruisers; thus ended the first participation of ship-borne aircraft in a naval battle.
THE ‘RUN TO THE SOUTH’
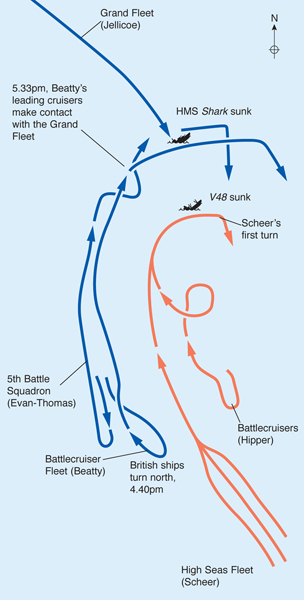
Beatty initially steered southeast in order to cut the enemy off from their bases and prevent them from escaping as they had at the Battle of the Dogger Bank. He then headed east and was spotted by the German battlecruisers at about 3.20pm. Hipper, for his part, followed the plan by turning south to draw the British battlecruisers towards Scheer. Beatty spotted him just after 3.30pm and gave chase. Thus began the first phase of the battle, known as ‘the run to the south’. At this point, the main body of the Grand Fleet was about 100km (60 miles) away, chasing the action. Scheer with the German battlefleet was 80km (50 miles) away, but closing rapidly as the two battlecruiser fleets headed towards him.
HMS Queen Mary exploding prior to sinking. This was the second loss in quick succession of a capital ship in so terrible and sudden a fashion. Hers was the more serious loss, being a more modern battlecruiser than Indefatigable.
Beatty’s force delayed opening fire because they overestimated the distance in poor visibility, and therefore failed to exploit their range advantage. At 3.48pm Hipper’s force opened fire at 14,500m (16,000 yards). Initially, the German gunnery was far more accurate, partly because the light favoured them – with the British showing up clearly against the setting sun, while the German ships were indistinct in the gloom to the east. They also distributed their fire effectively, while the British repeated the error of the Dogger Bank, with two German ships being engaged by multiple British battlecruisers, leaving one to fire undisturbed.
The British suffered the worse. Tiger and Princess Royal were damaged, as was Lion; at 4pm a shell hit on a turret threatened to destroy the ship but the last words of the dying Major Francis Harvey, Royal Marines, ordered the flooding of the magazine, thereby saving her. The German ships were by no means unscathed: Seydlitz was hit twice by Queen Mary, burning out a turret but the improved post-Dogger Bank precautions against flash saved the ship. Lützow and Derfflinger were hit too. Indefatigable was involved in an intense duel with Von der Tann. At about 4.02pm, Indefatigable was struck by two salvoes in quick succession, the second of which led to a magazine explosion that destroyed the sinking ship, leaving two survivors from a crew of 1019.
‘The run to the south lasted a little over an hour and was a German success. Hipper achieved his objective of luring part of the British fleet onto Scheer’s main force and had also sunk two British battlecruisers.’
By this time, the Queen Elizabeth-class ships had succeeded in closing the gap and swiftly made their presence felt. At about 4pm, they spotted the German light cruisers through the mist, and forced them to pull off with a couple of accurate salvoes. At 4.08pm they were finally able to open fire on the German battlecruisers at a range of at least 17,400m (19,000 yards) and almost immediately hit the enemy ships. Their gunnery was far more effective than that of Beatty’s battlecruisers and impressed the Germans, with Scheer later commenting, ‘The new enemy fired with extraordinary rapidity and accuracy.’ Several of Hipper’s ships were hit, forcing them to zigzag and reducing the weight of fire against Beatty’s ships; Von der Tann lost two turrets and was also hit in the stern, took on water, and was very fortunate not to lose speed, while Moltke was hit four times.
A more serious blow fell on the British force. At about 4.20pm the damaged Lion briefly veered out of the line, freeing Derfflinger and Seydlitz to concentrate their fire on Queen Mary. At 4.26pm, she was hit by a salvo that was followed seconds later by a magazine explosion that sank the ship in less than two minutes, killing all but 20 of her 1286 crew. After this second loss of a battlecruiser, this time one of the most modern and powerful, Beatty was inaccurately informed that a third of his ships, Princess Royal, had blown up. This prompted one of the most famous quotations of twentieth-century naval warfare, as he remarked to Chatfield, his flag captain, ‘There seems to be something wrong with our bloody ships today.’
At about the same time as the 5th Battle Squadron opened fire on Hipper’s battlecruisers, Beatty ordered his destroyers to make a torpedo attack. As they surged forward, they were met by their German counterparts, engaged on a similar mission, resulting in a fast and confused action between about 4.15pm and 4.45pm. The British destroyers gained the upper hand, preventing attacks on their own battlecruisers, while achieving a torpedo hit on Seydlitz, which inflicted only minor damage due to the impressive underwater protection of the German battlecruisers. They also sank two German destroyers, V27 and V29, while two British destroyers, Nomad and Nestor, were immobilized and were later sunk. At 4.53pm, Beatty recalled his destroyers as the character of the developing battle changed dramatically.
At 4.33pm, Goodenough on HMS Southampton, the furthest-advanced British light cruiser, reported the presence of the German battlefleet. This news came as something of a shock, since the inaccurate information from the Admiralty had given the impression that it was not at sea. Beatty initially held his course to confirm the report, then at 4.40pm turned to the north, with Scheer to his southeast and Hipper, not yet joined up with his superior, to his northeast. Beatty’s destroyers had done their job: together with the fire of the 5th Battle Squadron, they compelled Hipper to fall back on Scheer, buying time for the British battlecruisers to make their turn. At about 4.45pm, the German battlefleet opened fire and a few minutes later, Hipper’s force turned north. The roles of the battlecruiser fleets were now reversed, with Beatty doing what Hipper had before – leading the enemy towards his own main force.
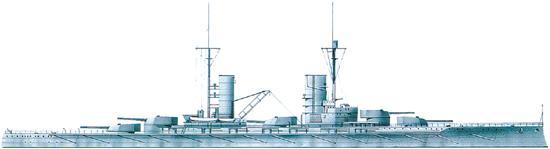
SMS Von der Tann was the very first of the German battlecruisers and had far heavier armour protection than her British counterparts. This served her well at Jutland, where she was repeatedly hit – all her turrets being knocked out – but survived.
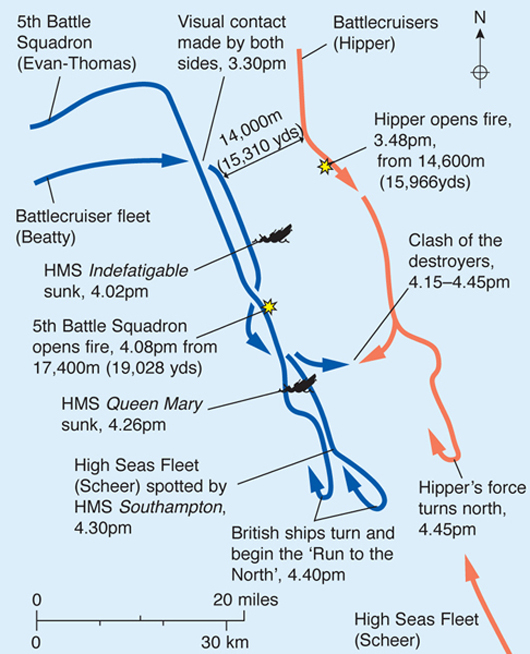
The initial contact and the run to the south at Jutland. The first stage of the battle saw Beatty chase Hipper’s battlecruisers, which were leading him towards the main German fleet. The Germans had the better of it, sinking two British battlecruisers, but narrowly escaped worse losses.
The run to the south lasted a little over an hour and was a German success. Hipper achieved his objective of luring part of the British fleet onto Scheer’s main force and had also sunk two British battlecruisers. His ships were damaged but still fighting, yet the end of the run to the south came none too early for him, since the effective fire of the Queen Elizabeth-class ships was gravely threatening his force. The delay in getting the 5th Battle Squadron into action removed the most powerful squadron in either navy from the early stages of the engagement, for over 15 minutes, when it could have had a huge effect; had they been in action from the outset, Hipper’s battlecruisers could well have been wiped out.
THE ‘RUN TO THE NORTH’
The second stage of the battle opened with another miscommunication between Beatty’s flagship and the 5th Battle Squadron. When Beatty turned his battlecruisers north, he did not initially order the battleships to make the same turn, presumably so as to reduce the distance between the two elements of his force. As they drew level he ordered Evan-Thomas to turn his ships in succession, rather than turning together, which meant that they would take longer to complete the manoeuvre. Furthermore, they would all follow each other around in the same line as they turned, meaning that the closing German battlefleet could concentrate its fire on the point of the turn – through which each battleship would progress – greatly easing their aim. This danger was exacerbated by another error by Beatty’s flag officer, Lieutenant Commander Ralph Seymour, who had been responsible for the mistakes during the Scarborough raid and at Dogger Bank, and whom Beatty had refused to replace. Seymour hoisted the flags giving the order to turn, but for some six minutes delayed hauling them down, which would tell Evan-Thomas when to begin the manoeuvre. Once again, Evan-Thomas waited for explicit instructions rather than using his own initiative to start the turn, with each minute carrying his force closer to the approaching German fleet. This problem was caused by Beatty’s actions, Seymour’s signalling error and Evan-Thomas’s hesitation. Its result was to increase greatly the danger to the valuable Queen Elizabeths.
A fleet of warships that could fire broadsides tended to fight in a single line ahead, to maximize its firepower and to make command and control as easy as possible. When manoeuvring in battle, the ideal situation that a commander could achieve was to ‘cross the enemy’s T’ - to be ahead of the advancing enemy, on a perpendicular course; in other words, to be in the position of the line at the top of a capital T. Such a position offered two advantages. First, it allowed the maximum number of one’s own guns to fire – the whole broadside of every ship – while the enemy could return fire with only the small number of forward-firing guns on the first few ships of his line. Second, the fire of one’s fleet was concentrated on the van of the enemy’s force. Nelson’s tactics at Trafalgar were unusual because he allowed his ‘T’ to be crossed, but he had calculated the risks accurately, and the enemy was unable to disable his van before he broke their line. The risks would have been far greater with the longer-range fire of World War I. At Jutland, both commanders wished to cross the enemy’s ‘T’, but only one would succeed – twice.

Crossing the enemy’s ‘T’ – the pinnacle of tactical achievement for fleet commanders in the battleship age. The blue fleet has crossed the ‘T’ of the red fleet.
Jellicoe joined the Navy in 1872 and gained extensive experience that twice nearly cost his life – with the sinking of HMS Victoria after a collision in 1893, and then with a bullet in the lung during the Boxer Rebellion. He worked closely with Jacky Fisher and helped to design the Dreadnought as Director of Naval Ordnance. He was made commander-in-chief of the Grand Fleet in August 1914 despite his great reluctance to replace the previous incumbent, Admiral George Callaghan. Jellicoe was highly intelligent and competent, with a great mastery of technical matters. He was also courteous and modest, though lacking Beatty’s social panache, and was genuinely popular with the crews of the Grand Fleet. He was also a great centralizer, unwilling to delegate work to others, and was painfully aware of the heavy responsibility he bore. Historians have a mixed view on his performance at Jutland, praising his deployment, but tending to see his tactics as rather cautious. In December 1916, he became First Sea Lord when he was already worn out by the burdens he had carried, and was dismissed in December 1917. Jellicoe comported himself with great dignity during the Jutland controversy of the inter-war years.
They were accordingly pounded by the heavy guns of the German battlefleet, whose captains could hardly believe their luck at having such an easy target and concentrated their fire against the battleships, while Beatty’s faster battlecruisers pulled away. Moreover, in the early stages of the run to the north, although the visibility was generally poor – with increasing amounts of smoke being added to the mist – it continued to favour the Germans. Any damage that appreciably reduced the speed of one ship of the 5th Battle Squadron could only have resulted in its being caught and sunk, like Blücher at Dogger Bank. Luckily for them, their 33cm (13in) armour and sturdy construction preserved them from the intense German fire. Valiant escaped unscathed, but Barham and Warspite were slightly damaged, and Malaya suffered worst: she took one hit that temporarily reduced her speed, but swift and effective damage control resolved the problem. They also continued to return fire effectively, despite the fact that the German ships were almost invisible to them, further damaging Derfflinger, Seydlitz and the van of Scheer’s fleet.
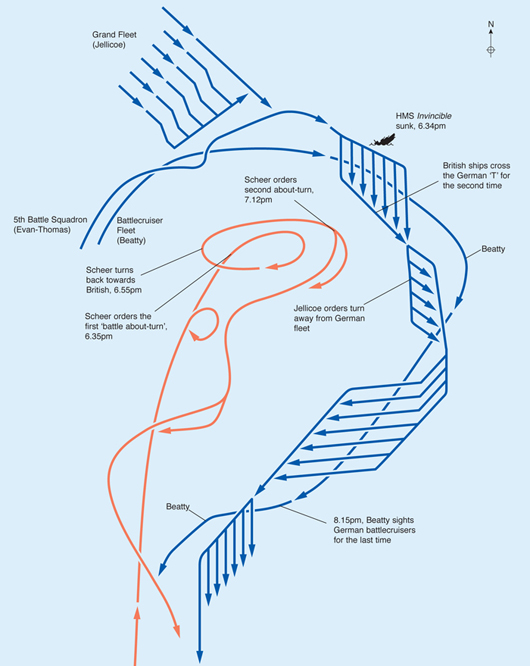
By about 5.30pm the light conditions had changed to favour the British, as the setting sun was now dazzling the German gunners. Further, the ebb and flow of the battle was on the point of changing once more: at 5.33pm Beatty’s lead cruisers made contact with the van of Jellicoe’s fleet. Around 5.56pm Beatty himself spotted the lead ships of the Grand Fleet. He then began to push towards the northeast, forcing Hipper to do the same for fear of having his ‘T’ crossed, thereby concealing from the Germans the fact that the British battlefleet was about to join the battle.
In contrast to the first stage of the battle, the British had considerably the better of the run to the north. This was largely due to the heavy armour and the effective gunfire of the 5th Battle Squadron. Just like Hipper before him, Beatty had succeeded: he made contact with the main body of the German force and then led it towards Jellicoe’s Grand Fleet, which would now have its long-awaited chance to smash its rival. He achieved this despite heavy losses that might have shaken a less determined commander. However, Beatty failed in the other, equally important aspect of his role as commander of the battlecruisers: he neglected to pass on to Jellicoe the crucial information about the enemy’s position and course that the commander-in-chief desperately needed.
Damage to the light cruiser HMS Chester following the battle. This ship had a close escape: scouting for Hood’s battlecruisers, she was badly battered by German light cruisers – suffering nearly 70 casualties – before Hood, in Invincible, came to her aid.
SMS Lützow, the same class of battlecruiser as the Derfflinger, began the Battle of Jutland as Hipper’s flagship. She helped to sink the armoured cruiser HMS Defence and the battlecruiser HMS Invincible, but the return fire from the latter caused damage that later proved fatal.
Jellicoe had received the 2.18pm report that the enemy had been sighted and increased speed. At 4.38pm, he heard the confirmation that the German battlefleet was present, prompting him to signal the Admiralty, ‘Fleet action is imminent’. Thereafter, he received a stream of signals that were inaccurate, incomplete and contradictory. This mattered, since Jellicoe was facing the momentous decision of how to deploy his fleet from its formation for steaming – in six separate columns – to the single line that it would adopt for battle, to bring to bear as many guns as possible. The lack of information prevented him from deciding the direction in which to deploy or when to begin the manoeuvre. It also meant that he encountered the German force earlier than he had anticipated and several kilometres further to the west.
The ‘run to the north’. The second of the main stages of the battle saw Beatty drawing the entire High Seas Fleet towards Jellicoe and the British battlefleet. The British ships escaped further loss, with the Queen Elizabeths inflicting damage on the chasing German battlecruisers.
One decision Jellicoe had made earlier was to order Hood’s 3rd Battlecruiser Squadron to push on ahead so that it could support Beatty as soon as possible. When it reached him, it had a significant impact in the latest of the many individual engagements that constituted the Battle of Jutland. At 5.27pm HMS Chester, which was scouting for the 3rd Battlecruiser Squadron, was surprised by four of Hipper’s light cruisers and was damaged. Hood rapidly came to her support and at 5.36pm turned the tables on the German vessels, crippling Wiesbaden and damaging Frankfurt and Pillau. Chester was seriously damaged, but made it back home. Hipper’s destroyers sought to carry out a torpedo attack, but were fought off by their counterparts in Hood’s force, which then went on to make their own attacks. These resulted in the loss of HMS Shark, though only after inflicting similarly fatal damage on the destroyer V48 and hitting the damaged Wiesbaden with a torpedo. The unexpected arrival of Hood’s battlecruisers, together with the torpedo attacks by British destroyers, persuaded Hipper to fall back on Scheer, thus concealing the arrival of the Grand Fleet as well as buying time for its deployment. By 6.14pm, Hipper had linked up with his superior and was heading north again.
At about this time, Jellicoe made the single most important tactical decision of the battle, indeed of the entire war at sea. He was well aware of the gravity of the decision facing him and that he was making it onthe basis of imperfect information, against an enemy which had appeared both earlier and on a different bearing than he had been led to expect. He was equally aware that getting the decision wrong or making it either too soon or too late would place Britain’s entire battlefleet in grave danger. This responsibility was his alone, epitomizing the ‘loneliness of command’.
Jellicoe’s first thought was to deploy to starboard – that is, for the line to form up heading southwest. This would have the advantage of getting into action at closer range and sooner, which was important because daylight was running out. However, it also carried risks. It would allow the German fleet to concentrate its fire on the British van, which would then have comprised its older warships, without the rest of the fleet being able to support it for several minutes. It would also give the Germans an ideal position for launching mass torpedo attacks against part of the British fleet. Deploying to port – having the line form to the southeast – would take longer but offered the advantage of silhouetting the German fleet against the setting sun. It also allowed Jellicoe to cross their ‘T’ – that is, to achieve the desirable position in a naval battle in which your fleet passes at a right angle ahead of the enemy fleet, allowing all of your guns to fire on his lead ships, which can only fire a small number of guns in reply.
Jellicoe therefore decided to deploy to port. He has subsequently been criticized for this by some historians, notably Churchill, whose assessment was made outside the confusion and danger of battle and with the considerable advantage, that Jellicoe lacked, of perfect knowledge of the position and course of the enemy as well as an awareness of the course of subsequent events. Some critics have suggested alternatives such as forming the line from the centre of the fleet or even deploying into two separate lines, but such manoeuvres would have been enormously complicated when in contact with the enemy, and were not realistic options since they had not been practised beforehand. Most historians – including, strikingly, the authors of both the British and German official histories – have concluded that Jellicoe made the right decision.

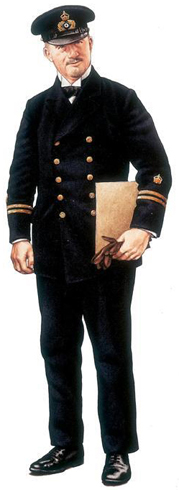
A Royal Navy lieutenant in 1916. The crews of the Grand Fleet were desperate to bring the enemy to battle. At Jutland, their training in gunnery and manoeuvring proved effective, but they were hampered by deficiencies in shells and by a lack of initiative among senior officers.
At 6.15pm Jellicoe ordered the Grand Fleet to deploy to port. The manoeuvre – moving from six columns into a single line, 10km (6 miles) long – was conducted well, given the large number of ships in numerous separate squadrons under several different commanders. It was complicated by the ill-fated action of one British commander.
The old armoured cruisers of the 1st Cruiser Squadron, under the command of Rear Admiral Sir Robert Arbuthnot, were ahead of the Grand Fleet. From his flagship Defence, Arbuthnot spotted the gunfire from the engagement between Chester and the German light cruisers and at 5.50pm hastened to join in, accompanied by HMS Warrior – the other two of his cruisers having become separated. He should not have placed himself between the two battlefleets, but with the reconnaissance role of the cruisers fulfilled, he apparently wished to support the embattled British light cruisers. He charged in firing, inflicting further damage on the battered Wiesbaden, but then came under heavy fire from Hipper’s battlecruisers. Defence was torn apart by the bombardment and exploded at 6.20pm, killing Arbuthnot and the entire crew of over 900 men. Her sister ship, Warrior, was seriously damaged, and would not have survived but for one of the stranger episodes of the battle.
‘As his fleet came under increasingly heavy fire, Scheer became aware that he was facing not merely an isolated detachment of the Grand Fleet but the whole of it. Stretching across the horizon were Dreadnoughts bearing names redolent of centuries of history’
The 5th Battle Squadron, lagging behind Beatty’s battlecruisers, had to rejoin the Grand Fleet. Rather than steer for the head of the line, which would have masked the fire of several British ships, Evan-Thomas elected to join the rear. However, when Warspite made the sharp turn that this required, her steering gear – damaged by an earlier hit – became jammed. The result was that she circled, twice, towards the German fleet. In doing so, she attracted almost all of the fire, at short range, of up to 10 German Dreadnoughts. She was damaged, but survived thanks to her heavy armour. She was sent home shortly afterwards, finally making port having had to avoid the torpedoes of one German U-boat and, in return, only narrowly failing to ram that U-boat and one other. The bizarre movements of Warspite had the beneficial effect of attracting German fire away from the crippled Warrior, which was therefore able to extricate herself. She would sink on the way home, but not before her 900 crew had been taken off by Engadine, playing her final role in the battle.
THE CLASH OF THE BATTLEFLEETS
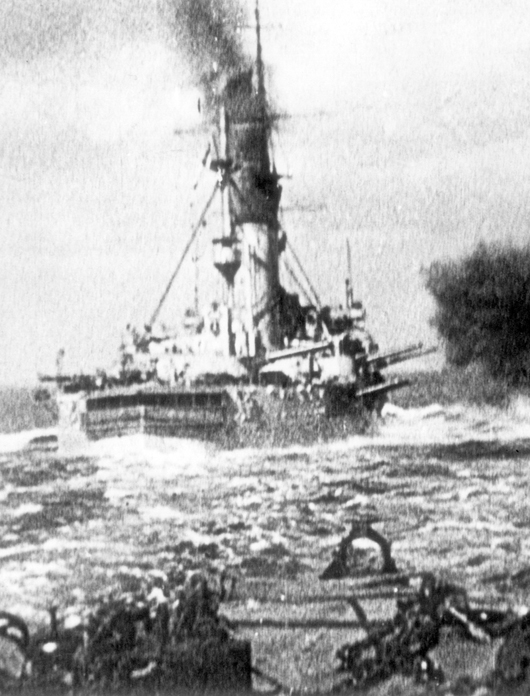
As the main engagement began, the High Seas Fleet enjoyed one last major success. The 3rd Battlecruiser Squadron had successfully forced Hipper to back away and thus covered the British deployment. It now took position in the van, a couple of kilometres ahead of Beatty, with Hood’s flagship, Invincible – the very first battlecruiser – in the lead. Hood’s ships opened fire on Hipper’s battlecruisers, to their southwest, which initially could not see them to return fire. The range was only about 8km (5 miles), and the recent gunnery practice of the British battlecruisers seemed to pay off as Invincible inflicted eight hits on Lützow, causing damage that would eventually prove fatal. Seydlitz and Derfflinger were also further damaged. Then, at about 6.30pm, the mist suddenly lifted to give the Germans a clear view of their assailants. Their heavy fire again demonstrated the weakness of the British battlecruisers: at 6.34pm, a shell hit a turret on Invincible, causing a magazine explosion that literally tore the ship in two. The shallow water in which she sank left her bow and stern jutting above the waves. Just six men survived from her crew of 1031; Admiral Hood was not among them.
Hipper’s 1st Scouting Group had suffered badly from the gunfire of Beatty, Evan-Thomas and now Hood. The extent of the battering they had taken is shown by the fact that when the damage to Lützow forced Hipper to disembark and relocate his command, he approached, in turn, Derfflinger, Seydlitz and Von der Tann, only to find that each was too badly damaged to serve his purpose. Finally, he transferred his flag to the relatively undamaged Moltke.
By 6.30pm the British warships began to complete their line having already opened fire on any enemy they could see. Visibility was very poor in the mist and smoke, but favoured the British, who could see their opponents against the light western sky, while they were largely hidden in darkness. As his fleet came under increasingly heavy fire, Scheer became aware that he was facing not merely an isolated detachment of the Grand Fleet, but the whole of it. Stretching across the horizon were Dreadnoughts bearing names redolent of centuries of history, taken from admirals, generals and famous ships from earlier eras: Benbow, Collingwood and St. Vincent; Marlborough and Iron Duke; Bellerophon, Temeraire and Vanguard. They had succeeded in crossing the ‘T’ of the German battlefleet and were firing remarkably effectively, inflicting heavy damage on its leading battleships. The very survival of Scheer’s force was in serious jeopardy.
SMS Derfflinger assisted in the destruction of the battlecruisers Queen Mary and Invincible. She received more than 20 heavy hits during the battle and was so badly damaged that Hipper was unable to move his flag to her from the doomed Lützow – yet she still made it home.
After a few moments in which he seemed stunned and unable to comprehend the unfolding situation Scheer took decisive action to save his fleet. At about 6.35pm he ordered a complex manoeuvre that had been meticulously practised in case of just such a situation: the Gefechtskehrtwendung or ‘battle about-turn’, in which the whole fleet reversed course almost simultaneously from the rearmost vessel forwards. This turn, covered by the destroyers with a smokescreen and torpedo attack, allowed the High Seas Fleet to break contact and vanish into the mist. It was heading southwest, away from home, but had gained a temporary respite from the British fire.
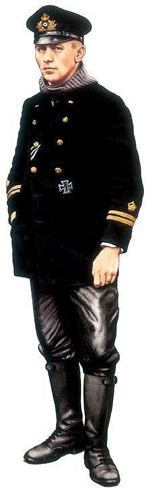
A lieutenant-captain of the Imperial German Navy in 1916. The meticulous training of such men withstood the test of battle. They were cheered by the losses that they had inflicted on their adversary, but morale began to decline as their commanders sought to avoid further clashes.
Jellicoe did not at first realize what his adversary had done. He did not see the turn himself and when, after a few minutes, it became clear that the German fleet was not simply hidden in the mist, he could not tell how far it had turned. Those among his captains who had observed the Germans make their about-turn failed to pass on this information. Jellicoe therefore expected the German fleet to reappear. When it did not, at about 6.45pm he steered to the south, aiming to get between Scheer and his route home in the hope of blocking his retreat and forcing him to resume the battle. As the British fleet made its turn, HMS Marlborough was hit by a torpedo, probably fired by the crippled Wiesbaden, killing two crewmen (the only fatalities suffered by the main body of the fleet during the entire battle). The damaged Dreadnought was able to remain with the Grand Fleet for the time being, but the experience only confirmed Jellicoe’s concern about the threat from underwater weapons.
It was not long before Jellicoe was given his second chance to have a go at the enemy, due to a remarkable decision by Scheer. At about 6.55pm he ordered his fleet to turn back towards the British. He later claimed that he was eager to resume the battle and to rescue the Wiesbaden, and headed into the British line to achieve surprise. Such a decision would be sure to surprise the British because it would have been suicidally stupid, allowing his ‘T’ to be crossed a second time, with his battered battlecruisers in the lead. As the historian Julian Corbett put it, this explanation must have been untrue, since ‘it cannot be reconciled with his high reputation as a tactician, or even with sanity’. More probably, Scheer realized he could not continue to steer west, away from home and safety, and therefore wished to reverse course; then, having misidentified Hood’s battlecruisers as the van of the British battlefleet, he misjudged its location and believed that his new course would take him safely through the wake of the British line.
The main fleet action at Jutland. The complicated movements of the battlefleets saw the British deploy for action and cross the ‘T’ of the German fleet. The latter turned away, then turned back towards the British, before making its escape a second time. After pausing due to the threat of torpedoes, Jellicoe gave chase.
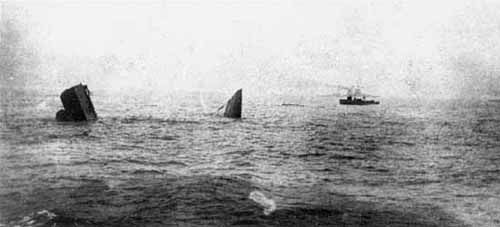
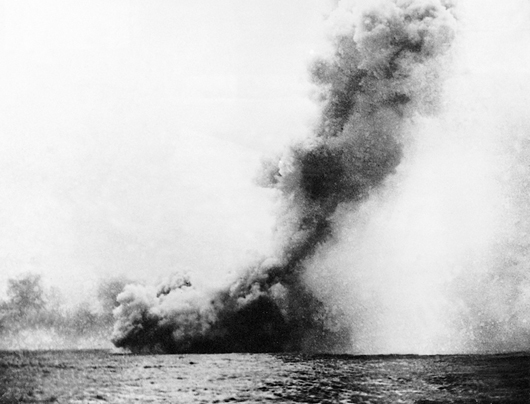
HMS Invincible was sunk in shallow water, her bow and stern left jutting in the air. This view, which shocked many men on both sides, provides one of the most striking pictures of the entire war at sea.
In any case, his change of course back towards the Grand Fleet was spotted by HMS Southampton, which alerted Jellicoe. At around 7.10pm the British fleet crossed the German ‘T’ for a second time, albeit with its divisions staggered rather than in a single line, so not all of its ships could open fire. Once again the leading German warships were hit repeatedly and found it difficult to return fire against British ships that were all but invisible except for the muzzle flashes of their guns. Hipper’s battlecruisers were hit hard yet again, taking at least 25 hits from heavy shells, with the battleships König, Grosser Kurfürst and Derfflinger also suffering damage.
Scheer realized that he had made a terrible mistake and at 7.12pm ordered a second battle about-turn back towards the west. This manoeuvre, conducted after a renewed round of heavy British fire, placed enormous demands on his captains and crews, but they succeeded. Scheer evidently recognized just how desperate his position had become: at 7.13pm he ordered his battlecruisers, several of which no longer had any functioning main guns, to charge the British, sacrificing them to cover his retreat. He then altered this order to have them engage the lead British ships and ordered his destroyers to cover him with a smokescreen and a torpedo attack.
It was at this point that Jellicoe made his most controversial decision of the battle, meeting the attacking German destroyers with his own light forces but also turning his capital ships away from the torpedo attack. His rationale was that turning away reduced the threat from the torpedoes by making them easier to avoid, since their relative speed would be far lower if they were chasing the battleships than if they were heading towards each other, while their speed would fall further as they reached the end of their range. In total, 31 torpedoes were fired, of which 20 reached the British line, but not a single one hit. The tactic succeeded – but at the cost of allowing Scheer to complete his turn and to put precious distance between the two fleets, with only about 90 minutes of daylight remaining.
Of all Jellicoe’s actions, this one has been most bitterly criticized. Some have argued that he should have turned towards the torpedoes, accepting the risk of having some of his warships damaged or even sunk in order to maintain contact with the German fleet. Critics such as Churchill, writing with his usual magisterial hindsight, have claimed that Jellicoe overestimated the threat from torpedoes. There was a genuine threat, however, and any critic has to acknowledge that Jellicoe could not know in advance how few torpedoes would be fired; he knew that the full capacity of the German flotilla was over 400 torpedoes, though in the event, not all the German destroyers took part in the attack, and many of those that did were not able to launch their whole load due to the heavy fire from the British fleet.
Jellicoe had no intention of accepting an unnecessary risk. Historians differ over whether his caution was excessive and needlessly threw away the prospect of another Trafalgar, or was wise and showed the same prudence that Beatty had at Dogger Bank when he thought he spotted a periscope. Pressing on would have resulted in damage, perhaps fatal, to some of his ships in return for catching some of the German stragglers. However, the annihilation of the German fleet that some suggest would have ensued is unlikely: most of it would still have escaped due to the poor visibility, the lack of daylight remaining and, particularly, Scheer’s evident (and quite proper) determination to avoid another engagement in which his forces would have been at a massive disadvantage.
Jellicoe successfully weathered the torpedo attack, albeit at the cost of allowing Scheer to break contact. He was again unaware of the precise course of the German fleet and initially expected to encounter it once more. He sought to pursue it to the west, but when he did not locate it, he turned southwest, again trying to place his fleet between Scheer and the German bases. Meanwhile, Scheer had turned to the south, hoping to avoid the British fleet; further contact seemed inevitable.
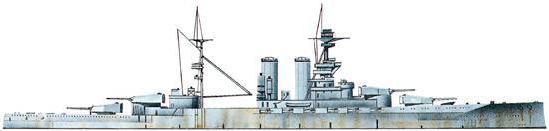
HMS Barham was a Queen Elizabeth-class super-Dreadnought, one of the newest and most powerful warships of the Grand Fleet. At Jutland, she served as the flagship of Vice Admiral Hugh Evan-Thomas in the 5th Battle Squadron, accompanying Beatty’s Battlecruiser Fleet.
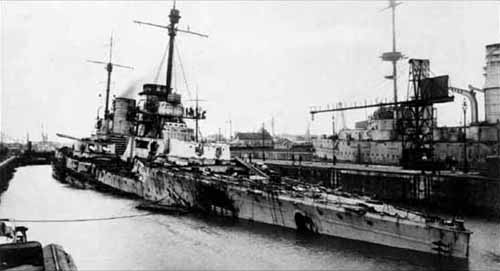
SMS Grosser Kurfürst. A König-class Dreadnought, she was commission in the week before the outbreak of war in 1914. She was badly damaged at Jutland but survived. Her subsequent career was chequered, being damaged by a British submarine as well as by a collision with another German ship and by running aground. She was scuttled at Scapa Flow in 1919.
At about 8.15pm, shortly before dark, there was another brief engagement as Beatty, ahead of the main British force, sighted Hipper’s battlecruisers. The German ships suffered further damage, unable to return fire because they could not see their antagonists. They were saved by the timely intervention of the pre-Dreadnoughts of the 2nd Battle Squadron, which were also damaged by the British battlecruisers but allowed Hipper to extricate himself. Beatty did not pursue, once again showing that he was not as reckless as some have tended to believe. Nevertheless, he did manage to push the German fleet to the west, further from the safety of home. As Marder notes, this was the last time in the war that capital ships engaged each other.
At about 8.45pm, some of the British light cruisers spotted three German battleships and informed Vice Admiral Sir Martyn Jerram, commanding the 2nd Battle Squadron from HMS King George V. He refused to open fire, however, suspecting them to be Beatty’s battlecruisers. His caution is understandable, but it was another lost opportunity.
NIGHT MOVEMENTS AND SCHEER’S ESCAPE
Jellicoe decided that he would seek to avoid an engagement during the night. He was aware that his forces lacked adequate equipment or training for a night-time action, and was concerned that the greater danger of torpedo attack at night would nullify his numerical advantage. Instead, he would seek to prevent Scheer from getting to the safety of his bases, in order to be in a position to resume the battle the following morning.
He was aware that Scheer had a range of options for his journey home. The first would have been to head northeast, pass through the Kattegat to return home. Jellicoe sensibly dismissed this possibility, since it represented more than twice the distance of the other options and involved too great a risk of losing damaged ships to the pursuing British. The second possible course was south, heading for the channel that had been swept through the British minefields and passing Heligoland. This was unlikely because of the difficultly of locating and navigating the safe passage through the minefield. This left two alternatives: one involved steaming to the southwest, then heading past the mouth of the Ems River and east along the German coast. The last option was to head southeast for the Horns Reef, then passing down the coast of Denmark.
In Jellicoe’s opinion, although the latter was the shorter route and hence the more attractive, it was blocked by the British fleet. After the mauling Scheer’s force had suffered before, it was unlikely to attempt to break through the Grand Fleet once again. Besides, the last time the Germans had been spotted, they were heading southwest. Jellicoe therefore assessed that the Ems route was the most likely, and took a course that would allow him to cover it. In case Scheer should seek to slip behind him to the Horns Reef, he ordered the minelayer Abdiel to lay more mines there. He also stationed his destroyers 8km (5 miles) astern of the battlefleet to intercept any such move.
A lieutenant-captain of a Zeppelin in 1914. The German Navy made extensive use of Zeppelins over the sea to scout for the enemy. Sensitivity to weather conditions reduced this advantage, which could not prevent the Royal Navy achieving surprise on a number of occasions.
At 9.17pm Jellicoe ordered the Grand Fleet to take up its formation for night steaming, with Beatty’s battlecruisers ahead of the main body, to prevent the Germans from passing in front of it. Jellicoe believed that the German fleet was to his northwest. In fact, it was closer than he realized and was on a converging course.
SMS Nassau, firing at sea. She was the first of Germany’s Dreadnoughts and experienced what was perhaps the strangest encounter of the Battle of Jutland. During the night action, she was rammed by the destroyer HMS Spitfire, which not only survived but carried away a chunk of her armour plate as a souvenir.
Despite Scheer’s later protestations that he was keen to resume the battle, his only concern was to lead his battered fleet to safety. He was well aware that its survival depended on his ability to reach home, which meant that he had to get past the British fleet during the night. From the various possibilities open to him, he opted for the shortest route, via the Horns Reef. This was probably his best decision of the day. However, seeking to head there as early as he did – turning to a south-southeast course at 9.30pm – was dangerous, carrying a high chance of running into the British again.
During the night, Scheer’s force was subject to a series of sporadic destroyer attacks, but he refused to be turned aside from his course towards Horns Reef. The two fleets were on converging courses that described a ‘V’, although as both moved south, the faster British edged ahead, with their lead growing all the time. Around midnight, Scheer crossed in the wake of the Grand Fleet, only about 15 minutes and less than 5 km (3 miles) behind it; such was the narrow margin of breaking through to comparative safety.
‘The two fleets were on converging courses that described a ‘V’, although as both moved south, the faster British edged ahead, with their lead growing all the time.’
Why was the High Seas Fleet able to escape through the rear of the British line? An important factor was that the German ships were far better prepared for fighting at night in terms of equipment (such as effective searchlights and star shells) and training (notably procedures for distinguishing friend from foe). Repeatedly, British ships hesitated to engage a ship they had spotted for fear of attacking one of their own, resulting in German vessels either escaping or being allowed the great advantage of opening fire first. The British destroyers failed either to prevent the Germans from breaking through or to inflict serious losses on them. Although their attacks were pressed with considerable courage, they were often disorganized, and some of the destroyer flotillas seemed more concerned with maintaining station than attacking the enemy.
There were around a dozen encounters during the night in which fire was exchanged and several others where it might have been but was not. In one, the light cruiser Southampton was heavily damaged and left on fire, but not before she torpedoed and sank the German light cruiser Frauenlob. In another action, British destroyers sank the light cruiser Rostock, then torpedoed the cruiser Elbing which, seeking to avoid further torpedoes, was rammed and sunk by the German Dreadnought Posen. During these attacks, the British lost the destroyers Tipperary, Fortune and Sparrowhawk (which was damaged by German fire, then in the confusion was rammed by two British ships). HMS Spitfire had a lucky escape: her captain realized that he could not avoid a collision with the German Dreadnought Nassau, with a tonnage more than 20 times that of his own unarmoured ship, so he chose to ram her. Although badly damaged, Spitfire survived the encounter and made it home, carrying a 6m (20ft) section of Nassau‘s armour plate as a memento. Around the same time, the damaged Black Prince, a survivor of the ill fated 1st Cruiser Squadron, was seeking to locate the Grand Fleet when she instead happened on the German Dreadnoughts at point-blank range and was rapidly sunk.
The failure of the destroyers to stop the Germans was compounded by their more startling failure to inform Jellicoe of the enemy’s movements. While Jellicoe had neglected to provide the destroyer commanders with a clear picture of the situation, they should have displayed sufficient initiative to press the attack when possible and to pass on reported sightings. At about 2am, shortly before dawn, Captain Anselan Stirling of HMS Faulknor led the 12th Destroyer Flotilla in a well coordinated torpedo attack that sank the pre-Dreadnought Pommern. Unlike the other light forces, Stirling signalled Jellicoe, but his report failed to get through due to German jamming.

Scheer joined the Imperial German Navy in 1872, gaining considerable experience and technical mastery, not least in the torpedo branch. Early in the war, he commanded battle squadrons of the High Seas Fleet before succeeding Admiral von Pohl as its commander-in-chief in 1916. He advocated a more active approach to drawing part of the Grand Fleet into an ambush. This resulted in the Battle of Jutland, where he managed to extricate his force from great danger; yet he turned down the Kaiser’s offer of ennoblement after the battle. Scheer was made Chief of the Naval Staff in 1918 and conceived the idea of a last great sortie by the battlefleet, only for it to be frustrated by mutiny. His memoirs put a rather favourable gloss on several episodes in the war, Jutland in particular, but show a justifiable pride in the achievements of his fleet. Scheer died in 1928, shortly before he could take up an invitation that he had accepted from Admiral Jellicoe to travel to England and meet.
It was not only the destroyers that were found wanting. Some Dreadnoughts spotted German warships, but failed either to open fire or to pass on potentially critical information. At 10.30pm, for example, HMS Thunderer spotted Moltke – making her way home – but did not open fire due to reluctance to reveal the position of the British fleet. Seydlitz, similarly on her own, was sighted several times and eventually broke through the British fleet; no ship opened fire, due to doubts over her identity, and Seydlitz limped home, barely afloat, when a couple of salvoes would have finished her. Worst of all, at about 11.40pm, as the German battlefleet passed astern of the British line, Malaya identified the Westfalen. Her captain, Algernon Boyle, refused the request to open fire, on the spurious grounds that his superior must be aware of the presence of the German ships but had not ordered him to engage.
To be fair, the captains and crews were all exhausted after the trials, stress and danger of battle, as well as the enervating experience of night operations. Less condonable were errors in the Admiralty in not forwarding crucial information. At 11pm Jellicoe was advised by the Admiralty of an intercepted signal giving the German course as south-southeast. This should have pointed to the fact that they were heading for Horns Reef, but Jellicoe dismissed it. This was largely because the error earlier in the day, when he had been wrongly informed that the German battlefleet had not left port, led him to disbelieve intelligence from the Admiralty. (This inclination was increased by an Admiralty signal accurately passing on a message from a German ship that had got its own position manifestly wrong.) Another signal was intercepted, in which Scheer requested Zeppelin reconnaissance over the Horns Reef early the following morning. Inexcusably, the Admiralty failed to pass on this signal or six others that pointed to the actual course of the German fleet. These invaluable pieces of intelligence were not forwarded to the commander-in-chief, but were simply filed away; Marder describes this as ‘criminal neglect’. Had Jellicoe seen these signals, he would have been able to realize Scheer’s intentions and could have changed course to intercept him the next morning.
HMS Black Prince was an armoured cruiser in Arbuthnot’s 1st Cruiser Squadron. Separated from the rest of the force, shed missed the action in which her sister Defence was sunk and Warrior fatally damaged. During the night, she ran into the German battlefleet and was rapidly destroyed.
SMS Wiesbaden was involved in the action in which HMS Chester was damaged, though she in turn was hit repeatedly by the heavy guns of Invincible. She was immobilized and was targeted by other British ships, but returned their fire until she sank.
Jellicoe himself cannot escape all blame. He simply assumed that the noise and light to his stern represented his own destroyers fighting off attempted torpedo attacks by German destroyers; but he could have sought to confirm this. He was also partly responsible for the fact that his crews were inadequately trained for night action and for their captains’ tendency to wait for orders rather than displaying initiative.
Around 2.40am on 1 June, just after dawn, Jellicoe turned the fleet north to gather up his light cruisers and destroyers for the battle that he still believed would ensue. His optimism fell sharply at 3am when a Zeppelin appeared overhead. It was driven off by gunfire that was rather more spirited than accurate, but it would surely alert Scheer to the presence of the British fleet, thus enabling him to avoid them. Shortly afterwards, Jellicoe’s remaining hopes were dashed when he learned via an Admiralty interception that the High Seas Fleet was well to his northeast, close to the Horns Reef. Scheer had made good his escape. At about 3.30am the German fleet reached the Reef. It passed through the newly laid minefield, which was relatively small due to the fact that HMS Abdiel had only been able to lay a few mines in the time available. The Dreadnought Ostfriesland was damaged by a mine laid earlier, but still made it home. The fleet also passed safely over the British submarines on its route, which had been instructed to stay on the sea bottom until 2 June.
Jellicoe’s forces combed the area for damaged enemy vessels, but found none, as Lützow and Wiesbaden had sunk during the night. At around 11am the British fleet, frustrated and disappointed, headed for home. On the way, as was traditional in the Royal Navy, many of those killed during the battle were buried at sea. The Grand Fleet arrived home on 2 June, and a few hours later Jellicoe reported to the Admiralty that it was ready for battle once again.
AN ANTICLIMACTIC END
Shortly after the High Seas Fleet arrived home, the German Government released its story first, putting out a triumphalist announcement that claimed a great victory. This statement exaggerated British losses and failed to acknowledge all of the German casualties. In the absence of any British statement, the neutral press and the British newspapers echoed this line. Their interpretation was strengthened by the initial Admiralty communiqué, which took traditional British understatement a little far: the tone was restrained as it listed British losses in full – the only error being its exaggeration of the number of destroyers sunk – but made no reference to specific German ships sunk, only stating that their losses were substantial. It quite failed to mention that the German fleet had twice fled the British, and that the latter was still at sea, in control of the battlefield and seeking a new engagement, the next morning. Later Admiralty statements gave a fuller account of the action, stressing that the German fleet had fled in poor visibility and that the Grand Fleet had ‘driven the enemy into port’, as well as making higher claims of Germans losses. This, together with the later admission by the German Government that it had concealed some of its own losses ‘for military reasons’ led to neutral press opinion swinging back the other, way as the German Government was accused of what would now be called ‘spin’.
So who actually won? The Royal Navy clearly suffered the greater losses – three battlecruisers, three armoured cruisers and eight destroyers, with a total of 6,000 men killed. The High Seas Fleet had lost one battlecruiser, one pre-Dreadnought battleship, four light cruisers and five destroyers, and over 2500 men. The British losses totalled 116,800 tonnes (115,000 tons) and the German, 62,000 tonnes (61,000 tons). In these terms, German claims of victory were understandable. However, taking into account ships damaged, the picture altered. Ten German capital ships were heavily damaged and the extensive repairs they needed meant that they were out of action for longer than the damaged British ships.
The results of battles are not assessed by men killed and machines destroyed but rather by which side achieved its aims. Scheer’s objective had been to destroy an isolated part of the Grand Fleet, which he had failed to do. Similarly, though, the Royal Navy had not inflicted a shattering defeat on its enemy, as public opinion confidently anticipated. In terms of the wider balance, however, the numerical superiority of the Royal Navy actually increased. While the loss of life on the three British armoured cruisers was grievous, the ships themselves were obsolete and their loss did not harm the capability of the Grand Fleet. The loss of four light cruisers was more serious for the High Seas Fleet. Both sides lost one new battlecruiser; the two older British battlecruisers that had been sunk were soon replaced by newly built vessels. When Jellicoe reported his fleet was ready for action on 2 June, this was no mere bravado: he had 24 capital ships available for battle while his opponent could have put to sea just 10. Perhaps more significant, the British advantage was now still greater in the minds of the German commanders. They were well aware of the narrowness of the margin by which they had escaped a shattering defeat, and this was to condition their subsequent activities.
German destroyers of the High Seas Fleet. These ships, like their larger British counterparts, played an important role in the battle, launching torpedo attacks against enemy capital ships as well as countering the enemy’s efforts to do so. The German destroyers were critical in helping the High Seas Fleet to escape.
Although the outcome of the battle was not a decisive victory, its importance was enormous. At the strategic level, the result was a great success for Britain. The purpose of the battle was to contest control of the sea and at its end, the British mastery was if anything stronger than it had been before. The blockade of Germany was in no way lessened and its slow yet strangling effect continued unabated. The German realization that they could not expect success in a future fleet engagement led to a switch to the alternative approach of relying on U-boats for victory, which had the ultimately disastrous consequences explained in the next chapter. The picture is perhaps best captured by an American newspaper, which wrote, ‘The German fleet has assaulted its jailor but it is still in jail.’
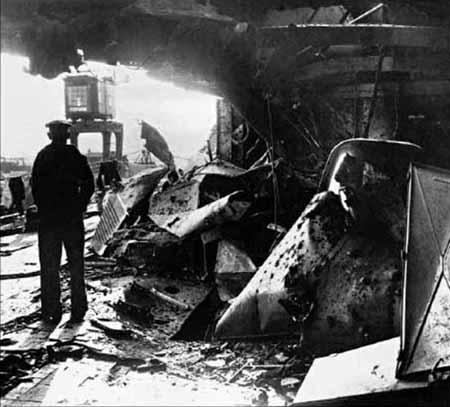
Damage inflicted on SMS Derfflinger. This photograph indicates the punishment taken during the battle by many German capital ships, particularly the battlecruisers such as Derfflinger. Their strong construction and the defective British shells allowed nearly all of them to reach home regardless.
The outcome of the battle was due to a number of factors. Perhaps the most significant was the poor visibility, exacerbated by the fact that the engagement began so late in the day. While this constraint affected both sides, its impact was to the greater advantage of the side seeking to escape.
Of all of the surviving German capital ships from the encounter, Seydlitz had perhaps the luckiest escape. Not only did she come close to foundering on the way home, she had also succeeded in breaking through the British battlefleet to get there.
There were important material weaknesses on the British side, one defensive and one offensive. It is not true that British armour was less effective than that of the Germans; indeed, the evidence suggests that the Royal Navy had the advantage in battleship armour, although the German ships had superior underwater protection. The weakness lay in the battlecruisers. Although the British ships of this type had thinner armour than their German counterparts, they were by no means fragile, with some taking repeated hits by heavy shells yet remaining in action. The critical failing was in anti-flash protection: while the High Seas Fleet had taken to heart the lesson learned at the Dogger Bank and tightened up procedures, the crews of the British ships tended to shortcut safeguards for handling explosive charges. The result was that a hit in a turret had a high chance of destroying a British battlecruiser, while its German equivalent might lose the turret, but would survive. With proper observation of the established procedures, all of the three British battlecruisers that were lost might have been saved, along with over 3000 lives.
Many historians have noted the impact on the outcome of Jutland of institutional failings in the Royal Navy. The argument, made best in Andrew Gordon’s masterly book The Rules of the Game, is that the long period of peace resulted in the dominance within the Royal Navy of a culture that sapped initiative. The formidable challenges of new technology resulted in excessive centralization and a tendency to play safe and await explicit orders. Such a system was appealing in peacetime, but would inevitably break down under the pressures of war. There were important differences between individual commanders, with Beatty – more like the German Navy – adopting a freer and more decentralized approach, expecting his subordinate captains to show initiative in the pursuit of his broad intentions rather than looking to exercise detailed control over their every action. On the whole, though, the Royal Navy was characterized by centralization and lack of initiative, which contributed to many of the weaknesses at Jutland. Jellicoe contributed to this culture, but was more its victim.
In terms of gunnery, the view that the Royal Navy proved inferior is wrong. The fire of the British battlecruisers tended to be less accurate than the Germans in the early stages of the engagement, but the British battlefleet enjoyed greater success than its opponent. The key British weakness was in defective armour-piercing shells, which at long range often detonated or broke up on hitting armour rather than doing what they were designed to, which was to penetrate the armour before exploding. This flaw, the result of inadequate and unrealistic testing in peacetime, denied the battlefleet the results of its accurate gunfire. Both Scheer and Hipper acknowledged that the poor British shells saved manyof their ships; with effective shells, it is likely that three more German battlecruisers and two or three battleships would have been sunk.
The battle has not only been fiercely debated by disputatious historians, but also resulted in bitter sniping among the British commanders involved and, even more, among their partisans. Beatty came to feel aggrieved about the result of the battle and his admirers insisted that Jellicoe threw away the golden opportunity presented by their hero. In contrast to Jellicoe’s dignified restraint, Beatty abused his post-war position as First Sea Lord to establish his opinion as the official version, censoring accounts of the battle that mentioned his errors or praised the role of the battlefleet. The controversy even extended to the Official History, with the Admiralty taking the extraordinary step of inserting a note in Julian Corbett’s book stating that some of his judgements ‘are directly in conflict with their views’. The press took a superficial view, lauding the attractive figure of Beatty, who had always courted them assiduously, rather than the quieter, more austere Jellicoe. Both men had more to be proud of than to regret at Jutland. Strikingly, Beatty insisted, against medical advice, on serving as a pallbearer at Jellicoe’s funeral in 1935, hastening his own demise a few months later.
A number of avoidable errors on the British side also contributed to the indecisive outcome. Greatest among these was the failure of the Admiralty to make effective use of the enormous advantage of signals intelligence. The early error that suggested the German fleet was not at sea inclined Jellicoe to treat later information from the Admiralty with suspicion, while the failure to pass on clear intelligence of Scheer’s route home ensured that he would not be intercepted. The second important mistake was Beatty’s failure to ensure that the 5th Battle Squadron was positioned to support his battlecruisers. The earlier participation of this powerful force would probably have saved some or all of the British battlecruisers that were lost, and would have cost Hipper several more of his ships. The third significant failing was in officers repeatedly failing to show the initiative that they should have, either declining to engage the enemy or simply neglecting to pass on to their commander-in-chief information that was clearly critical. For many historians, this weakness was the result of wider organizational weaknesses. On the way home, Beatty amplified his earlier comment, stating, ‘There is something wrong with our ships – and something wrong with our system.’ He was right on both counts.
Most criticism has been directed against Jellicoe for showing what is claimed to be excessive tactical caution. In fact, he had no great need to take chances, since Britain already had a position of dominance at sea. Moreover, taking a great risk with the fleet would have been unwise, since it would have jeopardized this favourable balance. For his critics, however, taking a limited and calculated risk might have brought about a decisive defeat of the High Seas Fleet. While such an outcome would not have ended the war, it would have produced practical and morale results that might well have shortened it.
Jellicoe was cautious; whether he was too cautious is a fine judgement to make after the event, and there is still nothing approaching a consensus. Churchill exaggerated when he described Jellicoe as the only man on either side who could lose the war in an afternoon, but it must have felt that way to the commander-in-chief. The main problem was that since Scheer was intent on avoiding battle and escaping, there was little that Jellicoe could do to force him to fight at such a disadvantage, particularly with poor visibility and daylight running out.
The popular view at the time, if not that of most Royal Navy officers, was that Jellicoe had let slip a great opportunity. In April 1919, both Jellicoe and Beatty were promoted to Admiral of the Fleet, but then in August Beatty was made an earl while Jellicoe had to be satisfied with the lower rank of viscount. The controversy over the Battle of Jutland escalated further thereafter. Jellicoe had made some errors and Beatty had made more, yet both deserve more credit than blame. The same could be said of the German commanders, and of Hipper most of all, with Scheer showing judgement and determination to extricate his fleet from the trap into which he had led it.
The principal consequence of the Battle of Jutland lay in its impact on the strategy of the two sides. The British approach remained largely unchanged, while the Germans felt compelled to take a dramatic gamble on which the outcome of the whole war depended.
Many of the German battlecruisers and battleships were seriously damaged during the Battle of Jutland, and were only able to put to sea again after months of repairs.