This chapter covers the following topics:
- How to create an Amazon AWS account
- Using the Simple Storage Service, as our data storage system
- Configuring and launching our Elastic Compute Cloud server instance
- Installing the R, RStudio, and Shiny Server on our instance
- Adjusting and managing the RStudio and Shiny server
RStudio was originally designed as a web application that was to be run on a Linux-based server. Many RStudio users encounter the desktop version initially, but the server version is essential for easy administration of R and RStudio in organizations allowing users to perform expensive computations on big data, and thus, escaping the limitations of personal computers.
In this chapter, you will learn how to manage the server version of RStudio and Shiny. It may not teach you everything you need to know in order to administer the server for your organization, but it should enable you to help your systems administrator install and manage an R system that effectively serves the needs of your organization.
Amazon Web Services (AWS) is a cloud-computing platform that combines a collection of dozens of different web services. After the foundation of Amazon in 1994, AWS was created for internal use to manage the massively growing server demands and related services in the year 2002. In 2006, it was officially founded for public usage. Since then, AWS adoption has increased remarkably. Today, it has by far the biggest market share of all cloud infrastructure services, and a huge number of big and famous web services and companies are using AWS. The most popular services are Amazon Elastic Compute Cloud, better known as EC2, and Amazon Simple Storage Service, which is also called S3.
Head over to https://aws.amazon.com and click on the Create an AWS Account button. Every new AWS account includes a bunch of free-of-charge services. In the so-called Free Tier, you get Amazon EC2 for 750hrs/month, 5GB of storage on Amazon S3, and more free of charge services for the first 12 months.

After entering your login credentials, you need to fill out your contact details and enter your payment information. Next, you need to process the identity verification in three steps. Finally, choose a customer support plan and you are ready to go.
After launching the management console, you get the total overview of all AWS services. This may look kind of overwhelming at first glance.
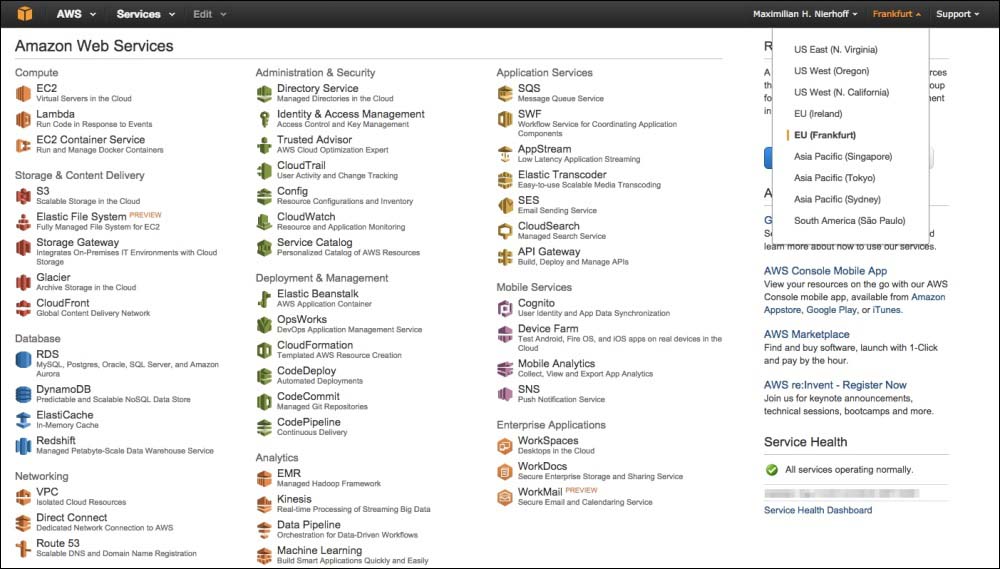
I chose Frankfurt as my server location. Of course, you can select any of the given regions. The different web services are sorted by their possibility of usage and purpose.
As of today, there are the following fields of use, which in turn include various services and tools:
- Compute
- Storage and content delivery
- Database
- Networking
- Administration and security
- Deployment and management
- Analytics
- Application services
- Mobile services
- Enterprise applications
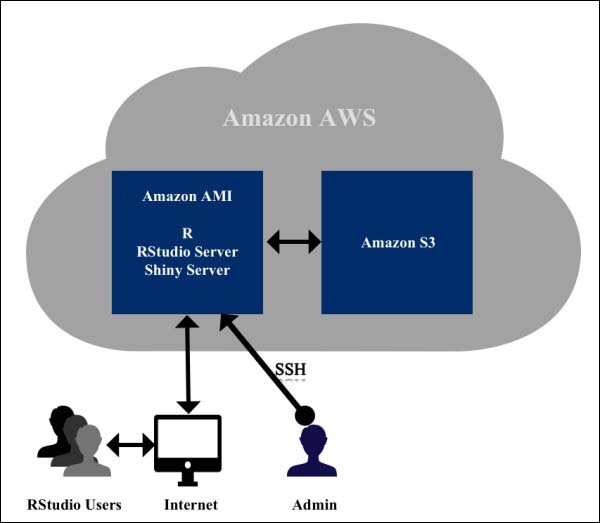
So, there is a service for pretty much any purpose. First, we dedicate ourselves to the scalable cloud storage in the cloud, which is called S3. Then, we need the Compute section, which includes the EC2. This service can be seen as a remote server, host, computer, and machine; its specifications are flexible and can be changed easily. In the following sections, you will learn, step by step, how to store your analysis data on an S3 cloud storage system, and how to install and configure the RStudio Server on a virtual cloud server by using EC2.
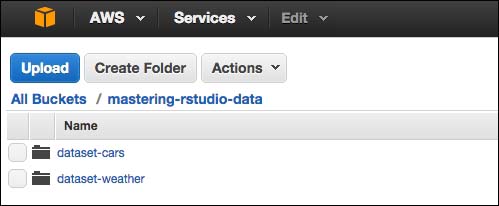
The Amazon S3 represents our desired way to store big data for our analyses since it is particularly user-friendly. Furthermore, five gigabytes of storage is free. Setting up a so-called S3 bucket is a quick and easy process.
To get started, click on S3 in the AWS dashboard. In the new window, you need to click on the Create Bucket button. In a pop-up window, you can enter your desired bucket name; in our case, we choose mastering-rstudio-data. It is recommended to choose a descriptive and unique name for your bucket. If you want to set up a logging to get access logs of your bucket, hit the Create button and you're done.

We can now upload datasets to our brand new bucket. Furthermore, you can create a meaningful folder structure in your bucket.
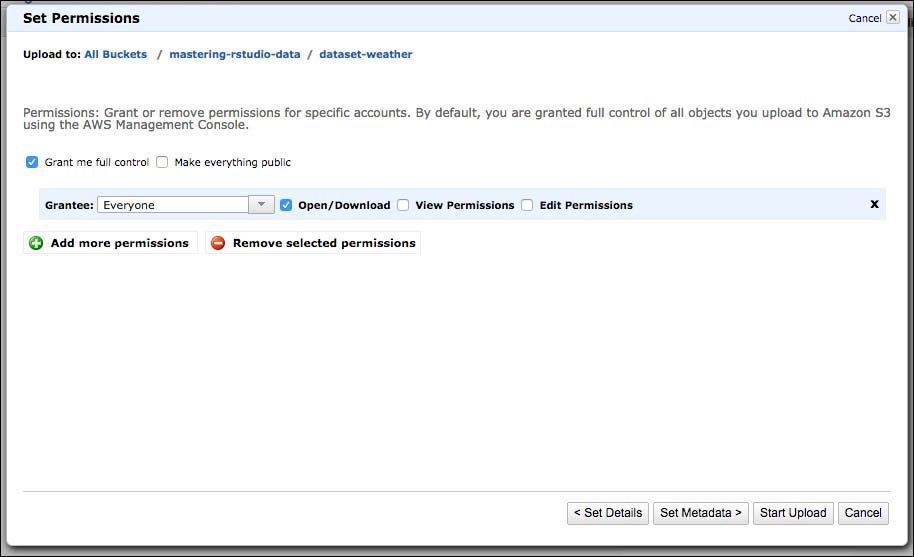
To start a data upload, just hit the Upload button. In the pop-up window, you can drag and drop the files that you want to upload, or click on the Add Files button to open the files browser on your computer. Next, you can directly upload the chosen data, or you can set some details by clicking the related buttons. If you choose to set some details, you can first decide between standard storage and reduced redundancy storage. Furthermore, you can check if your data should be encrypted.
In the following step, you can set permissions. Now you can, for example, enable your data to be opened and downloaded by everyone. This is necessary if you store images of a website (or is it possible only when you store a dataset which is anyway a public one anyway), but if you store private data, the Everyone permission becomes a security issue. Therefore, it is recommended that sensitive data should not be set to Make everything public.
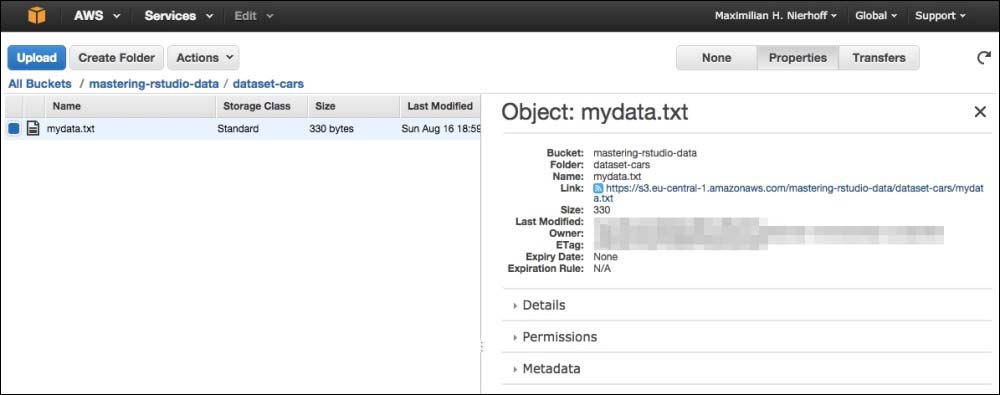
After your data has been uploaded, you can still change and view all your settings by clicking on the Properties tab.
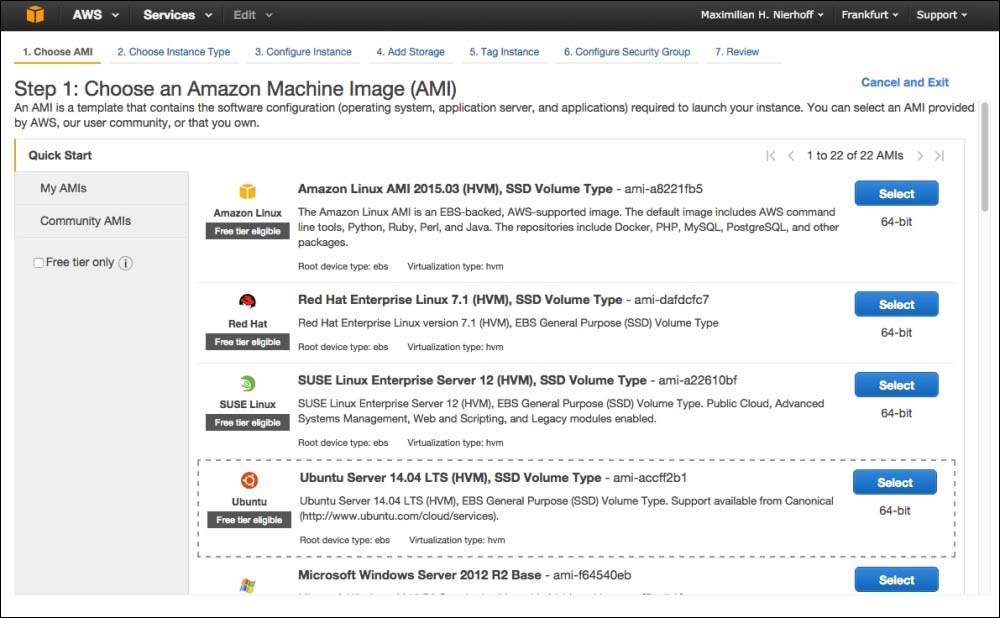
Click on EC2 to get to your EC2 Dashboard. Here, you need to click on the blue Launch Instance button. Now, you need to follow a seven-step wizard to launch your instance.
The Amazon Machine Image (AMI) contains the software configuration (operating system, application server, and applications) required to launch your instance. We choose the Ubuntu Server AMI. This software configuration is also free tier eligible and is the most chosen flavor for RStudio Server installations. Ubuntu is a very stable and user-friendly Linux distribution.
Next, you need to choose the desired virtual server. Amazon offers a wide range of different instance types. Currently, there are five utilization areas with particular specialties:
- General purpose
- Compute optimized
- GPU instances
- Memory optimized
- Storage optimized
These so-called families include, in turn, several instance types with differing combinations of CPU, memory, storage, and network capacity.
We take the first option in the long list, in fact, the t2.micro type of the General purpose family. The main reason is that this instance type is the only free tier eligible one. If you are planning to use RStudio Server and AWS professionally for analyzing really big data sets that are also parallelized, it is recommended to launch a bigger instance of the memory optimized or GPU instances families.
You can now also click on the blue Review and Launch button to take the shortcut and jump to the last step: the review.

The third step of the launching process focuses on configuration options. If you need help, every configuration option offers a question mark icon with explanations and further information. In this step, we first add a new, so-called IAM role and second user data, which installs the R, RStudio, and Shiny server on your micro instance.

The reason and purpose of AWS' Identity and Access Management (IAM) is stated in the following paragraph:
IAM roles for EC2 automatically deploys and rotates AWS credentials for you, removing the need to store your AWS access keys with your application. Select the instance profile that contains the required IAM role. If you created your IAM role using the console, the instance profile has the same name as your IAM role. […]
We need to create an IAM role to allow the software we want to install, which are R, RStudio, and the Shiny server, to access the AWS services and make secure API requests. Furthermore, we need this IAM role to read data from the S3 bucket that can store our data and more. As a reminder, in our free account, we also got five gigabytes of free storage for Amazon's cloud storage service called S3.
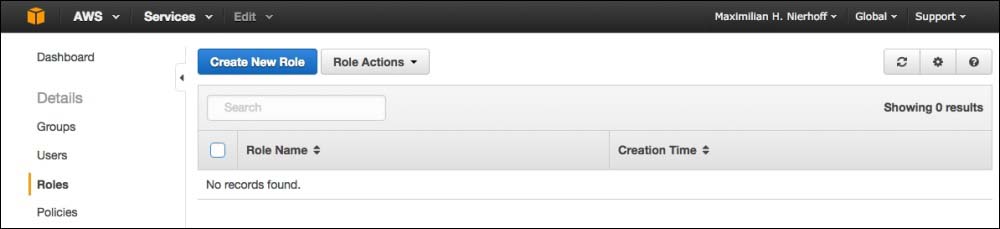
- Click on the Create new IAM role link text in step 3 of your launching process. This opens a new window, where you can manage all your IAM roles. Next, hit the Create New Role button to start the five-step role creation process.
- First, you need to set your desired role name. In our example, we chose
MasteringRStudio.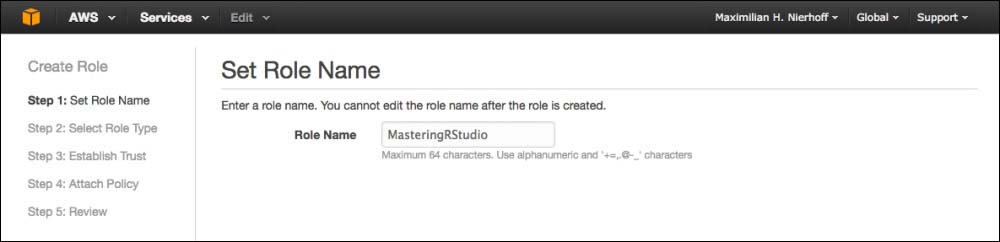
- Next, we select the role type. In our case, this is Amazon EC2 in the AWS Service Roles tab.
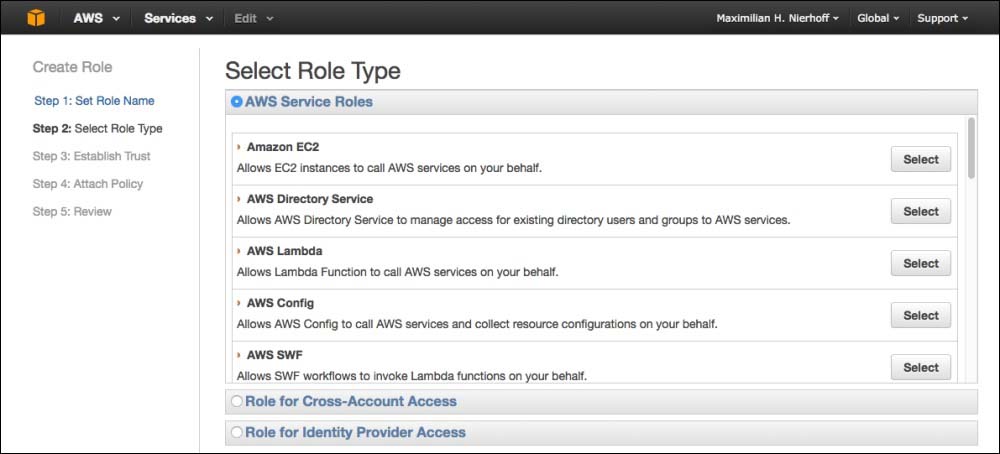
- The third step is called Establish Trust, but it gets automatically skipped since we selected an AWS Service Role option in the preceding step.
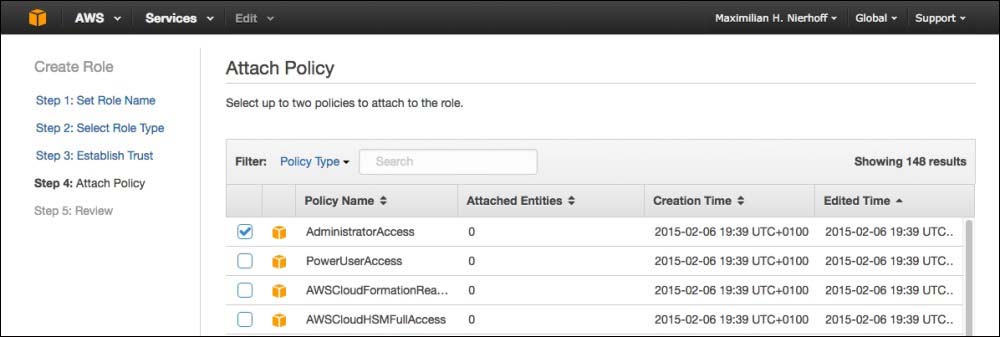
- In the fourth step, you can select up to two policies for the role we are creating. We check the AdministratorAccess option to give our role full access. Furthermore, we add the policy called AmazonS3FullAccess.
- The last step represents the review of all the chosen options.
If you'd like to, you can now add additional storage. There is already a fixed storage type called Root. This device with a a prefilled size of 8 GB is the installation location for our chosen AMI—the Ubuntu Server. Since we want to use our created S3 bucket to save big data sets, there is no need to change anything here.

In this step, you are able to tag your instance. In the screenshot, we gave our instance the name, RStudio and Shiny Server, by using the Name tags, which represents Amazon's own metadata system. There are a bunch of other tags possible; for our purpose, we do not need to add any other.

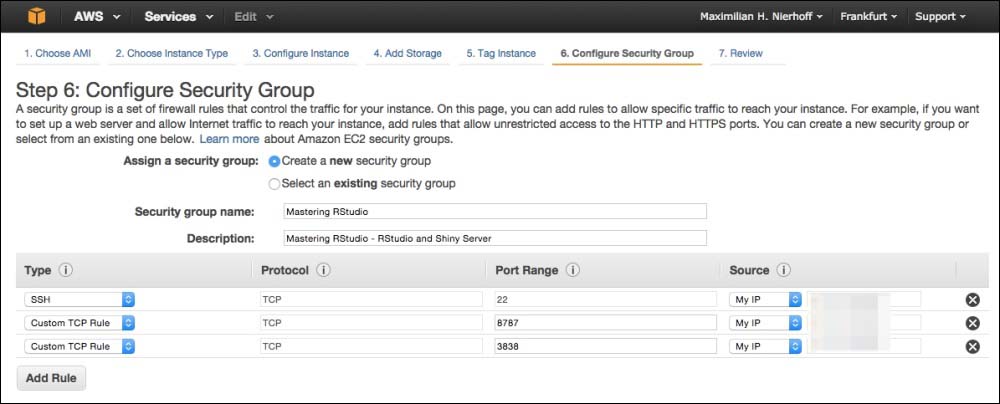
By defining a security group, you can easily determine the rules that control the traffic of your instance. In fact, the security group acts as a virtual firewall.
We are creating a new security group, which will reflect the required changes that make RStudio and the Shiny server work correctly. Therefore, we are adding two more rules. The first rule opens the port, 8787, for the RStudio Server, and the second one opens the port, 3838, for the Shiny Server. As you can see, the first rule, which comes prefilled, is the SSH one on port range 22. We will explain SSH shortly.
As you can see in the following screenshot, as the source, we chose My IP for all three rules. This is only recommended if you have a static IP address. Most companies have a fixed IP address that never changes. But most private users have a dynamic IP address. If this is your case, you need to change the Source to Anywhere, which makes it possible to access your instance with any IP address. This can be a security problem if you want to analyze sensitive data.
Furthermore, we chose the Security group name, Mastering RStudio, and a corresponding description.
After all this, we are at the last step: the review step. If you selected Anywhere as Source in the previous step, you will get a warning again. Furthermore, all the settings we made are listed and can be checked. When you are ready to go, you can finally click on the Launch button and a new pop-up will appear.

So, what is a key pair exactly? Amazon describes it as follows:
A key pair consists of a public key that AWS stores, and a private key file that you store. Together, they allow you to connect to your instance securely. For Windows AMIs, the private key file is required to obtain the password used to log into your instance. For Linux AMIs, the private key file allows you to securely SSH into your instance.
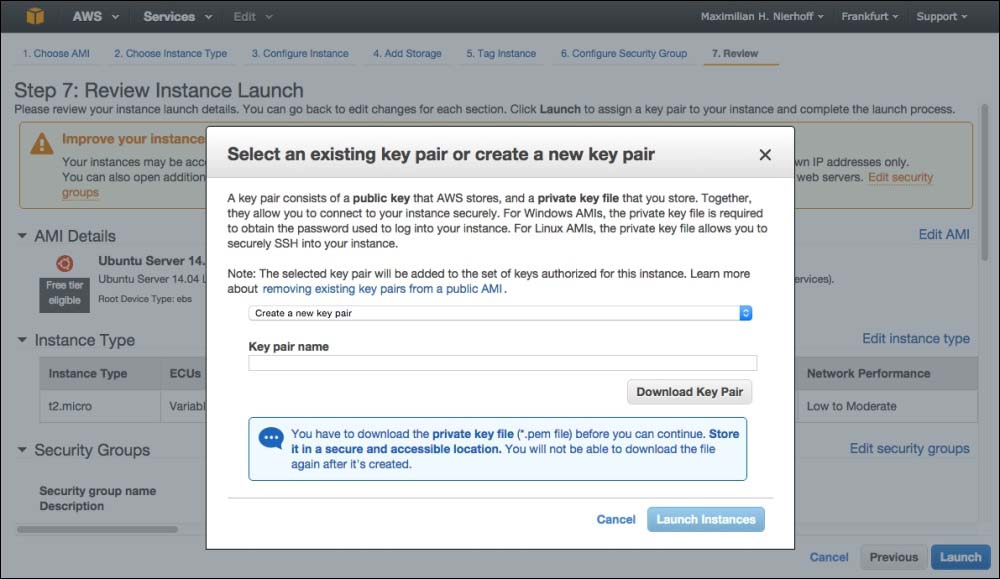
Choose Create a new key pair in the selection box, give your key pair a name, and download the key pair by hitting the related button. Now you have a brand new key pair called Your-Key-Pair-Name.pem in your download folder.
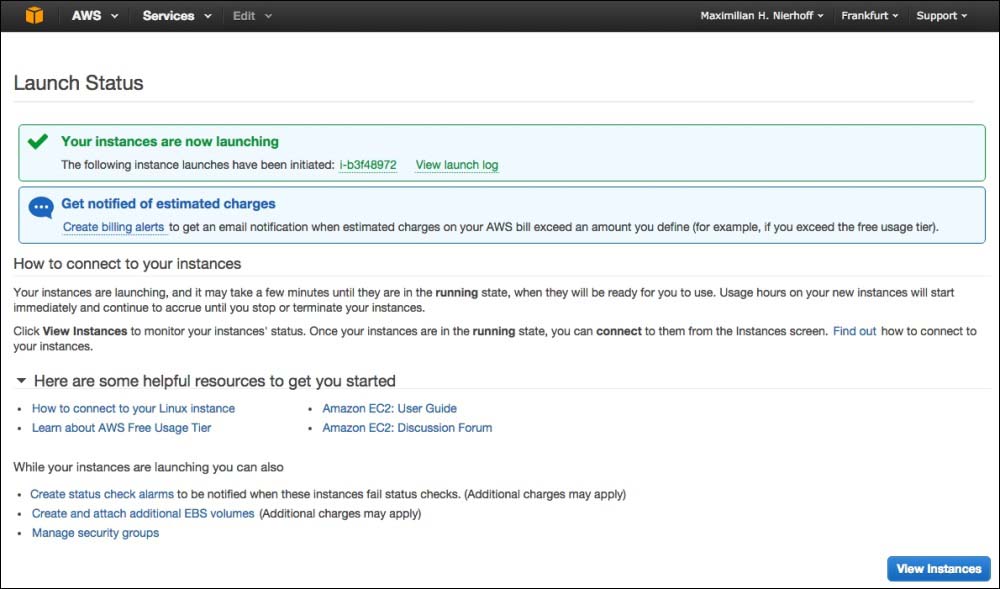
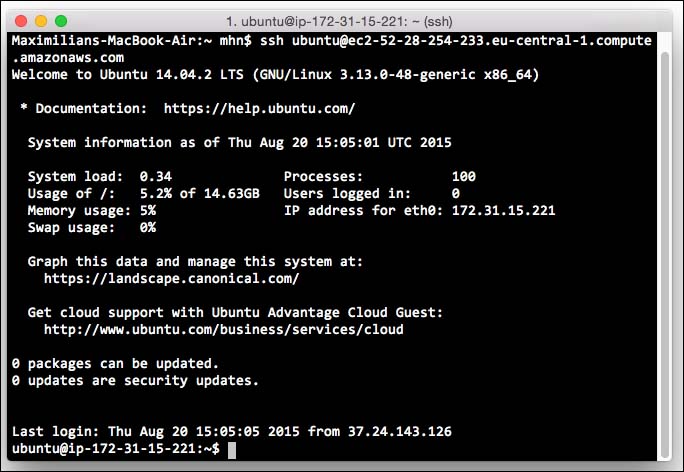
Our instance is now launched and running. The next step is to establish a connection with the server in order to complete the desired setup by installing R, RStudio, and the Shiny server.
Since this a very important topic when you are working with servers in the cloud, we want to give you a brief introduction of SSH. The acronym stands for Secure Shell and denotes both, a network protocol, as well as corresponding programs with which you can establish an encrypted network connection with a remote device in a secure manner. Often, this method is used to make a remote command line locally available. Thus, on a local console, outputs of the remote console will be displayed and the local keystrokes will be sent to the remote computer. This can be used, for example, for remote maintenance. The newer version of the SSH-2 protocol provides other functions such as data transfer via SFTP. Usually, SSH uses port 22, and if you remember, we already added the SSH rule during our server configuration.
SSH is not installed by default on computers with the Windows operating system. However, you can download free SSH clients such as PuTTY, MobaXterm, and others. On Linux and Apple Macintosh machines, SSH is installed by default, so you just need the terminal.
Remember the created key pair you downloaded before? Next, you need to store this key pair securely, so that it is not be publicly accessible. Use the terminal (also known as shell and console) of your operating system and navigate to the folder where you saved the Your-Key-Pair-Name.pem file.
Enter the following line to make sure your private key is not public:
chmod 400 Your-Key-Pair-Name.pem
Next, we connect via SSH to our created instance. Since we launched an instance with the Ubuntu server as the operating system, the user is just ubuntu. Furthermore, you need to copy the Public DNS of your instance, which can be found twice on the EC2 dashboard.

Then bring it all together by typing the following into your terminal:
ssh -i Your-Key-Pair-Name.pem ubuntu@<your public DNS>
After hitting the Enter key, your terminal will print this warning:
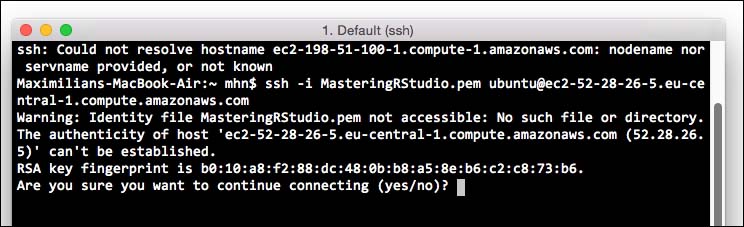
Type yes, hit Enter, and you will get this response:

Now, you are connected to your instance with SSH. Just type in your terminal anytime you want to access your instance:
ssh ubuntu@< your public DNS>