Project 3: Make Your Own Candles
Why would you want to do this? It is fun, easy, and cheap, and it offers a sense of self-sufficiency.
Why wouldn’t you want to do this? You don’t use candles or aren’t comfortable working with hot wax.
Is there an easier way? You can splurge on candle molds, and while they may initially be more expensive than the number of candles you’d buy, you can use them limitless times, making the cost eventually negligible. They come in myriad sizes and shapes.
Cost comparison: The price of homemade candles is a small fraction of that of their store-bought counterparts.
Skills needed: None in particular except a steady hand for pouring melted wax into the molds while keeping the wicks upright.
Further refinements: You can branch out beyond beeswax to other kinds of wax, you can try coloring your candles and scenting them with essential oils, and you can try different styles of candle making (such as hand dipping) to expand your repertoire of shapes and styles. Using beeswax sheets is great for young kids because they can roll or shape the wax around a short piece of wick in almost any style, and voilà—handmade gifts for the relatives!
Homemade candles are easy and inexpensive to make, and they are nice gifts to give. I used to hoard candles, saving them for special occasions and not wanting to spend money to replace them. Now we light candles for every dinner and have found, over the years, that it makes our family time quieter, calmer, and cozier because we are embraced in a circle of light and warmth (and the dim light also serves to disguise ingredients in meals that picky eaters would otherwise remove!).
In the following projects, we use two beeswax methods: rolled, with beeswax sheets; and poured, using hot melted beeswax. If you choose to invest in molds for poured candles, you’ll see that many have small holes to assist with threading the wick through or inserts that ease the removal of the finished candle.
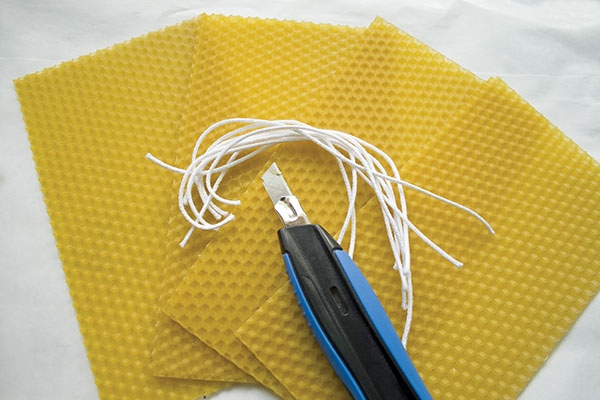
Rolled Taper
Materials:
•Beeswax sheets
•Roll of wick
•Scissors
Step 1: Take a sheet of beeswax out and let it warm up a bit to make it more malleable. You can let it sit in a sunny area for a few minutes to speed up the process, but watch to make sure that it doesn’t melt.
Step 2: Decide on the height and diameter of your candle; cut the sheet according to your desired size, if needed. The sheets of beeswax I use are 8½ inches by 16½ inches, so I make two 8½-inch tapers approximately 1 inch in diameter, depending how tightly I roll them.
Step 3: Lay the wick along one edge of the sheet, pressing it carefully into the wax to hold it in place before cutting the wick. I fold a little bit of wax over mine to secure it. When the wick is secured in place, cut it from the roll, leaving at least half an inch of wick at the top.
Step 4: Start rolling the sheet tightly, working along the length of the taper. It’s OK to press down firmly as you roll, as this will also compress the wax and help it stick together.

Secure the wick along one edge of the beeswax sheet.
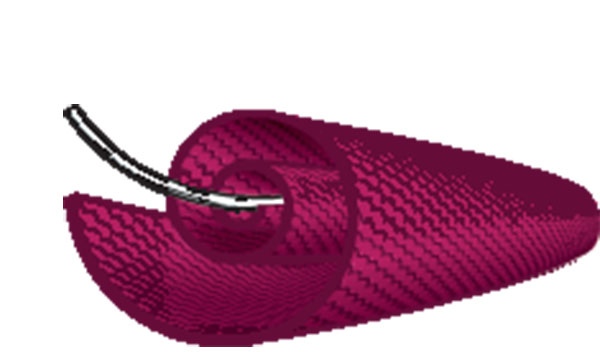
This illustration is intended to show the basic procedure of rolling the wax around the wick. You will roll yours much more tightly.
Step 5: When the wax is all rolled up, roll the candle a few times back and forth on your work surface to firmly secure the end of the sheet against the finished candle body. You can angle the bottom of the candle inward a bit by smoothing it with your fingers; this will give the candle a tighter, smoother end to tuck into a holder.
Poured Square Column
Materials:
•Quart or pint paper milk cartons
•Large (28-ounce or larger) metal can with label and one end removed
•Old saucepan with diameter slightly larger than that of your metal can
•Oven mitt
•Bulk beeswax
•Roll of wick
Step 1: Rinse out the milk carton and cut off the top so that you are left with a rectangular box.
Step 2: Poke a small hole in the center of the bottom of the carton—just big enough to feed the wick through while keeping a snug fit. Pull through a length of wick that is longer than the height of the carton, leaving a tail sticking out of the bottom; you can tie a small knot in it if you’d like. Set the milk-carton mold on a plate or thick pile of newspapers with the tail of the wick lying flat against the underside of the carton. Try to have the carton as level as possible.
Step 3: Melt enough bulk wax to make a candle of the desired height (see the How Much Wax? sidebar). To do so, put the wax in the empty tin can, put the can in a saucepan filled with water, and boil the water. Be careful—you don’t want to get any water in the wax, and the wax can spatter or burn as it melts against the hot sides of the can.
Step 4: When the wax is completely melted, reach into the milk carton and hold the wick upright so it will be straight inside the candle. With the other hand in an oven mitt (or using a helper), carefully pour the melted beeswax into the milk carton while holding the wick gently taut and keeping your hand above the hot wax flow. Be careful not to splash wax as you fill the carton to the desired height.
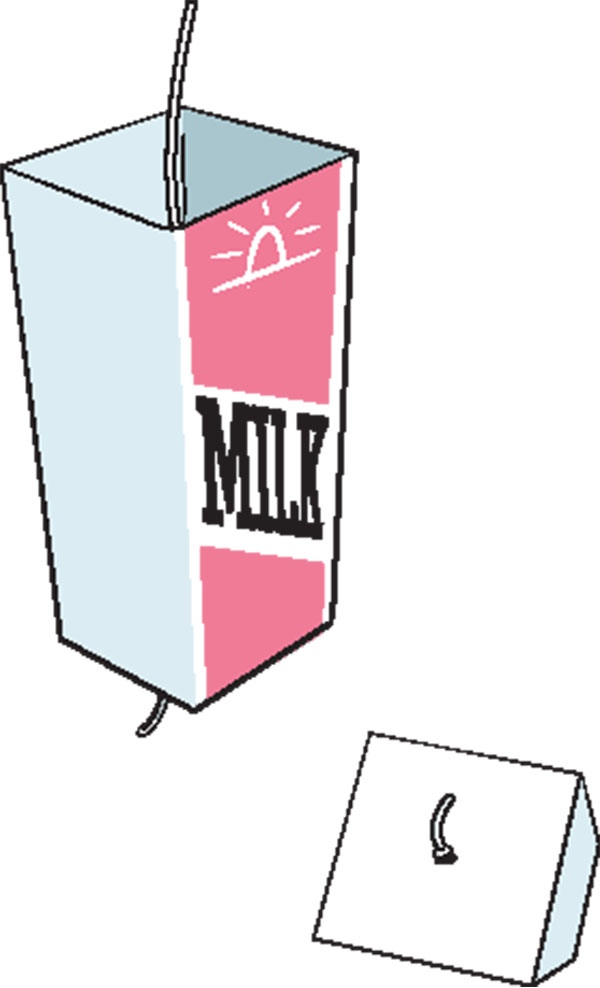
Make a small knot at the bottom, with an inch or less of wick at the top.
Step 5: Let the candle cool completely, ideally overnight. The larger and thicker the candle, the longer the time needed for the candle to thoroughly solidify.
Step 6: When the candle is completely solid, tear the milk carton away from the sides and the bottom of the candle. Trim the bottom wick flush with the candle bottom, and trim the upper wick to no more than an inch at the top. You can smooth imperfections or edges with your fingers or a quick dip of the whole candle into a bowl of hot water.
How Much Wax?
CandleTech (www.candletech.com) includes, among its many fine resources for candle makers, an online calculator to help you figure out how much wax you’ll need for a given project. You just enter the dimensions of your mold, and CandleTech tells you how much wax you will need. You will find the site’s calculators under “General Info” on the home page.
For further reference, 1 pound of beeswax yields approximately 16 ounces of liquid wax, 1 pound of paraffin wax yields approximately 20 ounces of liquid wax, and 1 pound of soy wax yields approximately 18 ounces of liquid wax.
Poured Round Column
Materials:
•Toilet-paper or paper-towel tubes
•Aluminum foil
•Rubber bands or tape
•Large (28-ounce or larger) metal can with label and one end removed
•Old saucepan with diameter slightly larger than that of your metal can
•Oven mitt
•Bulk beeswax
•Roll of wick
•Heat-safe container
Step 1: Prepare your paper-tube mold. Fold a square of aluminum foil so that it is larger than the bottom of the tube and then fold it over the tube’s opening. Secure the foil around the sides with a tight rubber band or a strip of tape wrapped around several times.
Step 2: Poke a small hole (carefully—the foil can tear easily) in the center of the foil and feed the wick through the hole and up the full height of the tube. It should protrude out of the top of the tube by at least an inch, with a small tail protruding from the bottom foil.
Step 3: Stand the tube up in a heat-safe empty container that will keep the tube upright and stable while you’re pouring the wax.
Step 4: Follow Steps 3–5 of the Poured Square Column, unmolding by tearing off the paper tube. The tube may leave some paper on the candle, which you can peel off or remove by quickly dipping the candle in hot water.
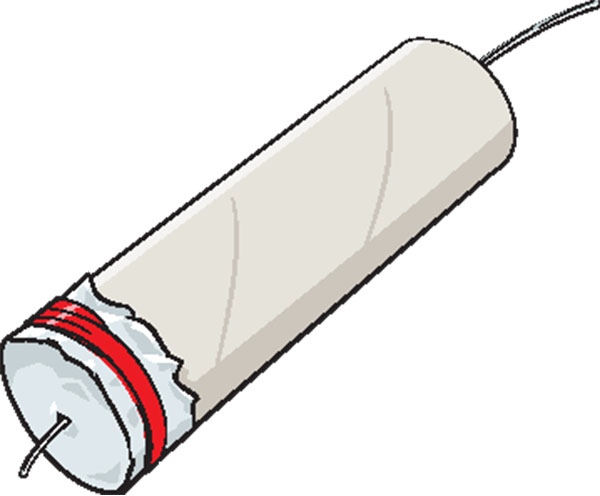
Foil secured with a rubber band forms the bottom of the “mold.”