Project 5: Keeping Chickens
Why would you want to do this? Chickens are wonderful pets, are great for kids, contribute the best compost additive for the garden, and are really fun to watch.
Why wouldn’t you want to do this? You don’t want to care for animals, don’t eat eggs, or don’t want to deal with chicken manure.
Is there an easier way? Buy a ready-made coop; there are many choices.
Cost comparison: Giving your chickens kitchen scraps contributes to a reduction in their feed intake and a possible reduction in your garbage-hauling costs. Letting them roam your garden occasionally to eat bugs can reduce your need to buy pesticides.
Skills needed: Concern and attention to animals and their needs. Basic construction skills for building your coop.
Learn more about it: In addition to finding local or online sources, I recommend Storey’s Guide to Raising Chickens (Storey, 3rd ed., 2010) by Gail Damerow, a fabulous all-around guide. Poultry House Construction (Domestic Fowl Research, 1997) by Michael Roberts is a go-to guide for building coops (the author includes plans for his designs). Wendy Bedwell-Wilson’s Starter Coops ( i-5 Press, 2012) offers illustrated coop instructions and care advice. Keep Chickens! (Storey, 2003) by Barbara Kilarski (from Portland!) is a lighthearted and confidence-inspiring read. Chickens in Your Backyard (Rodale, 1976) by Rick Luttmann and Gail Luttmann is an informative and fun basic book.
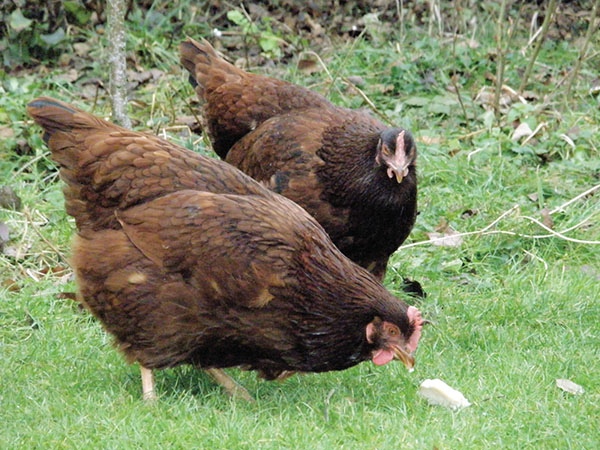
Poultry keeping is one of the easiest and most fun hobbies that someone interested in food and gardening can have. The birds are hilarious, give you eggs so tasty that you’ll come to dread store-bought ones, and will keep your compost pile hot and working well. They make great conversation (topics, although you’ll find that they do tend to chat among themselves), and they don’t shed on the couch. In many ways, they are ideal pets.
Several years ago, a friend told me that she wanted to get her husband some chicks for his birthday. Although she didn’t want them, he did, and she decided that this gift would show him how much she loved him. He was thrilled to receive the chicks, and he and their boys commenced building the coop and pen.
He called me repeatedly with questions, so I sat down one evening and wrote what I called my “chicken brain dump” for him—every bit of chicken-related information I could think of at the time. I found out later that he passed it on to some of his friends, who have passed it on to some of their friends. It has become somewhat popular among local chicken-keeping beginners, and I’ll share it with you here. When planning a coop and laying out a pen, keep in mind that for two to three birds, you’ll need a bare minimum of 12 square feet in the pen, and a house that is no less than 4 square feet. Adjust your plans according to your own flock.
The Necessities
An appropriate chicken coop should
•be easy to clean out and stock with clean bedding;
•be strong and secure enough to keep out predators and rodents;
•protect your birds from drafts and wetness;
•have good ventilation (chickens are very susceptible to respiratory ailments);
•provide the birds with enough space to walk and stretch their wings and a place to roost;
•have some sort of natural light source.
A good pen or yard for the chickens should
•have good drainage;
•have a dry area where the birds can dust year-round;
•protect the birds with cover and shelter from wind, rain, and sun;
•have nests or protected areas in which to lay eggs;
•have sanitary and accessible food and water.
Note: Nests and food/water can be inside the coop if desired.
The coop must protect your birds from determined predators.
In their coop, chickens need the following items:
•A perch, set at a minimum of 4 to 6 inches off the floor. It is helpful to have a pull-out tray underneath the perch because this is where 90 percent of the droppings will go.
•8 to 12 inches of perch space per bird. For two or three birds, plan a roost bar of at least 24 inches; 36 inches is ideal. In hot and humid weather, the chick-ens will need a longer perch so they can keep more space between them.
•A nest box, although this can be outside the house. It is nice to be able to access the nest box from outside the pen so you don’t have to walk in and get dirty when you collect eggs. Try to situate the chickens’ entrance to the nest box so that they don’t have to walk under the perches; otherwise, they will be walking through their droppings, which will make the eggs dirtier than usual. If the nest box is in the coop, place it lower than the perches—chickens are tree-perchers and ground-nesters.
•Bedding, which can be shavings bought at a pet store, sawdust, or shredded paper. Such materials
help mitigate the waste, absorb the ammonia, facilitate cleaning, and balance out the extremely high nitrogen in the waste if you compost it. It also is comfortable for chickens to walk on.
It is helpful if you can close the door to the coop at night for warmth and to ward off nocturnal predators. However, if your pen is fully secure (five sides of chicken wire), then the door can stay open all the time. Birds deal better with cold (they wear down comforters!) than they do with heat.
Feeders are better outside the coop, under some type of cover to protect the feed from rain. When the feed is inside the house, it encourages the birds to stay in, which then encourages fighting, egg eating, messing in the nest, and broodiness (wanting to sit on the eggs to get them to hatch, which simultaneously stops the broody bird’s ovulation). If you can hang the feeder, all the better, because chickens have a habit of scratching while they eat, which can get dirt into the feeder. A hanging feeder also avoids “billing out,” which is the chickens’ scooping feed onto the ground with their beaks and thus wasting feed. It is best to put out only as much food as will be eaten in one day; otherwise, rats and mice will begin to visit this convenient cafeteria.
It is also best to have waterers outside the coop in case of spills and leaks; they also will be easier to clean and monitor. An automatic waterer (gravity waterer) that hooks up to a hose or spigot is ideal, and the effort you save for the money you spend is well worth it. You can find these types of waterers at feed stores.
The Cornish Cross is a common meat bird.
Types of Birds
There are three kinds of chickens—egg layers, “dual-purpose” birds, and meat birds. Egg layers are hens specifically bred for high egg production in their first two to three years. In the first year that a hen lays, she will lay smaller eggs more frequently (every day). In the second year, the laying becomes less frequent (once every one and a half to two days), but she will lay larger eggs. Often, this continues into the third year, but laying slowly decreases as the chicken ages.
Layers are smaller and leaner than other chickens, designed for egg production only. White Leghorns are typical egg birds—slim, slight, lean, mean egg machines. This stature also makes layers more able to fly than other chickens, at least up and over tall fences. When a layer breed bird dies or is culled, it is not good for eating because of its slim build.
Dual-purpose birds are exactly that—good for a couple years of egg production and then not bad for the stew pot. They are larger, meatier birds than egg layers, and they’re good at laying too, often producing larger eggs in their second and third years. Rhode Island Reds, Barred Rocks, New Hampshire Reds, and Australorps are all technically dual-purpose birds—big birds that make a decent coq au vin when their laying time is up.
If you want meat, meat birds are a different type of chicken altogether. The most common is a hybrid called Cornish Cross, which is bred to produce large breasts and thighs, meaty and tender. They don’t really roost and are kept only a short time, being fed to maximize their “fleshing out” and then processed at no later than ten to twelve weeks old.
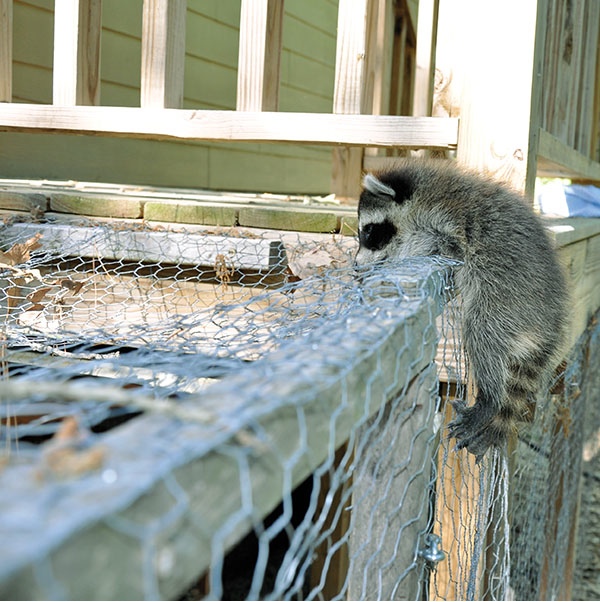
Other hybrids are great in terms of not having many of the traits that can be annoying in chickens. For example, sex link hybrids have had the broody gene bred out of them, and although they are large enough to make decent eating when their laying time is over, they are extremely efficient egg layers—and are very friendly and docile as well. They come in black, red and gold; the Gold Sex Links, or Gold Stars, are my absolute favorite birds—beautiful, friendly, excellent layers. One of them was my first raccoon casualty, and one of two that I wept for.
The laying ability and larger build of the Rhode Island Red make it a good dual-purpose bird.
Other Details
It’s ideal to have three birds. It’s unkind to keep just one, as chickens are flock birds, and two can make for a peculiar hierarchy.
When you buy birds, they can be sexed, that is, sorted and separated into cockerels (young males) and pullets (young females). Straight-run birds go directly from hatching in the incubator into a brooder without being sexed and can be any mix of cockerels and pullets. If you are after egg layers, do not get straight-run birds. Pay the extra money to get assurance (90 percent with most hatcheries, higher if ordering sex links) that you’ll have a hen. It’s a disappointment to find that not only will you get no eggs out of your bird but also that he crows at first light and sometimes even all day. It’s illegal in many cities to keep roosters (or to have more than a certain number of chickens without a permit).
From chick to laying is about five months, and it’s not unusual to get double-yolked eggs when chickens first begin to lay (I once got a triple-yolker, and the world record is five yolks). Occasionally, there are shell-less eggs in the early days. Some breeds lay white eggs, while others lay brown eggs. Auracanas and their cousins, Ameraucanas, lay blue and blue to blue-green eggs, respectively.
Chickens will slow down and more often stop laying during months with fewer daylight hours; egg production drops significantly in the late fall and winter. There is a photoreceptive gland behind a hen’s eyes that stimulates laying when triggered by a certain number of daylight hours. If you want your birds to lay regularly year-round, you can put artificial light on a timer in their coop, but this taxes their endocrine systems and, ultimately, their health. Hens are born with all of the eggs they are going to lay already in their bodies—you won’t get any more than that by giving them extra light.
Chicken manure and bedding make great compost; they are fabulous activators for compost piles because they are very high in nitrogen. Don’t apply manure or bedding directly to young plants because it will burn new growth, and too much nitrogen can delay blooming. However, nitrogen encourages lots of leaf growth, so these materials are good for herbs and salad when composted.
The chickens, if you let them, will wander around your garden, eating the pests and scratching in the soil. Their scratching aerates the soil and exposes weed seeds and bugs to the chickens’ voracious appetites, and the chickens’ manure fertilizes the area. They also eat young, fresh green plants, but they prefer to scratch in the soil and eat bugs. My hens eat all of my weeds and kitchen scraps, even the meat—they pick the bones clean. They will eat almost anything live that ventures into their pen and is smaller than they are—I’ve seen them catch and kill a mouse and then have a fabulous game of rugby with it. They can even track flies and snatch them out of the air.
You can use a dog run for a pen, and even a simple doghouse can be manipulated into a totally functional coop; either of these items can be found secondhand. Most chickens won’t make much of an effort to escape if they are content, so you can use lightweight fencing, but you must shut them in at night to protect them from predators, such as raccoons, rats, coyotes, owls, and hawks, who will try hard to get in and kill them.
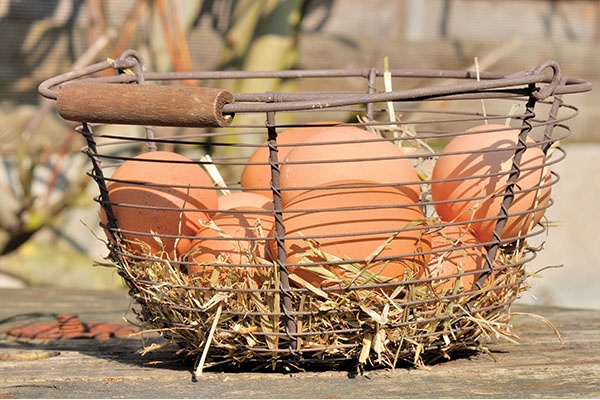
Fresh eggs can be as close as your backyard, even in an urban or suburban neighborhood.
Build a Confined Coop
We know that chickens need a safe place to roost at night. The following is a design for a very basic enclosed pen that can be adjusted to fit your yard as needed. It’s modular, so you can easily add, divide, or remove sections as your flock shrinks and expands. You can also modify this as a henhouse for a yard of free-range birds. Remember to include the previously listed chicken-coop essentials in your design. This project and the illustrations are shared with us courtesy of Wendy Bedwell-Wilson’s Starter Coops ( i-5 Press, 2012).
Materials:
•Two sheets of ½-inch construction-grade plywood, 48 inches by 96 inches
•Twelve 96-inch lengths of 1x4 pine
•One roll of 1-inch mesh poultry netting, 48 inches by 25 feet
•Approximately 500 1¼- to 1½-inch galvanized deck screws
•Tape measure
•Pencil
•Square
•Circular saw or handsaw
•Electric screwdriver
•Staple gun and box of staples
•Two 4-inch hinges
•1 hook-and-eye safety latch
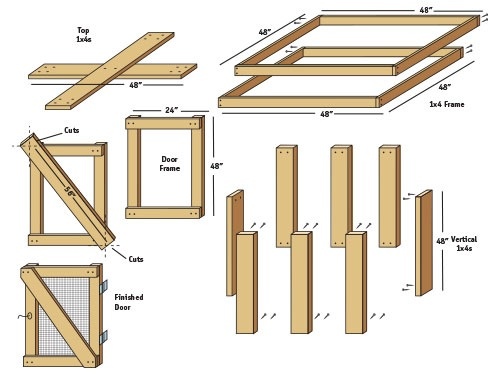
Step 1: Measure, mark, and cut eight pieces of 1x4 lumber, each 48 inches long. Screw four of the pieces together to form a square (alternate inside and outside boards), using two screws at each joint to ensure a solid connection. Then screw the other four pieces together to make an identical square. You now have the top and bottom of your frame.
Step 2: Measure, mark, and cut eight more 48-inch pieces of 1x4 lumber to create the vertical wall pieces. Use one at each corner and one in the center of each side (at the 24-inch mark) to attach your top and bottom frames, using two screws at each joint.
Step 3: Cut two more 48-inch lengths of 1x4 pine. Screw these 1x4s to the tops of the four center vertical wall pieces so that they cross the top of the coop. You should now have a cube-like frame that measures 48 inches on all sides.
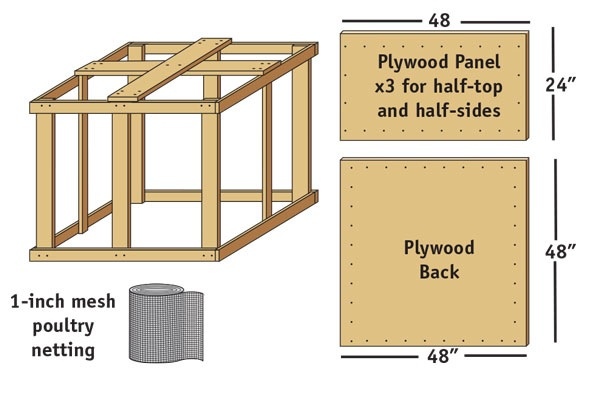
Step 4: When the structure is completely framed, enclose the left half of the front, the left half of the top, and the front half of each side with poultry wire. (The door will occupy the other half of the front, and plywood will cover all other open areas to prevent drafts. The mesh areas allow air and sunshine to flow into the coop.) Measure and cut enough wire for each panel to cover the panel with excess for staples. Affix the wire inside your frame using your staple gun, placing a staple about every 2 inches to prevent predators from breaking in.
Step 5: Measure, mark, and cut three pieces of plywood for the sides and roof, each 24 inches by 48 inches, and one piece for the back that is 48 inches by 48 inches. To attach the plywood to the open sections of the coop, place one screw at each corner and screws about every 6 inches in between.
Step 6: To build the door, first, cut five pieces of 1x4: two 48-inch pieces and two 24-inch pieces for the frame, plus one 56-inch piece that will act as a cross-brace. Next, lay the 24-inch pieces on top of the 48-inch pieces to create a rectangle and screw them together using four 1½-inch screws at each junction. Then, measure and cut a 24-inch-by-48-inch piece of poultry wire and staple it to the back of the door. Screw in your cross-brace from the top left to the bottom right, using two screws at each end. Trim the edges of the brace with your handsaw to match the angle of the door’s frame. Finally, screw your hinges to the door’s frame, attach the door to your coop’s frame, and add your safety latch.
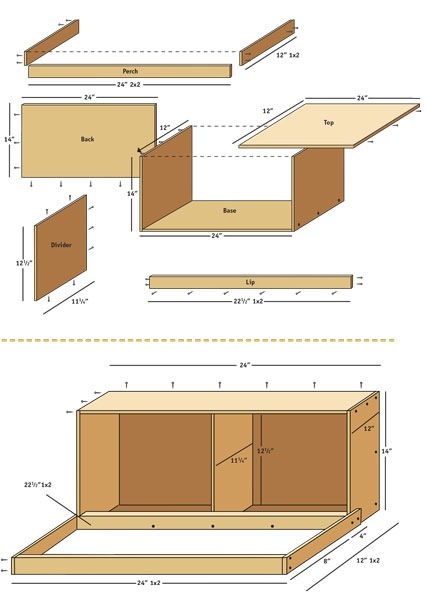
Build Nesting Boxes
You can expand this simple double nesting box to as many boxes as you need, as well as include hatches at the top or back for easy egg-collecting. Each box should measure about 12 inches wide by 14 inches high by 12 inches deep for an average layer. Project and illustrations from Wendy Bedwell-Wilson’s Starter Coops ( i-5 Press, 2012).
Materials:
•One sheet ¾-inch construction-grade plywood, 48 inches by 96 inches
•One 22½-inch length of 1x2 pine
•Two 12-inch lengths of 1x2 pine
•One 24-inch length of 2x2 pine
•Approximately fifty 1½-inch galvanized deck screws
•Electric screwdriver
•Tape measure
•Pencil
•Circular saw or handsaw
•Electric drill
Step 1: For the base and top of your nesting box, measure and mark on the plywood two pieces that are each 24 inches by 12 inches. Carefully use your circular saw or handsaw to make the cuts.
Step 2: For the sides and center divider of your box, measure, mark, and cut two pieces of plywood that are each 14 inches by 12 inches (sides) and one piece that is 12½ inches by 11¼ inches (center divider). Set the center divider aside for now.
Step 3: Screw a side to each end of the box’s base, placing one screw at each corner at least 1 inch from the edge and one screw in the middle of each side.
Step 4: Use your screwdriver to attach the top to the box’s sides, using three screws for each side.
Step 5: For the back, measure, mark, and cut a piece of plywood that is 24 inches by 14 inches. Secure the piece in place with one screw about 2 inches from each corner and another about every 5 inches in between.
Step 6: Lay the nest box on its back and slide the pre-cut center divider piece directly into the center of the box so that it fits snugly against all sides. You should now have two boxes of equal size. Secure the divider in place by driving two screws each into the top and bottom and three screws into the back.
Step 7: With the box still on its back, add a lip to the front of the box by attaching the 22½-inch length of 1x2 pine across the bottom front of the structure. Drive two screws through each of the box’s sides and into the lip and one through the lip and into the base about every 6 inches in between, making sure the screws drive securely into the plywood and don’t poke out at all.
Step 8: Add a 12-inch length of 1x2 pine to the bottom of each side of the box, allowing 8 inches to extend out in front of the box. Drive two screws through each of these arms into the sides of the box. Connect the two arms with the 24-inch length of 2x2 pine that will serve as a perch. Securing the perch by driving two screws through the end of each arm into the ends of the 2x2.