Project 2: Setting Up Artificial Lighting
Why would you want to do this? You have room to grow plants indoors, and you want to try to extend their growing season and maximize the possibilities of what you can grow.
Why wouldn’t you want to do this? You are concerned about using too much electricity or increasing your electricity bill, or you live in an area with plenty of sunlight hours.
Is there an easier way? You can buy prefabricated grow-light stands, but they are expensive. You can simplify this project by using (or building) simple bookshelves with securely attached cup hooks on the undersides of the shelves. Attaching S hooks to the lights and employing lightweight chains makes it possible to raise and lower the lights depending on growth and desired light intensity.
Cost comparison: You can make any of the versions of the grow-light stand in this chapter for about half, or less than half, of the price of a prefabricated stand.
Skills needed: Basic construction skills.
Learn more about it: Gardening in Your Greenhouse (Stackpole Books, 1998) by Mark Freeman describes lighting options and includes illustrations; The Complete Book of the Greenhouse (Ward Lock, 5th ed., 1996) by Ian G. Walls has a brief chapter on light and plant growth; Greenhouse Gardener’s Companion, Revised, (Fulcrum, 2000) by Shane Smith can’t be beat for thorough explanations of artificial lighting and its role in plant growth.

You don’t have to have a greenhouse or an industrial-strength grow lamp to grow plants inside. You can keep your houseplants healthier and blooming longer than they would with just normal, ambient house lighting, or you can keep them growing off-season with the proper use of artificial lighting.
Obviously, we are no longer dependent exclusively on the natural seasons to obtain fresh produce. Supermarkets, industrial manufacturing processes, and long-distance shipping of specialties have almost rendered seasonal eating moot. That is not necessarily always a good thing—we now know that it is healthier to eat less processed foods, eat seasonally, and grow as much of our own food as we can. However, technology can be our friend by helping us maximize our abilities to grow and to extend, rather than disregard, the seasons.
Using artificial light to grow plants is almost as time-honored as electricity itself, and there’s such a variety of affordable light sources available. Incandescent lights work to start seeds and plants in a pinch, but over the years, growers have learned that different types of light emit different ranges on the light spectrum, as well as different heat output.
I had a hand-me-down high-powered metal halide grow light, and only when it was stolen out of my greenhouse did I find out how many varieties of grow lights exist and how much they cost. Professional grow lights are insanely expensive (and cause your electricity bill to skyrocket). You can just as easily use a regular light fixture and, with the benefit of the warm environment of your home, start and grow plants for a fraction of the cost of using a grow light.
Professional grow lights can generate an ideal light spectrum, but they (and incandescent bulbs) generate too much heat. I have had many flats of fragile seedlings actually baked from being too close to the light. The spectrum of fluorescent bulbs is not as complete as that of other lights, but because they hardly generate heat, it is fine—and important—to put fluorescent lights close to new plants. The bulbs should be placed no more than 4 inches from the growing medium (prior to sprouting) or the top of the highest leaf to provide the proper amount of light for growth.
Because I packed up and moved at least twice a year during my college years, I appreciate objects that can fold flat; to gardeners, seasonal items that can be dismantled and stored in small places are invaluable. The following DIY artificial-light fixtures compact to not much more than the size of the light itself.
Materials for all projects:
•Standard work light fixture (made for tube-style fluorescent bulbs) for two (minimum) or four (ideal) bulbs
•Fluorescent plant or aquarium bulbs that fit your fixture (although these are sometimes labeled as “grow lights,” these fluorescent lights do not generate the heat that the high-powered professional grow lights do; rather, these are fluorescent bulbs with a spectrum of light specifically for growing plants or lighting aquariums)
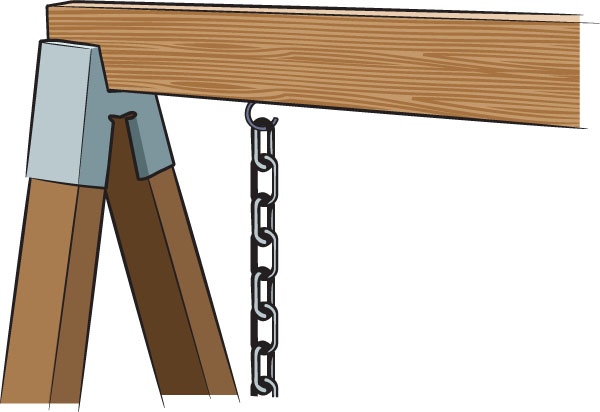
•Small link (1-inch or less) chains, length determined by your site
•S hooks
•Optional: screw eyes
The first step for all versions of this project is to assemble the work light with the bulbs installed. These types of lights usually have openings or hardware on top for hanging. Instead of using the included hardware, insert S hooks (or, better yet, screw eyes and then S hooks) into the top openings. You want at least two hangers, and they should be evenly spaced down the length of the light. Whichever version of this project you use, you must turn the light off for at least eight hours a day.
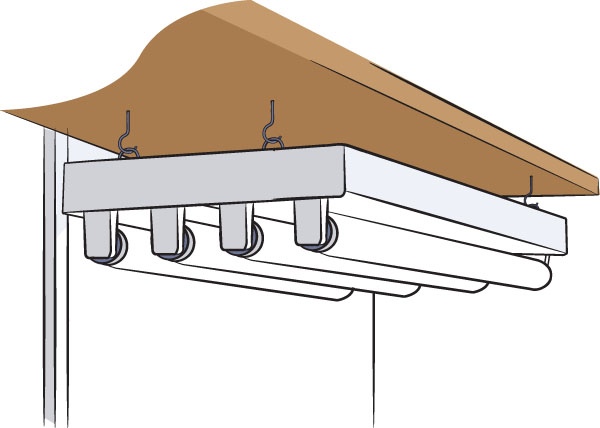
You can hang the light fixture flush or use chain to lower it.
Version One
The beauty of this system is that, as the plants grow, you can raise your light in small increments by either moving the S hooks up the chain or shortening the chain at the ceiling hooks.
Additional materials:
•Ceiling hooks or screw eyes, one per hanger
Step 1: Securely install the ceiling hooks or screw eyes in your ceiling above where your plants or flats will go. Space them to match up with the hangers in your light.
Step 2: Hang an appropriate length of chain from each of the hooks/eyes, using S hooks if necessary, so that your light will hang at the desired distance from your plants.
Step 3: Hang the light fixture from the chain, adjusting the distance from the plants or the flats if necessary.
Version Two
Additional materials:
•Brackets, one per hanger
Note: The distance of the light from the plants can be adjusted here, too, but this version uses shelf brackets that are mounted to a wall. The arm of the bracket that protrudes from the wall must be as long as at least half the width of the light fixture so that the fixture will hang away from the wall.
Step 1: Install the brackets securely in the wall above where your plants or flats will go. Place them the same distance apart as the hangers in your light, and make sure that they are level with one another.
Step 2: Hang an appropriate length of chain from each bracket, using S hooks if necessary, so that your light will hang at the desired distance from your plants.
Step 3: Hang the light fixture from the chain, adjusting the distance from the plants or flats if necessary.
Version Three
Additional materials:
•Two sawhorse brackets
•0ne length of 2x4, 6 to 8 inches longer than the length of your work light
•Four lengths of 2x4, slightly longer than the desired maximum height for your grow light
•Ceiling hooks or screw eyes, one per hanger
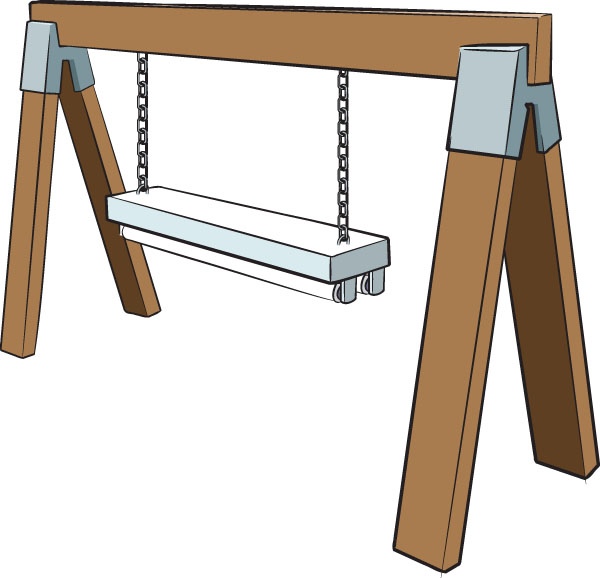
Version Three is best for plants that need close proximity to light.
Note: While this version is not as pretty (or as unobtrusive) as the previous versions, it has the advantage of needing less chain and being more versatile for location. It is ideal for cool-temperature fluorescent lights because the distance between plant and light is minimized. It can go on a tabletop, under a table, or even in a closet. And when not in use, the entire thing can be taken apart and easily stored.
Step 1: Assemble the sawhorse with the 2x4s according to the instructions that come with the brackets.
Step 2: Install the ceiling hooks or screw eyes on the underside of the crosspiece to match up with the hangers on your light.
Step 3: Hang an appropriate length of chain from each of the hooks/eyes, using S hooks if necessary, so that your light will hang at the desired distance from your plants.
Step 4: Hang the light fixture from the chain, adjusting the distance from the plants or the flats if necessary.
In Version Three, the light hangs under the sawhorse crosspiece.