6
Exercises
“The Belly Burn Plan helped me transform my body. My middle has always been a problem area for me, and The Belly Burn Plan was just what I needed. The exercise plan doesn’t take a lot of time or equipment, and the workouts are fantastic.”
—CINDY B., AGE 52
All of the workouts in this book include exercises appropriate for your fitness level, some of which you may not be familiar with. In this chapter, you’ll find easy-to-follow definitions of the exercises, many of which include photo demonstrations. Not only will you be in great shape by the end of the program, you’ll be fitness savvy, too.
Equipment
You’ll be amazed by the number of exercises you’ll do in The Belly Burn Plan that require absolutely no additional equipment at all. The most frequently used piece of equipment you’ll use is your own body. Beyond that, the most you’ll need is a set of hand-held weights, like dumbbells. If you don’t have access to dumbbells, get creative. Lots of household items can be substituted for dumbbells, including:
- Books
- Gallons of Water
- Pans/Pots (with handles)
- Soup/Vegetable Cans
The weight of the dumbbells or hand-held weights you choose to use depends on the strength of different muscles. Generally speaking, if you can perform twelve to fifteen repetitions of any exercise with ease using one particular weight, it’s time to bump it up. On the other hand, if you’re having a problem making it to twelve repetitions because the weight feels too heavy, it’s best to drop down a pound or two.
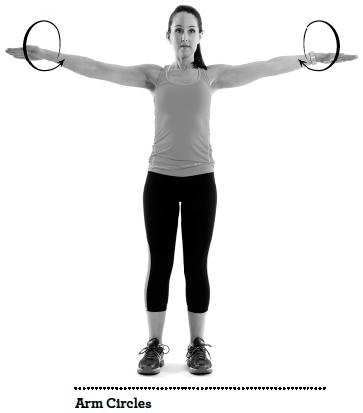
Arm Circles:
- Usually done with no weight at all, extend your arms straight out from your sides.
- Without bending your elbows, make small, tight circles with your arms. Don’t let your arms drop.
- Continue making circles until your set is complete.
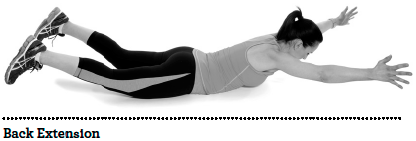
Back Extension:
- Start by lying face down on the ground with your arms and legs extended out in a V, nose pointed down.
- Pull your arms and legs off the ground. Concentrate on pulling your shoulder blades back while squeezing your bottom to help maintain the position.
Tip: To maintain the proper form, keep your nose pointed down to the ground. Squeeze your bottom as you bring your arms and legs off the ground.
Bicep Curls:
- Holding a handheld weight in each hand, bring your arms to a 90 degree angle with your palms facing up.
- Keeping your elbows in at your sides, slowly raise the weights bringing your palms toward your shoulders.
- After your palms are up toward your shoulders, release them slowly back down to the starting position without moving your elbows from your sides.
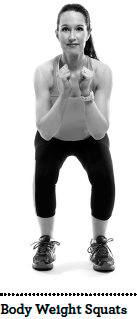
- Stand with your legs shoulder-width apart.
- Drop down by bending your knees, as if you’re going to sit into a chair.
- Return to a standing position.
Tip: Try to get your thighs as parallel to the floor as possible. Focus on keeping your shoulders pointed up toward the ceiling, getting your bottom back as far as possible and keeping your knees over your toes. Draw your abs in through the entire exercise and squeeze your bottom on the way up.
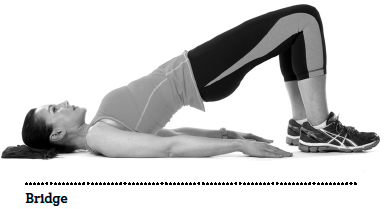
Bridge:
- Start by lying flat on your back with your knees bent and hands resting at your sides.
- Push your hips up toward the ceiling, keeping your feet firmly planted.
Tip: Squeeze your glutes (bottom) and try to prevent your hips from dropping. If you look down at your body toward your knees, you should be able to clearly see your hips and thighs. Hold this position for the designated period of time.
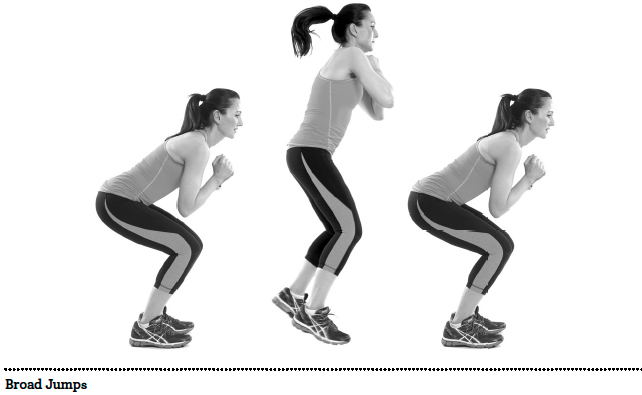
Broad Jumps:
- Standing with your feet shoulder-width apart, drop down into a squat position.
- Spring forward, jumping as far as possible. Land softly by bending your knees and absorbing the jump. Turn around and repeat.
Tip: Never lock your knees. To get as much distance out of your jump, look well beyond the point where you think you might land. Visually “overshoot” your goal.
Burpees:
- Start by standing with your feet shoulder-width apart.
- In one motion, drop down into a squat, reach forward and plant your hands on the ground in front of your feet.
- Without moving your hands, kick your feet back so you’re in a straight-arm plank position.
- As soon as your body is planked out, return to position 2.
- Jump straight up, allowing your feet to leave the ground.
To do half burpees:
- Start in a straight-arm plank position (Burpee step 3).
- Jump your legs in, tucking your knees under your chest, finishing in a squat position (Burpee step 4).
- Jump back into a straight-arm plank position and repeat.
Tip: This exercise is tough but well worth it! You’ll work all the muscles in your body and your lungs, too.

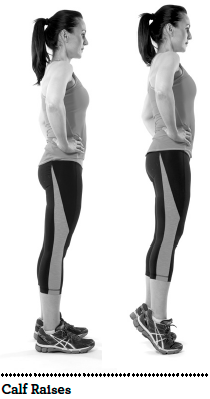
Calf Raises:
- Start by standing with your feet flat, spaced just a few inches apart. Lift your heels off the ground, coming up to the balls of your feet.
- Bring heels back down to the ground, repeating this up/down motion continuously.
Tip: The muscles in your calves are important, but smaller than some of the other muscles through your thighs and bottom. Expect your calves to feel as if they’re on fire as you reach the end of each set.
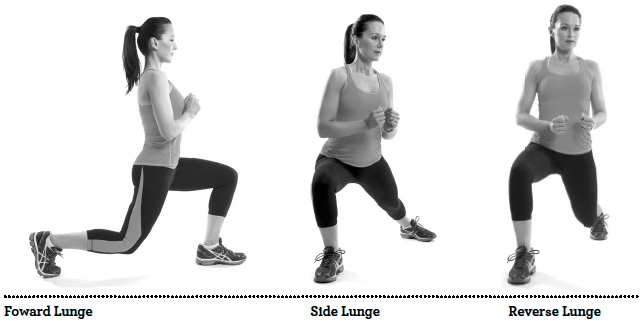
Clock Lunges:
These lunges bring your legs to the twelve o’clock, three o’clock and six o’clock position in five easy steps.
- Step forward into a traditional lunge position, moving your forward leg to twelve o’clock.
- Return to standing.
- Step out to a side lunge at three o’clock.
- Return to standing.
- Take a big step back doing a reverse lunge to six o’clock.
Tip: Each set is one clock lunge. The opposite foot of the leg that’s doing the lunging stays in the same spot with the exception of a slight pivot.
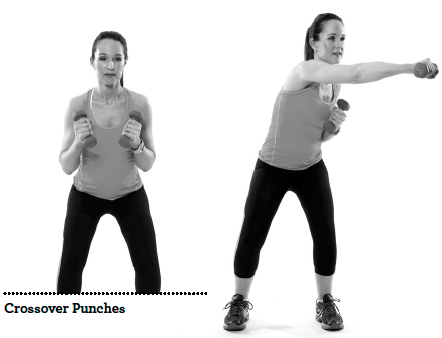
Crossover Punches:
- Stand with your feet shoulder-width apart and arms bent holding two hand-held weights.
- Punch across your body to the opposite side, holding your abs in as tight as possible. Your arm should finish straight with your palm facing down toward the ground.
- Draw your arm back into the starting position and repeat on the opposite side, alternating continuously.
Tip: Keep a slight bend in your knees and don’t forget to use your abs. Think of driving your fist into a punching bag before bringing it back to repeat on the opposite side.
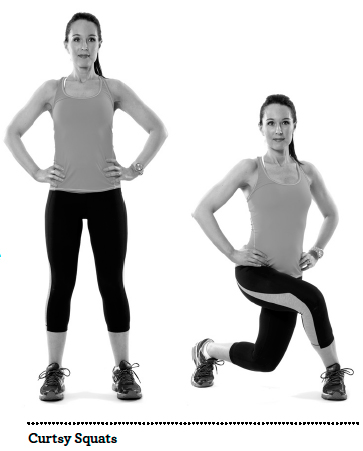
Curtsy Squats:
- Start with your feet shoulder-width apart.
- Step one leg back and across the opposite leg, like a curtsy, then squat down.
- Come back to a standing position and repeat on the opposite side.
Tip: This exercise works the sides of the hips, helping to shape and tone your bottom. Your backside will thank you later!
Donkey Kicks:
- Start by resting on your hands and knees in a tabletop position. Keep your neck relaxed with your nose pointed down at the ground.
- Take one leg, and kick it straight behind you, pushing through your heel.
- Bring the leg back toward your belly and repeat on the opposite side.
Tip: Your hands don’t move and your hips should stay square. Remember to draw your abs in toward your spine.
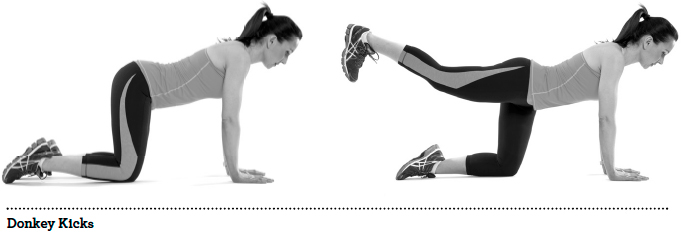
Figure-8 Shoulder Sizzler:
Use a hand-held weight (ideally between 5 and 10 pounds) for this exercise.
- Stand with your feet hip-width apart, toes pointed forward and a slight bend in your knees.
- Hold the weight with both hands and raise your arms so they’re at shoulder height and directly in front of you.
- Draw your abs in and start moving the weight into a large, horizontal figure eight (or infinity sign, if you prefer).
Tip: This exercise works your shoulders and your abs. Keep your elbows locked and belly button drawn in and be sure not to move your hips or feet. You don’t need a lot of weight for this exercise, but don’t be afraid to upgrade a pound or two if you’re not feeling it after the first set.

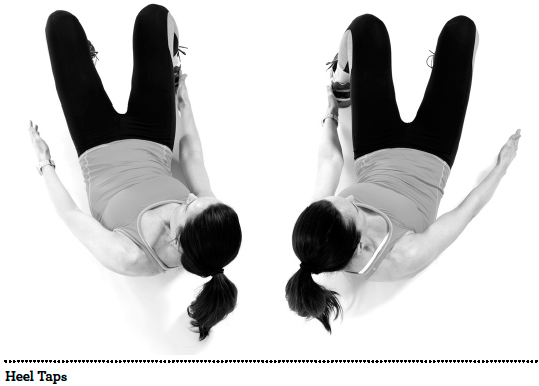
Heel Taps:
- Lie flat on the ground with your knees bent.
- Extend your arms down toward your feet and raise your head and shoulders off the ground.
- Tap your right hand against your right heel, then your left hand against your left heel.
- Keep your head and shoulders off the ground until all repetitions are complete.
Tip: Pull your belly button toward your spine and lower back toward the ground.
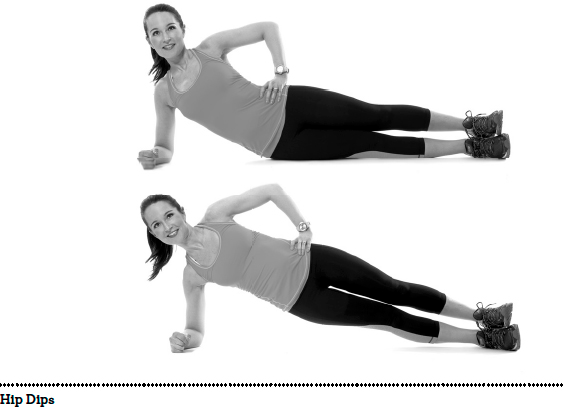
Hip Dips:
- Start this exercise by turning on your side, resting on your forearm with your elbow bent.
- Stack your feet on top of one another.
- Push your hips up, then drop them back down to the ground.
Tip: To avoid rolling forward, keep your free hand off the ground and resting on your hip or along the side of your leg.
High Knee Running:
Think marching-band knees, just a little higher and faster!
- Simply jog or march in place, pulling your knees as high as possible.
Tip: Keep your body straight, abs tight and pull your knees as close to your chest as possible.
Note: Beginner workouts perform a variation of High Knee Running called High Knee Marching. Your heart rate will still get a boost without all the impact. To perform the exercise, simply pull your knees up to your chest at a walking pace.
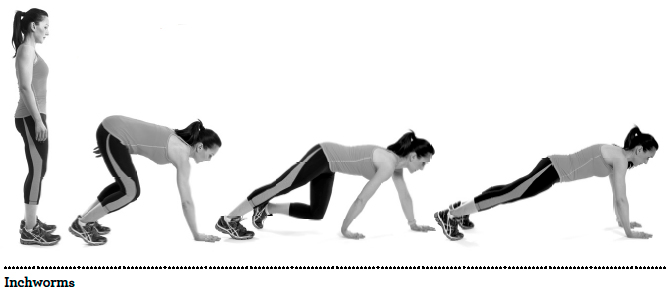
Inchworms:
- Start by standing straight, then bend over and touch the ground. Bend your knees, only if necessary.
- Slowly walk your hands forward until your body is completely planked out.
- Without moving your hands, slowly walk your feet forward until they meet your hands.
- After completing one inchworm, keep moving, walking your hands out, followed by your feet.
Tip: Be sure to keep your belly button pulled into your spine to support your lower back.
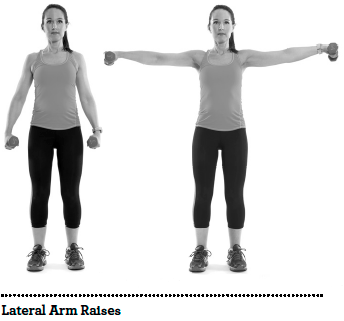
Lateral Arm Raises:
- Start by holding a light weight in each hand at your sides.
- With a slight bend in your elbows, raise your arms out from your sides up to shoulder height.
- Slowly return back to the starting position.
Tip: If you extend beyond your shoulders, much of the effort is lost. Do each repetition slowly, with extra attention paid to how high you lift your arms. This is a great exercise for the small muscles of the shoulders that helps to give a lot of definition.
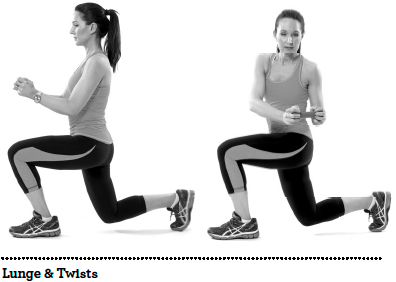
Lunge & Twists:
- Start by stepping into a traditional lunge position.
- When your body has reached a comfortable forward position, extend your arms forward holding one weight with both hands, then twist your body in the direction of your lead leg.
- Return to a standing position and repeat, alternating sides.
Tip: When you step out and lunge on your left leg, use the weight and twist to your left side. Do the same, but twisting to your right, when you’re leading with your right leg.
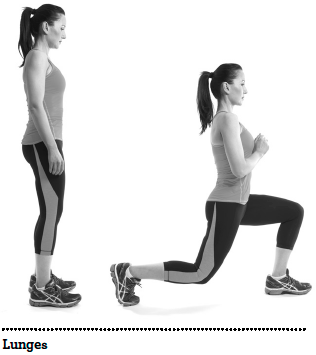
Lunges:
- Start by standing with your feet about hip-width apart.
- Step one foot out about two to three feet in front of you.
- Bending your front knee, and dropping your back knee closer to the ground, enter a lunge position.
- Keep your back straight and don’t let your front knee extend beyond your toes.
- Return to a standing position. Alternate legs, or repeat continuously on the same leg.
Tip: Avoid the mistake of leaning forward over your knees. Protect your knees and keep your shoulders in line with your hips.
Mountain Climbers:
- Start down on the ground in a straight-arm plank position, resting on your hands and toes with your back straight.
- Bring your right knee up and in toward your right elbow.
- Return your right foot back to the starting position.
- Repeat on the opposite side by bringing your left knee to your left elbow.
Tip: Concentrate on keeping your abs drawn in and pulling your knee as close as possible to your elbow. This is a great full-body exercise that gives extra attention to your abs, back and shoulders.

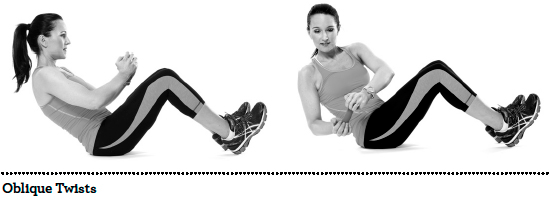
Oblique Twists:
This exercise can be done with any weighted object (ideally between 5 and 10 pounds) that you can hold firmly with both hands, such as a dumbbell, medicine ball or even a gallon of water.
- Start by sitting with your knees bent and heels planted on the ground.
- Slowly lean back until you feel your abs engage.
- Move the weight in a twisting motion from the right hip to the left hip, getting as high of an arch as possible.
Tip: If your core is strong enough, lift your heels off the ground to perform this exercise. Twist your body from your shoulders to your waist while keeping your belly button pulled to your spine.
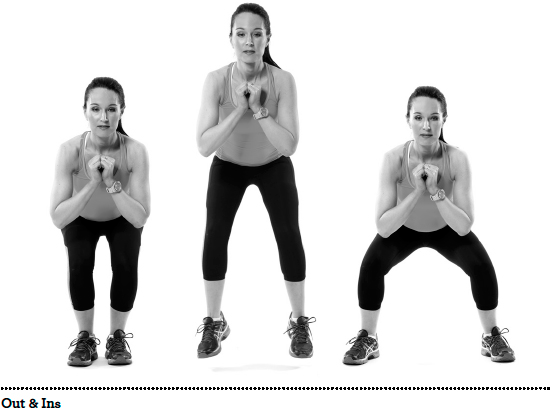
Out & Ins:
- To begin, stand in a squat-like position, feet about six inches apart.
- Jump both feet out, finishing in a wide-leg squat position (this is your “out”).
- Hop both feet back in to your starting position (this is your “in”).
Tip: Always stay in your squat. Don’t stand up! Your legs deserve the workout.
Plank:
This exercise can be done one of two ways, either as a traditional forearm plank or as a straight-arm plank.
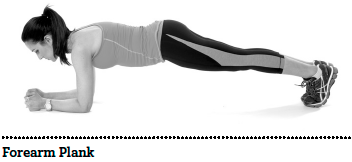
To do a forearm plank:
- Start by lying face down on the ground.
- Resting on your forearms, push your body off the ground with the rest of your core supported by the balls of your feet or toes.
To do a straight-arm plank:
- Start on your hands and knees.
- Keep your hands resting under your shoulders and extend your legs straight back, resting on the balls of your feet or toes.
- Maintain this position for the duration called for in the workout.
Tip: If you’re just beginning, you may need to rest on your knees. As you get stronger, try to avoid resting on your knees altogether. Regardless of the position you’re in, it’s important to keep your back straight, neck in a neutral position (avoid drooping) and pelvis tucked under to protect your back.
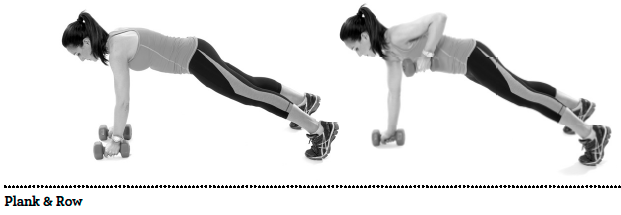
Plank & Row:
- Start in a straight-arm plank position.
- With your right arm, row a dumbbell (between 8 to 15 pounds) up, pulling your elbow toward the ceiling.
- Return weight to the ground and repeat with your left arm, alternating sides continuously.
Tip: Try to keep your abs as tight as possible and use the heaviest weight you can manage. Keep your hips level to the ground, and make sure all the motion comes from your arm.
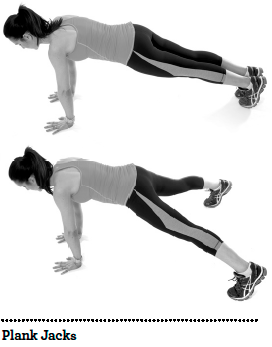
Plank Jacks:
- Start in a straight-arm plank position with your feet close together.
- Like a horizontal jumping jack, jump your feet out into a wide V position without moving your upper body.
- Quickly jump your feet back together to the starting position.
Tip: Don’t forget, this is still an abs exercise, so keep your tummy tight the entire time.
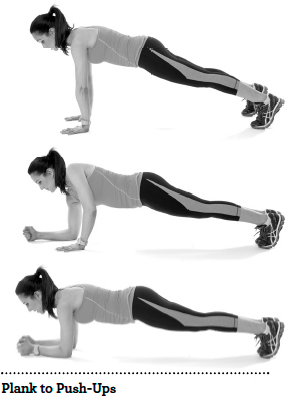
Plank to Push-Ups:
- Start this exercise in a straight-arm plank position.
- Drop down to your right forearm (left hand stays in place).
- Drop down to your left forearm (ending in a forearm plank position).
- Push up onto your right hand (left arm stays in place).
- Push up onto your left hand (ending in a straight arm plank position).
This is one repetition. Continue the exercises by dropping down one arm at a time, then pushing up one arm at a time. Be sure to alternate sides.
Tip: Keep your abs tight and try to stay off your knees as much as possible. This is a great exercise for the shoulders, chest, back and abs.
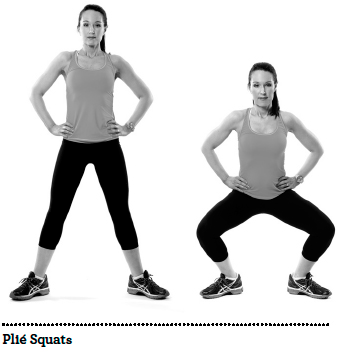
Plié Squats:
- Begin by standing in a modified plié position (with your heels about hip-width apart and toes pointed out at a 45-degree angle).
- Drop your hips down as deep as possible while pushing your knees out to the sides. Hold for one second.
- Return to the standing position, squeezing your bottom, and pull up on your toes to keep the weight over your heels.
Tip: This exercise not only works the quadriceps of the top of the thighs, but also the abductor and adductor muscles of the outer and inner thighs.
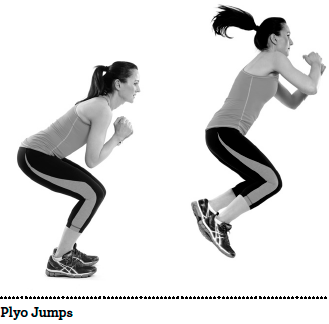
Plyo Jumps:
- Start with your feet hip-width apart.
- Squat deeply.
- Come out of the squat by jumping as high as you can, leading with your arms.
- As you come down, land as softly as possible, bending your knees to absorb the jump.
Tip: This exercise works the big muscles of your thighs and bottom. Because Plyo Jumps push your heart rate up high and fast, the number of repetitions is fairly low. Do every Plyo Jump slowly and controlled, focusing on the quality of the jump, rather than how fast you can get through it.
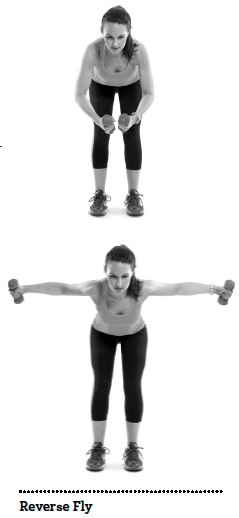
Reverse Fly:
- Start by standing with your back straight, holding a light set of dumbbells, one in each hand.
- Bend over to a 45-degree angle and allow your arms to drop softly in front of you.
- With your belly button pulled back toward your spine, open your arms out wide, like the wings of a bird.
- Slowly drop your arms and bring them back in toward the center of your body.
Tip: You should be able to see the weights in your peripheral vision. If you can’t, your arms are too far back. This is an excellent exercise for the shoulders and back.
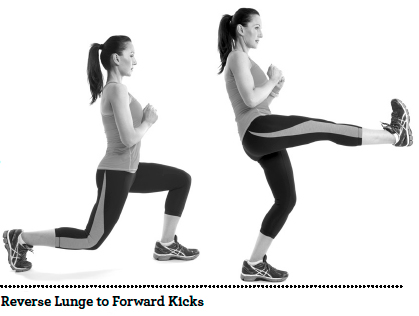
Reverse Lunge to Forward Kicks:
- Start by standing with your feet about hip-width apart.
- Take a big step back with one leg and drop down into a reverse lunge.
- From the reverse lunge position, kick the back leg forward, straight out in front of you, driving with your heel, pulling your toes to your face.
- Go immediately into the next reverse lunge alternating legs continuously.
Tip: Lunges are great for working all the muscles through the thighs, hips and bottom. You’ll also improve your balance and push your heart rate up by driving your leg forward into a powerful kick.
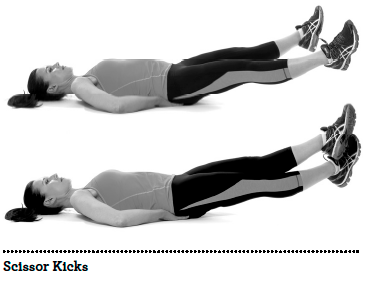
Scissor Kicks:
- Start by lying on your back with your hands tucked under your back at your tailbone, palms down.
- Firmly press your lower back down into the ground.
- Without bending your knees, slowly lift your legs between 30 and 45 degrees off the ground in a V position.
- Crisscross your legs over one another, pointing your toes away from you the entire time.
Tip: This is an incredible exercise for your abs. For more of a challenge, hover your feet as close as possible to the ground without making contact.

Shoulder Press:
- Holding a set of dumbbells that are a heavy weight, but something you can manage, stand with your feet shoulder-width apart and your knees slightly bent.
- Bend your elbows and raise your arms, starting with the weights just above ear level.
- Push the weights up toward the ceiling until your arms straighten out.
- Slowly return the weights to the starting bent position and repeat.
Tip: This exercise primarily works the big muscles of the shoulders, but is supported by the biceps (top of the upper arm) and triceps (the back of the upper arm) as well.
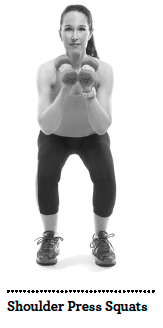
Shoulder Press Squats:
- Using a set of dumbbells that are a challenging weight, but something you can manage, begin this exercise like a traditional shoulder press.
- As your arms come down from the top position of the shoulder press, drop down into as deep of a squat as possible.
- As you come out of the squat, drive your arms back up overhead into a shoulder press.
Tip: This is an efficient combination exercise that works the big muscles of the shoulders while getting into the hips, thighs and bottom, too. Always remember to squeeze your bottom and draw in your abs throughout the entire exercise.
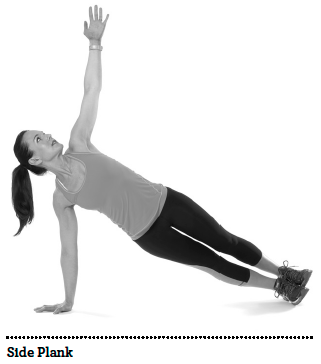
Side Plank:
- Start by sitting with your legs extended over to one side.
- Place your hand on the ground, just under your shoulder. Keep the weight on your hand equally distributed from fingertips to palm.
- With your legs extended, stack your feet on top of each other, push your hips up and raise the opposite arm up into the air—reaching for the sky. Now hold.
Tip: You have the option to stagger your feet if you can’t quite manage to stack them on top of each other. This is a great exercise for working the oblique muscles of the abs as well as the stabilizing muscles of the shoulders.
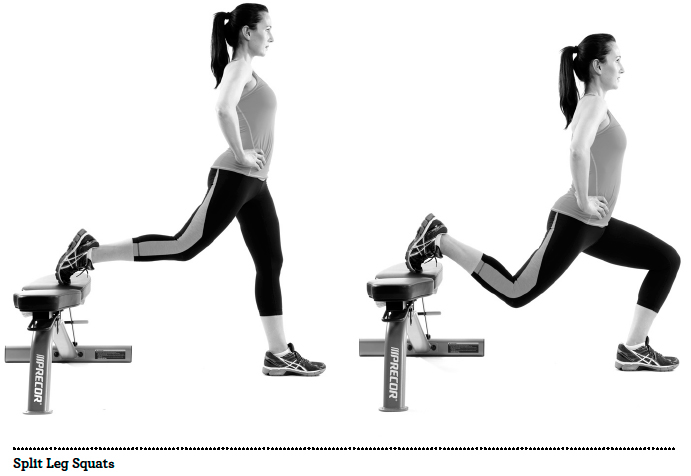
Split Leg Squats:
- Start by facing forward and placing one foot up on a bench or a chair behind you, resting on your toes. Your legs should be split, similar to a lunge position.
- Without changing the position of the leg behind you, bend your front knee into a single leg squat position, keeping your back straight and abs tight.
Tip: Make sure your knee does not extend over your toes when dropping into the single leg squat position. If it does, slowly hop the leg forward a couple of inches.
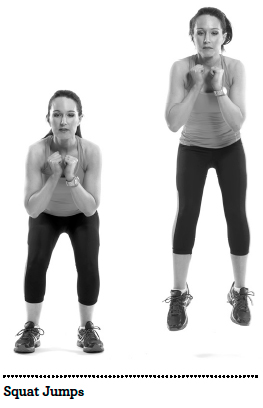
Squat Jumps:
- Stand with your feet hip-width apart.
- Bend your knees and drop into a squat position with your thighs as close to parallel with the ground as possible. Think of sitting into a chair as you come down.
- As soon as you drop down into this position, spring back up, jumping off the ground a few inches. Land by bending your knees and dropping back into the next Squat Jump.
Tip: Squat Jumps are a faster, less intense version of Plyo Jumps. The goal is to get in a high number of repetitions with less of a lift off the ground.
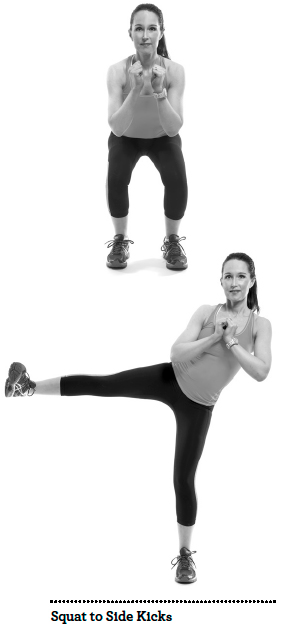
Squat to Side Kicks:
- Start with your feet shoulder-width apart.
- Drop down into a squat position.
- As you come to a stand, kick one leg out to the side, driving your leg out until it is as close to horizontal as possible.
Tip: Pull your toes toward your face, aiming with your heel. Drop down to a squat and repeat on the opposite side.
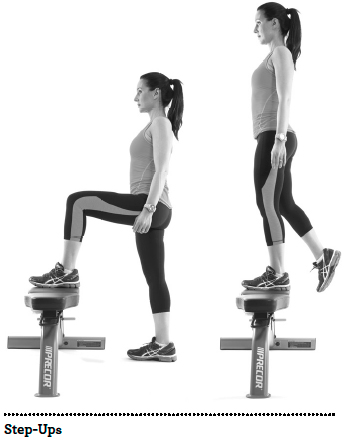
This exercise should be done with a sturdy bench, step or riser that is about knee height. Lower is okay, but higher is not. A step that is too high could lead to a knee injury.
- Place your right foot on a sturdy bench, step or riser. Step up.
- Drop back down onto the ground, holding the right foot on the step until the number of repetitions for that leg is complete.
- Switch to the left leg, placing your left foot on the step.
Tricep Dips:
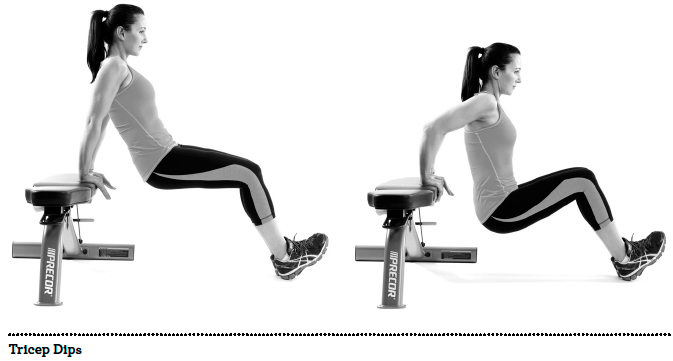
- Sit on the edge of a sturdy bench, step or riser with the palms of your hands grasping the edge of the seat at the outside of your thighs.
- With your arms as straight as possible, walk your bottom off the seat, suspending your upper body with your hands only.
- Keep your knees bent and slowly bend your elbows behind you.
- Return to the straight-arm position before dipping back down to a bent arm position. Repeat continuously until set is complete.
Tip: This exercise works the triceps in the back of the arms. These muscles are small and usually much weaker than the bigger shoulder and bicep muscles. The closer your feet are to the edge of the seat, the easier the exercise is. The farther you walk them out, the more difficult it becomes.
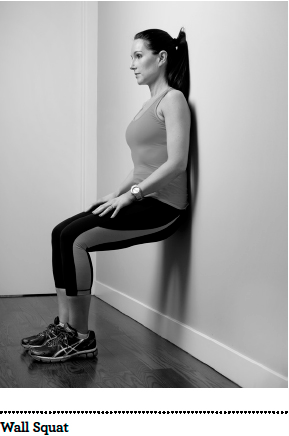
- Lean against a wall with your feet hip-width apart and about sixteen inches out from the wall.
- Drop your hips down to the point that it looks as though you’re sitting in a chair.
Tip: Don’t let your knees collapse in. Your knees should not be over your toes, so adjust your feet if needed.