CHAPTER FIVE
MODELLING FICTITIOUS BRANCH LINES
In this chapter I have included a few branch line layouts that are fictitious, although they are based loosely on prototypes. It is sometimes a better option to take an imaginative approach to build a model branch line that will suit your requirements and the space you have available to display the model. I hope the selection provided here will inspire you to have a go at building one or more as projects of your own. The selection offers four layouts operating both goods and passenger services, with two built to standard gauge and two narrow-gauge light railways. The others selected give the modeller the opportunity to build an industrial branch line operating only goods, although one does feature a director’s saloon as part of the running stock.
Most of the industrial branch lines selected will occupy small spaces and take the form of a display diorama rather than the usual end-to-end layouts.
To conclude this selection I have included two branch line layouts, built to high standards, that demonstrate what can be achieved. The first one is Phil Waterfield’s ‘Malham’, a fixed display within the house that depicts a fictitious terminus in the Yorkshire Dales. The concept is that it represents a branch built by the Midland Railway to serve the limestone quarries and the local farming community, besides providing a passenger service, running off the Settle and Carlisle line and terminating at Malham.
The second layout has been made to be portable so it can be run and displayed at exhibitions. This layout is totally industrial and depicts the fictitious ‘Manston Brewery’. The model has been built by Rob Milliken to P4 (18.3mm) gauge.
IMAGINARY MODEL BRANCH LINES
CHAGFORD
Chagford is an imaginary branch line terminus based on what might have been. Typical Great Western practice has been followed in laying out this small West Country terminus, incorporating all the facilities required for a station of this size, including locomotive stabling.
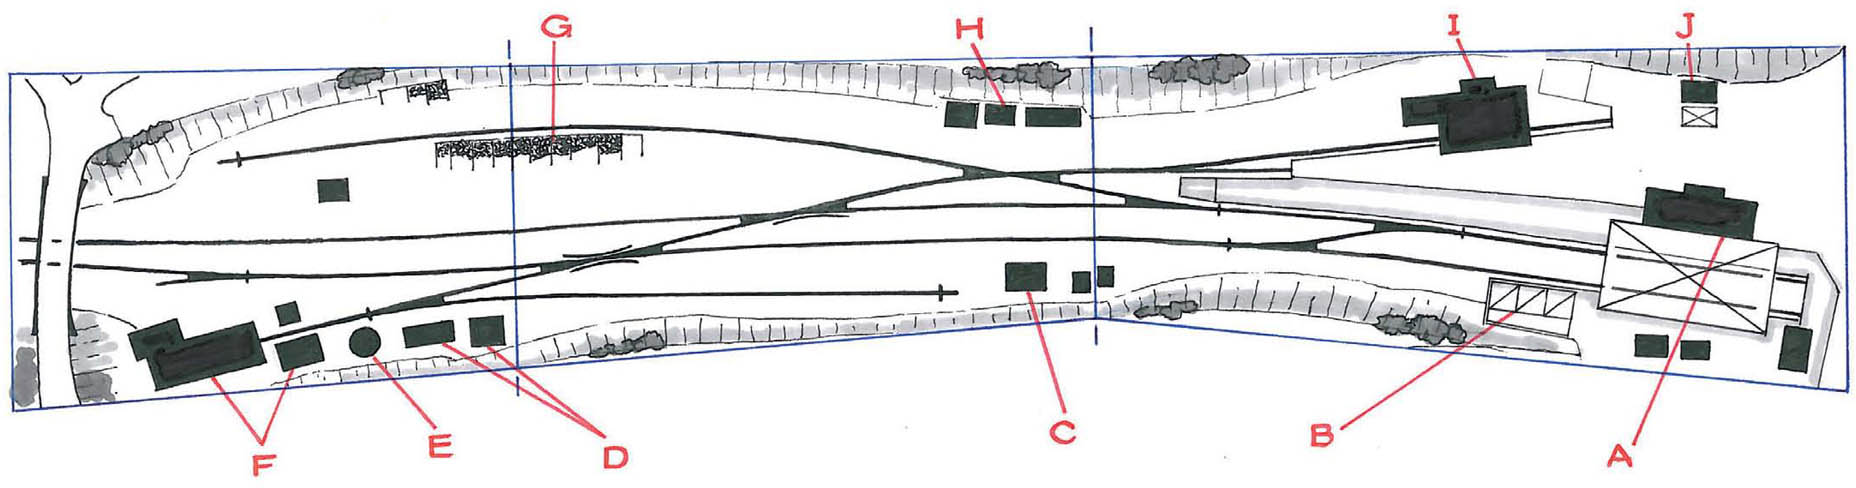
Chagford track plan: (A) station building and train shed; (B) cattle pens; (C) signal cabin; (D) loco stores and mess-room; (E) parachute water tank; (F) engine shed and coaling stage; (G) coal bunkers; (H) coal merchants’ huts/offices; (I) goods shed; (J) weighbridge and office.
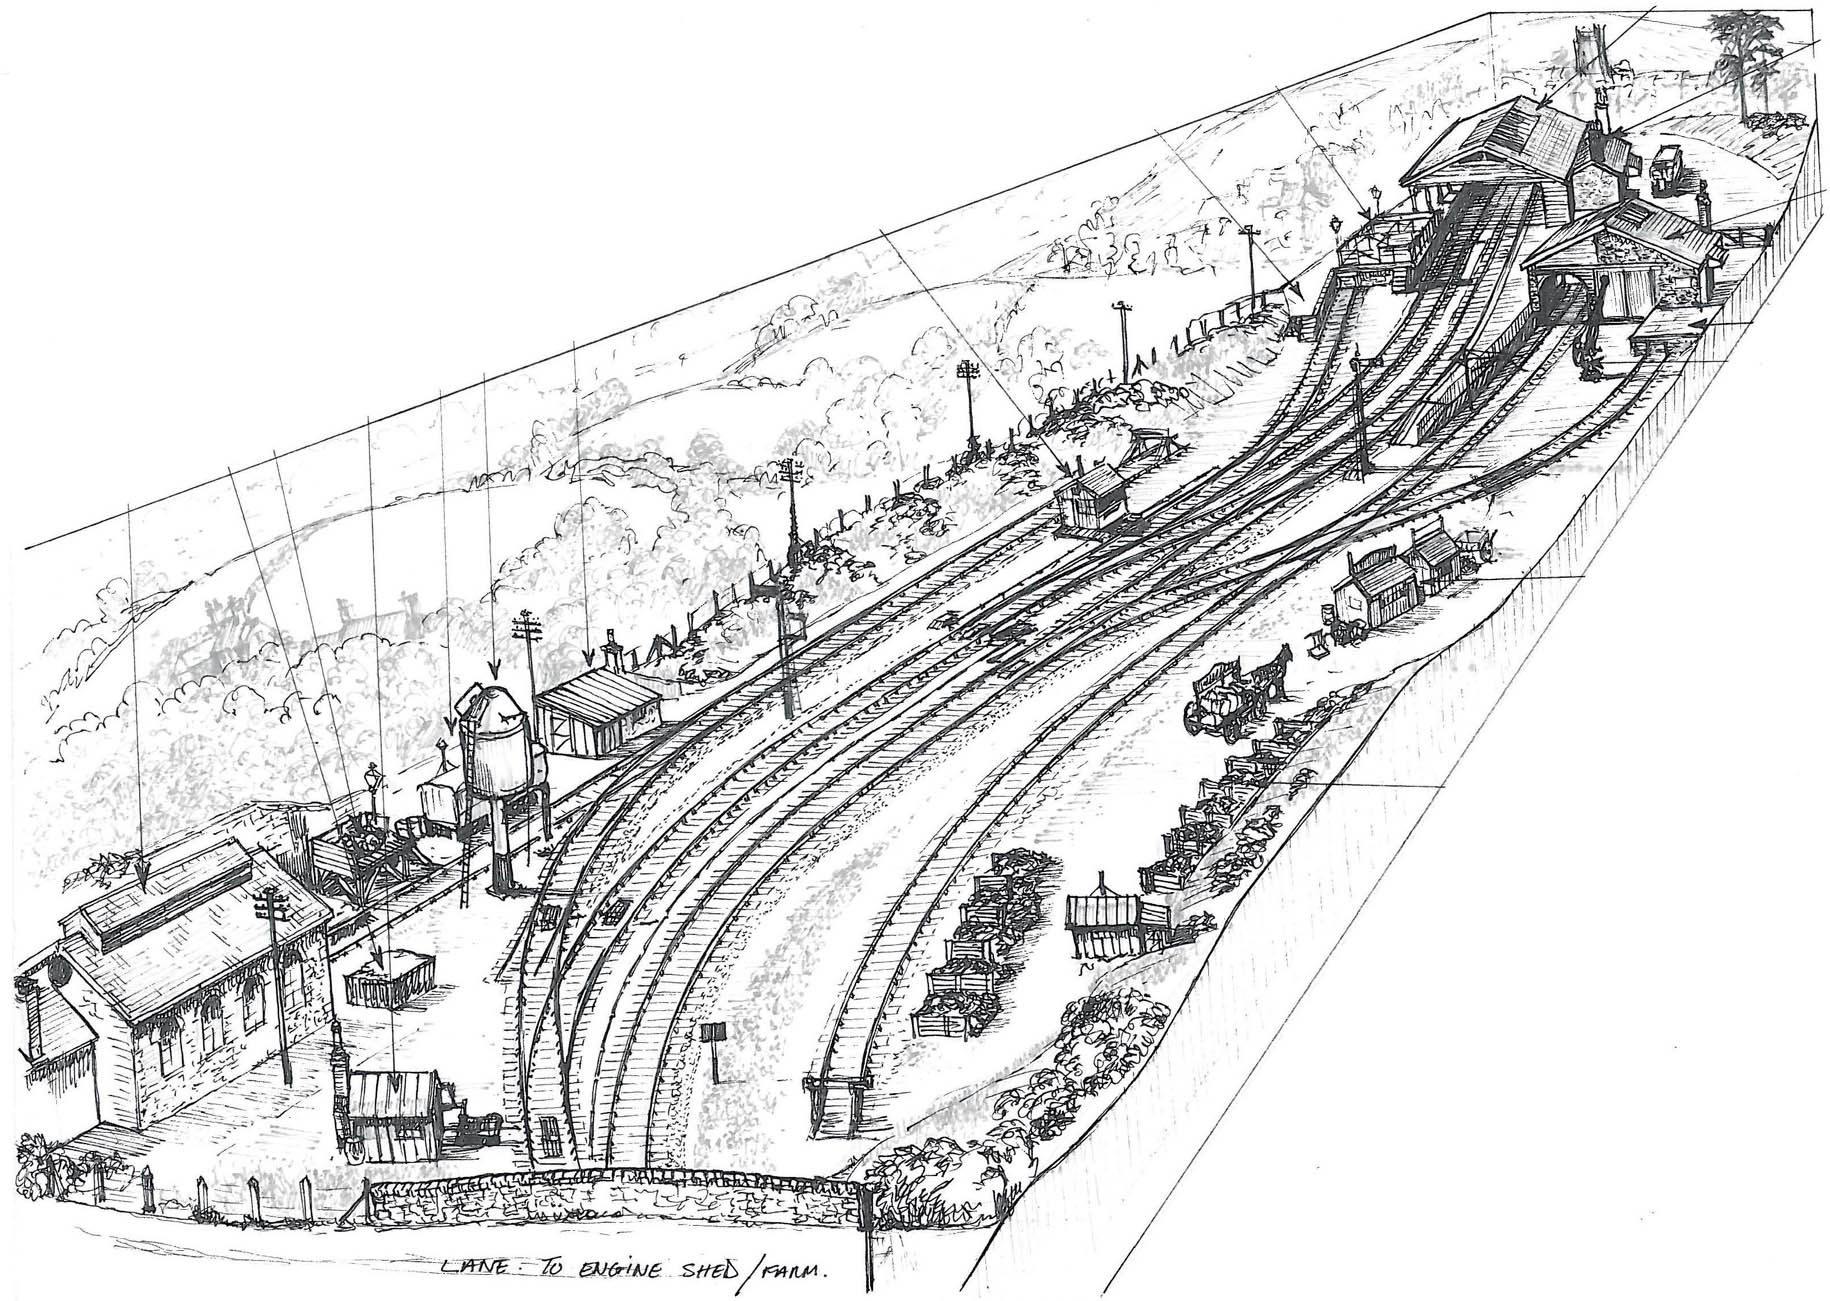
The layout at Chagford is here shown changed around, with the goods yard fronting the layout.
ASHOVER
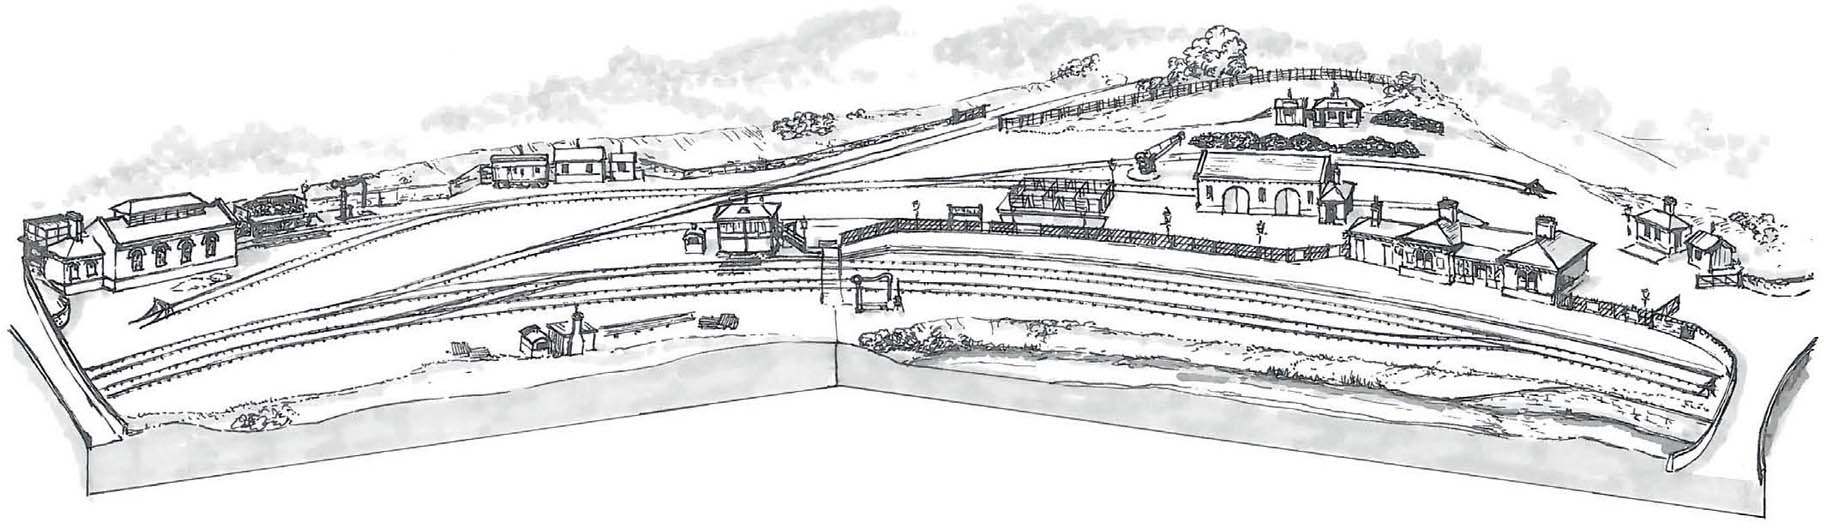
This small Midland Railway terminus has been designed using the concept of a standard gauge railway being built along the route of the Ashover Light Railway. The terminus would have served the large village of Ashover, together with Butts Quarry and those at Fallgate and Milltown.
The station layout would follow others of a similar size built by the company, with all the goods handling facilities required. The terminus also has locomotive stabling and servicing requirements, including a turntable. A private siding is also located at the far side of the site running off to Butts Quarry.
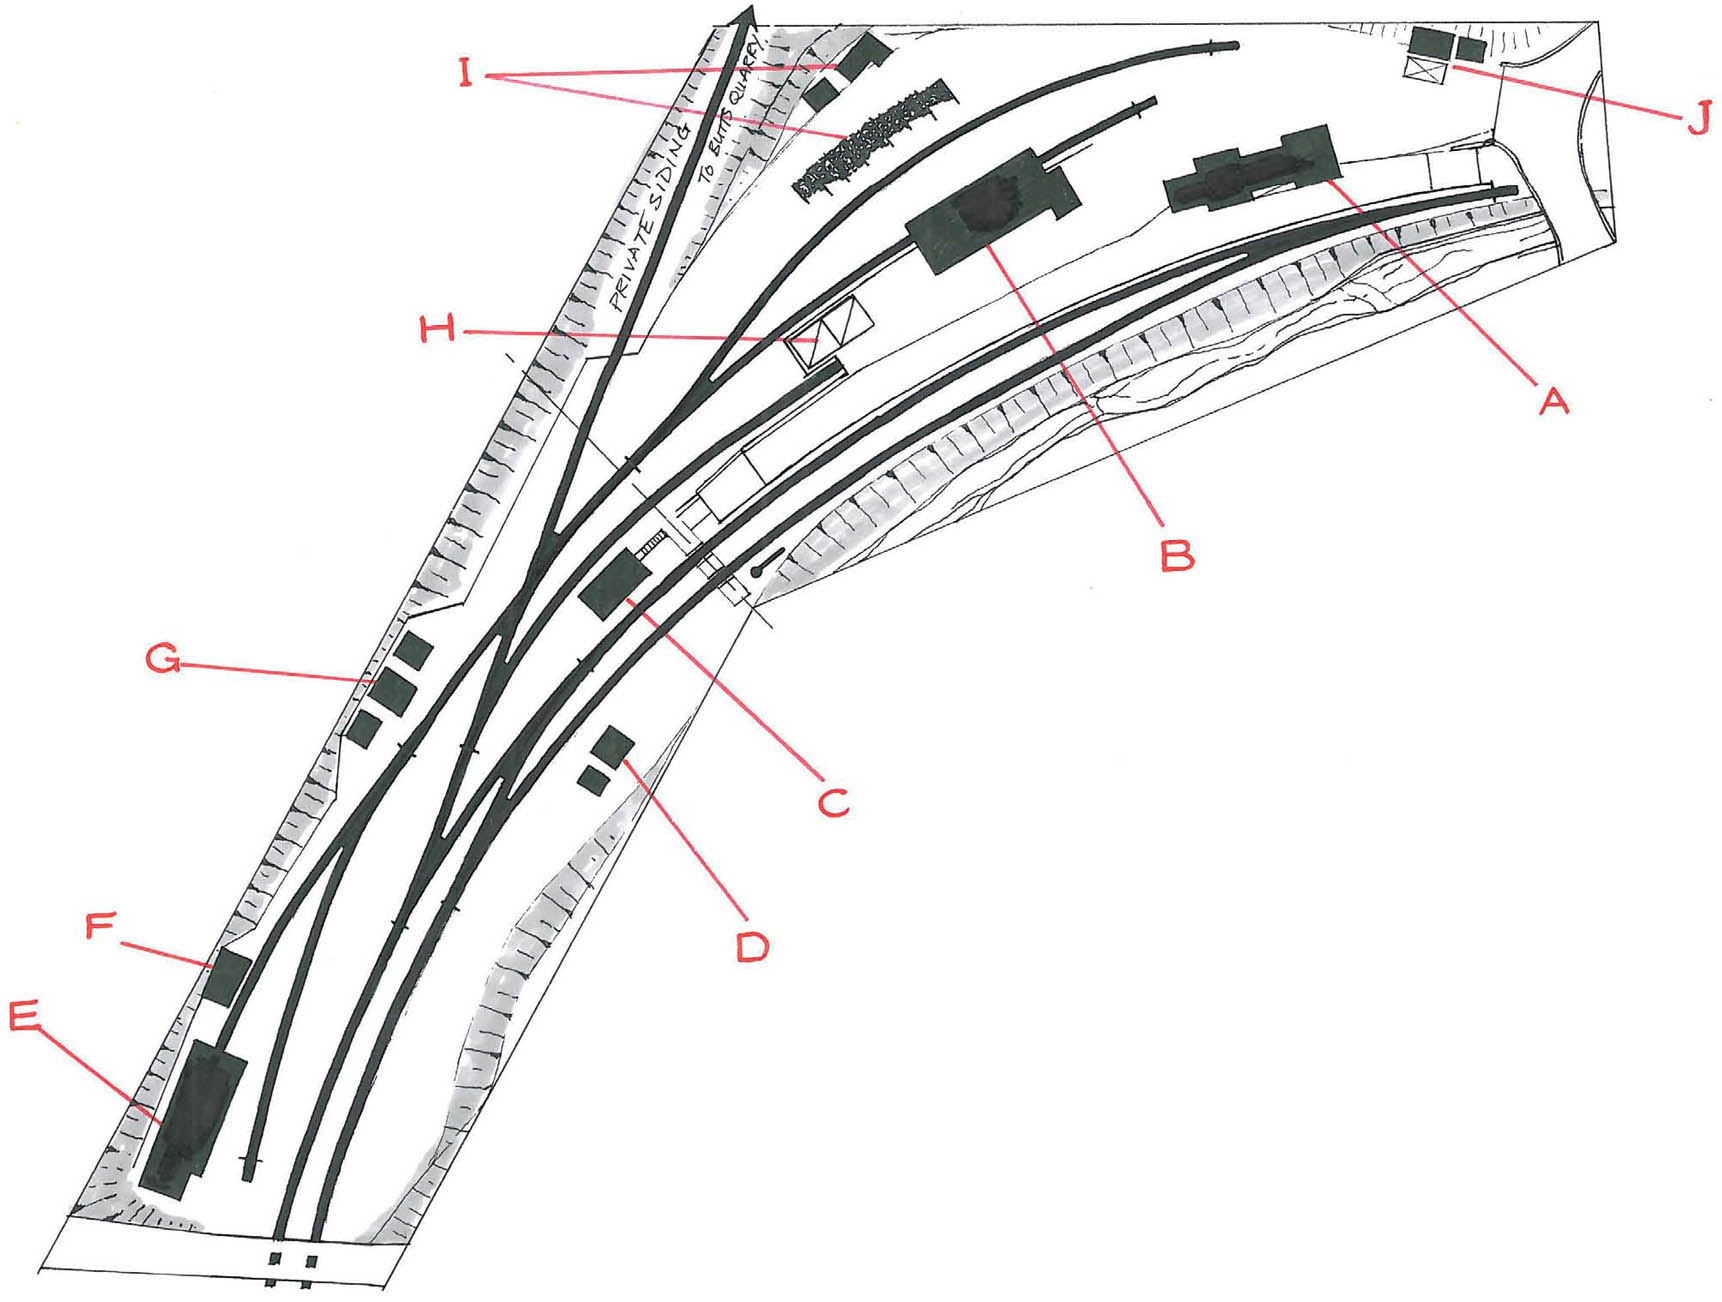
Ashover track plan: (A) station building; (B) goods shed; (C) signal box; (D) lamp and oil stores; (E) engine shed; (F) coaling stage; (G) loco stores and mess-room; (H) cattle pens; (I) coal bunkers and coal merchants’ offices.
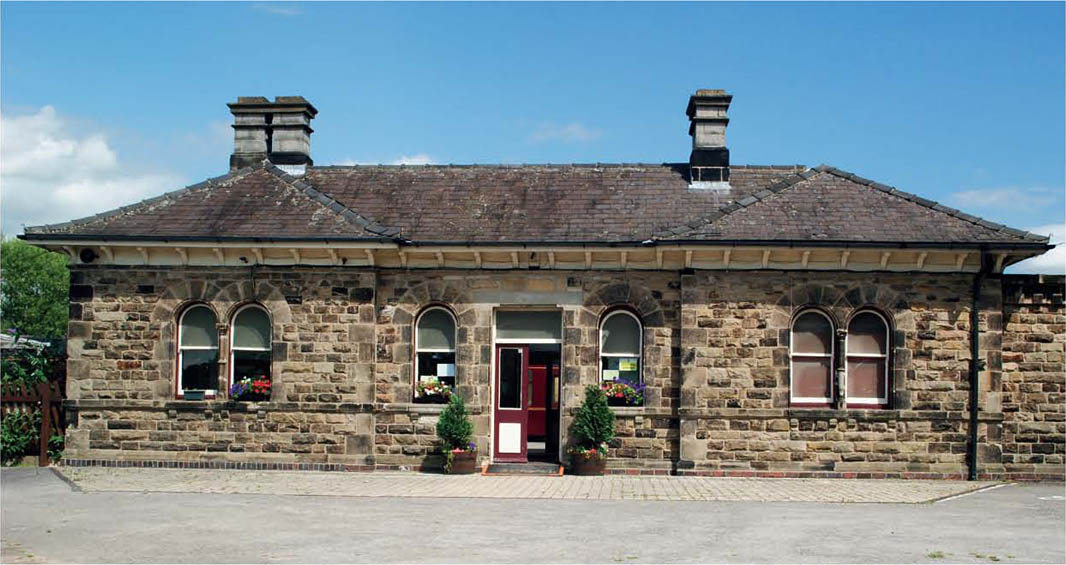
Butterley station building would be a perfect fit for a model of the unbuilt standard gauge service to Ashover. Hornby has recently produced a ready-to-plant model of the station.
PARWICH/LONGNOR (NARROW GAUGE)
This layout plan offers a choice of two narrow-gauge light railway terminuses.
Parwich would be the terminus of an imaginary railway built to light railway practice serving this area of the Derbyshire Peak District. The line would have connected with the North Stafford station at Ashbourne before following the valley of the Bentley Brook to reach Parwich. The railway would have served the local community, transporting dairy products from Parwich and servicing the limestone quarry at nearby Ballidon.
The second choice of Longnor would be the terminus of an extension of the Leek & Manifold Valley Light Railway. This was proposed, but lack of money meant that the line terminated at the smaller hamlet of Hulm End. The railway would have provided a service to the local farming community in the upper Dove and Manifold valleys. Longnor itself was a thriving market town and became an important meeting place of the Staffordshire Moorlands.
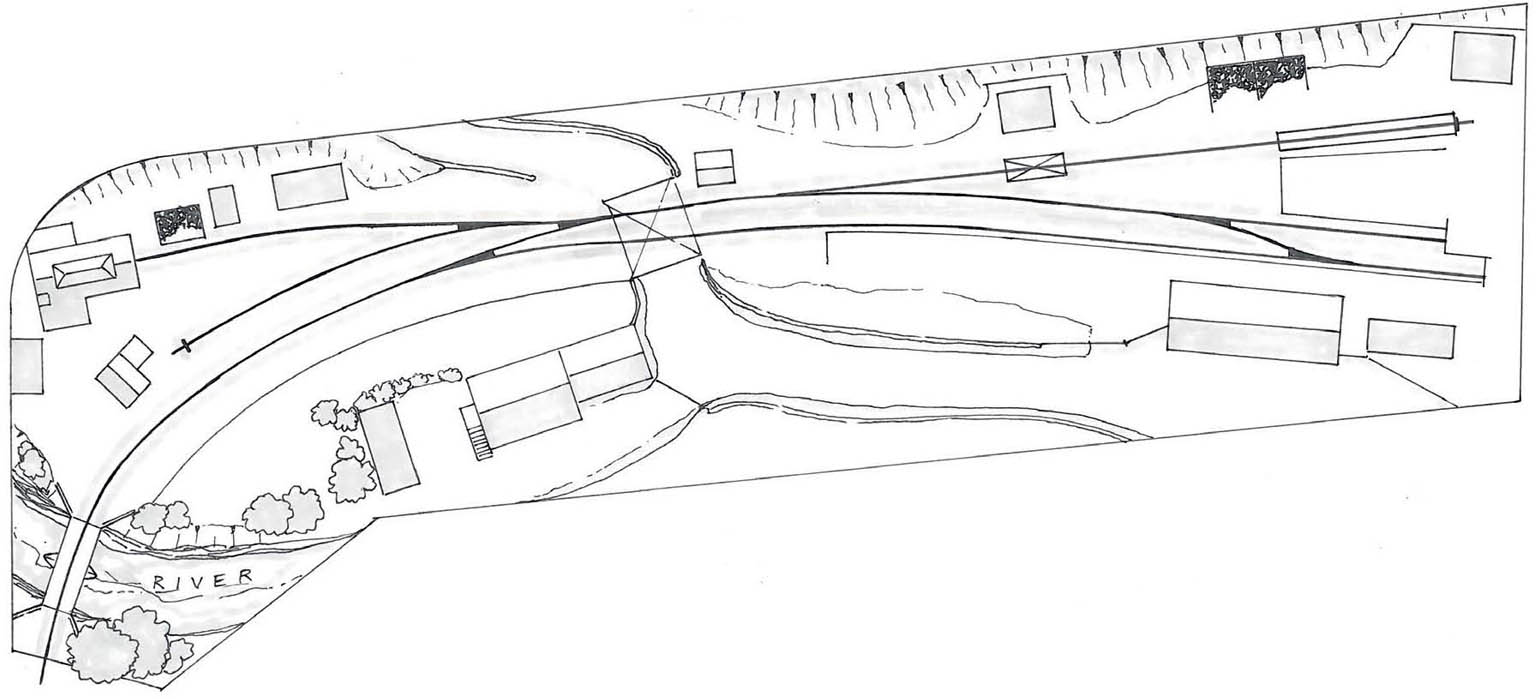
Parwich/Longnor track plan.
Parwich/Longnor.
The track plan provided would therefore suit both concepts, with the goods and other facilities all catered for.
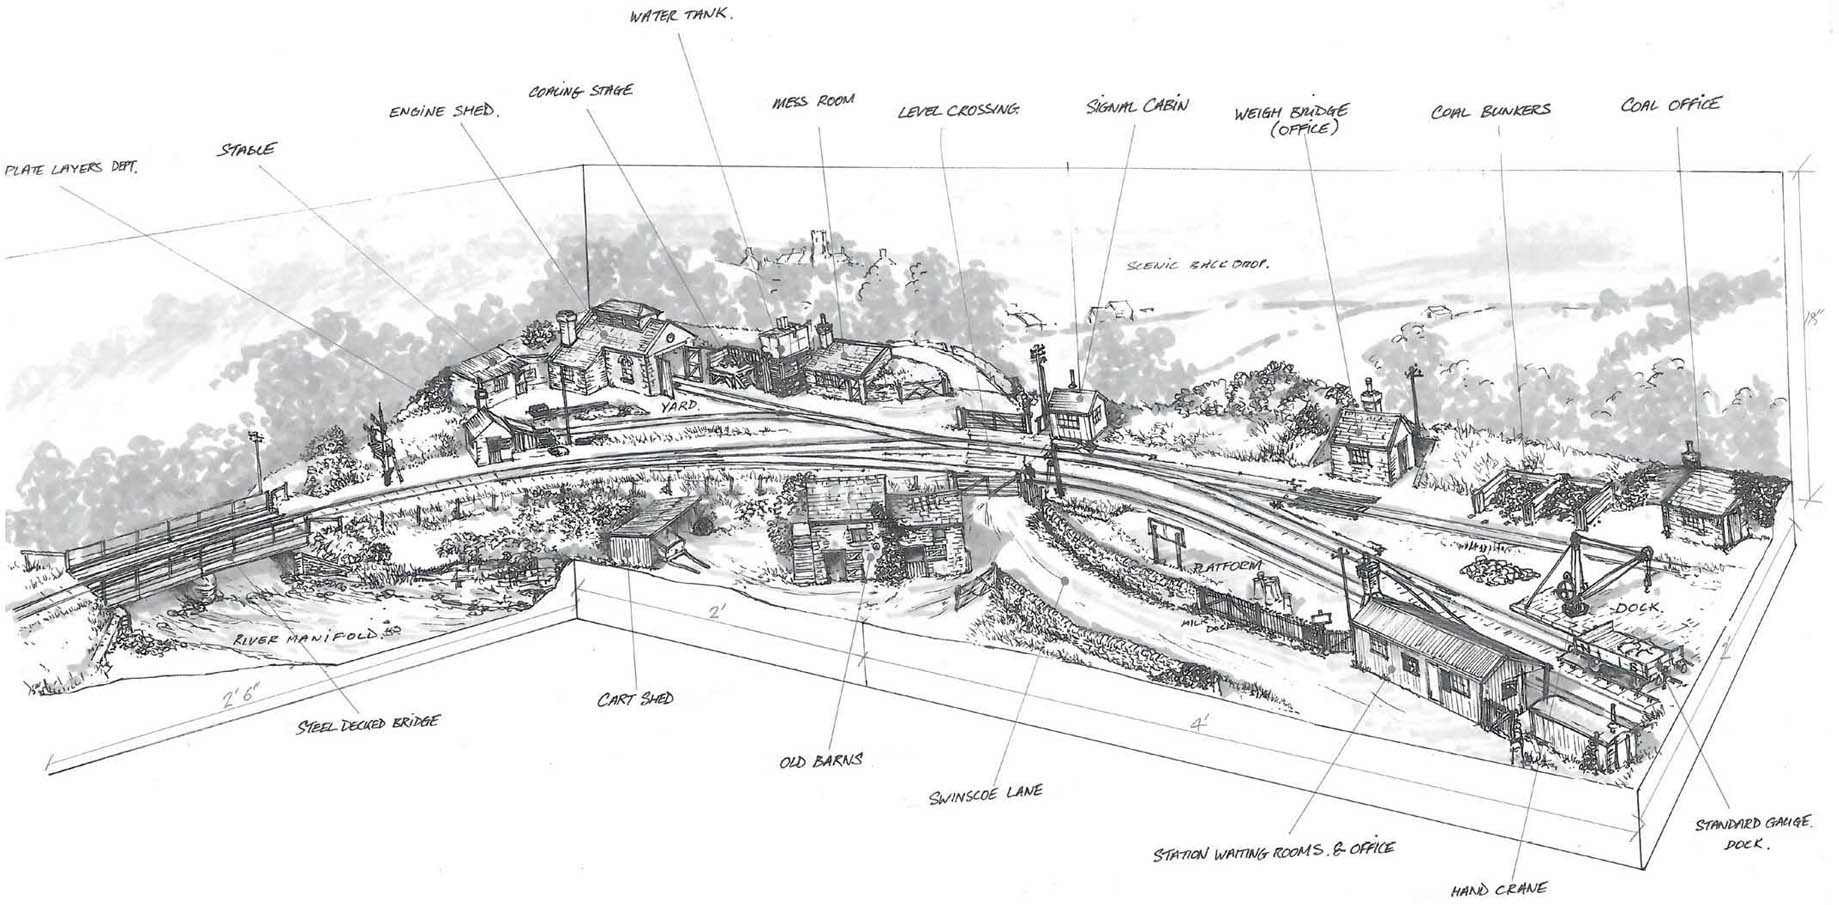
FENNY BENTLEY (NARROW GAUGE)
This layout plan features the largest of the intermediate stations along the fictitious narrow-gauge branch from Ashbourne to Parwich. Fenny Bentley is entered on a level crossing over the main Ashbourne to Buxton road. A passing loop is provided along with a general goods siding. The yard has a small stone-built warehouse together with the local smithy.
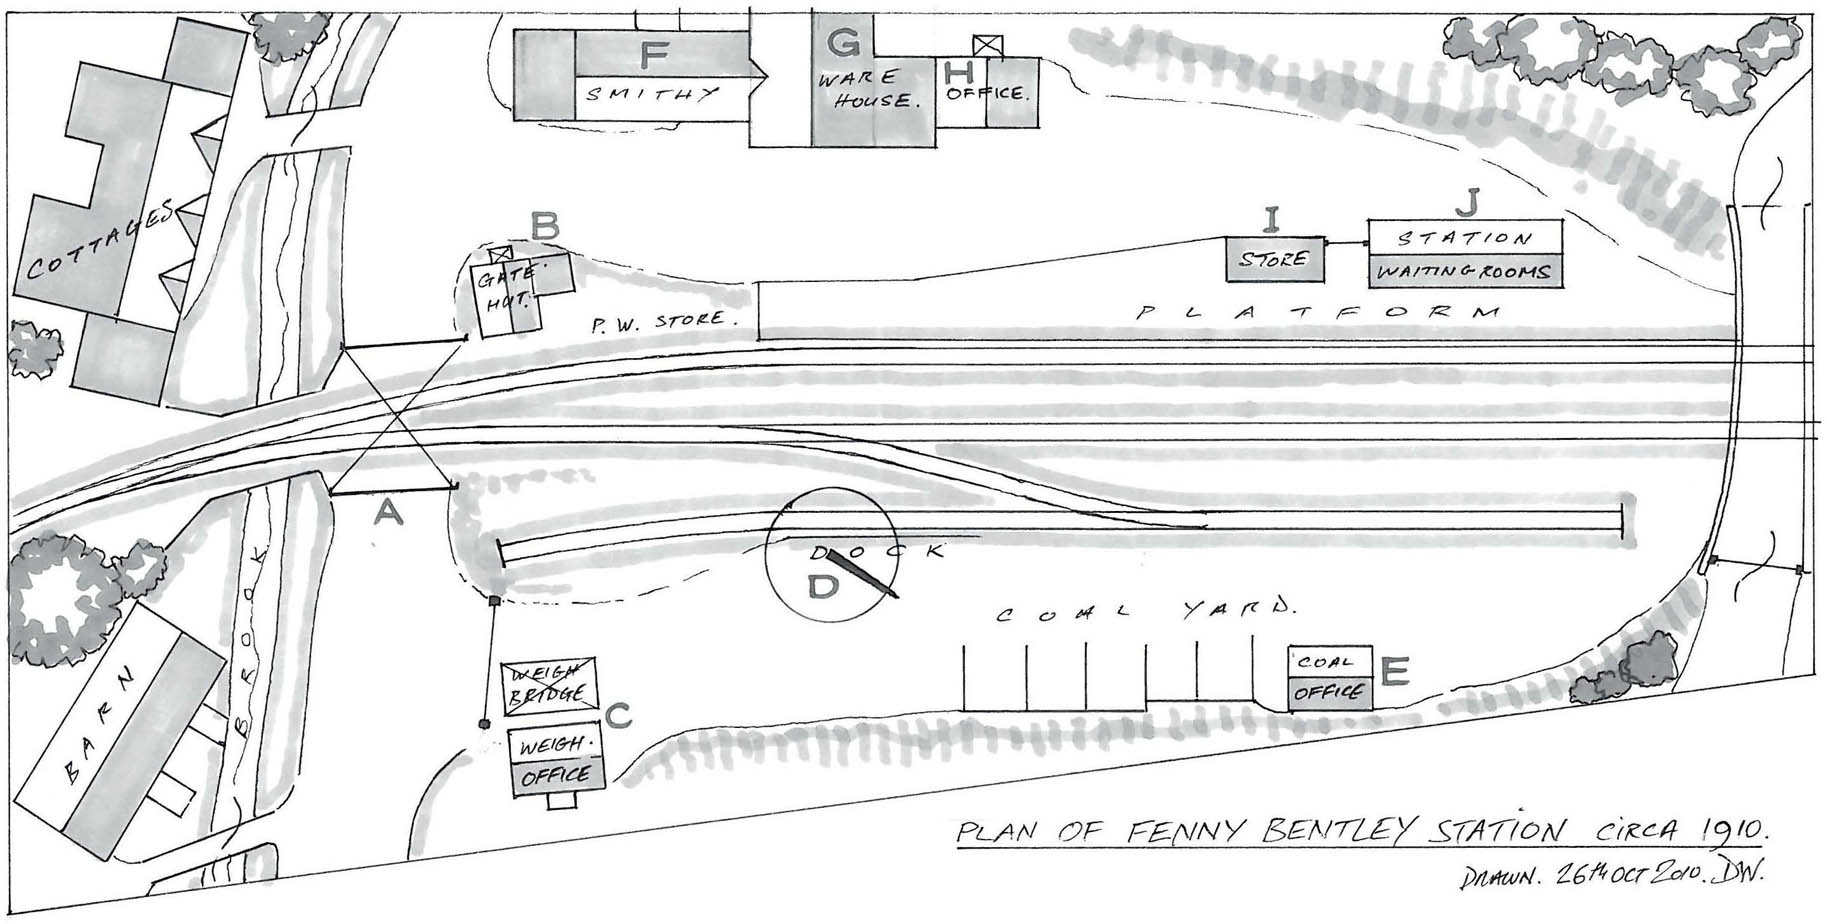
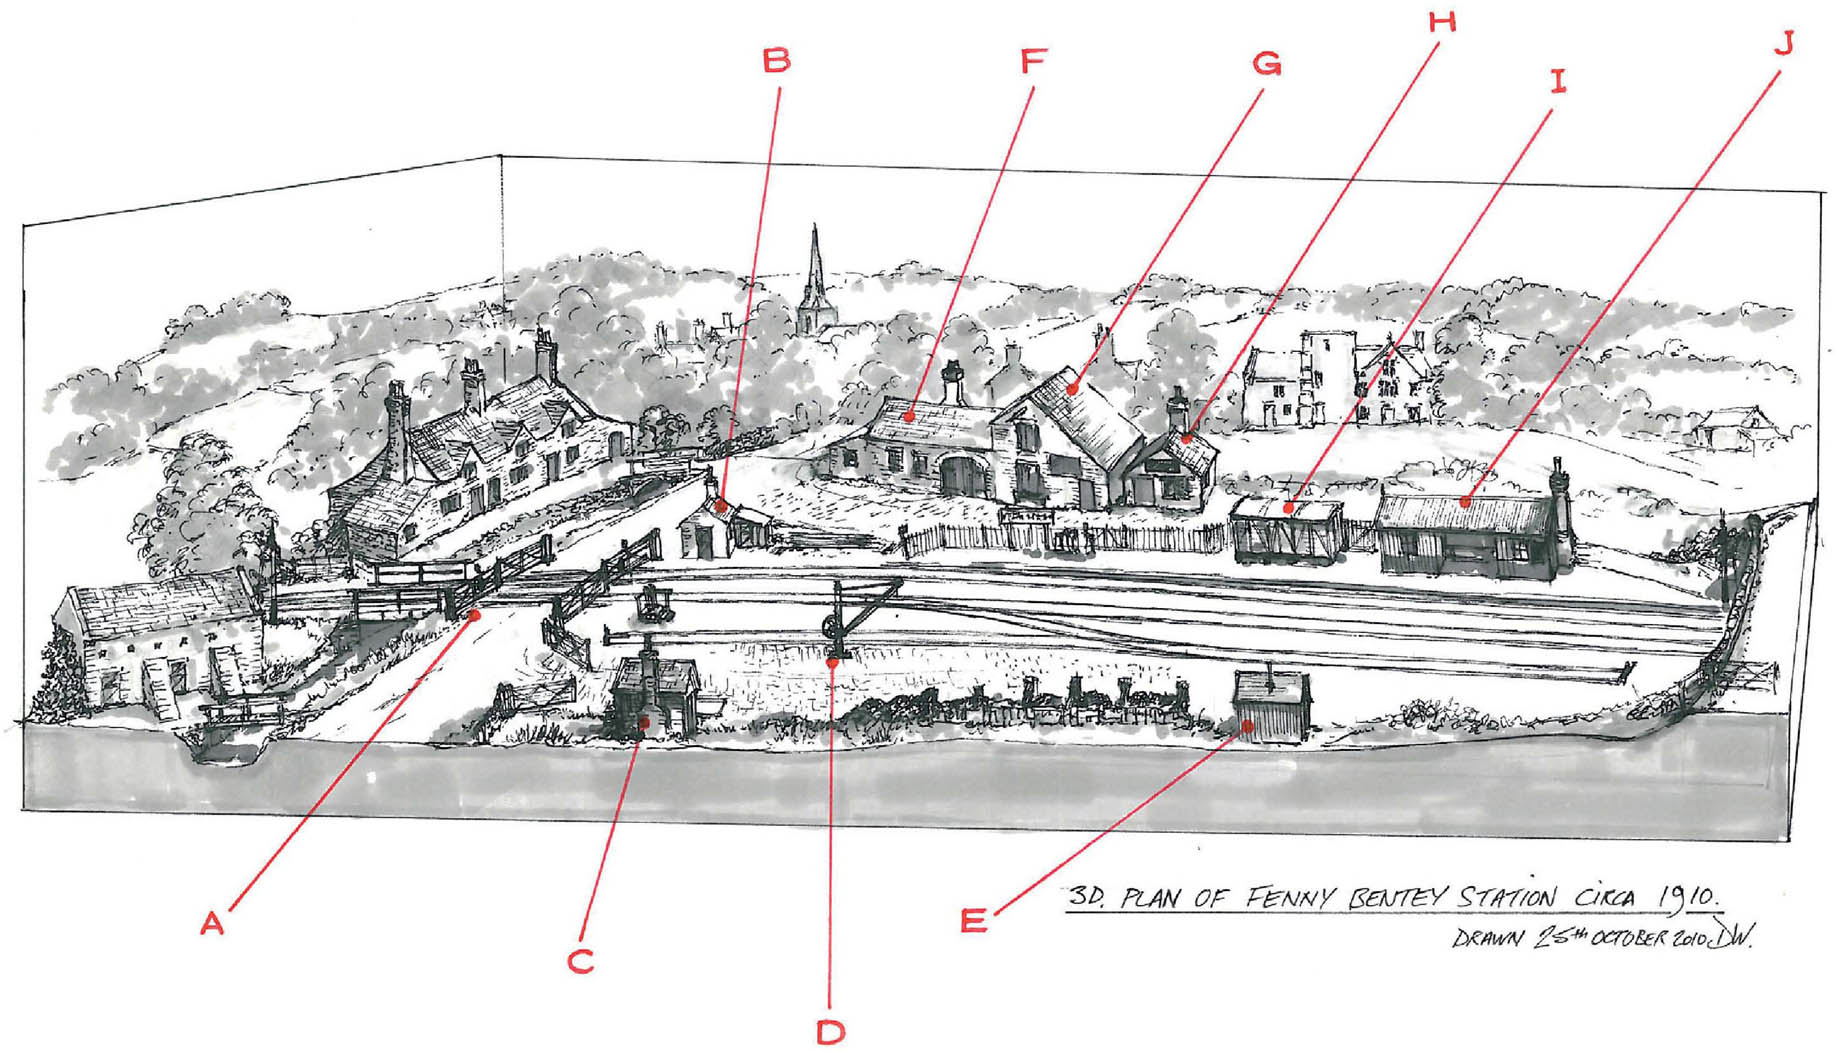
Fenny Bentley track plan: (A) level crossing; (B) crossing keeper’s hut; (C) weighbridge and office; (D) yard crane and dock; (E) coal merchant’s office; (F) smithy; (G) warehouse; (H) yard office; (I) grounded van body (store); (J) station building/waiting room.
IMAGINARY INDUSTRIAL RAILWAYS
The next three layout designs presented are all industrial, requiring freight-only operations. The designs would also fit into small spaces even in 4mm scale, making them micro layouts.
BREWERY BRANCH (BURTON UPON TRENT)
Burton upon Trent was famous for having the largest private railway system in the country. I have presented a small layout plan here of one of the brewery branches. I have purposely included one of the many level crossings that became a feature of the town’s streets. The model is based around one of the ale docks where casks of finished ale would be loaded onto wagons. This was then transported via the internal brewery branch lines to the exchange sidings, where the wagons would have been marshalled into larger trains for distribution to all parts of the country.
The larger breweries had their own fleet of locomotives with short wheelbases to cope with the sharp curves. Any modeller wanting to produce an accurate model would therefore have to look at the available kits or scratch build them. The smaller breweries, however, used locomotives supplied by the railway companies that met their requirements. The Hornby ex-L& Y 0-4-0 (Pug) or Bachmann’s Midland Class 1F tank would be good choices for your ready-to-run motive power.
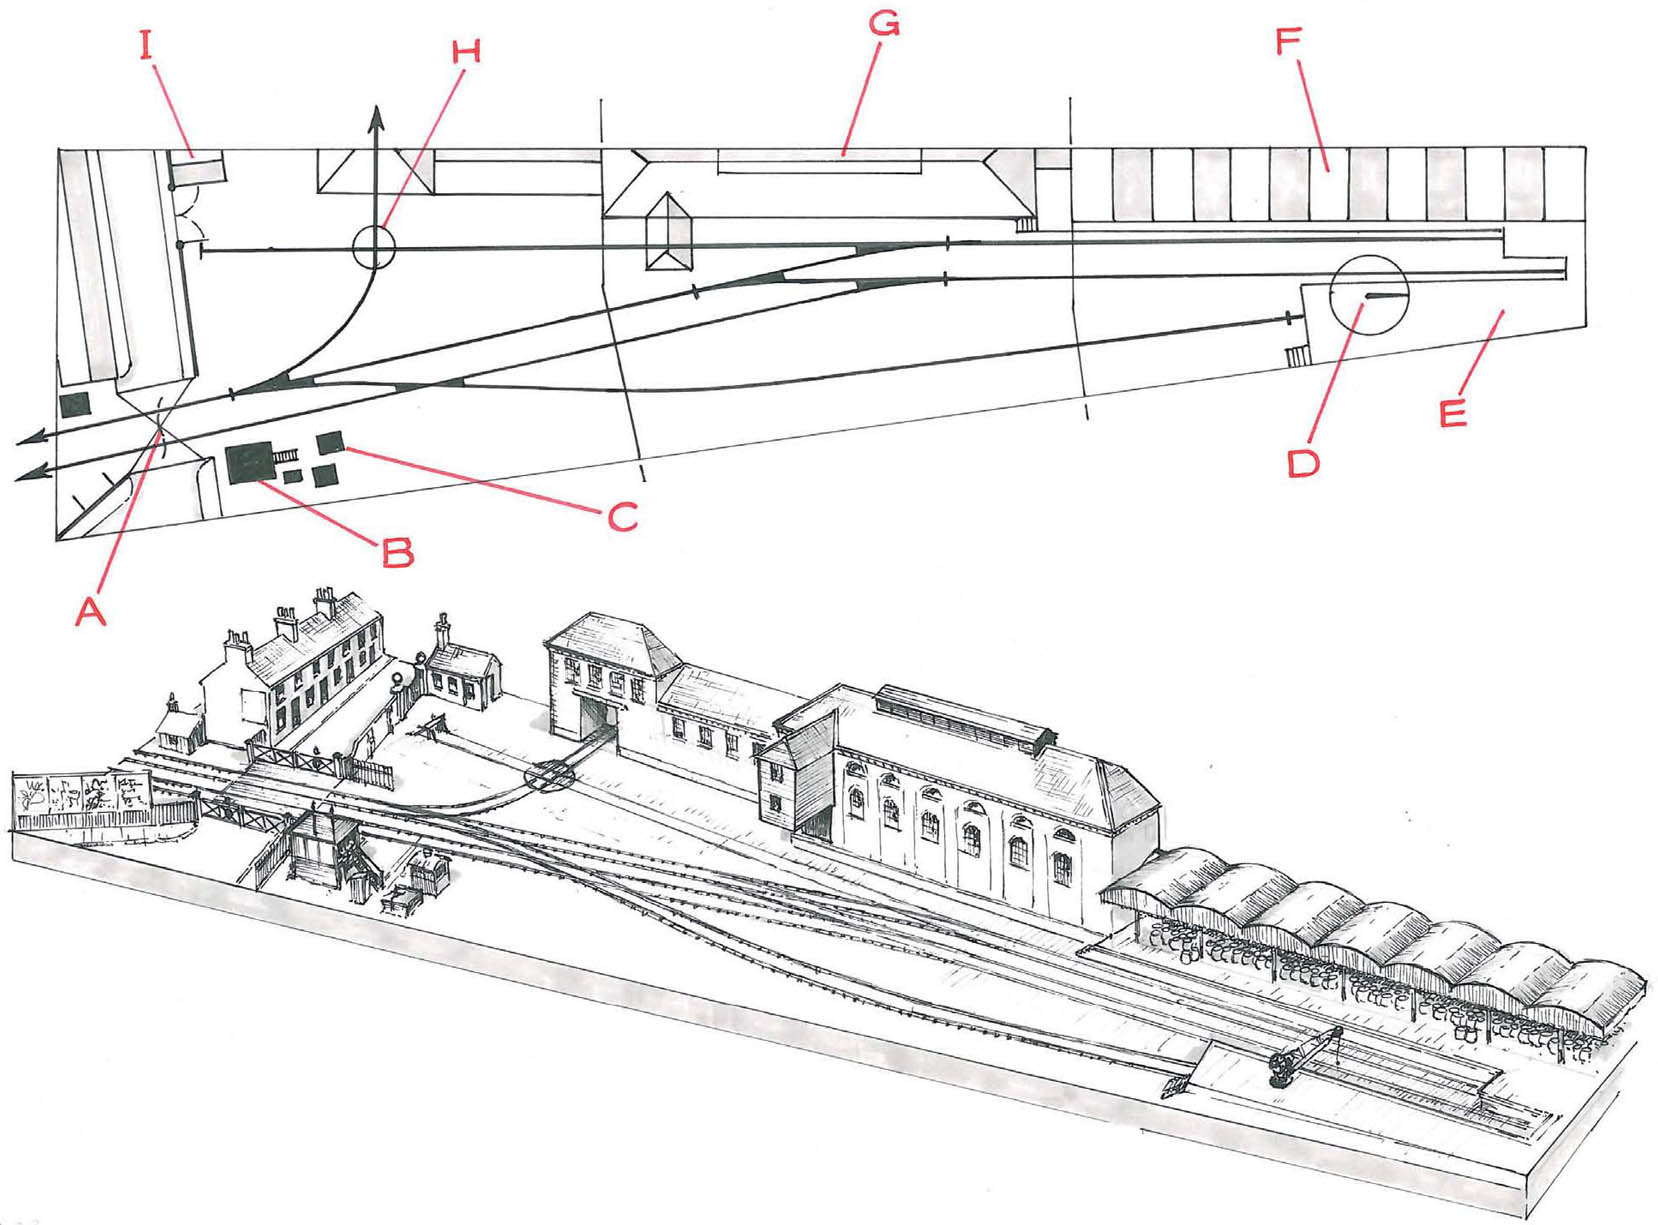
Burton Brewery Branch track plan: (A) level crossing; (B) signal box; (C) lamp hut; (D) yard crane; (E) cooperage dock; (F) ale loading dock; (G) hop stores and maltings; (H) wagon turntable; (I) gatehouse.
OAKTHORPE COLLIERY
Oakthorpe is a fictitious small colliery based on the Nottinghamshire and Derbyshire coal fields. The plan presented includes the main part of the colliery, all condensed within a small area to give an interesting but manageable layout. I have used the coal sorting screens at one end to form a run-off to a cassette fiddle yard. At the other end the positioning of the engine shed masks the run-off. The centre of the layout is dominated by the head stocks and the winding house. This has an attached boiler house complete with chimney.
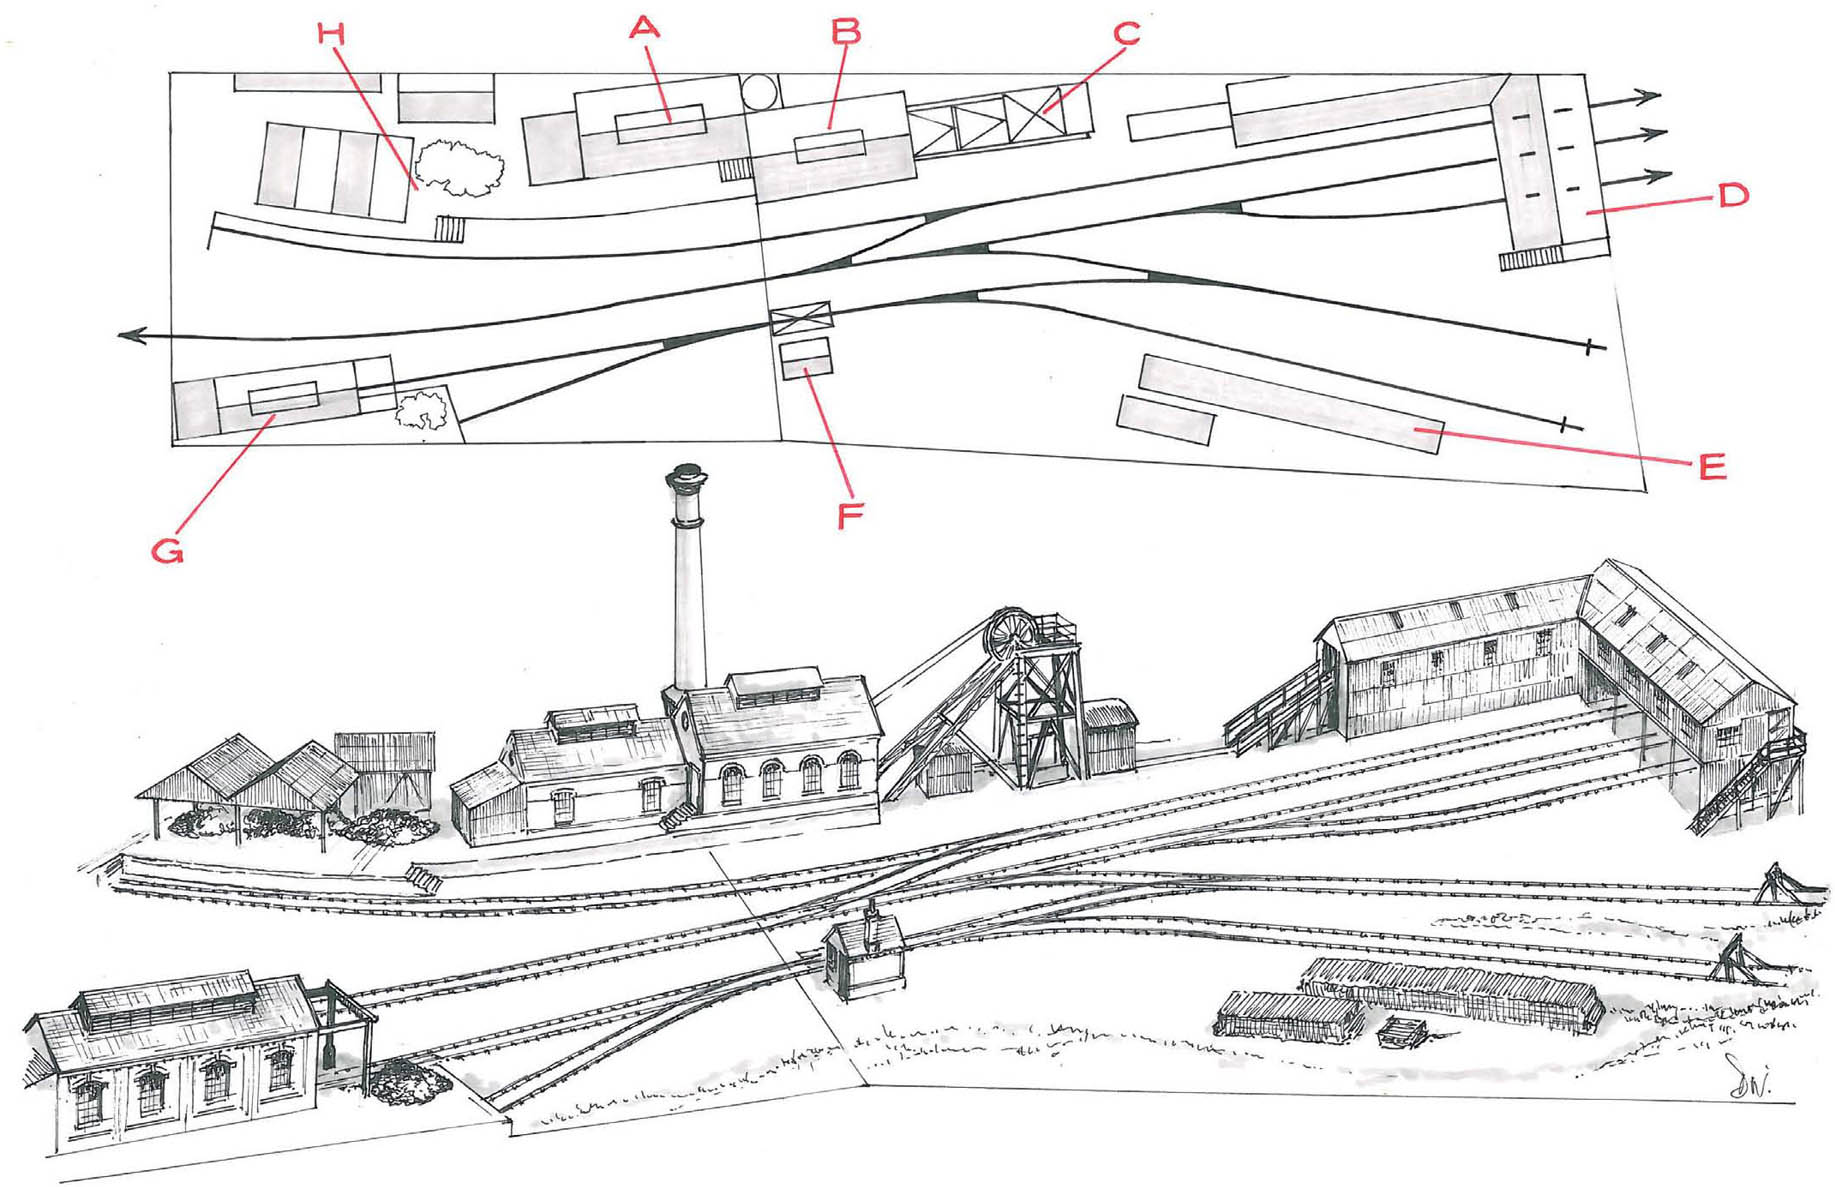
Oakthorpe Colliery track plan: (A) boiler house; (B) engine/winding house; (C) pithead stocks; (D) sorting screens; (E) pit-prop store; (F) rail weighbridge; (G) engine shed and coaling stage; (H) coal delivery dock.
The modeller’s choice of locomotives to run here is probably more varied than on the brewery layout. The Hornby J94 springs to mind, although the Bachmann Midland Class 1F would also not look out of place.
RIDDINGS BRICK AND PIPE YARD
The last design I would like to present is another industrial branch concept serving a brick and pipe yard. Although completely imaginary in design, it is based on the works that belonged to James Oakes & Company of Riddings. The works were sited at Pye Hill, just over the county border in the Erewash Valley. As with the colliery layout I have used buildings to either mask the cassette fiddle yards or position them so that the trains run through them to enter.
Besides the more conventional buildings on this site, a number of round beehive brick kilns are featured, together with their familiar square chimneys.
As on the previous layout plan, the choice of locomotives is open to any of the classes that would fit. The selection could include any smaller classes from the ‘Big Four’ as this type of brick yard was found in most counties around the country.
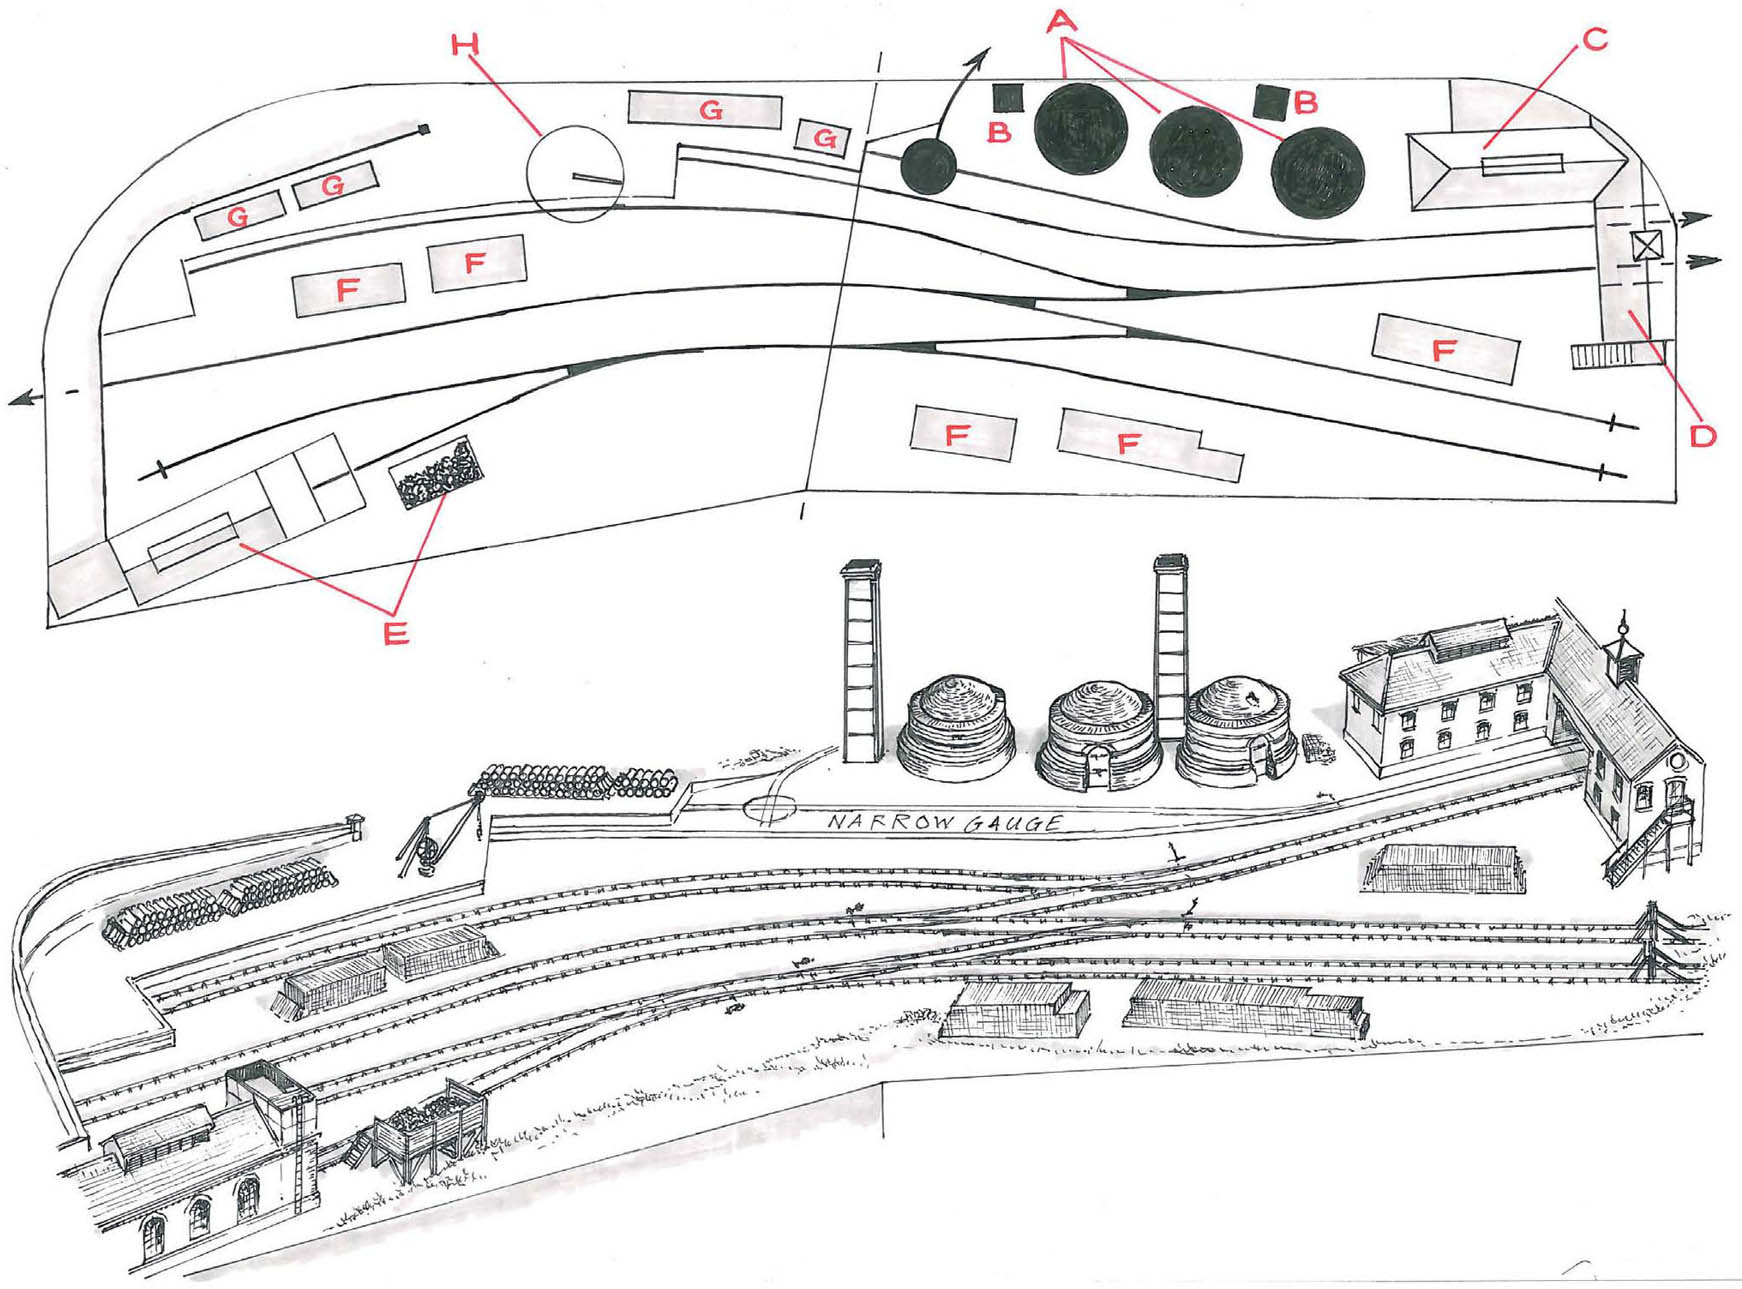
Riddings Brick and Pipe Yard track plan: (A) beehive kilns; (B) square chimneys; (C) workshop; (D) yard offices; (E) engine shed/water tank and coaling stage; (F) brick stacks; (G) pipe stacks; (H) yard crane.
To conclude this chapter I have included two imaginary layouts built to high standards. The first features Phil Waterfield’s ‘Malham’, creating a branch line to serve both the local community and industry.
The second shows Rob Milliken’s totally industrial brewery layout, based on a typical brewery branch and yard. Rob has cleverly used an original name derived from an amalgam of Mansfield and Marston Breweries: ‘Manston’
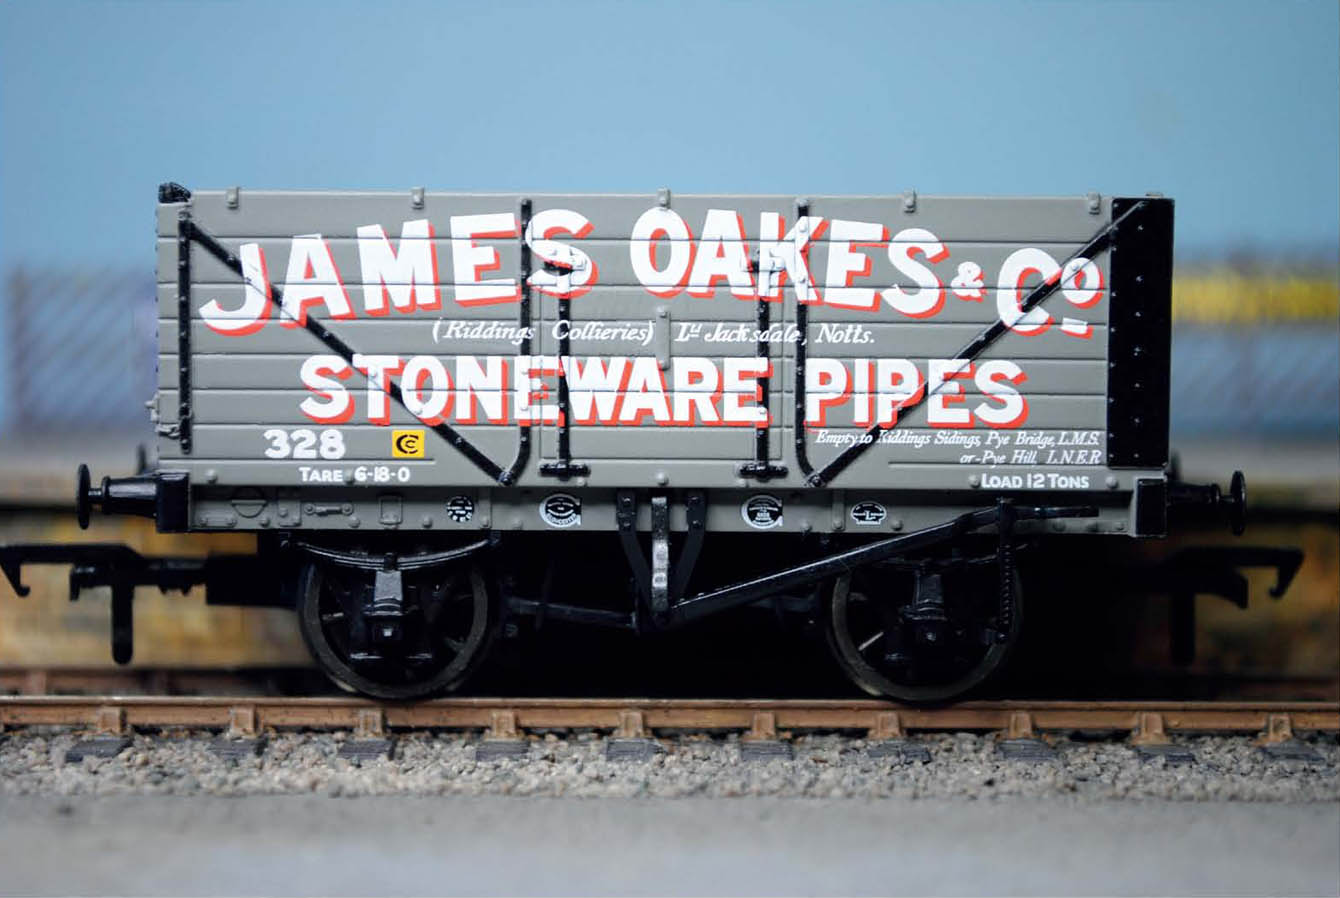
A private owner wagon belonging to James Oakes & Company. A number of wagons would be required if you choose to build this industrial branch line. The wagon has been produced as a limited edition by Bachmann and is available from the Midland Railway Centre.

Modelling a brick and pipe yard will also require a good number of the distinctive beehive kilns. This 4mm scale resin casting of such a kiln, produced from a master by the author, is now available from Skytrex 2013.
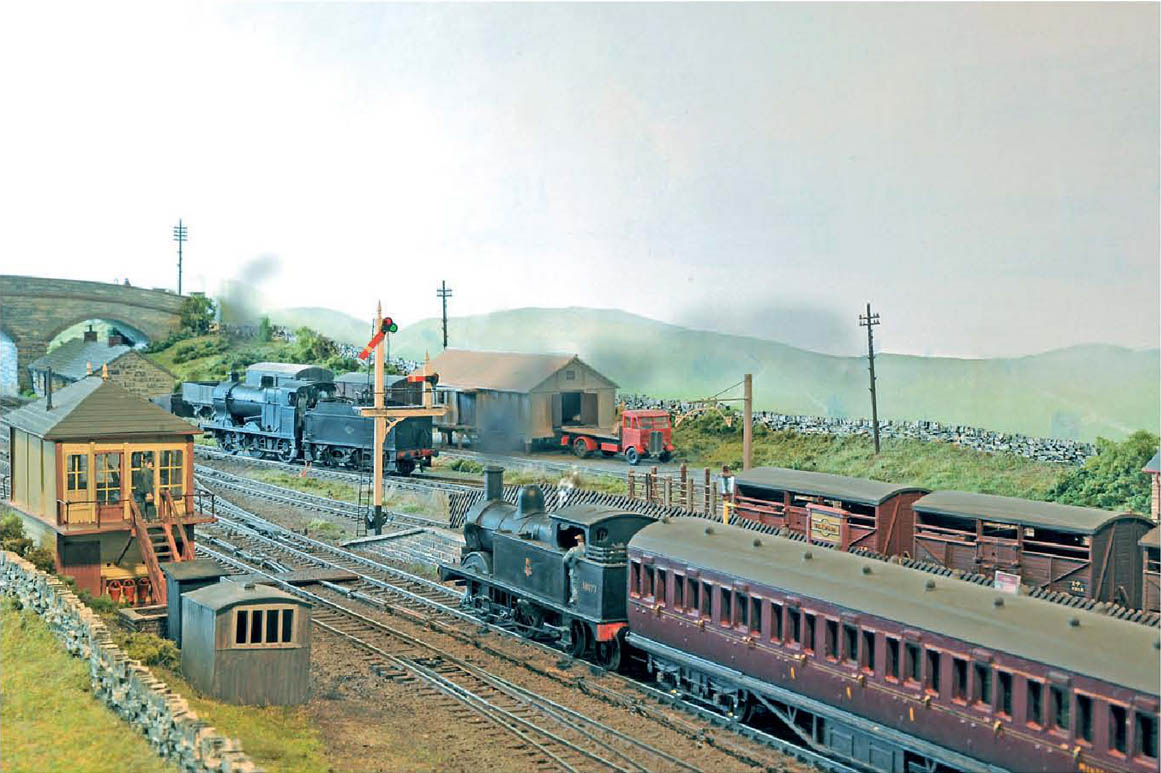
A general view of ‘Malham’, Phil Waterfield’s model of an imaginary Yorkshire Dales terminus. PHIL WATERFIELD
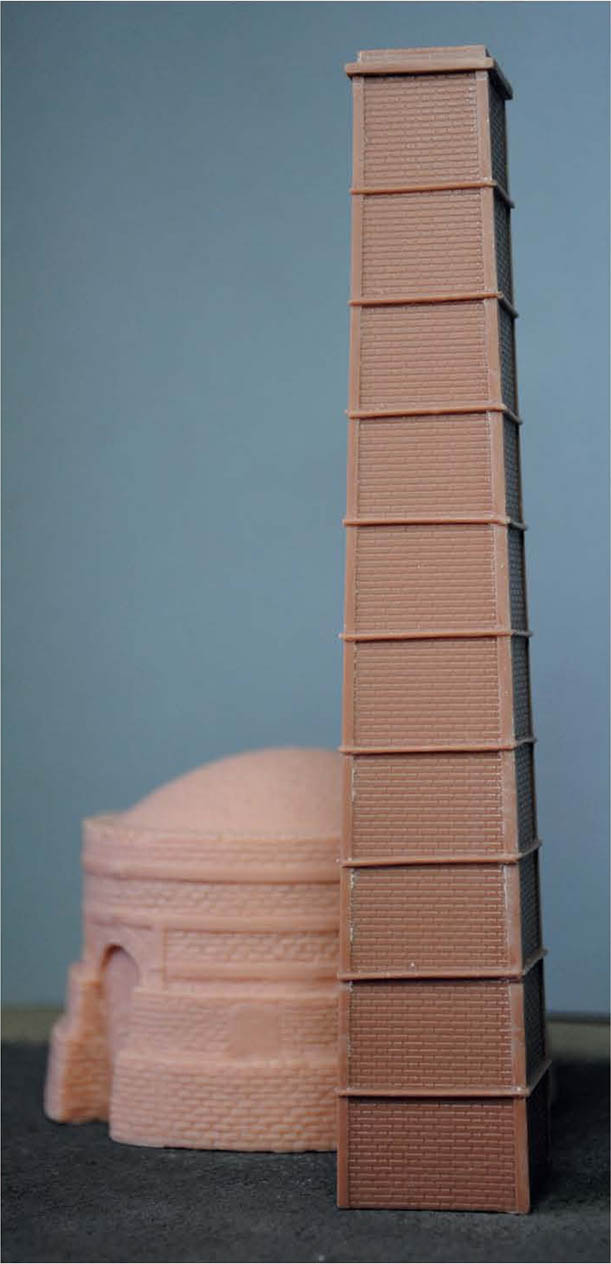
The brick and pipe yard will also require a few chimneys. This square sample was common to this type of works. The resin casting pictured is also available from Skytrex 2013 to complement the 4mm scale kilns.
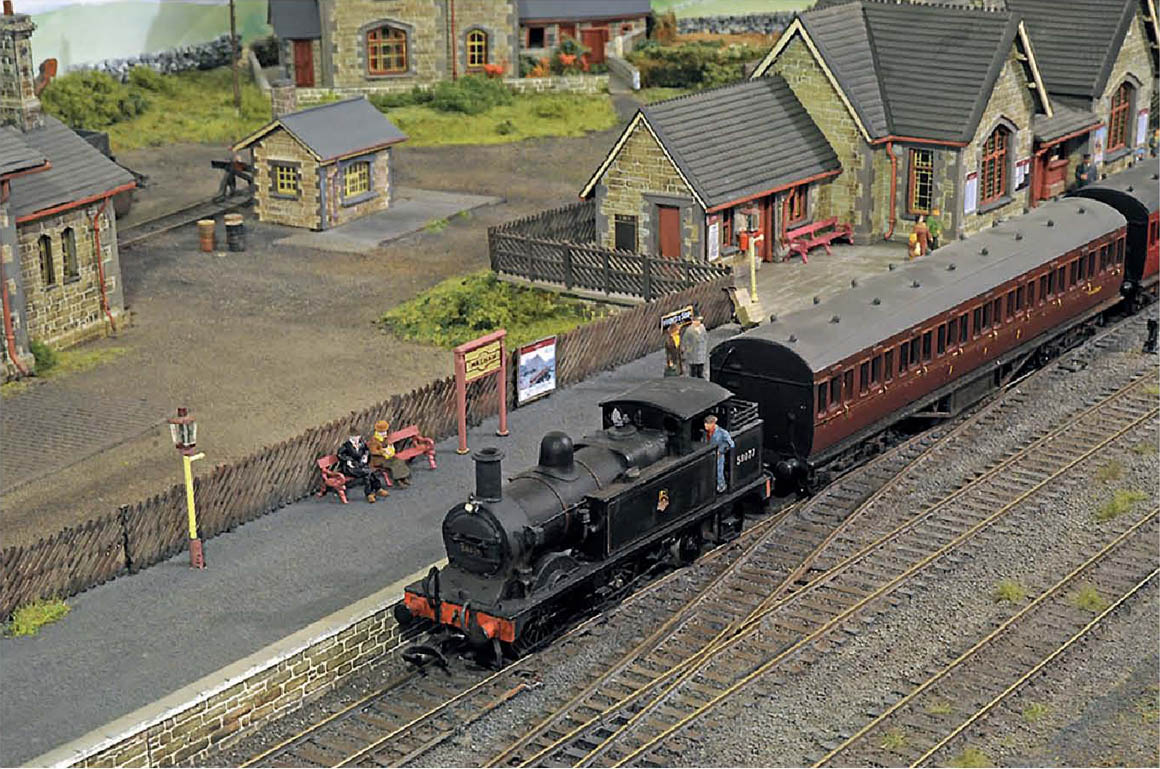
Another view showing the station at ‘Malham’. PHIL WATERFIELD
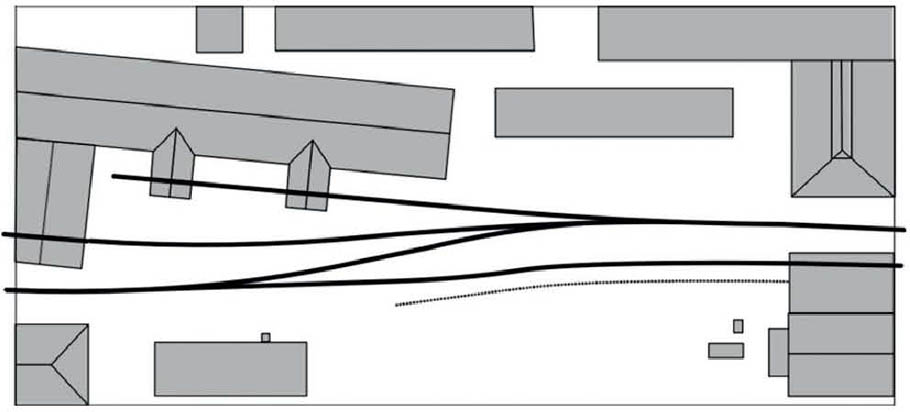
The track plan for Rob Milliken’s model of the fictitious ‘Manston Brewery’. ROB MILLIKEN
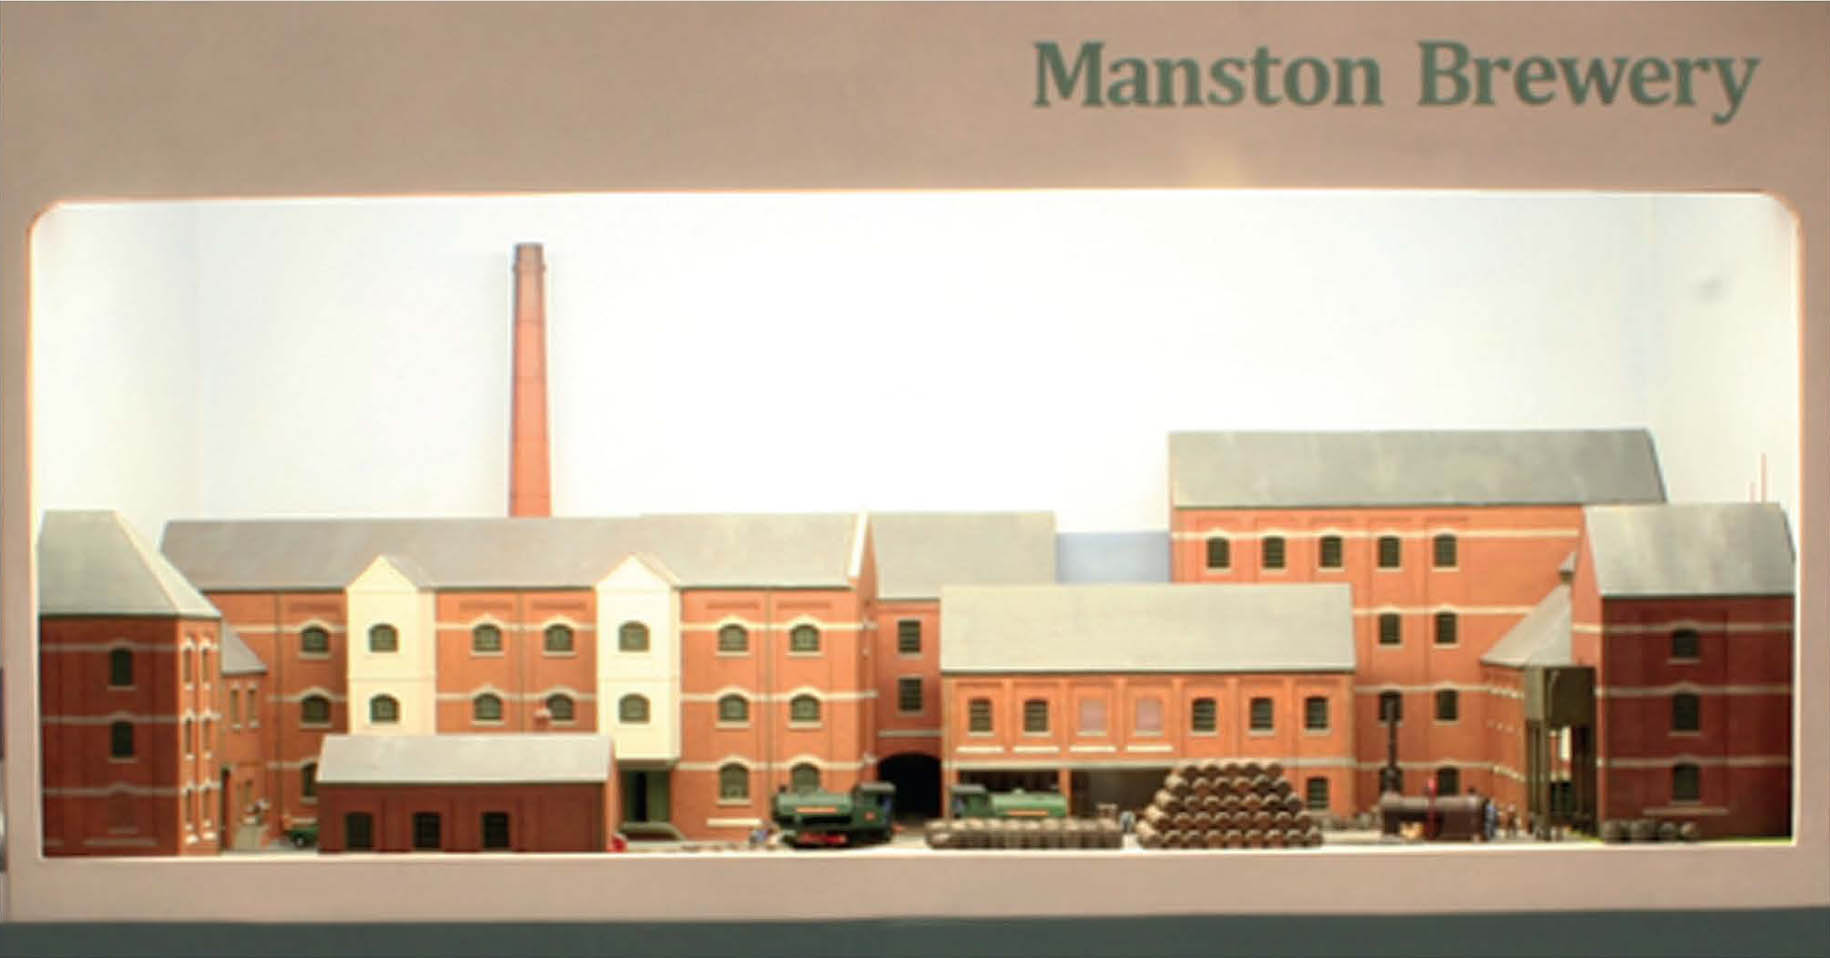
This photograph illustrates just how compact the ‘Manston Brewery’ layout is. Rob has made a special effort to present the model in a professional way, which is important when presenting a model such as this at public exhibitions. ROB MILLIKEN
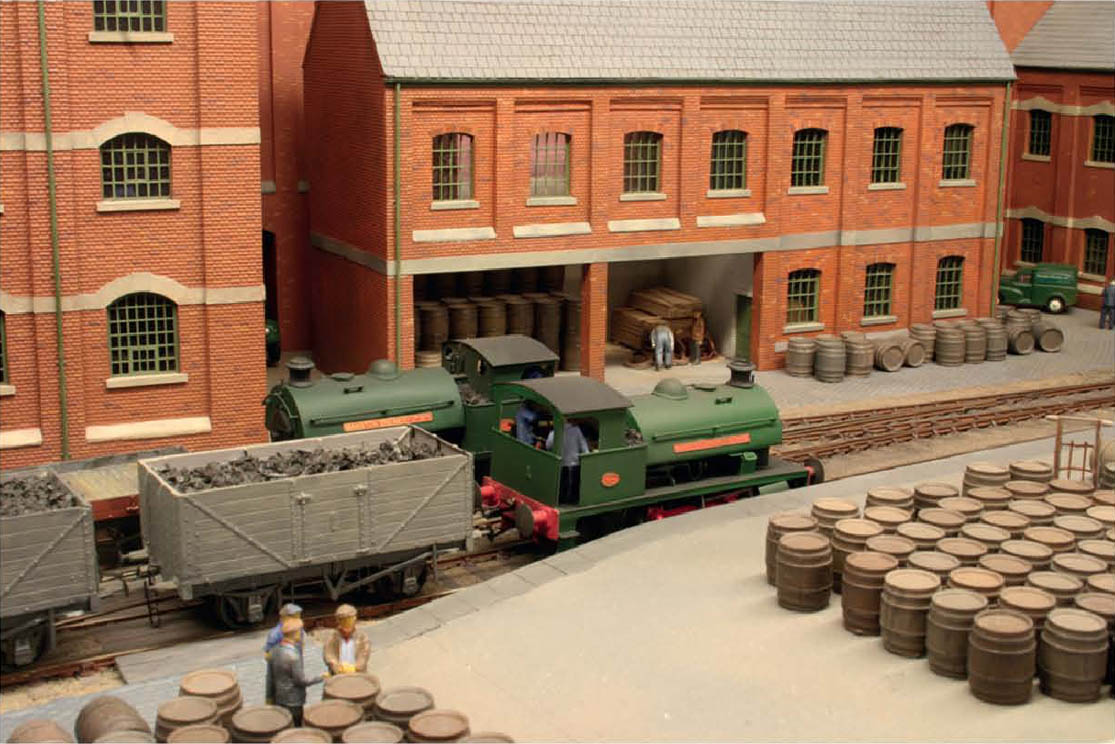
This close-up view of ‘Manston Brewery’ shows just how much detail and interest Rob has managed to include in a relatively small space. ROB MILLIKEN