WordPress Customizer is a relatively recent addition to the WordPress ecosystem. In short, it's a framework meant for live-previewing any changes that the user makes to their website. The Customizer's interface allows for the modification of various aspects of a theme's and website's appearance, starting from the name of the site, the tagline, all the way to the colors used, layouts, widgets, menus, and more. We talked about the Customizer from the user's point of view back in Chapter 8, Customizing Your Website Appearance/Design.
Now, from a developer's perspective, when you're building your WordPress theme, there are a couple of things that you should do in order to make it compatible with the Customizer. Luckily, the starter theme that we're using in this chapter as the foundation of our theme, the _S theme, already comes with some basic Customizer integrations. Let's go over them one by one, and at the same time, see how we can expand our theme's functionality further.
First, let's look at the following line of code. It should be placed at the end of your functions.php file:
require get_template_directory() . '/inc/customizer.php';
This definition simply includes an additional file that takes care of the Customizer integration itself. Even though we could do everything right in the functions.php file, having the Customizer handled in a separate file makes for a theme structure that's easier to grasp.
That new customizer.php file is where we're going to add all of our new code. The core of the Customizer integration is done via the customize_register hook. It allows us to define new Customizer panels, sections (the main elements of navigation within the Customizer), settings (the data that our theme can accept), and controls (the visual UI elements that allow us to tweak our settings).
In order to register all of our new Customizer elements, we can use the following function:
function daily_cooking_custom_customize_register( $wp_customize )
 { /* */ }
add_action( 'customize_register', 'daily_cooking_custom_customize_register' );
Within this function is where creating new sections, settings, and controls is done. However, as you'll notice, we already have this function in the customizer.php file created. This is, again, a result of building our theme on top of the _S starter theme. We've opted for this approach since it allows us to get started with theme development a lot quicker than building things from scratch.
Our current daily_cooking_custom_customize_register() function already features the following lines:
$wp_customize->get_setting( 'blogname' )->transport = 'postMessage';
$wp_customize->get_setting( 'blogdescription' )->transport = 'postMessage';
This code capitalizes on some Customizer abilities that are available for WordPress themes by default. Namely, those two enable us to modify the title and blog description.
Now it's time to add something new to the Customizer. Firstly, adding a new section is very simple. Let's start by including the following function call inside our main daily_cooking_custom_customize_register() function:
$wp_customize->add_section();
The function can take two arguments—the first one is the identifier for your new section, and the other is an array of additional options. Here's what we're going to do:
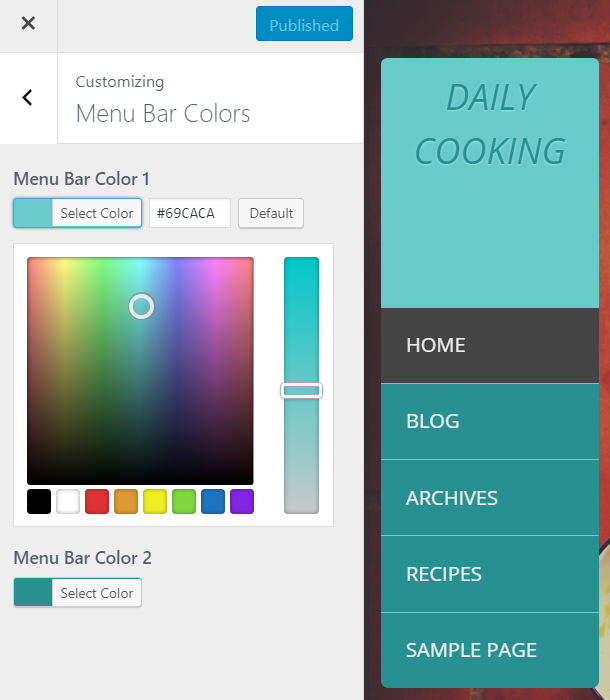
$wp_customize->add_section( 'menu_bar_colors' , array(
  'title' => 'Menu Bar Colors',
  'priority' => 30) );
This creates a new section titled Menu Bar Colors and identified by menu_bar_colors. Now, let's add a new setting. Settings provide a way to communicate with WordPress and let it know that we're using a value that the user can modify. New settings can be added via the $wp_customize->add_setting() function call. We can handle this as follows (as you can see, I'm adding not one, but two new settings):
$wp_customize->add_setting( 'menu_bar_color1' , array(
  'default' => '#69CACA') );
$wp_customize->add_setting( 'menu_bar_color2' , array(
  'default' => '#279090') );
Once the settings are in place, the last elements of the puzzle are some new controls. Controls tie the two together; they let WordPress know which sections work with which settings. This is done via the $wp_customize->add_control() function call, as follows:
$wp_customize->add_control( new WP_Customize_Color_Control( $wp_customize, 'menu_bar_color1', array(
  'label' => 'Menu Bar Color 1',
  'section' => 'menu_bar_colors',
  'settings' => 'menu_bar_color1') ) );
$wp_customize->add_control( new WP_Customize_Color_Control( $wp_customize, 'menu_bar_color2', array(
  'label' => 'Menu Bar Color 2',
  'section' => 'menu_bar_colors',
  'settings' => 'menu_bar_color2') ) );
As you can see, each of our settings gets its own control. At this stage, when you save the file and go to the Customizer from the WordPress dashboard (Appearance | Customize), you'll see the new section in the sidebar. Inside it, you'll also see that the elements are all operational. Although, they don't have much impact on the appearance of the theme yet. We'll handle that next. Take a look at the following screenshot:
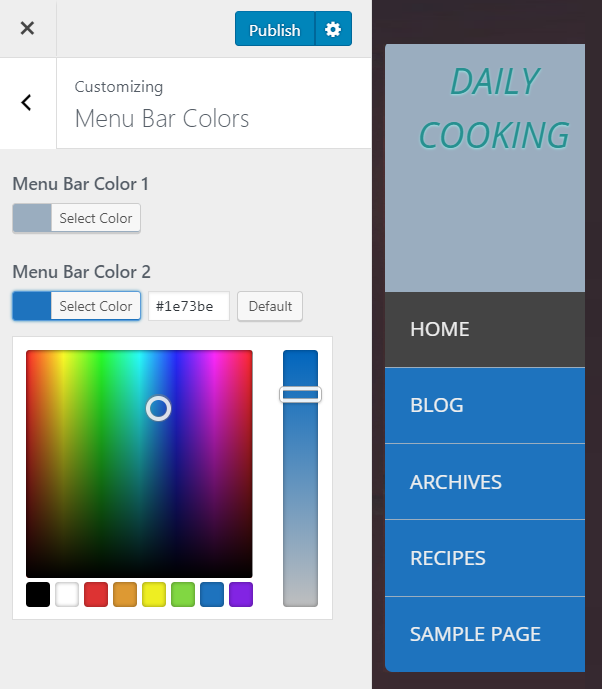
The first thing we need to do now is alter the CSS of the theme based on what the user has set in the Customizer. To make that happen, let's add the following code at the end of the customizer.php file:
function daily_cooking_customizer_menu_css()
{
  ?>
  <style type="text/css">
  .site-header .site-branding { background: <?php echo
    get_theme_mod('menu_bar_color1', '#69CACA'); ?>; }
  .main-navigation ul li { border-bottom: 1px solid <?php echo
    get_theme_mod('menu_bar_color1', '#69CACA'); ?>; }
  .site-header { background: <?php echo
    get_theme_mod('menu_bar_color2',
    '#279090'); ?>; }
  </style>
  <?php
}
add_action( 'wp_head', 'daily_cooking_customizer_menu_css');
This new function hooks up to wp_head and alters the CSS of the website. The most important instructions in it are those three inline PHP echo blocks. Here's one of them:
echo get_theme_mod('menu_bar_color1', '#69CACA');
The get_theme_mod() function allows you to grab the current theme's settings and indicate the name of the specific setting that you need in the first parameter (the second one is the default value). When you save your file now, the new color selection options should be fully enabled. Refer to the following screenshot:
We have only scratched the surface here in terms of what's possible in the Customizer, but it's still given you a good overview, and has also proven that the Customizer is actually a very developer-friendly environment to work in. Always try putting as many of your theme's settings as possible in the Customizer module; the end user will thank you for it!
https://codex.wordpress.org/Theme_Customization_API and https://developer.wordpress.org/themes/customize-api/.