
WHAT IT TAKES
Time: 1 day
Skill level: Intermediate
By itself, the tile in a shower enclosure is almost maintenance free. With an occasional wipe-down, it can look good for years. Grout, however, is a different story—eventually it’s going to break down. Large cracks and crumbly chunks are alarming, but smaller fractures can be trouble too. Fractures, and stains that won’t wash out, may indicate spots where water is leaking in and working its way behind the tiles. Sooner or later, that water will weaken the adhesive that’s holding the tile or cause rot in the walls. When that happens, the only solution is to tear out the tile and start from scratch.
The good news is that if you catch it in time, you can quickly and easily give tiled surfaces a new lease on life—and a fresh look—by applying a new layer of grout. The following pages walk you through the regrouting process from start to finish and offer tools and tips to prevent mid-job mishaps. You don’t need previous tile experience; regrouting is mostly grunt work.
The materials needed for an average-size shower cost about $50. In some cases, you can finish the job in a few hours, but to be safe, give yourself a day or two. If you start on Saturday morning, you should be able to take a shower on Monday.
Before you begin digging into that old grout, make sure you have all the tools and materials you’ll need to finish the job. Think of this project in three parts: scraping and cleaning, regrouting and cleanup.
When you’re choosing grout-removal tools, stick with steel to be safe. Many special grout scrapers equipped with carbide tips work well and stay sharp for a long time, but if you slip, the carbide can damage your tile or tub. Steel utility knife blades, on the other hand, may dull quickly, but they’re less likely to scratch the tile. Buy a knife with easy-to-change blades, and also buy plenty of spare blades (a 100-blade pack only costs about $10). They’re ideal for cleaning out narrow joints. A manual grout saw (Photo 2) with a notched steel blade is also handy for stubborn chunks of grout.
As for grout, buy a 10-lb. bag—you may have some left over, but that’s better than running out. Grout comes in two forms: unsanded and sanded. Your choice depends on the width of the gaps between the tiles. For joints up to 1/8 in., choose the unsanded variety. For wider joints, choose sanded to avoid cracking. Whatever type you need, look for a “polymer-modified” mix. The extra ingredients help prevent future cracking and staining. It’s almost impossible to match new grout to old, but don’t worry. By scratching out the topmost layer from all the grout lines and adding new, you’ll get a fresh, consistent color.
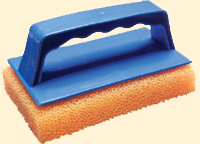
To apply the grout, buy a rubber-soled grout float and a grout sponge. In case the grout starts hardening too quickly, you’ll also want to buy a plastic scouring pad. Last, buy a tube of tub-and-tile caulk that matches the grout color.
Before you begin your attack, take a minute to protect your tub against scratches and debris that can clog your drain (Photo 1). Tape a layer of plastic sheeting to your tub’s top edge. Next, lay a drop cloth on top of the plastic to protect the tub and cushion your knees. Then remove the faucet hardware or protect it with masking tape.
Getting rid of the old caulk and grout requires plenty of elbow grease, but it’s not difficult work, especially if you take your time. Begin by cutting out the old caulk (Photo 1) and then move on to the grout (Photo 2). When you’re using a utility knife, switch blades as soon as the edge stops digging and starts skating on the grout (Photo 2). At times, you may have more success with the grout saw. Whatever tool you choose, the goal remains the same: to remove about 1/8 in. from the top (or more, if the grout comes out easily).
When you’re done, remove dust and debris, which can weaken the bond between the tile and the new grout (Photo 3).
Once the grout is mixed, the clock starts ticking toward the moment when it will harden on the wall…or in the bucket. Pro tilers can mix and use a 10-lb. bag of grout before it hardens, but to play it safe, mix up a few cups at a time and work in sections. A smaller batch will allow you plenty of time to apply it and clean the excess from one wall at a time. When you run out, rinse the container before mixing a new batch.
Before you make a batch from a bag, shake the bag to redistribute any pigment and Portland cement that might have settled out in shipment. After it’s been dry mixed, scoop out a few cups (one cup equals about a half pound) into a bucket. The instructions on the bag indicate how much water to add per pound of mix. To ensure a strong mix, start with about three-quarters of the specified amount of water and gradually pour in just enough to make the grout spreadable. Aim for a fairly stiff consistency, somewhere between cake icing and peanut butter (Photo 4, inset). Don’t worry if the grout looks a little lumpy. After it’s mixed, allow it to sit for 10 minutes. During this time, the remaining dry specks will absorb moisture. Give the grout one last stir (restirring also keeps the mix from hardening in your bucket) and it’s ready for application.
Focus on one wall at a time. Scoop out some grout with a rubber float and press it out across the tiles at a 45-degree angle (Photo 5). It’s OK to be messy. The goal is to pack as much grout into the joints as you can. Press hard and work the float in several directions.
Immediately after you fill the joints, rake off the excess grout and put it back in your bucket. Hold the float on edge, and remove the excess (Photo 6). Move the float across the joints diagonally to prevent the edge from dipping into the joints and pulling out too much grout. Work quickly before the grout starts to harden.
The time between scraping and sponging varies from job to job. Depending on your mix, the humidity or the temperature, the grout may take anywhere from five to 20 minutes to firm up. Begin sponging as soon as the grout feels firm and no longer sticks to your finger.
Using a well-wrung tile sponge, wipe away the bulk of the unwanted grout with short, gentle, circular strokes (Photo 7). Turn the sponge so that you’re using a clean edge with each pass. Rinse and wring it out in the “dirty” bucket, then dip the sponge in a “clean” bucket, and finally wring it out again in the “dirty” bucket. This two-bucket technique helps keep your sponge and rinse water clean so that you can remove grout more effectively. Wring out as much water as possible. Too much water can pull cement and pigment from your fresh grout lines.
In addition to wiping away the excess, the sponge works for fine-tuning the shape of your grout lines. To shave down any high spots and make the lines slightly convex, run the sponge across the joint until the grout lines appear uniform. (If you find a low spot, use your finger to rub in a little extra grout.)
Finally, scrape out any globs of grout that may have gotten into the joints you intend to caulk (Photo 8). This includes all corners and the tub/tile joint. You could do this chore later, but it’s a lot easier now, before the grout is rock hard.
The sponge-wiped walls may look clean at first, but as the surface moisture evaporates, the remaining grout particles will create a light haze. Give the grout an hour or two to dry, then buff off any residual haze with a soft towel (Photo 9).
Let the grout dry overnight before applying the caulk along the tub/tile joint and inside corners. For clean, precise caulk lines, run painter’s tape along the inside corner and at the tub/tile joint (Photo 10). Just remember to remove the tape as soon as you finish smoothing. If you wait too long, the caulk will skin over or stick to the tape and you’ll pull out the caulk when you try to remove the tape. Depending on the caulk, your bath should be ready in 24 hours.
To reduce mold growth, seal grout lines for extra stain and water resistance. Give the grout a week or two to cure completely before sealing. Remember that sealers wear off over time, so you’ll need to reapply it every year or so. If you don’t want to apply a sealer, wiping your walls down with a squeegee after each shower works almost as well.
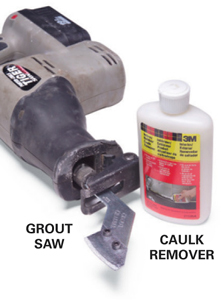
The basic arsenal of simple scratch-out tools works for most projects, but there are times when you might need a little extra help. This pair of not-so-secret weapons can make short work of super-stubborn grout and caulk.
The first is a grout saw attachment. Attached to a reciprocating saw or oscillating tool (there are different types), this carbide-tipped clean-out tool works like a steroid-fueled electric toothbrush. Controlling the blade so it doesn’t scratch the tile may take some getting used to, so start with light pressure. Once the blade digs in, it’s not too difficult to keep it on the path.
The second weapon is caulk remover. You’ll find it indispensable if the previous installers used silicone caulk to seal cracks around tubs and showers. Silicone’s stickiness can make removing it a real headache. The chemical requires a few hours to soften stubborn caulk, but waiting is better than the tedious chore of scratching off the silicone remnants with your knife and possibly damaging your tile or tub.
tip
When you’re shopping for grout, stick with brands that offer color-matching caulks. Factory-matched caulk/grout combinations blend almost perfectly.
tip
The biggest mistake you’re likely to make is waiting too long before sponging the excess grout off the tile.
A plastic scrub pad is a cheap insurance policy. The coarse pad quickly and easily scours off hardened grout that a sponge won’t pick up, but it won’t scratch the tile.
Of course, buying one may guarantee that you won’t need it. On the other hand, should you need one, you won’t be able to drive to the hardware store fast enough.
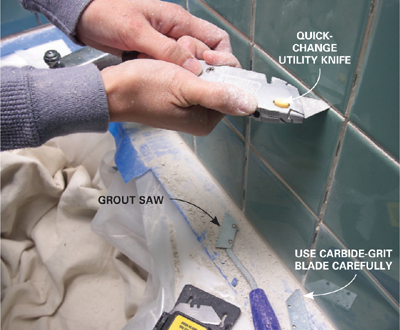
Scratch out at least 1/8 in. of grout from all the horizontal and vertical lines with a utility knife or grout saw. Change blades often.
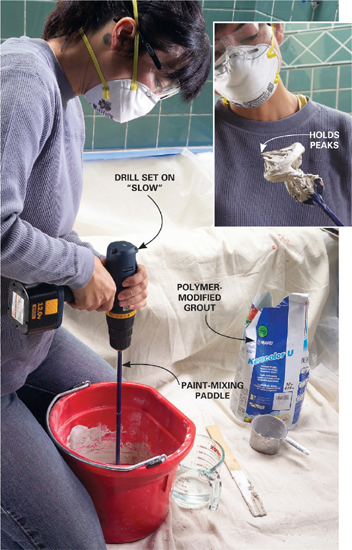
Mix the grout with water in a tall bucket using a paint-mixing paddle. Mix slowly until the grout becomes a thick paste.
Spread grout at an angle to the grout lines with a rubber float. Press hard on the float to pack the joints full of grout.

Scrape off excess grout by tipping the float on edge and pushing it diagonally across the tile. Work quickly.

Wipe off the excess grout with a damp sponge as soon as the grout lines are firm. To keep the rinse water clean, dip the sponge in the “dirty” bucket and wring it out. Then dip it in the “clean” bucket and wring it over the dirty bucket.
Scrape grout out of the inside corners and tub/tile joint so that you can seal these joints with caulk later on.