
WHAT IT TAKES
Time: 1 day
Skill level: Intermediate
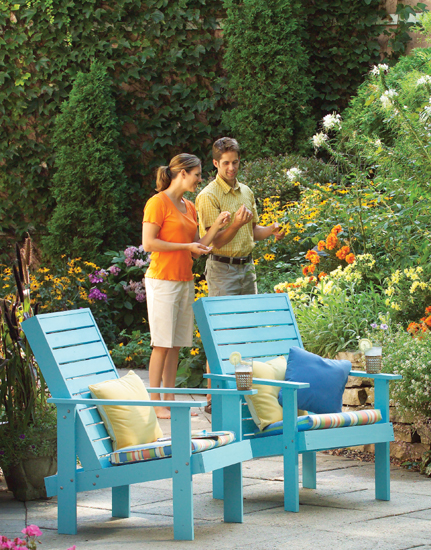
Most wooden outdoor chairs can get uncomfortable in a half hour. This one is designed so you can settle in and knock off a few magazines or even catch a snooze. The cushion adds an extra bit of staying power, and the slats will help keep you cool. And you’ll like the built-in tray on the back for holding your snack and phone.
Every detail of this chair is engineered for simplicity of construction, starting with the use of standard-width lumber for the parts.
While a power miter box is ideal for cutting the parts to length, you could easily use a circular saw or even a jigsaw for all the cuts. You’ll also need a drill/driver and spring clamps for assembly.
These chairs are pine, but you could choose fir, cedar, treated pine or any other wood that can handle the outdoors. The pine for each chair cost about $35. Order the cushion online, or use any chair cushion about 18 to 20 in. square.
You’ll need only 1x3s (3/4 in. x 2-1/2 in.) and 1x4s (3/4 in. x 3-1/2 in.) for this project. Choose wood that either is knot free or has only small, tight knots. Look for straight boards, but they don’t have to be perfect because you’ll cut them into shorter lengths. If you can’t find good 1x3s, buy 1x6s and rip 2-1/2-in.-wide pieces from them. You can ask the lumberyard to do it if you don’t have access to a table saw.
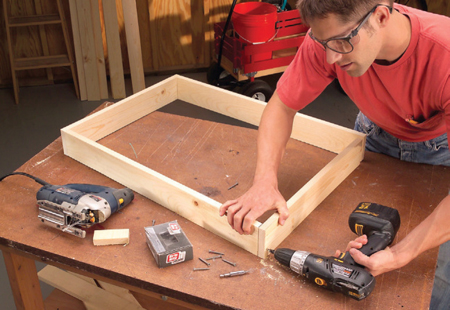
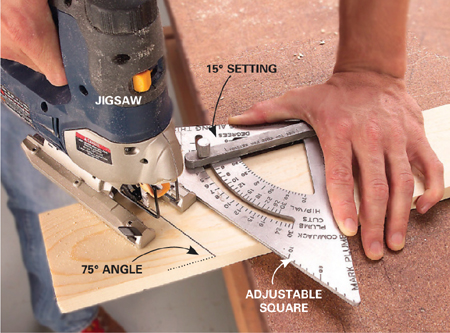
Do all your assembly work on a flat benchtop or floor area in your garage or shop. Begin the process by cutting the seat box parts. It’s easier to give the parts a quick sanding at this point than to sand the project after assembly. Then drill pilot and countersink holes and assemble the box with 1-5/8-in. deck screws. (See Photo 1 and Figure A.) A No. 8 pilot/countersink bit lets you quickly predrill and countersink in one step. Next cut the seat supports (C) using a miter saw or an angle guide to cut the 75-degree angle. An adjustable quick square (sold at home centers and hardware stores) works great as a cutting guide (Photo 2). Spread an exterior glue and screw the supports to the sides of the box with 1-1/4-in. galvanized screws (Photo 3).
Cut the seat back sides (E) and the seat top (B) and then glue and screw these pieces together with 1-5/8-in. deck screws. Next, glue and screw the back supports (D) to the seat back sides, making sure the supports extend 3-1/2 in. beyond the ends of the sides.
With the seat box assembly lying flat, insert the back assembly and align the back supports (D) directly behind the seat supports (C) and secure them with clamps (Photo 4). Drill two 1/4-in. holes through each seat box side and through the back supports. Insert 1/4-in. x 2-in. carriage bolts, add a washer and tighten the nuts with a wrench.
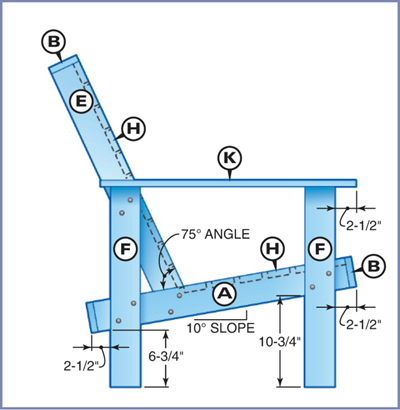
Mark the legs and seat frame with an adjustable square set at 10 degrees. Then draw a 10-degree line on the sides of the seat frame, 2-1/2 in. from the front and back (Figure B), to mark the leg positions. Also mark on the back edge of the rear legs at 6-3/4 in. and on the back edge of the front legs at 10-3/4 in. (Figure B).
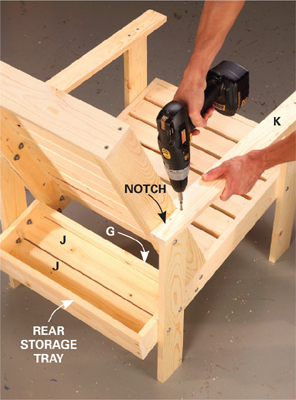
Align the marks on the legs and the seat frame and clamp the parts into place (Photo 5). Be sure the front and back legs are parallel and that both legs are square to the work surface. Clamp the legs to the seat frame and the back. Drill 1/4-in. holes and bolt the legs to the seat and back. Cut the two slats (J) for the rear shelf and the back seat brace (G) and nail them to the sides with 6d galvanized casing nails.
Cut the slats (H) for the seat and back. Starting at the top of the seat back, fasten the slats with glue and 4d (1-1/2-in.) galvanized finish nails. The 1x3s used here were 2-5/8 in. wide and spaced every 3/8 in. If your 1x3s are narrower, adjust the spacing or add another slat. You’ll probably have to notch the lowest slat on the back to fit around the seat supports (Photo 6).
Now glue and nail the seat slats to the seat supports, starting at the front. Adjust the spacing to get a good fit.
To complete the chair, cut the arms and hold each on top of the legs so it overhangs the corresponding front leg 2-1/2 in. Then mark the back of the arm and notch it 3/4 in. with your jigsaw so it fits tightly against the side of the seat back (Photo 7). Fasten the arms so the outer sides overhang the legs by 1 in.
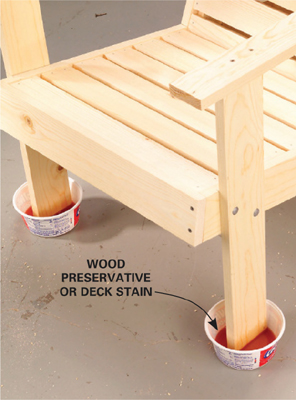
No matter what finish you choose, be sure to soak the legs in a preservative or deck stain to keep water from wicking up and ruining the finish or causing rot (Photo 8). If you paint, use an oil-based primer followed by two topcoats of a high-quality gloss or semigloss acrylic paint.
Materials List
ITEM |
QTY. |
8' pine 1x4s |
4 |
8' pine 1x3s |
6 |
1/4" x 2" galvanized carriage bolts with washers and nuts |
8 |
1/4" x 2-1/2" galvanized carriage bolts with washers and nuts |
8 |
2" deck screws |
8 |
1-5/8" deck screws |
24 |
1-1/4" galvanized wood screws |
32 |
4d galvanized finish nails |
1 lb. |
6d galvanized casing nails |
12 |
Cutting List
KEY |
QTY. |
SIZE & DESCRIPTION |
A |
2 |
3/4" x 3-1/2" x 30" seat box sides |
B |
3 |
3/4" x 3-1/2" x 21-1/2" seat top and box ends |
C |
2 |
3/4" x 2-1/2" x 19-1/2" seat supports (measure to long point of 75° angle) |
D |
2 |
3/4" x 2-1/2" x 32-9/16" back supports (measure to long point of 75° angle) |
E |
2 |
3/4" x 3-1/2" x 29-1/8" seat back sides (measure to long point of 75° angle) |
F |
4 |
3/4" x 3-1/2" x 23-1/2" legs |
G |
1 |
3/4" x 3-1/2" x 20" back seat brace |
H |
17 |
3/4" x 2-1/2" x 20" seat and back slats |
J |
2 |
3/4" x 3-1/2" x 20" storage tray slats |
K |
2 |
3/4" x 2-1/2" x 30" arms |
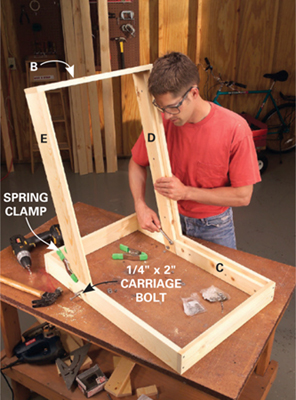
Cut, drill and assemble the parts for the back (Figure A). Then clamp the back to the seat frame, drill 1/4-in. holes and install the carriage bolts.
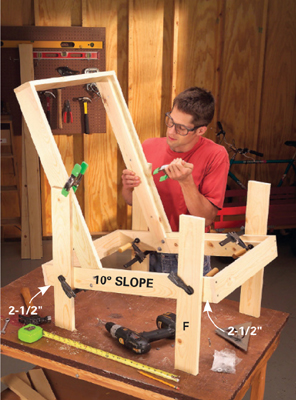
Position the legs and clamp them to the frame using Figure B as a guide. Drill and fasten them with carriage bolts. Nail the rear storage tray slats to the sides.