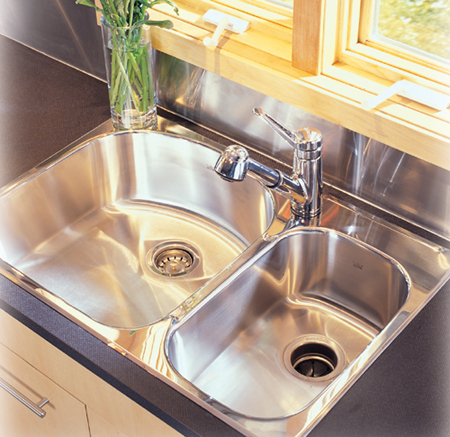


WHAT IT TAKES
Time: 1 day
Skill level: Intermediate
Installing a new sink and faucet is easier than ever thanks to the simple-to-cut-and-assemble white plastic (PVC) drain parts (Photo 7) and nearly foolproof flexible water supply tubes (Photo 6). Some plumbing experience would be helpful, but even without it you can replace your sink and faucet in less than a day using a few basic tools that you probably already own. You’ll need large slip-joint pliers for the drain fittings (Photo 1), a fine-tooth saw to cut the plastic pipe, a set of open-end wrenches or two adjustable wrenches to loosen and tighten the supply tubes, and hex head nut drivers for the sink clips and the clamp on the dishwasher drain. If you have a plastic laminate countertop and need to enlarge the hole for the new sink, you’ll also need a jigsaw.
Measure your old sink. The standard size is 33 x 22 in. and about 7 in. deep. If yours is this size, you’ll have no problem finding a new one to fit the same hole. If you want to install a sink that’s larger or deeper than your current one, first check the cabinet width below to make sure it’ll fit. Then decide how to enlarge the hole. If your countertop is stone, tile, solid surface or metal, you may have to hire a pro to enlarge the hole. If it’s wood or plastic laminate, enlarge the hole yourself with a jigsaw.
Getting the old sink out is usually harder than putting the new one in. Old plumbing parts are likely to be corroded, and the sink may be glued to the counter with caulk or caked-on gunk. Sinks are mounted in several ways, but here are a few general tips for removing yours:
• Place a bucket under the trap to catch wastewater while you loosen the slip-joint nuts.
• Remove the disposer (Photo 1).
• Use a pair of pipe wrenches to separate drain parts that won’t yield to large slip-joint pliers. Don’t worry about damaging the pipes; you’ll be replacing them with new plastic parts anyway.
• Add shutoff valves if your hot and cold water supply pipes don’t have them.
• Working carefully, slice the caulk around the sink with a utility knife, then slip a stiff putty knife under the sink’s lip and gently pry up to loosen it. On some old sinks, you must remove the mounting clips from under the sink before you lift it out.
• Get help lifting out a cast iron sink.
Follow the steps in Photos 2 – 7 to assemble, install and connect your new sink and faucet. Some sinks, like the stainless steel sink shown here, require clips tightened from below to hold them in place (Photo 3). Most cast iron sinks are held in place by their own weight and a bead of caulk. Follow the mounting instructions provided with your sink.
When you’re finished with the installation, turn on the shutoff valves and check for leaks. Then run water in both bowls and check the drains for leaks. Most leaks can be fixed by tightening the connection. If this doesn’t work, you’ll have to take the leaky joint apart and inspect it for missing or misaligned parts.
• Plumber’s putty
• Tub-and-tile caulk
• Two basket strainer assemblies (only one if you’re installing a disposer)
You’ll need the following 1-1/2-in. PVC drain parts:
• One P-trap assembly
• One end or center outlet waste kit
• Two sink tailpieces—only one if you’re installing a disposer. If you have a dishwasher and no disposer, get a special “dishwasher” tailpiece that has a tube to connect the dishwasher drain hose.
• One special “disposer” waste arm, if you have a disposer
• Two flexible water supply tubes for kitchen sinks. Match the nuts on the ends to the threads on your faucet and shutoff valves. Also measure to determine the right length.
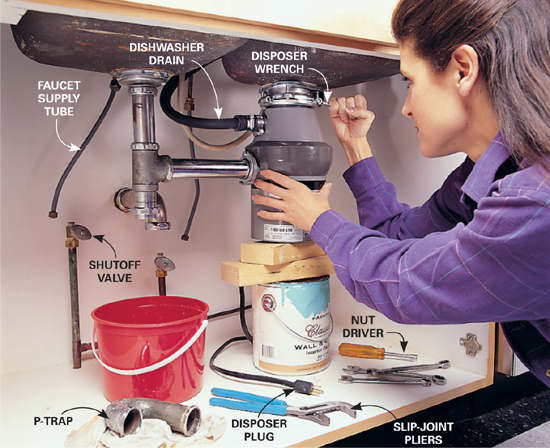
Remove the trap and other drain parts by loosening the slip-joint nuts with large slip-joint pliers or a pipe wrench. Disconnect the disposer from the sink by sticking a large screwdriver or disposer wrench into the ring near the drain and twisting it counterclockwise. You may have to tap it with a hammer to break it free. Close the water valves and disconnect the tubes leading to the faucet. Hold the shutoff valve steady with one wrench while you loosen the supply tube nut with a second wrench. Remove any clips holding the sink in and lift it out.
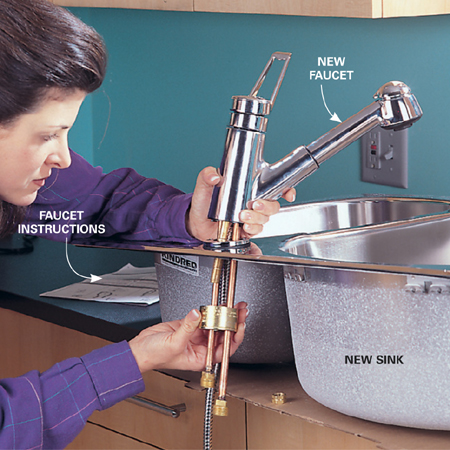
Mount the new faucet to the new sink. Follow the instructions provided with your faucet. Protect your countertop with cardboard.
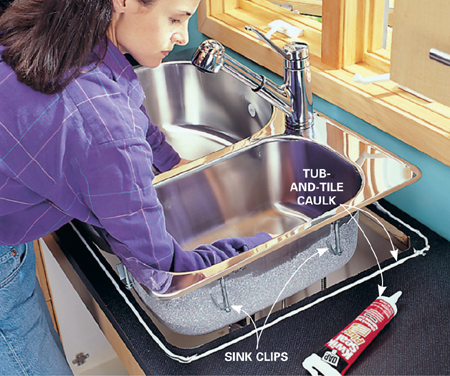
Set your new sink in the countertop to check the fit, then trace around it with a pencil. Enlarge the hole if necessary. Remove the sink and apply a bead of mildew-resistant tub-and-tile caulk just to the inside of the pencil line. Set the sink back in the hole and use a nut driver to tighten the clips that hold the sink down. Tighten the clips just enough to close the gap between the sink and countertop. Don’t overtighten. Clean up the excess caulk with a damp cloth.
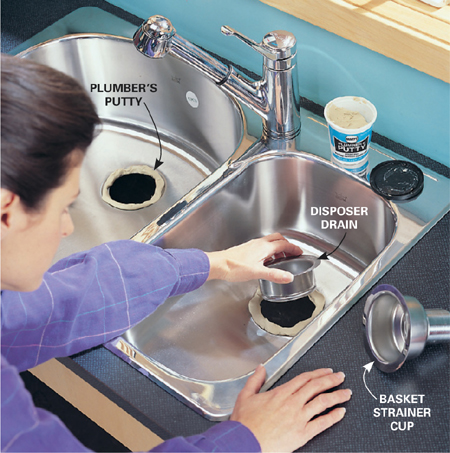
Roll plumber’s putty into a 1/2-in.-dia. rope and form it around each drain opening. Press the top half of the basket strainer assembly down into the plumber’s putty on one side. On the other, press the disposer drain down into the putty.
Assemble the undersink half of the basket strainer assembly and tighten the large nut with slip-joint pliers. Hold the basket with your hand to keep it from spinning. Reassemble the disposer drain and tighten the three screws. Clean the excess plumber’s putty from around the drain openings and polish the sink with a dry cloth.
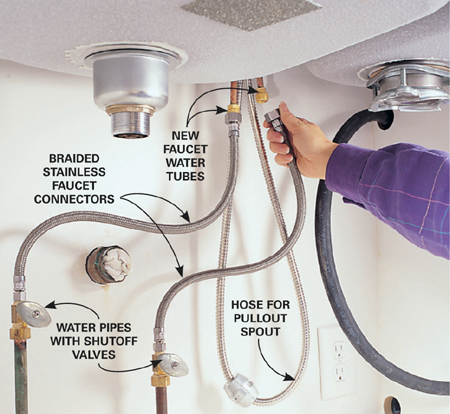
Connect the water supply valves to the new faucet with flexible braided stainless steel sink connectors. Hand-tighten the connections. Then turn them an additional quarter turn with a wrench.
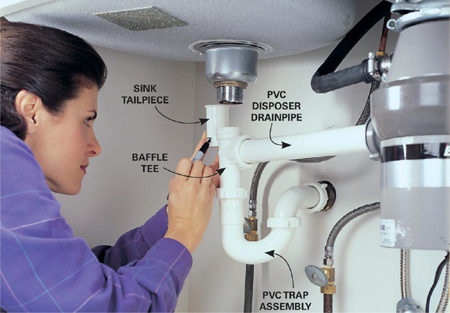
Loosely assemble the new PVC drain fittings. Hold up and mark parts needing to be cut. Then saw them with a fine-tooth wood saw or hacksaw. Slope the horizontal pipes down slightly toward the drain in the wall. Hand-tighten all the fittings and turn the nuts an additional quarter turn with large slip-joint pliers.
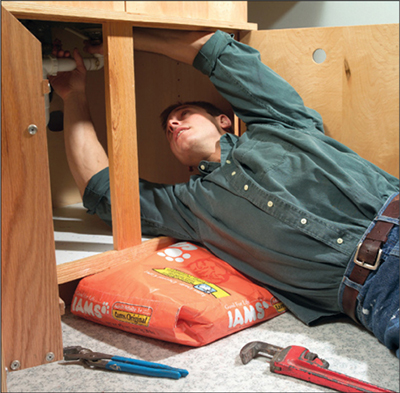
Prop up a scrap of plywood on some 1-qt. paint cans in front of the cabinet or grab a big bag of pet food. This will make working under the sink more comfortable. Otherwise, the edge of the cabinet would be digging into your back.

Repairing water damage
Let’s face it—it’s easy to get water on the floor of your sink base cabinet. We’ll never understand why cabinetmakers use particleboard for the base, but they do. And once it starts swelling, your only option is to replace it. But you don’t have to cut out the entire bottom. Here’s an easier way to install a new sink base bottom.
Remove the drain lines (and garbage disposer, if there is one) to get maneuvering room. Then trace a cutting line about 3 in. in from all four edges. Then cut out the middle section of the swollen sink base with a jigsaw (Photo 1). Next, cut a piece of 1/2-in. plywood to the interior size of the sink base. Cut slots for the water supply tubes. Then seal the edges and face of the plywood with urethane varnish. Then install the new plywood floor and fasten it to the old floor (Photo 2). Caulk around the edges and pipes to prevent water from seeping under the new floor. Then reattach the P-trap and garbage disposer.
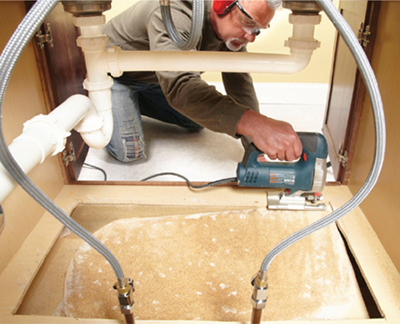
Remove the middle section. Drill a 3/4-in. hole in each corner of the traced cutout line. Then run your jigsaw along the line. Remove the old, swollen floor.