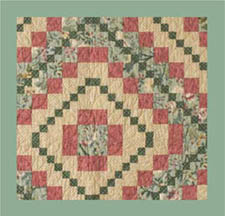

Adding borders to your quilt top is a wonderful way to frame the design developed by the piecing. The border is a place where you can stop the repeat piecing design and give your eye a place to stop or rest.
A single border is often enough for a simple quilt pattern. A combination of two or more plain strips around the outside edge of the piecing can be more exciting, and adding corner blocks can add another design element.
For now, we will keep the borders basic and simple. Further into the series, we will address more complex borders, such as pieced borders and border stripes. When you use a pattern as a guide for making a quilt, the cutting measurements are mathematically correct. However, as you now know from working through the patterns, mathematically correct measurements are very difficult to maintain when working with fabric, seam allowances, and pressing. This class will address how to work with the actual measurements of your quilt top. You can pick any quilt you have made up until now to use for these lessons.
Once the quilt top is completed and well pressed, you need to check that it is square. Are the two sides the same length, and are the top and bottom the same width? Then you’ll need to measure the entire top to determine the length needed for the borders. The first step is to fold the quilt top in half to determine whether the top and bottom are the same width as the center, and the two sides are the same length. To do this, fold one end of the top over to the center of the quilt top as shown at right. Are the top and center the same width? Repeat with the other end.
Do the same with the sides, one side at a time. Are they the same length?
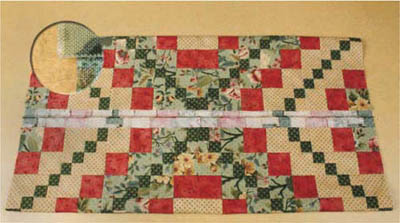
Folding quilt top to center
tip
When measuring for borders, do not measure along the actual outside edge, since it’s easy to stretch that edge as you measure.
As you pieced your quilt top, you squared up each unit as you went along. This process really helps develop a quilt top that is very accurate. If everything is perfectly even, you’re ready to measure and cut the border strips. But what if things don’t come out even? Perhaps one side is longer than the other, or one end is shorter than the other. Now is the time to make corrections.
Harriet does this by examining the piecing of the seams where the rows are joined. It is a common problem for the fabric to pivot slightly as you’re nearing the end of any seam, especially if you are using a zigzag throat plate. If this is happening, then it’s possible that a slightly larger or smaller seam was taken at the edge, making that side of the quilt shorter (or longer) or narrower (or wider) than the opposite side where the seam started. Just one or two threads’ width difference per seam can throw off the measurements dramatically. If this is the case, restitch, being careful to keep the needle just beside the previous stitching. If the seams need to be smaller, release the stitches back from the edge about 3″ to 4″, and restitch, being careful to not stitch in the same holes a second time.
hint
When folding your quilt top in half, line up the seams of corresponding blocks. This often shows which seams or blocks are off. They should line up exactly across from one another.
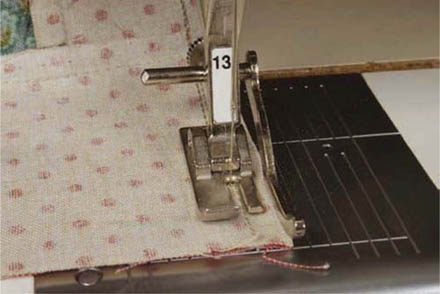
A deeper seam being taken
Whatever you determine, attempt to make corrections until the top is within ⅛″ or less of being even when it is folded in half and measured.
Check for accuracy by folding the edge to the center after each correction. You don’t want to overcorrect. Often one correction is enough to fix the problem. In the end, you want both sides to be exactly the same length, and both the top and bottom to be the same width. Never cut or trim to correct size discrepancies!
Next, use a square ruler 16″ or larger to check all four corners. Are they perfectly square, at perfect 90° angles? When placing a square ruler on the corner, use the straight and diagonal lines of the ruler to align with the inner seams of the blocks.
Everything needs to be aligned with the ruler lines as closely and as parallel as possible. If the corner is not perfectly square, shave away any little bits that are causing the problem. Remember—do not do this before you check the length and width of each side of the quilt top. You cannot correct an internal piecing problem by whacking off the corner to make the sides and the top and bottom the correct length. This action will only distort the shape and measurements of the units in the corner.
If the corner is really out of square, look at the internal piecing of the block in the corner. Adjust the seam allowances first as described, and if the corner is not perfectly square, you can then shave off threads to correct this.
This is very important because when the first border is sewn on, the border will continue the out-of-square problem, and the finished quilt will not lie flat or hang straight.
Use a 24″-long ruler and rotary cutter to clean up the side edges of the quilt top. Measure out from any seams to make sure that you are not cutting too deep into the body of the quilt top. Remember, you are just cleaning up the edge of ragged threads. The edge pieces should measure the grid measurement plus ¼″. If you cut too deeply, the dimensions of the units within the block along the edge will not stay accurate. For example, if the squares of your four-patch should finish at 2″, but you cut into the side of one or more of these squares, they will not measure 2″ finished and will not appear square when the quilt is finished.
Once the top and bottom of the quilt top are even with the center (the same length as the center on both sides), and the corners are square, you’re ready to measure for and cut your borders.
A SLICK TRICK
FOR ACCURATE
BORDER WIDTH
In the next lesson, you’ll learn about border length. But width must be addressed, too. Harriet strongly recommends that each border strip be cut at least 1″ wider than the desired finished measurement.
You will find that when you stitch the border onto a pieced quilt top, going over the lumpy seam allowances and not sewing every seam 100% straight will affect the width of the border after it is pressed. If you’ve added extra width, the border can now be cut perfectly straight using the seam as a baseline.
For example, if the border is designed to finish at 4″, lay the ruler on the seam at the 4¼″ line, and cut along the raw edge of the border. This will give you an exact-width border and a very straight edge to add the next border (if any) onto. Do this for every border you add.
If this is the last border, do not trim it until the quilting is finished. This extra gives you a handle to hold onto when quilting right up to the seamline.
Measure through the center of your quilt top, end to end, to determine the length of the side borders. If you choose to add the top and bottom borders first, measure through the center from side to side.
tip
There are no solid rules about which borders go on first—whether it’s sides, then top and bottom, or top and bottom, then sides. It depends on what appeals to you. Look at the illustrations below and notice your first reaction to each. If you feel one is balanced and the other is not, you’ll probably prefer to attach your borders in that order, or vice versa. We do recommend, however, that you be consistent when you’re adding several plain strip borders to the same quilt.
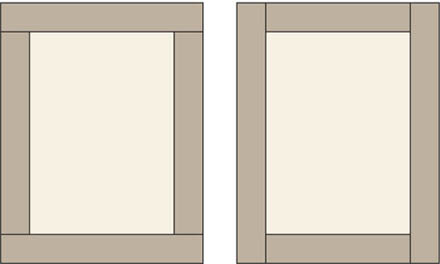
Different effects of border placement
The side border length is determined by the measurement through the center of the quilt, from top to bottom.
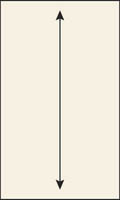
Measure through center of quilt.
The top and bottom borders are cut the width of the top through the center, plus the width of the two side borders. It is best to attach the side borders first, and then measure the width from the raw edge of one border through the center to the raw edge of the opposite border.
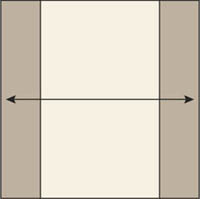
Measure from raw edge to raw edge of borders.
tip
Harriet likes to cut her border strips about 1″ longer than measured. This gives a bit of overhang to trim and square once each border is attached. It is critical that every corner is perfectly square before adding the next border. By having a bit of extra length added, there is actually something to trim and square up. Be sure to mark in ½″ for the starting point of the border on the edge of the quilt.
Many quilters prefer to cut border pieces from the length of the fabric, using a continuous piece for each side. Others cut crosswise strips (selvage to selvage) and piece the strips to get the length needed. (Sometimes your choice is dictated by the design of the fabric; for example, you would usually cut stripes lengthwise.)
If you cut crosswise, you must add together measurements for the top, bottom, and two sides. You will also need to add four times the width of the border to this total to allow for the extra length added to the top and bottom borders by the width of the side borders. Remember to add ½″ or more to the strip width for trimming, plus ½″ seam allowances.
Let’s walk through this step by step. You are adding a 4″ border to a baby quilt. The quilt top measures 25½″ × 35½″. You need 2 strips the length of the quilt, or 35½″ of border for each side (the ½″ is seam allowance). That equals 71″ of fabric.
The top and bottom borders are sewn on after the side borders, so their length will be 25½″ plus the width of the side borders. If you are adding 4″ borders, that would be an additional 8″ plus ½″ seam allowance—a total of 33½″. Total inches needed would be 35.5″ + 35.5″ + 33.5″ + 33.5″ = 138″.
If you are cutting borders from the length of the fabric, you would need to buy enough to accommodate the longest border (35½″, or 1 yard). If the borders are cut 4½″ wide, you will be using 18″ of the width of the yardage, leaving 1 yard of 24″-wide fabric. This 24″ is now available for strips when making the blocks. When figuring yardage for the blocks, figure 24″ strips instead of 42″, and you will be able to use this excess fabric and know how much more you need to cut as 42″ strips. No leftovers.
If you are cutting the borders crosswise and piecing the strips together, divide the total number of inches you need by the fabric width. So, 138″ ÷ 42″ = 3.29, or 4 strips. Four strips 4½″ wide = 18″ (½ yard) of fabric.
The basic formula for borders with butted corners is as follows:
First border length = finished border length + 1″. (Remember to add the width of the border × 2 for the top and bottom to accommodate the width of the side borders once they are attached.)
If a quilt will have multiple borders, this formula continues. To minimize confusion, draw a diagram and write your numbers on it.
What if, instead of adding one wide border, you want to add two narrow borders plus a wide one? Using the diagram below, let’s walk through the measurements.
Your quilt top finished at 25½″ × 35½″. We want to add 2 borders 1″ wide and finish with a 4″ border. How do we know what size border strips to cut? The first side borders will be the length of the quilt top—35½″ (seam allowance included). Once they are sewn on, measure from raw edge to raw edge of the borders. With the seam allowance added, that is an additional 2½″, plus the 25″ of the quilt top. The first top and bottom borders will be 27½″. The new length of the quilt is: 35″ + 2½″ = 37½″ long.
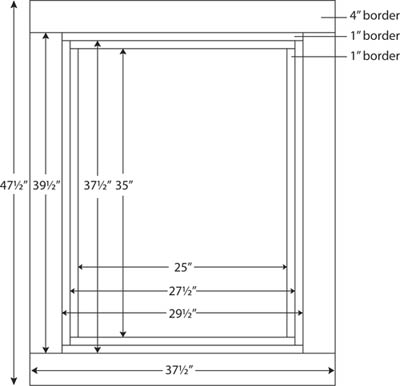
Diagram showing border sizes
You have added the first 1″ border to all sides of your quilt top. The quilt is now 27½″ × 37½″, and you want to add another 1″ border to the first 1″ border. The side measurement is 37½″, so you will need 2 strips 37½″ long. The top and bottom borders will need to be 27½″ + the 1″ width × 2 = 27½″ + 2″ = 29½″.
If the border is cut lengthwise, you will need to buy 1 yard of the second border. If the border is cut crosswise, add the lengths together: 37.5″ + 37.5″ + 29.5″ + 29.5″ = 134″. Divide the number of inches needed by the fabric width: 134″ ÷ 42″ = 3.19, or 4 strips. Four strips 1.5″ wide = 6″ (¼ yard).
Keep repeating this process as you work through the wide third border in the diagram. The drawing makes it easy to keep the measurements straight.
Second border length = finished border length + (finished border width × 2) + 1″.
Continue this process with every border that you want to add.
If the borders will be longer than the available strip length, you’ll need to piece them. The angle of the seam is a personal preference, but we feel that a 45° angle is the least noticeable. Again, some fabrics will look best with the seam angled, while some may not show a straight seam at all. This will be for you to decide with each situation and fabric. If the fabric is a busy print, chances are the seams will never show either way. However, if it’s a solid fabric, the seam can be obvious. Study the illustration below to get a feel for what your eye prefers.
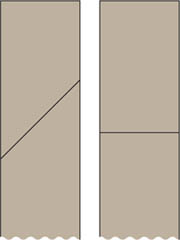
How to splice a border seam
For a diagonal border seam, lay the strips on top of one another, all facing right side up. Using the 45° angle on your long ruler, cut through all the layers. That way, when you position 2 strips right sides together, the angle is correct for both ends. Align the edges and make sure that the offset on either end is no more than your seam allowance width.
When you start to stitch, the needle should align perfectly with the “crotch” made by the 2 angles coming together. The edge of the fabric should align exactly with your seam allowance guide. Stitch, and press the seam open. If the border edges are not exactly straight, the seam was not aligned correctly.
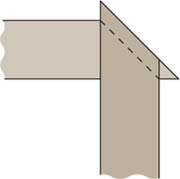
Placement of seam for diagonal joining
You’ve measured your quilt. You’ve cut and, where necessary, seamed strips together to create the border length needed. Now you’re ready to attach those strips to the body of the quilt.
Here is one of our firm rules in quiltmaking: Always cut borders to size and pin them to the quilt top prior to sewing.
Never merely take the strips and the quilt top to the sewing machine and start feeding them through the machine. You must always carefully pin the strips to the edges of the quilt top before sewing.
1. Make placement marks on the strips before pinning. Fold each border in half lengthwise to find its center, and mark with a pin. Place a pin at the end edge measurements if you’re cutting the border a bit longer than the actual measurement of the quilt top. Find the midway point between the center and end edges and place a pin at this position on both sides of the center. Repeat this process on the quilt top.

Measuring and marking center points
2. When pinning the borders to the quilt top, we recommend that you work at the ironing board or on a large table. You will be adding 1 border at a time. Lay your quilt top face up. Start at the center. Match the center pin on the border to the center pin on the quilt top. Pin the border in place. Place the heads of the pins alongside the raw edges, making it easier to remove them as you come to them when sewing. Line up the other placement pins on the border with the placement pins of the quilt top.
3. Pin the border securely to the top between these marker pins. Take care to pin the seam allowances down so they can’t flip as you stitch the border onto the edge.
4. Take the top to the sewing machine and sew with the border on top, taking out the pins as you go.
tip
If you find that either the border or the quilt top is slightly longer than the area between the pins, ease the fullness in evenly, and pin carefully. When you sew, place the longer side down. Allow the feed dogs to help ease in the fullness. If the longer piece is on top, you are more likely to get small pleats at the pins.
5. Back at the ironing board, press the seam in the closed position. Fold the border over and glide the iron from the quilt top across the seam allowance, gently pushing the seam allowance toward the border strip. Once the seam is set, apply starch to make sure the border seam is crisp and flat.
6. Repeat Steps 2 through 5 for the opposite side, and for the top and bottom borders. Once all 4 borders have been attached, pressed, and starched, you are ready to trim and square.
7. If you have cut the borders wider than needed (see page 96), now is the time to trim them to size. Measure each corner with the square ruler again and check for squareness. Make any corrections that are necessary before adding the next round of strips. Keeping the borders flat and accurate is easy if you make them wider and you square and trim each time a round of borders is added.
It is truly a personal choice as to whether mitered or butted corners are best on a quilt, unless you’re using a stripe or other directional print. Stripes really frame the quilt nicely when mitered. Mitered corners do take more fabric and more time, but the results can be well worth the effort. In this book, we will deal only with adding a single mitered border; in later books in the series, we will talk about adding multiple borders and mitering them.
1. The first step in mitering is to measure the length of the quilt top. To that measurement, add 2 times the width of the border, plus 5″. This is the length you need to cut or piece the side border.
For example, if the quilt top is 60″ square and the borders are 6″ wide, you’ll need border strips that are 77″ long (60″ + 12″ + 5″ = 77″). Cut or piece 2 border strips this length.
2. Pin securely, and stitch the strips to the sides of the quilt top. Do not stitch off the edge of the quilt top. Stop and backstitch at the seam allowance line, ¼″ in from the raw edge. The excess length will extend beyond each edge. Press the seams toward the border.
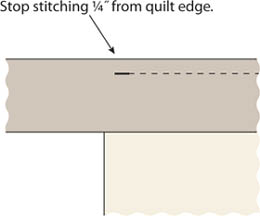
3. Determine the length needed for the top and bottom border in the same way, measuring through the center of the quilt to the raw edges of each border. Add 5″ to this measurement. Cut or piece these border strips.
4. Again, pin and stitch up to the seamline, and backstitch. Each side of each corner is stitched just up to the seamline and not beyond. The border strips extend beyond each end. Once the borders are on, press the seams toward the borders.
Excess border length extends beyond each end.
5. To create the miter, position a corner on the ironing board, supporting the quilt top so that it doesn’t drag and distort the corner. Working with the quilt right side up, lay the unstitched end of one border out straight and flat and then lay the other border out crossing the first border.
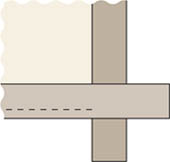
Position border strips for mitering.
6. Fold the top border strip under so that it meets the edge of the bottom border and forms a 45° angle. If the border is a plaid or stripe, make sure that the patterns match along the folded edge. Press the fold in place.
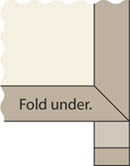
Fold under top border strip 45°.
7. Pin the fold in place. Position a 90°-angle ruler over the corner to check that the corner is flat and square. When everything is in place, remove the pins, and press the fold firmly.
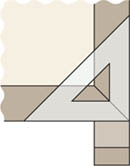
Checking for square corner
8. Using a water-soluble gluestick or even Elmer’s Washable School Glue (make sure it is the totally water-soluble variety), draw a fine line of glue just under the fold of the miter. Press to set the glue. Now you can fold the quilt top so that the right sides are together. The glue will hold the fold in place perfectly while you sew.
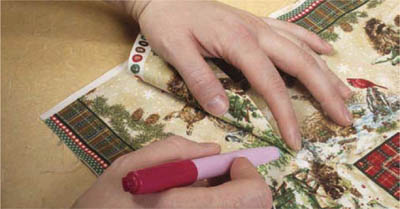
Gluing corner in place
9. Beginning at the inside corner, backstitch, and stitch on the fold toward the outside point, being careful not to allow any stretching to occur.
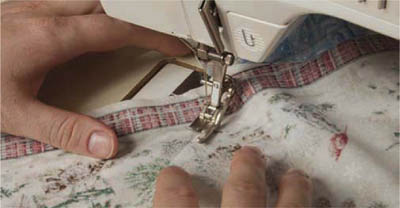
Stitching on fold line—wrong side of quilt
10. Once the seam has been stitched, open to the right side and check that everything is aligned properly. If it is, gently tug on the glued area; it will release easily. Trim the excess border fabric to a ¼″ seam allowance. Press the seam open. Repeat for the other 3 corners.
note
As discussed earlier, Harriet suggests that the final border be cut wider than the desired finished width so that there is a margin for control while quilting, as well as the ability to cut a perfectly straight and even final border after quilting. When figuring yardage for the borders, don’t forget to add 1″ to 2″ to the width of the final border to accommodate this situation.