Open this book to any section—“How to Prune a Tree”, for example—and you’ll have all of the information you need to complete a gardening technique. Each section includes a list of materials, step-by-step instructions or simple instructions for techniques that don’t require multiple steps, and photographs illustrating the steps. Even if you don’t know much about how to garden, you can read each section, follow the instructions, and learn how to take care of an area of your yard, lawn, or garden.
So, why an introduction?
To transform yourself from someone who mows the lawn and occasionally prunes the shrubs to a gardener with beautiful flower beds and vegetable plots, you need to learn a few basics about how to look at the landscape, where to situate plants around your house so they thrive, how plants grow, and how to find the supplies and extra information you need to be successful. Gardening is a hobby just like fly fishing or sewing—after you’ve learned the lingo, it is easier to read instructions, find the right supplies, and have fun while doing it. Once you’ve read this introduction, the information in each chapter will make more sense. You’ll have a better understanding of the overall picture.
Now, let’s get started!
Learning to See
How can you tell if your plants are healthy? How do you know if your garden is pretty? The first is a matter of learning how plants grow. The second is mostly a matter of personal taste. It’s hard to have a pretty garden, though, if you don’t understand how plants grow. That’s because plants react to everything you do to them. When you fertilize, prune, or stake a plant, the plant grows a certain way. (Or stops growing, depending on what you do to it!)
A quote by Marcel Proust says, “The real voyage of discovery consists not in seeking new landscapes but in having new eyes.” There are, in fact, things happening in your yard and garden right now that you might not have even noticed. Once you understand what you’re looking at, you will know what to do about it. Much of gardening is in learning how to look at your plants and tell what they need: more sun, more water, more food, more shade, or a trim.
As you tend your garden using the techniques in this book, your plants will become healthier, larger, and more beautiful. You will learn to see the difference between a plant that is barely surviving and one that is thriving, and you’ll know how to help the plant that’s in trouble. Start learning to see by looking around your yard.
Finding Your Way Around the Yard
If you spend much time as a gardener, particularly if you start reading other gardening books and magazines, you’ll frequently see the phrase “right plant, right place.” You can save yourself a lot of time and money if you plant plants in areas of the garden with conditions that match growing needs listed on plant tags. For instance, select a sunny spot to plant perennials or annuals that indicate “full sun” as a growing need on their tags.
Certain types of plants are also better for some areas of the yard than others. For example, if you hear someone talking about “foundation plants,” they’re talking about plants next to the house—usually smaller shrubs, small trees, perennials, or annuals. An “island bed” is a landscape bed in the center of a yard, or a bed that doesn’t have a driveway, sidewalk, patio, or house on one side of it.
Here’s a typical yard, and the landscape features in it:
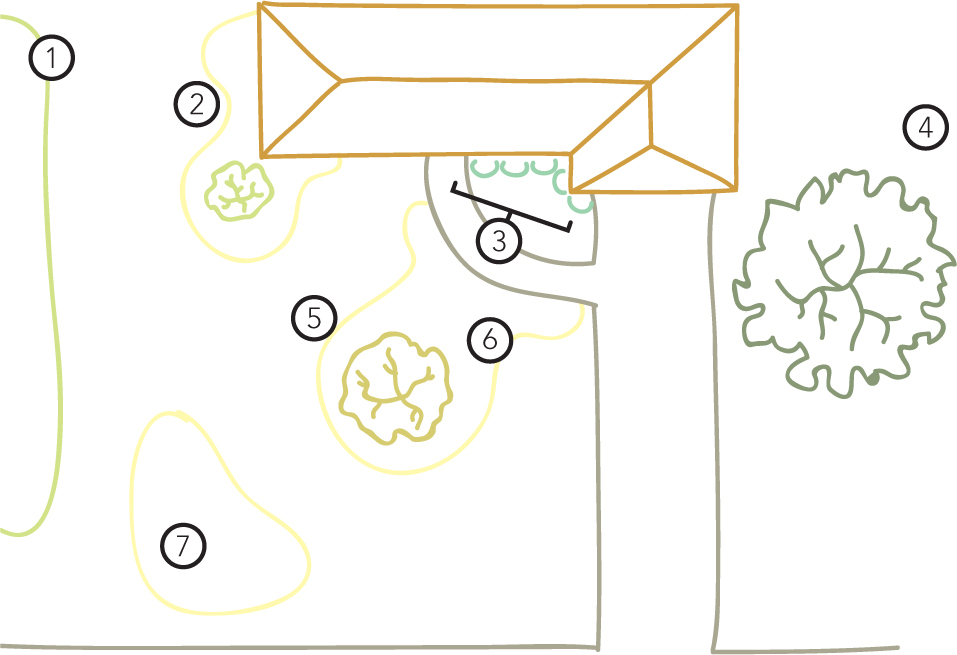
1 Hedge
2 Small tree
3 Foundation planting
4 Large shade tree
5 Medium tree
6 Landscape bed
7 Island bed
Once you know what to call different areas of the yard, it’s easier to make shopping lists, because you know the types of plants to find for each area.
Gardening, like other hobbies, offers tremendous opportunities to go shopping. There are thousands of different types of plants, hundreds of garden tools, and an array of fertilizers, pest control products, and mulches.
In the “What You’ll Need” section right after the Introduction, you’ll find pictures and descriptions of the most commonly used gardening tools and supplies, so that you can figure out what your tool shed’s lacking and stock up. There’s also a “What You’ll Need” list for each specific technique. In “Gardening Information Decoded,” you’ll learn how to read seed packets, plant tags, fertilizer labels, and the USDA hardiness zone map (so that you will know how cold your area gets—important when choosing some plants). There’s also information about navigating a garden center, nursery, or the garden center section of a home-improvement store. Here’s some other information you need to know before shopping.
Understanding the Term “Organic”
Go shopping, open the newspaper, or look at a website, and you’ll see “organic this” and “organic that” everywhere. But do you really know what organic means? The scientific definition of organic is an element that contains carbon. The way the word organic is used in gardening (and grocery shopping—because vegetables come from farms and gardens) is to refer to something that is made of, or grown with, naturally occurring materials. If you buy a food product labeled organic, it means that it was grown without using certain chemicals, and the grower paid the fees to be inspected for certification.
What the term organic does not mean:
• Safe
• Non-toxic
The safety of any product depends partially on how you use it. If you take a bath in pyrethrin, a natural chemical extracted from chrysanthemums, you’ll get sick. You still have to take precautions when using organic materials. Remember, ricin—a highly toxic poison—is derived from the castor bean plant. It’s a naturally occurring material. The best way to decide what products (fertilizers, pesticides, weed killers) to use on your lawn and garden is to read the labels and follow the instructions. The book The Truth about Organic Gardening, by Jeff Gillman, is one of the best sources of information about organic gardening.
Reading Tags and Labels
Spend some time reading tags and labels because they give a lot of information about where to plant things, how to use products, the type of protective gear you should wear while using a plant spray or dust, and what to do if you accidentally swallow something, get it on your skin, or splash it in your eyes. Whether something is labeled organic or natural or not, read the precautions and instructions on the label before buying it.
Gardeners love talking with other gardeners, and the staff at your favorite place to buy plants will be great sources of information. If you have a problem and you need help fixing it, ask someone for more information. If you need a particular tool, ask about it! Don’t be afraid to ask for help. Garden centers want you to be successful so you’ll come back and shop some more, so they’ll be eager to help.
Once you get home, it’s up to you to keep your plants growing. That’s easier if you know the names of different parts of plants, and how plants grow. Here is a crash-course in botany—only the parts you need to know to be a successful gardener.
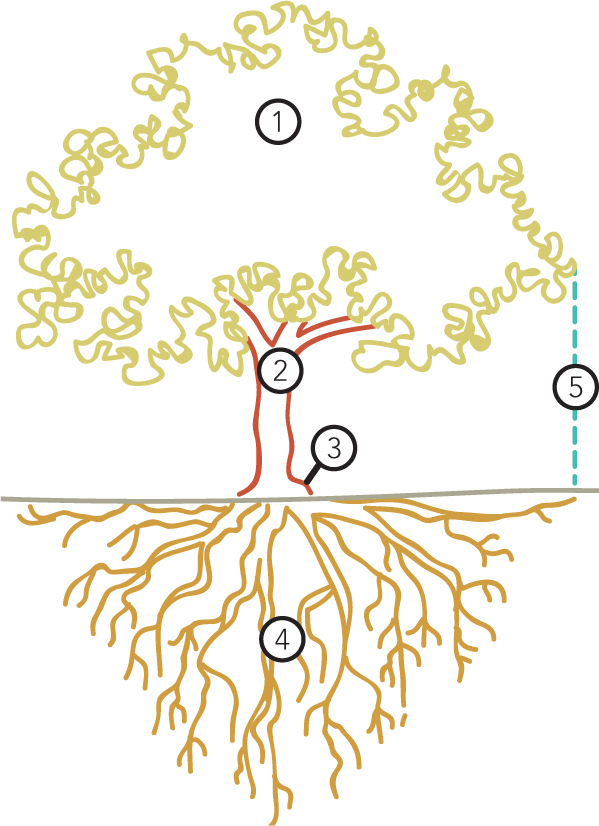
1 Canopy
This is the top of the tree, and is made of branches and leaves.
2 Trunk
The tree’s main support system, and where food and water travel up and down the tree.
3 Crown
This is the area where the trunk meets the roots. (The crown should never be under the soil or buried in mulch.)
4 Roots
These stabilize and anchor the tree, and take in water and nutrients from the soil.
5 Dripline
An imaginary line between the widest branch in the canopy and the ground below. You should water trees from the dripline in toward the trunk.
1 Branch collar
A swelling between the branch and the trunk. You always cut just outside the branch collar while pruning so the tree can heal itself.
2 Leaves
There are two parts to leaves. The petiole (2a), which is the “leaf stem” connecting the leaf to the branch, and the leaf blade (2b), which is what you think of as the leaf.
3 Buds
These are nestled between the petiole and the branch. Trees always sprout new branches from buds, which is why pruning instructions say “cut back to a leaf.”
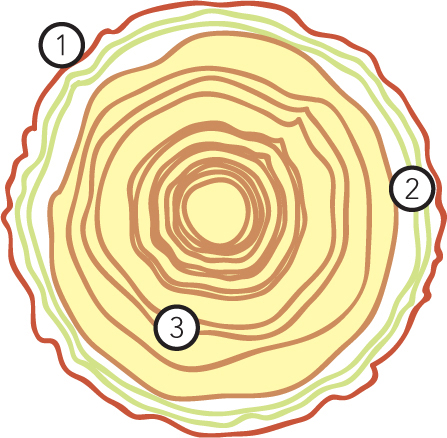
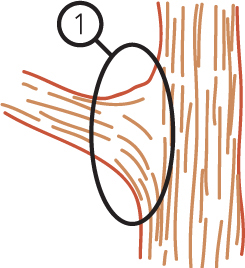
1 Bark
The protective outer covering for the tree.
2 Xylem and phloem
The parts of the tree where food and water travel. These layers are right under the bark, so if you accidentally cut the bark all the way around the tree, the tree will starve.
3 The heartwood
This is the wood on the inside of the tree that makes up most of the trunk. This is where you see tree rings in a cross-section of a tree. This part of the tree is old growth, and is actually dead.
A shrub is like a tree without a trunk. Tree pruning techniques like cutting back to a leaf also apply to shrubs. Roses are shrubs, and they grow like other typical shrubs. Here are the parts of rose bushes and shrubs.
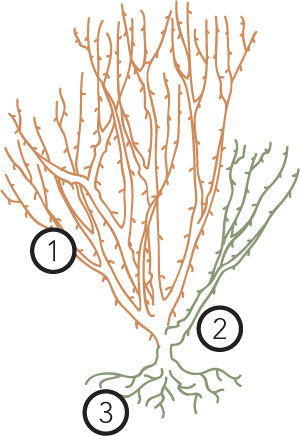
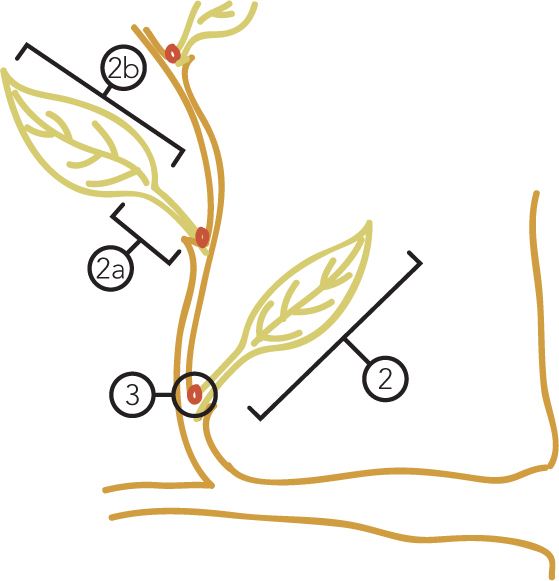
1 Branch (also called a “cane” on roses)
Branches make up the bulk of a shrub. Flowers and fruits form on the branches.
2 Sucker
Suckers are branches on shrubs that sprout from near the soil line, close to the roots. Many roses are actually two plants grafted together—the top is one plant and the bottom is another. A sprout coming from the roots of a rose is also called a sucker, and often looks nothing like the rest of the branches on the rose plant.
3 Roots or rootstock
The roots of all shrubs are underground. Most roses, however, are grown on what are called “rootstocks.” These are roots of a hardy and tough rose variety that is more resistant to cold than most rose types. The top of a rose plant is a more sensitive flowering variety that is grafted, or joined, onto the tough rootstock.
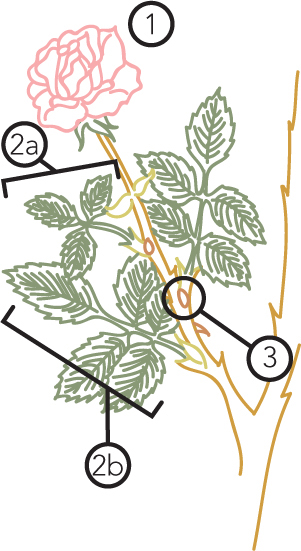
1 Flowers
Shrub flowers form along branches or at the tips of branches.
2 Leaf and leaflets
Shrubs have single or compound leaves. Roses have compound leaves with three (2a) or five (2b) leaflets. When pruning roses, you always want to cut the branch back to a leaf with five leaflets.
3 Buds
Buds are the places from which new branches sprout. They’re usually nestled between the leaf petiole (bottom of the leaf) and the branch. When you prune a shrub, always cut back to one-quarter inch above a bud so that the plant will resprout and hide the cut.
Seeds are small miracles. Inside every seed there’s a baby plant and enough food to sustain that plant while it is sprouting. The seed coat protects the seed until it sprouts.
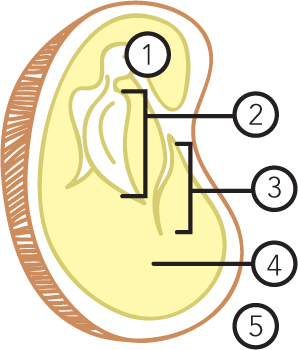
1 Embryo (baby plant)
The embryo is the baby plant inside the seed.
2 Seed leaves
Seed leaves are the first leaves that will open up after the seed sprouts.
3 Embryonic root
This part of the seed will grow to become the plant’s roots.
4 Food for baby plant
Every seed has some stored food to give the plant energy to sprout and grow when conditions are right.
5 Seed coat
The outer layer of the seed.
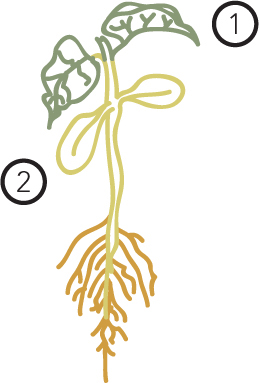
1 First true leaves
The first set of leaves that the plant grows after it sprouts. (They are above the seed leaves.)
2 Seed leaves
These are the first leaves that you see after a seed sprouts. They were the leaves stored inside the seed. Seed leaves usually look a little bit different from the true leaves. They’re smaller, rounder, and lighter in color.
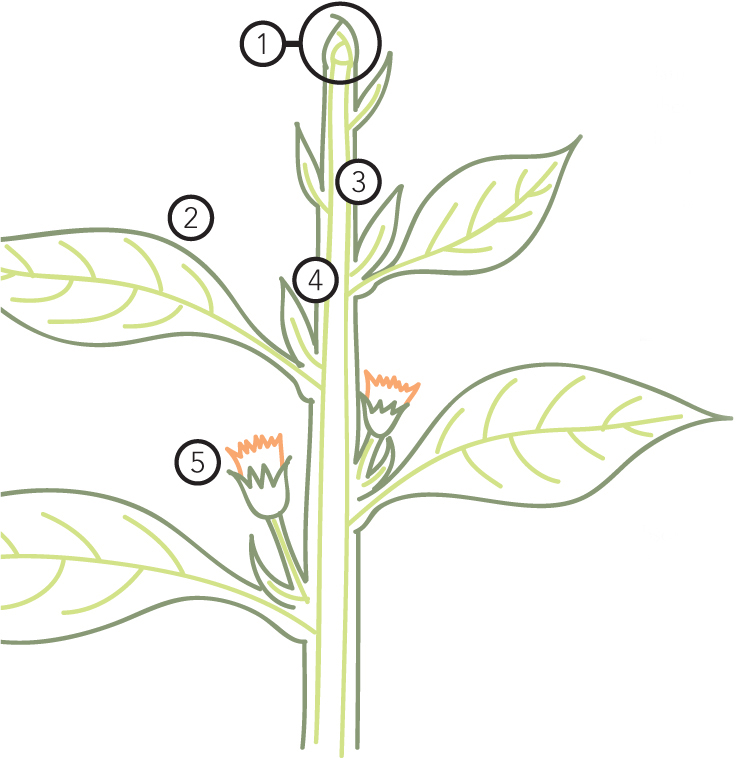
1 Growing tip
All plants grow from growing tips at the end of their branches. Plants don’t grow up or out from the middle of their stems. The growing tip of the plant manufactures a plant hormone that prevents buds near the tip from sprouting. When you pinch a plant to remove the growing tip, the buds closer to the tip will sprout, and the entire plant will be bushier.
2 Leaf
The leaves are the workhorses of plants. Leaves “breathe” for the plant, taking in carbon dioxide and releasing oxygen. Leaves also use carbon dioxide, water from the roots, and sunlight that they absorb to make food for the plant through the chemical process of photosynthesis.
3 Stem
The stem is the main plant support. It is also the area through which water and food travel up and down the plant.
4 Bud
The bud is a new plant branch and growing tip waiting to sprout. The buds are nestled between a leaf and a branch or stem.
5 Flower
Flowers are the reproductive parts of plants. In order to to fruit or produce seeds, the plant flowers must be pollinated by insects, birds, or wind.
Flowers are the plant’s reproductive system. It’s important to know that, because to trick the plant into continuing to bloom, you will cut off the faded flowers to prevent plants from setting seeds.
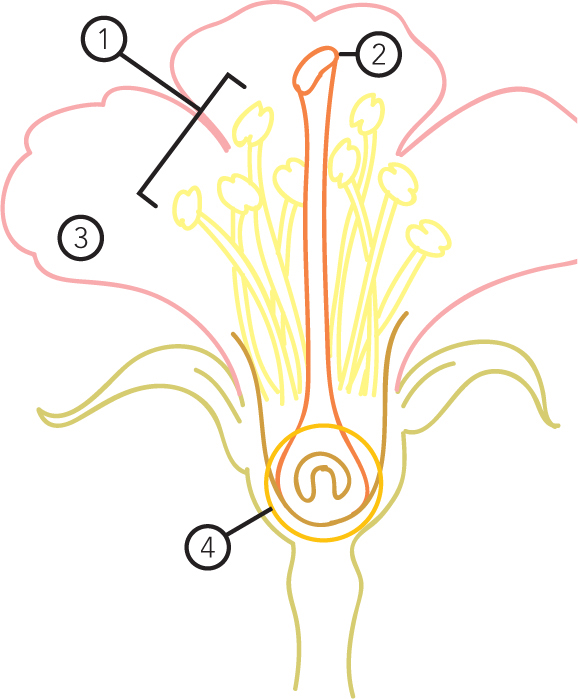
1 Stamen
Stamens are the male parts of a plant. They produce pollen.
2 Pistil
The female part of a plant is called the pistil. Pollen lands on the sticky top of a pistil to fertilize a plant.
3 Petal
Petals attract pollinators to fertilize a plant.
4 Ovary
The ovary is at the bottom of a pistil. Once a plant is pollinated, the ovary matures into a seed or fruit.
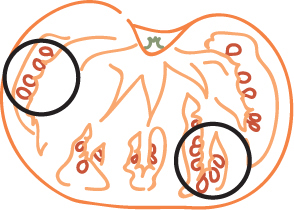
Did you know that anything you eat that has seeds is actually a fruit even if you call it a vegetable? Peppers, eggplants, and tomatoes are all fruits. If someone describes a tomato plant as “fruiting,” they’re saying that there are tomatoes ripening on the plant.
Seeds inside a tomato
Seeds form inside the fruit of a plant. There are different kinds of fruits. Maple tree fruits look like helicopters and they don’t have squishy flesh around the seeds like tomatoes do. Maple trees rely on wind to carry their seeds far away. Tomato plants, apple trees, and other plants with delicious edible fruits rely on animals to disperse their seeds.
Practice makes perfect, especially with gardening. Just like the first soufflé you make might not be the fluffiest, or the first fly you tie might not be as precise, your first attempts at gardening could produce interesting results. Here’s a little secret though: even experienced gardeners kill plants, prune things the wrong way, or end up needing to move a plant because it outgrew its space. Following good gardening instructions (like those in this book) will help you be more successful, but you’ll always learn some things by trial and error.
Looking for Information
When you’re first starting out, it’s important to get correct information. If you search the Internet for gardening information, search for sites with .edu at the end of the Internet address. This will help you find information from university Extension offices and horticulture departments, written by people with professional training and experience.
The important thing is to keep growing—literally and figuratively. Keep learning new information, trying new techniques, and growing new plants.
