
You know what tactics are. They are the decisive moves you use to decide the majority of your games. Most of the other moves on your scoresheet may seem like filler, passes that you made until you can pin a queen, skewer a rook or fork two pieces.
But a master uses tactics in a different way. Sure, many of his games end the same ways that yours do, when his opponent cannot meet tactical threats. But to get to that point a master builds up a position, usually slowly, until it is overwhelming.
To do that he uses two types of move that most amateurs rarely employ. One type is forcing and positional. That is, the move gets its energy from tactics. Typically it’s a simple threat to win something. But its primary purpose is to obtain better chances in a positional way, such as by improving the placement of a bishop or knight or weakening enemy pawns or forcing the trade of a strong enemy piece.
These are ‘little tactics’. They make seemingly minor, almost trivial changes in the position, in contrast to ‘big tactics’, the ones that win games. Here is an example of little tactics in action.
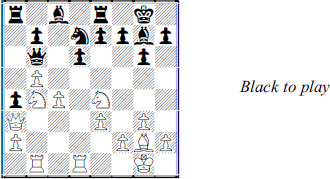
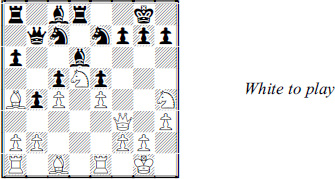
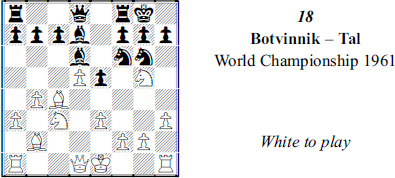
White has more pieces developed but as usual that’s only a temporary advantage. Most of his edge may disappear after …  c5.
c5.
In most cases, a lead in development can only be exploited by tactics. In this case, that suggests 1 c6. The main points of it are:
(a) White threatens to win with 2 xe7+ and 3 xd6, and
(b) After 1 … bxc6 2 bxc6 he threatens 3  xb6, and
(c) He also sets up a elementary pitfall, 2 …  xc6?? 3 f6+, which costs the queen.
There were other tactical elements to 1 c6. For instance, if Black replies 1 … bxc6 2 bxc6 and then 2 … c7, White would regain his sacrificed material with 3 cxd7. Then 3 …  xd7 leads to this.

White still has a lead in development and again he can exploit it tactically, with 4 c5!. His threat to win a pawn, 5 cxd6, would prompt 4 … dxc5. Then another tactic, 5 b7 xb7 6 f6+ and xb7, favors White nicely.
But if that was all there was to 1 c6 – a one-move threat to win the e-pawn, a cheap trap for Black to fall into and a few other tricks – there wouldn’t be much to White’s knight move. Black would simply defend his pawn, as he did in the game, with 1 … e8.
That’s how many amateurs play chess. They make tactical moves in the hope that their opponent will overlook their point. When their opponent doesn’t miss the threat, their move turns out to be just a waste of time.
But there was more to 1 c6!. Its main purpose was purely positional. White’s knight looked good on d4 but it wasn’t doing enough. He wants to plant it on a much better square, d5. He got closer to that with 2 b4!.
If White can play 3 d5 it’s not just a one-move threat. It squeezes Black’s position, e.g. 3 d5 d8 (or 3 … a5) 4 b6 threatens 5 c7.
Black understood the danger and reacted sharply, with 2 … f5 3 c3 c5. This is the practical approach to defense: When your position is in decline, rely on tactics. Black pinned the b4-knight and prepared an attack on the c-pawn (… e5xc4). In addition, he set a pitfall, since 4 xa4 can be met by the pinning – and apparently winning – 4 … a7.
But White was able to fight tactics with tactics. After 3 … c5?, he fell into the trap, 4 xa4! a7 because he had seen 5 a6!.

This meets the 5 … xa4 threat and prepares to win with 6 c7.
Black had nothing better than 5 … bxa6 after which 6 b6 is far superior to 6 xa8.
Black managed to avoid dropping material after 6 … xb6 7 xb6. But he had steadily lost ground in the positional battle that began with 1 c6!. White piled on more forcing moves, 7 … b8 8 c5! e6 9 db1 dxc5 10 b7, and Black resigned soon after 10 … xb7 11 xb7 a8 12 xc5.
Most players regard moves as being either tactical or positional. They like to divide and distinguish them, putting them in separate boxes. That makes studying easier. They can look at White-to-play-and-win positions to sharpen their tactical skill. They can look at a master game with positional themes to understand what strategy is all about.
But this blinds them to the benefits of a forcing positional move, like White’s play in the next example.

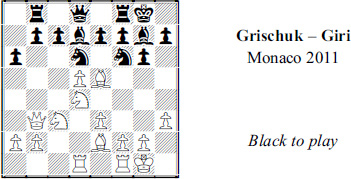
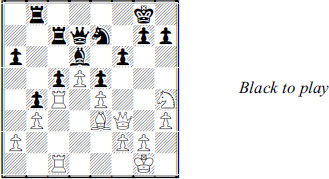
White’s basic idea is to attack and win the d5-pawn, say with de2-f4 and d2/fd1.
But Black has several defenses including … e4 and … e6, depending on circumstances. Quiet White moves, which is another way of saying non-forcing moves, may not overcome those defenses.
White’s solution was 1 b4!, forcing Black to choose a square for the knight immediately. Then 1 … e6 rules out … e4 and allows a strong 2 de2!.
So Black replied 1 … e4. But White followed up with two more forcing moves. He played 2 xe4, intending to answer 2 … dxe4 with 3 c6!.
The attack on the Black queen gives him either a favorable endgame (3 … xd1 4 fxd1 and d7 or xe4) or a nice middlegame (3 … xc6 4 xc6 or 3 … e8 4 d6!).
But Black can use little tactics, too. He thought he had found a flaw in White’s calculations so he met 2 xe4 with 2 … xd4, a zwischenzug (in-between move).

Black’s point is that without a White knight – and with a Black pawn on e4, rather than d5 – there is no significant edge (3 xd4 dxe4 or 3 exd4 dxe4).
However, the little tactics aren’t over. White found a counter-zwischenzug. 3 d6!. Then Black has a glum choice between defending an isolated pawn middlegame (3 … xd6 4 xd4) or going into the complications of 3 … a6.
The complications turn out to be awful – 3 … a6 4 xd4 xf1 5 xd5! and now 5 … xd6? 6 xf7+ costs the queen while 5 … h3 6 xa8 xa8 7 e4 leaves Black a pawn down with little compensation.
Black chose 3 … xd6 and was condemned to defense after 4 xd4 ad8 5 fd1 f5, otherwise 6 e4!. He eventually lost after 6 b2 f7 7 d4 e5 8 cd1 and d2.
Tactics are not the same as combinational play. A tactical move typically makes a threat. A combination typically offers a sacrifice. Both may secure a positional advantage. Jose Capablanca was famous for making a petite combinaison, a little combination. Here’s a modern example of a little combination followed by little tactics.
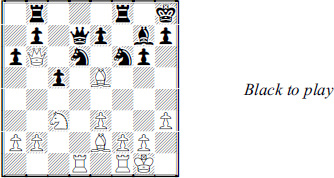
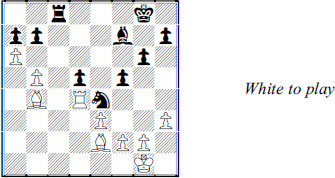
Black played 1 … c5. There is sound reasoning behind this: After 2 dxc6 bxc6 the improved piece play Black receives on the b-file may matter more than the targets he creates at a6 and c6.
But 1 … c5? is an oversight. He was surprised by 2 e6!, which exploits the presence of Black’s king at the end of the b3-g8 diagonal.
It doesn’t appear that the king matters in a position like this because there are pawns at d5 and f7, blocking the diagonal. Yet the combination works because after 2 … fxe6 3 dxe6 White has three threats. One is the obvious 4 exd7+.

But the others are 4 xd6! and 4 xd6!, based on 4 … exd6 5 e7+, which would win the queen.
Black made the best of a bad deal by getting his king off the diagonal, 4 …  h8.
h8.
After 5 exd7 xd7 the combination is over and we can appreciate the fruits it bore White. He enjoys several positional plusses, including the two bishops, the isolated e7-pawn and the exploitable hole at e6.
There are a number of promising moves to consider, including 6 f3 and 6 a4. But White played 6 b6!, threatening both 7 xc5 and 7 xd6 exd6 8 xd6.
Black again tried for b-file play with 6 … c6. But after 7 xc6 bxc6 8 b3! he had amassed four weak pawns.
Add to that the slimness of Black counterplay, and it amounts to a positionally lost game. He resigned after trying another trick, 8 … fe4 9 xe4 xe5, which allowed 10 xc5 a8 11 d7!.
Looking back, we can detect a difference. The little combination, 2 e6!, gained several advantages. The little tactic, 6 b6!, was less forcing. But its threat to win a pawn secured a won endgame.
Boris Gulko, the only player to win the championships of the Soviet Union and the United States, grew up as a fan of Mikhail Tal. What he particularly admired in Tal’s combinations is that when one was over, what was left on the board was not an ‘and wins’ position but one that had gotten somewhat better.
“They improve an equal position or turn a worse position into equality or, often, make an unclear position more unclear,” Gulko wrote. In fact, in the game Tal called his favorite, the featured combination was essentially no more than a clever way of trading queens.

White has just captured a pawn on f5. The routine 1 … xf5 promises little after 2 e1.
Black tried 1 … e5!, to trade bishops (2 fxg6? xg2 3 xg2 b7+).
But White had a forcing reply, 2 f4. He is not trying to win a piece with 2 … xg2 3 fxe5? because 3 … a8! and 4 … b7 would create devastating mating threats on the long diagronal.
Instead, he would meet 2 … xg2 simply with 3 xg2!, pocketing a safe pawn.
Therefore Black answered 2 f4 with 2 … f3+ 3 xf3 xf3 and White came back with the obvious 4 e1.

Tal had foreseen this and replied 4 … e2!! and 5 xe2 xe2.
What most fans enjoyed was the might-have-beens: the winning variations that could have come about after 6 c1 g2+ 7 f1 xh2. Some lines run at least six moves more and include … e8-e2 and … f5xg3(+).
But many fans failed to appreciate that when White played the best move, 6 xe2! and then 6 … xe2 7 b2! gxf5, Black had reached an endgame that was only slightly better for him. It was enough to work with and Tal won 45 moves later.
Of course, you don’t have to be capable of 12-plus-move combinations to become a master. But a much smaller petite combinaison is a master’s stock in trade.
There’s a second kind of little tactics. This one is also positional in purpose but it’s non-forcing. A move of this kind doesn’t threaten anything. But it needs a tactical justification to make it playable.
It comes about most commonly when a master sees a candidate move he’d like to play. Often it’s a move he’d love to play. It improves his position considerably. But it seems to fail for a simple reason, such as putting a pawn or piece en prise.
The remedy is to look one move further. You try to find a tactical shot that makes the positional candidate playable.

White has more space and more targets. Black can’t castle kingside because it would lose his h-pawn and likely his king as well.
But Black can put up a fight by maneuvering his knight to e4. He’s not ready to do that immediately because … c5 would allow xf5!, followed by xc5 or xg7+. However, Black can prepare with … b6 and then … c5-e4.
With that in mind, White turned a merely advantageous position into a nearly winning one with 1 c5!.
What’s protecting the pawn? Tactics: 1 … xc5 is crushed by 2 xe6.
Black is on slightly firmer ground if he takes with his knight, 1 … xc5. But then 2 ac1 threatens 3 xc5 xc5 4 xe6. If Black replies 2 … b6, White ensures an edge with 3 b3.
Some amateurs might consider 1 c5 because they see how taking the pawn brings swift punishment. But White didn’t expect to win that way. He expected to just keep improving his position, as in the game, which went 1 … f8 2 ab1!.

The c-pawn still isn’t hanging (2 … xc5? 3 xe6). But what makes 2 ab1! a good move is that it sets up b7 up as a target.
He would win, for instance, after 2 … g6 3 b6 e7 4 fb1 b8 5 f3 in view of 5 … h4 6 xb7, 5 … c6? 6 xc6 or 5 … d5 6 xf5!.
In the game, Black opted for 2 … f6?, which allowed a strong 3 f3 b8 4 b6!. The game ended with 4 … fxe5 5 xe6 xe6 6 xe6+ f8 7 fxe5 g8 6 d5! resigns.
Little tactics can be difficult to appreciate because the changes they bring about are so slight, such as repositioning a lazy piece or opening a diagonal. Unless you can be sure that the repositioned piece is on a better square or the diagonal will matter, the change may have no benefit, or even backfire.
Let’s see how a world champion used little tactics.

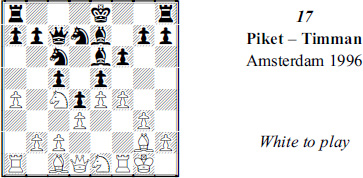
The first moves that catch the eye of most players are the forcing 1 a5 and 1 d1.
Many players would prefer 1 d1 for two reasons. It develops a piece, and the natural defense, 1 … xc4, allows White to post his light-squared bishop on a terrific diagonal, 2 xc4.
But a master would want more out of the position, as we’ll see in the next chapter. White’s chances are already so good that he should check out another develop-with-tempo move, 1 g5.
It is tactically justified by 1 … xg5 2 xd6. Moreover, White can see that if Black tries to avoid this by means of 1 … f6? he gets into a nasty pin. White can exploit it with 2 e3! and 3 d5.
So far, so good. But there are still at least two major questions. The first is: How good is 1 … xg5 2 xd6 ? Has White improved his chances since the position in the previous diagram?

He has. His knight is well placed at d6, and if the attacked Black rook goes to c7, the Black bishop is trapped by 3 a5!.
Moreover, if the rook goes to b8, White can take aim at another target, f7, in coordination with 3 c4!. Then if Black defends with 3 … f8, White can choose between going after the b-pawn with 4 d5 or increasing pressure with 4 fd1.
That’s a lot to calculate, and some players – even masters – would stop after they saw 3 c4. Some – including masters – might stop after visualizing 2 xd6 and conclude that the position just has to be good for White.
But two good outcomes – after 1 … xg5 and 1 … f6 – are not enough to justify 1 g5. The other big question White has to answer is whether he benefits after 1 … f6, since he has no better reply than a retreat, 2 e3.
That is what happened in the game, which continued 2 … xc4 3 xc4+ h8.

White hasn’t won material or created a vulnerable pin. But he improved his position considerably. He not only got his bishop to the good diagonal but that diagonal was extended to Black’s first rank.
White proceeded to squeeze Black’s minor pieces with 4 a5 c7 5 fd1 f8. Then 6 a2! stopped Black’s knight from coming into play via … e6. White can visualize a mating attack by lining up his queen in front of the light-squared bishop and threatening g8.
With so little room to operate in, Black swapped rooks, 6 … xd1+ 7 xd1 d8 8 xd8 xd8. But after 9 a6 b6:

White’s superiority has grown again, and this is where the more familiar role of tactics – the game-winning ‘big tactics’ – comes in.
A good idea is to get his queen to d5, where it threatens that mate on g8 as well as an attack on the queenside pawns, a8 or b7. But after 10 d2, Black has an adequate defense in 10 … d7!.
A better method is 10 e2! with the idea of b3 and c4. Black can defend against the g8 mate idea by moving his knight and playing … f8. But he would be lost on the queenside, 10 … e6 11 g4! (threatening xe6) c7 12 c8 and b7.
The point to appreciate here is that the key to White’s victory was 1 g5! f6. That one-move tactical line created a concession that proved to be huge. Black did not have a major improvement after 2 e3, and soon after that White had a positionally won game, thanks to additional forcing moves like 4 a5 and 9 a6.
The biggest obstacle to learning how to use little tactics is the mindset that tells you that tactics are used to attack. One way to rid yourself of this notion is to examine master games that have nothing to do with attack.
You might choose games with quiet openings, such as the more positional lines of the Queen’s Indian, French, and Nimzo-Indian Defenses. After each move, try to find a tactical point. Don’t rely on annotations to point them out. Annotators, particularly elite GMs, regularly omit mention of key tactical points. They seem to think they’re too obvious and unworthy of their comment.
Don’t expect every move that’s played to have a tactical subtext. But appreciate the way a master blends tactics and strategy together. Consider the next example.

The position of Black’s queen suggests it can be exploited. But by ‘exploited’, we don’t mean White should be able to win the queen or even a pawn. Rather, he can try for some positional plus, like a superior pawn structure or more space.
For example, he can drive the queen off the diagonal with 1 e1 and then 1 … c8 2 xb7 xb7. Then he can try to seize control of the center with 3 e4.
But Black can use little tactics of his own, with 3 … b4!, intending … xc3/… xe4. White’s position deserves more than 4 b5 a6 5 d6 c6 (6 d1 e8).
White’s solution was the immediate 1 e4. Black can’t take the pawn because 1 … xe4 2 e5! costs a piece.
That’s a fairly primitive tactic. But it pays off in the positional column. After 1 e4! White has the better center and threatens to gain more space by pushing to e5.
If Black tries to discourage that with 1 … d6, his bishop has no retreat from c5. It might be trapped if White can engineer b2-b4.
So Black played 1 … e7, safeguarding the bishop and threatening 2 … xc4.
But White used his fine tactical sense to enlarge his edge with 2 e5! h5 3 e3!.

Again Black gets punished if he grabs a pawn, 3 … xc4? by 4 d2 c7 5 xb7 and 6 g4, trapping the knight. (He might also be winning with 4 g5, which threatens mate on h7 as well as xb7.)
To safeguard his knight, Black played 3 … f5. But White wasn’t done with little tactics. He shot back 4 e1! c8 5 f4!, which gives him a big edge in space and a pawn structure that greatly favors his pieces.
Once again tactics stopped Black from grabbing a pawn, 5 … xg2 6 xg2 xc4?? 7 xa8.
Play continued 6 … a6 7 e2! – attacking the knight and prompting a new weakness – 7 … g6 8 d1 d8 9 f3 c7 10 d3 e8 11 fd1!

Rather than spend a tempo on 11 b3 to protect the pawn, White had figured out that 11 fd1! xc4 12 xd7 leads to a big endgame edge for him.
Black managed to liquidate his worst weakness with 11 … d6. But thanks to White’s little tactics – 1 e4! and 2 e5!/3 e3! and 7 e2! and 11 fd1! – he had a substantial edge and eventually converted it to victory after 12 b3 dxe5 13 xd8 xd8 14 xe5 f6 15 f3 b8 15 b5.
Count it up and you’ll find more than half a dozen threats and minor tactics. Looking at games like this should deepen your appreciation of little tactics. Among contemporary players, Vishy Anand, Vladimir Kramnik, Hikaru Nakamura and Magnus Carlsen regularly use little tactics to the full and their games are a rich source of study material. Among the older players whose games you might consider there is Samuel Reshevsky, Mikhail Botvinnik, Anatoly Karpov, Akiba Rubinstein, Svetozar Gligoric, Vasily Smyslov and Tigran Petrosian.
Yes, Petrosian. After one of Boris Spassky’s world championship matches with Petrosian, he told Gligoric, “You know, Gliga, Tigran is first and foremost a stupendous tactician.”
Let’s be honest. No one intentionally alternates tactical moves with strategic moves. No master says to says to himself, “I’m going to play something positional this turn and then next move it’ll be time to find a pin or skewer that I can use.” It just turns out that way, a happy accident.
Here’s an example of mixing little tactics and positional moves from Yuri Averbakh, best known for his splendid endgame play and books.
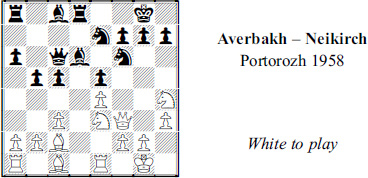
A few moves earlier White was pursuing a standard strategic goal in this opening, e3-d5. If he had achieved it, Black would have been virtually forced – for tactical reasons – to capture the knight. White would then retake with his e-pawn, giving him a passed d-pawn, a wonderful outpost on e4 for his pieces and the c2-h7 diagonal for his light-squared bishop.
But Black discouraged that plan when he retreated his knight from c6 to e7 and puts his queen on c6. Now 1 d5? just loses a pawn.
However, Black’s regrouping has a drawback. White underlined it when he played 1 c4!.
Normally, he would be reluctant to reinforce control of d5 this way because it creates a hole at d4 that Black could occupy with a knight. But after … e7/… c6, it’s gotten hard for Black to do that.
So far this is purely positional thinking: outposts, passed pawn, hole. Black replied 1 … e8.

Black has a strategic goal of his own, occupying d4 by a different route, … c7-e6-d4!.
White cannot stop that through positional means. That’s the job of tactics and White found 2 b3!. He threatens 3 cxb5! followed by xf7+ and mates.
That exploits the knight’s absence from f6. If the knight goes back, 2 … f6, White has another shot, 3 g4!. That would lead to clear positional edge after 3 … xg4 4 hxg4 and 5 g5 or 3 … xg4 4 hxg4 with a renewed threat of 5 cxb5 and 6 xf7+.
Therefore Black met the threat of 3 cxb5! with 2 … b4. However, this enabled White to resume improving his game positionally, with 3 d5!, the move he’s wanted to play for several turns.
When Black replied 3 … b7, White improved another of his pieces by means of 4 a4!.
Black tried to the same with 4 … c7.
The Black knight is headed once again for d4 via e6. But White found another way to deter him and, naturally, it was tactical, 5 g5!.
He threatens to win a piece or more with 6 xe7 xe7 7 c6! (7 … xc6?? 8 xe7+ and xc6).
And what about 5 … f6 ? Well, there are few Black pieces defending his king so White believed 6 xf6+ gxf6 7 xf6 had to give him a winning attack.
Black had run out of ideas and he accepted the consequences of 5 … cxd5 6 cxd5 f6 7 e3.
Since his light-square bishop has no particularly good square he traded it off, 7 … d7 8 xd7 xd7, and there followed 9 ac1 dc8 10 c4! ab8 11 b3 c7 12 ec1.
White has a positionally won game. He may not be able to crack through the queenside defense because Black has committed all his pieces there is. Instead, White switched to the kingside and eventually won after 12 … b5 13 g4! g5 14 g2 g7 15 h4.
Most players have an uneasy feeling about composed studies. They don’t like those ‘White to play-and-win’ positions they see in magazines because they seem artificial.
Yes, most studies are very artificial. But what amateurs might like about them is that the solutions are usually 100 percent tactical. You don’t have to know esoteric, technical positions. Just work out the tactics.
In fact, one of the best ways to improve your winning technique is to work on endgame tactics. Technique is mainly a mixture of little tactics combined with progress-making moves, such as creating a passed pawn. Here’s a dramatic but not unusual example.

White had employed few tactics to build up his positional edge. But to convert that edge he needed threats, and he began with 1 a6!. This is based on the elementary 1 … bxa6? 2 c6 fork.
Black made another concession with 1 … xd4 2 xd4 and should have continued 2 … bxa6 4 bxa6 dc8, now that the fork was eliminated. His position had declined thanks to 1 a6 but is not yet lost.
However, he tried to used his own tactics with the immediate 2 … dc8 and 3 xc8+ xc8.
His point is that 4 axb7? b8 and 5 … xb7 not only regains his pawn but makes the White b5-pawn as much of a target as his own a7-pawn.
But White had another trick, 4 b6!, to get a protected passed pawn to the seventh rank (4 … bxa6 5 b7 b8 6 xa6). That would win swiftly.
Black chose 4 … axb6 instead but after 5 axb7 b8 6 a6 he was lost.
He might have tried one last trick with 6 … e8 so that he rids himself of the dreaded pawn after 7 xd5 c6 and … xb7.
But this fails – tactically, of course – to 7 f3! and then 7 … f6 8 d6 or 7 … c5 8 xc5 bxc5 9 xd5 because of the 9 … c6 10 xc5 xb7 11 b5! pin.

Instead, Black played 6 … e6 and resigned after 7 xe4! – in view of 8 d6.
By playing over endgames like that, or entire games by Magnus Carlsen, Vladimir Kramnik, Anatoly Karpov or any of the other great players mentioned earlier in this chapter, you should enjoy a greater appreciation of how to become what every master is: a positional tactician.
And now for some quiz positions:

What is White’s biggest problem and what should he do about it?
White’s position looks nice but what specifically can he do?
How does White improve his position?

How does White establish a positional advantage?