
At a memorial service after Bobby Fischer’s death in 2008, the Philippines master Renato Naranja recalled how they both competed in the 1970 Interzonal tournament. One day, after Naranja had drawn with a Soviet grandmaster who was much stronger than him, Fischer told the Filipino he stood better when the game ended.
Yes, I know, replied Naranja, but I couldn’t see how to win. Fischer said that was no reason to agree to a draw. When you know you have an edge, you just keep playing, he said. “You had the two bishops,” Fischer said. “Just move around.”
This is another major difference between masters and amateurs. Masters want more out of a position. They try to win – and find ways to win – positions that seem unlikely to be winnable. Here’s a vintage example.
Black played 1 … f5. This was “a big surprise” for Larry Evans when he annotated the game. He gave the move a ‘?!’ to label it as dubious. “This move would never occur to me,” Evans wrote.
There are several reasons why it wouldn’t. It’s not a developing move. It restricts Black’s QB. Moreover, Black has good alternatives, such as 1 …  e8 or shifting his bishop to e6 and d5. These alternatives are so firmly based on general principles that – barring a tactical problem – they have to be good.
But Evans was 16 when he wrote, “This move would never occur to me.” Already a master, he knew a lot about playing. But he had a lot to learn about winning.
What he didn’t appreciate is how drawish the position becomes if Black plays purely according to principle. After 1 … e8, White can play, say, 2 c3  d6 3 d4. There is little to prevent him from playing other principled moves, such as e3,
  d2, fe1 and f4 or g5. Then the position is so evenly balanced, there is no friction. It will get closer and closer to a draw after each of the inevitable piece trades.
Black didn’t want a draw. He was a stronger player than White and he followed Siegbert Tarrasch’s advice. A master offers “silent odds” whenever he plays a weaker player, Tarrasch said, so he has to find ways to avoid a draw.
This doesn’t mean taking risks. In this game Ernst Gruenfeld wasn’t making bad moves in the hopes of confusing White.
No, he was simply giving White more chances to go wrong after 1 … f5. (There were very few ways to go wrong after 1 … e8.) And Black had a logical way to do that:
The first step is … d6 followed by … h4, threatening mate on h2.
Then, if White defends with g2-g3, Black’s queen will retreat to f6 and he will try to open the kingside with … f4!. On the other hand, if White defends with h2-h3 he is vulnerable to … g5-g4.
Evans wrote that the strange 1 … f5 inexplicably worked “like a charm” as the game continued 2 d3 d6 3 d2 h4 4 g3 f6 5 c3 h6.

If White meets … f4 with g3-g4, Black can continue … h4 followed by … g5 and … h5! with a fierce, if not winning, attack.
White preferred 6 e1 f4 7 g4. But this allowed 7 … fxg3 8 fxg3 f2!. As stunning as that may appear, it is a known sacrificial device.
In this case, 9  xf2 xh2+ 10 e3 xg3+ 11 f3 xg4 12 xg3 xg3 would land White in a bad endgame (or in the losing 11 xf3 g4! and …e8+.).
Instead, he inserted 9 e8+ f8 and then 10 xf2 xh2+ 11 f1. But 11 … xg4! 12 xg4 xe8 eventually won for Black.
Afterwards it was pointed out that 10 h5! would have held for White. But that doesn’t detract from 1 … f5!. It gave White ways to go wrong. Instead of being able to rely on routine moves in a sterile position, he was soon fighting for a draw.
Masters want more. And because of that, they often get it. It sounds too simple but it’s true.
There are specific ways to emulate masters in this way. But ultimately it comes down to Fischer’s attitude: If you keep pressure on your opponent long enough, if you keep forcing him to make choices – if you keep trying to win – there’s a good chance that you will.
This view was also a tenet of the Soviet School. Mikhail Botvinnik’s watchword was “Prolong! Prolong the struggle.” Think twice about trading pieces when you have the advantage, he said. Continue the pressure, even if you have to temporarily retreat.

Black had made considerable progress in the previous five moves. He advanced his bishop from f6 to b2, where it pressures the a3-pawn and watches for the chance for a tactical shot on c1. He moved his rook up from c4 to c2, where it pins the knight. And he shifted his queen from c8 to h5, from where he can invade at h2, giving check.
It looks like Black can deliver a knockout with 1 … c1. For example, 2  xc1 xd1 wins the queen and 2 d7 h2+ 3 f3 allows mate after 3…h1+.
But White can refute 1 … c1 with 2 xc1! xc1 3 xc1. His king cannot be separated from the rook and knight (3 … h2+ 4 e1 g1+ 5 d2 and 6 e2!). They in turn defend the only targets, the pawns at g3 and a3. This is what is called a ‘fortress.’ Black cannot win.
But the position in the diagram isn’t even and is hardly drawish. Black may retreat his attacked rook. But that just means moving the furniture. Or in Fischer’s terms, ‘just moving around’.
Black played 1 … h2+ 2 f3 c8!.

Black doesn’t have a specific threat. But he can visualize, again without calculating, that the rook would be effective if it reaches h1 or h2.
He can also see how hard it is for White to find safe moves. For example, if his queen leaves the first rank, such as 3 d3, he allows a strong 3 … h1+! so that 4 g4 h5 mate or 4 f2 h8!, threatening 5 … h2 mate.
A computer might find a defense, perhaps with a rook move. But a human in White’s chair would be reluctant to risk putting his rook on an unprotected square such as with 3 e7.
In the end, White played 3 b1. Black found a way of making progress, 3 … c1! 4 xc1 h1+ and 5 … xc1.
For example, 5 e2 xc1 6 b3. Now if Black looks for ways to ‘just move around’, he would find 6 … g2+ 7 d3 c6!, with a killing threat of … d6+/ … d2 mate.
Instead, White played 5 f2 xc1.
To stop the threat of … f1 mate, White played 6 d3. But 6 … g1! prompted resignation (7 e4 h2+ 8 f3 f1+ or 7 c3+ h7 8 e2 g2+ 9 d3 d1+).
Show two experienced players a complex position, and they are both likely to find a good move. The stronger player is likely to find it faster. But he’s also more likely to keep looking once he’s found it.
As good as the move may appear, the master looks for a better one. That often makes the difference of a half-point, if not a full one.

Black is a pawn ahead but there are a lot of tactics that skew attempts to evaluate the position.
The first point to notice is that White’s last move, 1 c1, appears to win material in view of 1 … d8 2 c8 or 1 … b8 2 d7.
The second point is that Black can avoid that fate with 1 … h3+ followed by winning the White queen with … xf1+.
When some amateurs make a discovery like that, they’re strongly tempted to bang down the knight with check, with hardly any thought. But 1 … h3+ would turn out badly. After 2 gxh3 xf1+ 3 xf1 xf1+ 4 xf1 Black cannot save his queen (4 … d8 5 c8).
A more experienced played would look further. He might notice that the … h3+ idea can be reworked by playing 1 … b8. Then he can meet 2 d7 with a much better version of the check, 2 … h3+ 3 gxh3 xf1+ 4 xf1 xf1+.
Of course, that’s better than 1 … h3+??. But a master wants even more.
Because the position is pretty tactical, he would sense there’s an even better use of the … h3+ idea. Black came up with the stunning 1 … g5!!.

When Black first noticed this possibility he probably calculated 2 xc7 h3+ and concluded that 3 gxh3 xe3+ 4 g2 xf1 leaves a complex position.
If you look further, you’ll see 2 … e2+! is much better than 2 … h3+?. White is lost, 3 xe2 xe3+ 4 xe3 xf1+ or 4 h1 xf1+.
White was strong enough to see the same variations after 1 … g5 that Black did. White didn’t take the queen but played 2 d2!, which takes most of the punch out of … xe3+.
True, Black can still use the … h3+ idea in yet another form. He can answer 2 d2! with 2 … xb6 3 xb6 h3+ 4 gxh3 xd2. Black would have the edge in the endgame after, say, 5 xf7 xf7 6 c2.
But Black still wanted more. He played 2 … e7! because he has much better chances than White if queens remain on the board. Play continued 3 fe1 f6.
Black can improve his position with … g6 and … h4 and followed by … g3 or … h3 or even … h3+, depending on White’s play. White’s pieces are protected and coordinated but they can’t do much.
And when White did try to do something, 4 c8?, he lost immediately to – guess what? – another knight check. After 4 … e2+! White resigned in view of 5 xe2 xe3+ 6 xe3 f1+! and mate or 6 h1 xb6, with an extra piece for Black.
The clear superiority of 1 … g5!! over the other candidate moves was revealed by calculation. More often the difference between alternatives is much less. What makes one candidate good, another better and a third best may simply be a matter of how many chances each one gives your opponent to go wrong.

White threatens to win the Exchange with xf8. Black can foil that with the simple 1 … xd2+ and then 2 xd2 fd8. He would have slightly the better of, say 3 e3 f4. But winning would require some bad White moves.
A more enterprising idea is 1 … g5. This time White will have a bad bishop, such as after 2 xg5 xg5 or 2 xd8 fxd8 3 xg5 xg5.
This may be more winnable for Black – or rather more losable for White. If White later allows a trade of his knight for Black’s bishop he will likely lose. The same goes for allowing Black’s king to invade along the dark squares, … h6-g5-f4.
But Black looked for more. He realized that he might be able to allow xf8. He could dominate the dark squares with … xf8, … g5 and … h6, followed by … d4 or … f4.
If Black is willing to offer the Exchange, the best way would seem to be a queen move, to avoid 2 xd8. But 1 … e7 2 xf8 xf8 3 d7! is problemsome.
Black looked for something better and found it in the remarkable 1 … c6!, one of the last moves you might consider. It eliminates the annoying d7 and prepares … e7.
White can trade queens after 1 … c6 but he is worse after 2 xd8 fxd8 3 xd8+ xd8 4 e2 f5 or 4 … f4. Also poor for him is 2 d6 xd6 3 xd6 fc8 and 4 … d4.
That left 2 xf8 xf8:

Now 3 d6 fails because Black can regain the Exchange favorably with 3 … xd6 4 xd6 d4 and … e7.
But the main benefits of 1 … c6! became evident when White made the mistake of staying in a material-up middlegame, with 3 d3?. Black’s control of the dark squares gave him a solid edge after 3 … g5 and 4 f2 h6.
For example, 5 e2 e3 6 g3 f4 7 c3 h5! 8 g4 d4! and the Black queen invades at e3.
In the game, White tried 5 f1 and was losing soon after 5 … d8 6 g3 d4 and 7 … f5. But the main reason he lost is that 1 … c6! gave him more ways to lose.
There’s another way that a master’s desire for more works for him: He doesn’t give up easily on a move he really wants to play. He remains loyal.
We saw how this works with a positional candidate in the last chapter. If a master really likes the positional features of a move he will try to find a tactical justification. The same goes for a tactical candidate move.
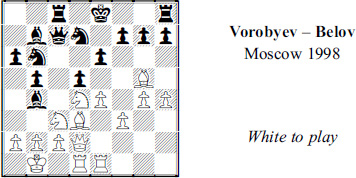
Black has just played … b4. It looks strong because … xc3 as well as … a4 are threatened.
But White noticed that the bishop is also unprotected. The first idea that comes to mind is 1 xd5 so that 1 … xd2 2 xc7+ or 1 … exd5 2 xb4. But on closer inspection, this fails to 1 … xd5!, protecting the bishop.
That’s enough reason to give up on 1 xd5 – but not to give up on the idea of exploiting that bishop. White saw that 1 cxb5 has the same 2 xc7+ and 2 xb4 ideas as 1 xd5.
However, once again there’s a problem. Black can meet 1 cxb5 with the countershot 1 … c5. He defends his bishop and leaves White’s knights vulnerable.
White would lose material after 2 c3 xd4 or 2 c3 axb5 3 cxb4 xd4.

White saw all this when he played 1 cxb5 but he didn’t reject the move. Instead he searched for a counter to the counter-shot. He found 2 b3!.
Black’s queen is also attacked and a retreat, 2 … f8?! makes 3 c3! strong this time.
The only hard calculation required of White once he spotted 2 b3 is to check out 2 … xd2 3 xc5. He concluded that 3 … xe1 4 d6+ and 5 xc8, or 3 … xc5 4 d6+ d7 5 xc8 xe1 6 xb6+ must be good for him. He was right and won.
The American grandmaster Walter Browne was renowned for his move loyalty. In a U.S. Championship tournament, he emerged from a standard opening variation, on the White side of a Petroff Defense. The position after 13 moves had been played many times before, but never by Browne.
He spotted a bizarre, tactical move, putting a bishop on h6, where it threatened xg7 but also allowed … gxh6. The more he looked at it, the more he couldn’t find a reason why it failed. Common sense told Browne that a strange move like 14 h6!?! couldn’t refute such a solid opening. But Browne refused to abandon it. He calculated and calculated and eventually played the move – and won.
Loyalty to an attractive candidate is another good habit. But to stick with a move, it must pass a cost-benefit test. It’s worth spending a significant amount of time trying to justify the move you want to play if it would make a significant change in your winning chances. If it doesn’t make a big difference, it’s not worth the lost minutes.

Black had just traded off his QN on d4. He wants to develop his QR more aggressively than normal, via a6. He expected 1 d2 a6! 2 f3 g6, with a threat of … xh3 and good chances.
But White crossed him up with 1 e1. Black could see that it threatened 2 xd5 xd5 3 xe7.
If Black has to defend against the threat with 1 … e6 or 1 … f6, he shelves his kingside plans for the QR. His prospects would shift from ambitious to modest.
Nevertheless, Black really liked the rook lift. “Having seen this move I understood that it had to be played!” he wrote. And that meant he looked at 1 … a6 2 xd5 xd5 3 xe7 g6. To him, it was a must-calculate situation.

Black threatens mate on g2. He saw that 4 g3 xh3 would give him good chances and he liked 4 g4 f5 so much that he was willing to try 1 … a6. (In fact, 4 g4 can be answered strongly with 4 … h5! followed by … xh3, … xg4 or … f5.)
In the end, White declined the sacrifice. Thanks to his refusal to abandon 1 … a6! Black got the edge after 2 h5 b4 and eventually won. (Even better was 2 … b4! 3 d2 f4! 4 f3 f6.)
Psychologists have found, through experiment after experiment, that people have stronger feelings about losing than about winning. Economists, who also analyzed this phenomenon, gave it a name, ‘loss aversion’. And experienced chess players know it as the curious feeling that the joy of winning a game never quite makes up for the pain of losing one.
This helps explain why many amateurs fight desperately – and skillfully – in a bad position. But then they relax when they realize the danger of losing is past.
An amateur who survives a strong attack as Black may say, “Good, now I can look forward to playing White in my next game.”
A master in the same situation will say, “Good, now it’s my turn to play for a win in this game.”
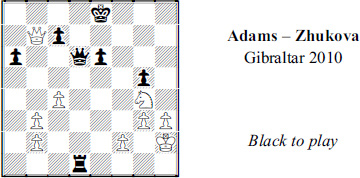
White had missed two winning lines in the time scramble as well as a third that would have brought Black to the verge of defeat. Now that the time control was reached, Black could catch a breath.
She saw that the worst was over because 1 … b1 (or 1 … a1 and 1 … c1) followed by 2 … d1 should draw. Then her threat of mate on g1 (or h1 if White’s queen leaves the diagonal) would force White to draw by perpetual check.
Considering what had gone before – and how much stronger a player White was – Black might have been expected to play a rook move quickly. Instead, she spent half an hour in thought.
But she wasn’t rechecking her analysis or looking for a simpler way to draw. No, she wanted to know if Black had any winning attempts.
Only after failing to find any did she go into the drawing sequence of 1 … b1! 2 e4 d1 3 xe6+ d8 4 f6+ c8 5 xa6+ b8 6 b5+ a7 7 a4+ b8 8 b5+ a7 and so on.
And let’s go back to Fischer one more time. After 44 moves during an Olympiad team tournament in 1970, his opponent, a friend, said “I don’t know who is better, Bobby, but I offer a draw.”
Fischer was candid when he refused: “I don’t know who is better either but I have an extra pawn.” Only when both sides were reduced to pass moves, 16 moves later, did he accept the draw. That’s the spirit of a master.
And now some quiz positions:

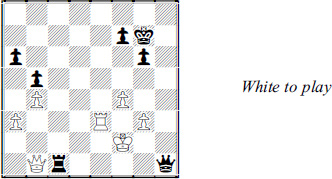
Black has perpetual checks at f3 and g4. Should he try for more?

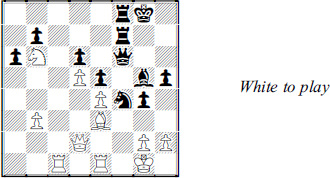
Each of White’s pieces seems better than its opposite number. What can he make of that?

White has two pawns in return for the Exchange and his last move, 1 b6, wins material.
As Black you see that 1 … xc3 leads to mate after 2 bxc3 d1+ 3 xd1 xd1+ 4 b2 c1+ and 5 … a3.
But White can ignore the queen sacrifice and reply to 1 … xc3 with 2 xd8. What do you make of that?

Black has given up a pawn to force White’s pieces to bad squares. The natural move is 1 … xd4.
How good is that? What other moves should you consider? And which is best?

White has two extra pawns. What should Black be thinking?

Black can try to rid himself of his slightly bad bishop with 1 … e5 and then 2 ab1 d4. Is there anything better?