
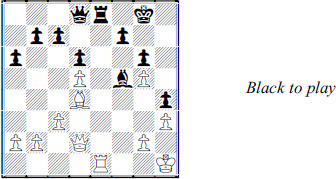
Any experienced player can figure out when he has an advantage, particularly a big advantage. A master knows when his advantage is big enough.
Enough to win. When a position is that good, a master knows that he doesn’t have to look for elaborate plans or to calculate risk-taking variations. He should be able to win with relatively simple moves, especially one-move and two-move threats, and simple precautions to eliminate counterplay.
After the game, White was surprised to find that his computer claimed he was only slightly better here. He knew the evaluation must be wrong. Black’s weak king is what matters most, by far.
Aside from the immediate threat of  xh6, White can make solid progress with straightforward ideas such as
  c5-e5 followed by e7 or e6. Once his rook penetrates, Black’s situation should be hopeless.
Black understood this, too, so he seized the initiative with 1 … d7 2 xh6 g7, threatening mate on g2. Then came 3 g3 d4, with another threat, 4 … xg3+.
However, it should be easy to see that White doesn’t have enough weaknesses to enable Black to keep making threats. Black, on the other hand, has plenty of weaknesses and that’s why White has a won game.
After a brief period of defense, 4 e6+ f7 5 e2  g7 6 f1, he was ready to consolidate with g2 and regain the initiative.
This happened quickly because 6 … g6 allowed him to substitute for g2 with 7 d1!.

White would win after 7 … xf2? 8 e8+!. Black had to pull back and resignation was getting closer after 7 … f6 8 e3 b6 9 d4! e7 10 d3+g7 11 f4.
This was more than a case of ‘just moving around’ in a superior position. White had a general plan of getting his rook closer to the Black king, ideally to g5.
In fact, Black resigned after 11 … e6 12 f5 f7, when he realized that two precise moves, 13 g5+! h6 14 d1!, would make resistance futile.
A master is able to win more often because he has a better understanding of what it takes to win. He sees winning potential in positions that other players – even computers – think are only mildly favorable. A master also rejects moves that lead to positions that are favorable – but not favorable enough.
Most of all, a master has a better sense of when to trade pieces when he has an advantage. This is critical when a player faces a choice of whether to liquidate a very good position or press for a better one.

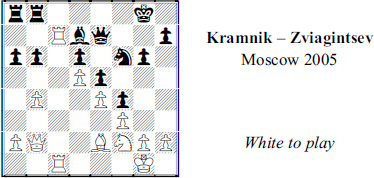
White has what annotators like to call a queenside bind. It’s not a winning position and there are no indefensible Black weaknesses. White’s pieces are simply much better placed than Black’s.
But there’s some urgency. Black can unravel by means of … f7 and …  b7. Then he threatens to consolidate with … d5 and even grab a second pawn, … xd6. Given time, Black is winning.
White can foil that by taking the bishop on b7 and penetrating at c7 with his heavy pieces. For example, 1 ac1 is an obvious candidate. Black could begin the unraveling with 1 … f7 and then 2 e3 b7.
A bit of inspection shows that White can’t improve his position further with quiet moves. This means 3  xb7! xb7 4 c7 makes sense. After 4 … b8:

Once again there are obvious candidates. One is 5 dc1 so that if Black tries to activate his pieces (5 … e8 followed by … e5, … e6 and … ff8) he can continue 6 b7 and cc7 with great pressure.
Or White can try to force a winning endgame with 5 b6, followed by dc1 and then b7 or xb8/a7.
Each of these lines looks very good for him and he would likely end up a pawn or so ahead in an endgame. But is it good enough?
Maybe not. As promising as these lines are, a master would be at least a little apprehensive about heading into a mere pawn-up endgame.
Why? Because White’s earlier position was simply too good to sell cheaply. It was the kind of position you can win in the middlegame.
White wanted more than an endgame and found it on the kingside. Back at the first diagram he detected a target at f6 and played 1 g4!. His idea is 2 g5 followed by 3 gxf6+ xf6? 4 e4, winning.
Black’s queenside pieces can’t defend the king and he was in deep trouble after 1 … g5 2 h4!.

Black was lost after 2 … gxh4? 3 g5 because of 3 … f7 4 gxf6+ f8 and then 5 f2 b7 6 e3, with killing ideas of g5/g1/g8 mate and h6+/d4/g1-g8 mate.
Yes, Black could have defended better. But even after 2 … h6 White would have somewhat better chances – with 3 a2 followed by h2, g2 and dh1, for instance – than if he had tried to win on the queenside with 1 ac1 and xb7.
How does a master assess winnability? There are several factors including (a) the material situation, (b) the positional plusses and (c) how close the position is to an endgame.
If it’s pretty close – so that a trade of one pair of pieces will reach a bookish endgame position – then experience or textbook learning should give you a fairly accurate evaluation. This is where knowing basic endgame principles will count.

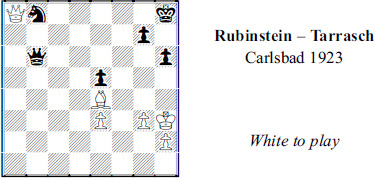
Black has just offered a trade of queens with … d5. Should White accept the invitation?
To be absolutely certain about the wisdom of 1 xd5 you’d have to know some subtle endgame theory.
You would know that White has excellent chances in a rook ending if his extra pawn were a b-pawn. But with an a-pawn, theory says Black would have to make some serious errors to lose.
However, you don’t have to memorize pages of book. A master would recognize that any endgame like this – with a single, extra pawn that is passed and on the queenside – is difficult to win when White’s rook is in front of, rather than behind, the pawn. That would tell White to avoid 1 xd5?.
He played 1 f4!. This (a) avoids the drawish rook endgame, (b) protects the only potential target for Black and (c), watches his own target at f7 (1 … b5?? 2 xf7+).
After Black replied 1 … g8, White connected his heavy pieces, 2 f6. Then came 2 … g7 3 a6 d7.

It might seem that White was thinking: “I’ll attack f7 and push the a-pawn to distract him enough to win the f-pawn.”
But that wasn’t his idea. His goal was to improve the position of his rook and he succeeded so well that he has virtually a forced win beginning with 4 f3!.
The point is that now a queen trade is very good because White can get his rook behind the a-pawn. For example, 4 … xf3 5 xf3 d2 threatens 6 … a2!, which would draw.
But it can be met by 6 a3!, since Black loses immediately after 6 … xf2+? 7 g1 and 8 a7.
In the game, Black met 4 f3 with 4 … c5. But then 5 c6! threatened both the queen and a mate, 6 f6+ or 6 c3+ followed by c8.
The game, which seemed drawish a few moves ago, was over immediately: 5 … d4 6 c3! xc3 7 xc3 d2 8 a3! resigns.
What clinched victory was realizing how winnable the rook ending is once White’s rook gets behind the passed pawn. It didn’t take lengthy calculation or memorization of book positions. It was knowing the behind-the-pawn principle.
The vast amount of endgame theory concerns specific positions in which one side has an extra pawn. The variations are often staggeringly difficult. But what’s more important is to know the general cases: When is an extra pawn enough to win? When is a second extra pawn needed? What are the winning piece-vs.-piece matchups?
Here’s another example.

Black has only a pawn for the Exchange. But White lacks a pawn that could he could try to queen. Take everything off the board but the pawns, the kings and a White rook and Black bishop, and it’s a possible draw.
Yet Black resigned in six moves. White accomplished that due to two factors. The first was his tactical vision. He saw that the ‘impossible’ 1 xf7 was possible.
After Black captures the bishop, 2 xd7! will work. Then 2 … xd7 leads to an endgame in which White has two rooks to battle the Black queen, with an equal number of pawns.
But calculation is only as good as the evaluation that accompanies it. The second factor that won the game was White’s realization that the endgame is a win, in a fact a relatively easy one. Play went 1 xf7! xf7 2 xd7 xd7 3 xd7+ h6 4 xc7.

White aimed for this because he knew the general case: Barring a complicating factor, two rooks beat a queen if pawns are equal.
The winning plan is elementary: The rooks will double up on the a-pawn and win it. After that, they can pick off the kingside pawns in the same way.
Black made it easy by playing 4 … d3, hoping for 5 a1 d4! 6 axa7 xf2, with a likely draw because of Black’s prospects for perpetual check.
But after 5 g1! it was safe for White’s rooks to win the a-pawn. It was too late for Black to push it (5 … a5 6 a1 a4 7 a7!, not 7 xa4?? d1+).
Black resigned after 5 … d4 6 c2 in view of, say, 6 … a4 7 cc1 a5 8 a1 b4 9 a2! and 10 fa1.
Another important factor in assessing whether a position is favorable enough is simply whether you can imagine how it would be won. But ‘imagine’ isn’t the right word. Imagination has little to do with it. It’s a matter of visualizing a plan.

White’s last moves were e3-f2 and the maneuver of his knight from c2 to f3. If his moves were words, they would say, “I’m going to win the h4-pawn.”
But Black has a defense, 1 … g7 and 2 … h8. Does White have another plan?
Yes, he can go after the pawn immediately, with 1 g5 and 2 xh4. Then Black doesn’t have time to play … h8.
But 1 g5 is a big step because 1 … xg5 2 fxg5 creates bishops of opposite color. That might draw in an endgame, and Black can get closer to an ending with 2 … e8 and … xe1+.
That makes the position in the diagram a critical moment. By playing 1 g5 White might either be throwing away a very favorable position or nailing down a win.
White figured out 1 g5 xg5 would be a win. And it had nothing to do with an extra pawn. He can visualize – without calculating – that once Black has no dark-squared bishop, he is highly vulnerable to mating threats on the long diagonal. White can’t be sure – without calculating a lot – that it will be a forced win. But the visualization tells him it should be close to a win.
With that in mind, play went 1 g5! xg5 2 fxg5 and 2 … e8 3 d4.
What White had visualized, when he looked at 1 g5, were knockout plans. One goes f6 followed by f2 and xh4-h8 mate. A similar one is c3-c4/c3 and d4.
Now that the position has clarified he can calculate specific variations. A simple one runs 3 … xe1+? 4 xe1 xg5?? 5 e8+ and 6 h8 mate.
A better defense is 3 … d7 or 3 … f8, hoping to flee with the king. But calculation shows that 3 … d7 4 f2 f8 loses to 5 xh4, e.g. 5 … xe1+ 6 xe1 a4 7 h2 (7 … xa2? 8 f6 and 9 e7+ or 7 … c2 8 h4).
In the game Black set a trap with 3 … e4. He is hoping for 4 f4? xg2+! 5 xg2 xe1 6 xh4 e5!.
But once you have a positionally won game – and this is what one looks like – you don’t need ingenuity. Precaution is usually enough. After White played 4 c4, Black found 4 … c5 in a bid to discourage d4.
However, White can turn to another winning plan, with 5 c3 and then 5 … d7 6 g1 to stop … xh3+.

Black had run out of good defensive tries (6 … f5 7 f1 d7 8 f4 and wins) and the game ended with 6 … b5 7 f4 b4 8 f6 xg2 9 xh4! xe1+ 10 xg2! e2+ 11 g1 resigns.
’Positionally won game’ is a useful cliché for annotators. But it means more to a master. When he can say with confidence that he has one, he knows it can be finished off with fairly simple, direct moves. He doesn’t have to do a lot to win. The game is already won.
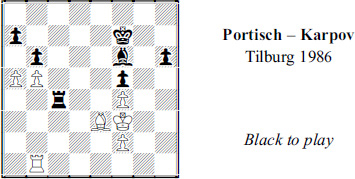
A position that is merely very favorable isn’t in this category. It will require precision, not just precaution, as in the next example.

Black sees that he has the advantage because the weakest target on the board lies at c4. If he gets to play … xc4, White will not only be a pawn down, but his d-pawn is probably doomed and his light squares may be fatally exposed. If that’s not a ‘positionally lost game’, it’s something very close to it.
A quick glance shows that if Black plays 1 … a6, White can defend c4 with his queen. If White’s bishop were, say on d2 or a3, Black could carry out a simple maneuver, … d7-e5, take on c4 and win fairly easily.
But the bishop is on h4. The difference is that 1 … a6? is actually an error. White can insert 2 xf6! and, following 2 … xf6, he can play 3 b3 and bring his knight to life at g3. Black will still be better. But it’s clearly not a positionally won game.
That prompted Black to make a no-turning-back decision, similar to 1 g5! in the previous game. He played 1 … g5! and then 2 g3 a6.
Yes, Black’s king position is loosened. But White is tied to the defense of c4 and can’t exploit the kingside. In fact after 3 a2 h5! it is Black who has the more ominous threat on that wing of … f7-f5-f4.

This is getting very close to positionally won territory. Play went 4 c1 f5 5 e2 f7!.
The threat of … f4-f3 is immediate. The tactical justification for Black’s play is that 6 xd6? fd8 7 e5 xd5 wins quickly.
White played 6 f4 and allowed the position to be opened, 6 … exf3 7 xf3 g6 8 a5 f4! 9 exf4 gxf4, now we’ve reached the positionally won stage.
That means Black can rely on fairly routine moves. The rest was 10 f2 ae8 11 f1 e4 12 axb6 xc4 13 d1 axb6 14 a4 b5 15 a6 e5! 16 xc5 fe8! (intending … e1+) 17 f2 e1 18 xd6 c2+! in view of 19 xc2 f1 mate. A little extra care – evaluating the consequences of 1 … g5 – made a huge difference.
To win a won game you typically need a ‘how’. It could be a general plan like Black’s kingside advance in the last example or more specific like the mate-on-the-long-diagonal theme of the previous one.
Without a ‘how’, even a position that seems hugely advantageous may not be winnable. Here’s a striking example.
White enjoys iron control of the c-file and a considerable advantage in operating room. There is no Black counterplay. All the ingredients seem in place for a slow, plodding win by a world champion.
Except … White lacks a plan. He can’t improve his position through simple means. He couldn’t find a way to make a6 or b6 into a target. Just moving the furniture around aimlessly won’t do the job.
The game ended in a draw after a series of quiet moves, beginning with 1 f1 e8 2 7c3 d8 3 d2 f6 4 c7 e8 5 7c3 f6 8 c7 e8. White had no ‘how’.
There’s a golden rule about converting an advantage that most non-masters don’t appreciate. They don’t appreciate it because they simply don’t believe it:
It is usually easier to win with a substantial positional advantage than with an equally substantial material advantage.
Amateurs don’t believe it because they exaggerate the significance of material. After all, they can see an extra pawn. A positional advantage is harder to detect. As a result they have a difficult time believing the rule in positions like the following.

Most players would try to solve this as a ‘White to play and win’ with calculation. Some will see that 1 c7 looks good. Others will notice that Black can save himself with 1 … e6 because 2 d7? xd5 threatens mate on g2.
And many will conclude that the solution is easy because 1 xh5+ wins a pawn. There is only one variation to look at and it runs 1 … gxh5 2 xh5+ g7 3 xe2. The forcing moves end with 3 … xd6+ 4 h1.
But the experienced player is suspicious of this. It’s not the variation he doubts but the evaluation. At the end, after 4 h1, White has no passed pawn. His does have an extra pawn but it’s located on the kingside. If White does win, the ‘how’ – promoting the h-pawn – will take a lot of moves and thinking.
Instead, he played the superior 1 e5. The main point is that 1 … xe5 2 xe5 enables White to break the blockade at d7 with e7!.
Black’s best was 1 … d2, so he can meet 2 e7? with 2 … xd6+ 3 xd6 xd6 4 xf7+ h6 with a dead draw.
But 1 … d2 allows a better version of the combination, 2 xh5+! gxh5 3 xh5+ g8 4 g5+ f8 5 xd2.

Why is this an easier win? It’s not because White has two extra pawns, rather than the one he’d have after 1 xh5+?.
No, what matters most is that he kept his d-pawn. That means he can break the blockade or force a trade of queens after d4-c5-c7. The ‘how’ is much easier this time. (In fact, the fastest way to win in the first diagram is 1 d4!. That makes 2 e5 a powerful winning idea now that 2 … d2 is not possible.)
Note that what mattered was a passed pawn, not necessarily an extra pawn. Good defenders understand that, too. Let’s see how both White and Black used the golden rule in the following example.

White’s obvious threat is to take the e7-pawn. His less obvious one is to dominate the c-file by doubling rooks. Black can foil both threats with a gain of time, 1 … f6, and then 2 … c8 or 2 … c7.
But that creates an ugly hole at e6. White can try to exploit it, after 2 e3 or 2 d2, with e4-e6+ followed by f3-f4-f5, or e1 or h2-h4-h5. With a positional, rather than material advantage, White has an easier ‘how’.
Black chose 1 … c7! because he understood that after 2 xe7 fc8 or 2 … e8 (3 xd6 xc1 4 xb8 xd1+) he has improved the power of his pieces, a positional gain for him. White has made a material gain. But his extra pawn means little because it is a doubled f-pawn.
White also understood this and replied 2 c6!. He threatens to take on a6, a much more valuable pawn because White would likely be able to create a passed a-pawn. Black replied 2 … xc6 3 dxc6 c8.

Once again White can win a pawn, with 4 xe7 xc6 and now 5 e4!. The tactical point is that 5 … c7 allows 6 xd6! xd6 7 a8+ (7 … f8?? 8 xf8 mate).
Better is 5 … c8 and then 6 xd6 xd6 7 xd6 leaves White with another pawn-up endgame. But it will be very hard to win, perhaps impossible against the best defense.
This explains why he preferred 4 c1!. The protected passed pawn is much stronger than an extra doubled pawn. Play went 4 … e6 5 d2 c7.
If there were no queenside pawns, White would be able to break the blockade at c7 by means of a4 and a5 or b4-b7.
But as it stands, he was able to make progress with 6 a4! and then 6 … d5 7 axb5 axb5 8 b4 b8 9 a3! d4 10 a6 e5 11 f4 d6 12 a5 c8 13 a7! a8 14 b6 b8 15 d4.

White will win because he can push the c-pawn or win the Black b-pawn. For example, 15 … c7 16 xc7 xc7 17 c5 and b4.
Black preferred 15 … b4 but then came 16 c7. White would win after 16 … b7 17 f6! xc7 18 e5!. Instead, the game ended with 16 … a8 17 b6 f8 18 xb4 xb4 19 xb4 e8 and Black resigned before b7 and the advance of the b and c-pawns.
There are many, many examples of that: A passed pawn – a positional advantage – turns out to be superior to an extra pawn – a material advantage. Yet the golden rule is difficult for many amateurs to accept. Part of the reason is that they’re confused by the somewhat vague, somewhat imposing word ‘positional’. If we replaced it with ‘non-material’ they’d have an easier time grasping positions like the following.
White has a big positional – sorry, a big ‘non-material’ – edge because of his superiority on light squares. A master sitting in White’s chair will try shifting his pieces around and around because it’s so hard for Black to defend h7 and g8.
He doesn’t have to calculate long variations to determine whether there is a forced win. He feels there is a likely win. As long as he can keep making credible threats, that’s enough for him to continue with confidence.
White began with 1 d5. He threatens 2 xe5, of course. But his main idea is 2 f7! followed by a decisive check (or a mate) on the eighth rank.
Black’s difficulties are illustrated by 1 … f6. This natural move meets both threats but leaves the knight unprotected. White would reply 2 b5!, with two new threats, 2 xb8+ and 2 e8+.
Black could meet one of them with 2 … e6+. But then comes 3 g4.

The attacked knight is lost after 3 … d7 4 f5 or 3 … a6 4 f5 (4 … f6 or 4 … d6 allow 5 e8+).
That leaves 3 … c8, abandoning a pawn, 4 xe5. White would then be close to a forced win and can finish off immediately after 4 … d7? 5 f5 and 4 … c6? 5 c5.
Black avoided this fate by choosing 1 … c7 instead of 1 … f6 back at the previous diagram. He protects his knight and e-pawn this way but leaves the kingside vulnerable to e6-g6-h7 mate.
White prepared that with 2 f5!. He needs to do that because the immediate 2 e6 allows 2 … d7!, trading queens and fleeing into a likely draw.
Black found a defense in 2 … c6. His idea is to meet 3 e6 with 3 … e7 4 f7 d8, when everything is, at least temporarily, covered.

But with such a huge positional edge – those light squares! – White should be able to make progress with simple threats. The one he chose was 3 c4!.
He threatens to win the knight with e4 (once he rules out … d7+ with 4 g4!).
Black would lose after the weakening 3 … h5 because of 4 e6 e7 5 f7! and xh5+ or f8+.
Black tried 3 … d6 but then came 4 f7!. Black could have resigned in view of 4 … f6 5 e8+ or 4 … e7 5 f8+. But he waited until after 4 … d8 5 g6!.
If you looked up that game, you’d find another instructive point. Just before 1 d5, White swapped a pair of rooks. He did it because without a rook, Black’s first rank became vulnerable to mates.
But usually the player with a positional – as opposed to material – advantage, will avoid trades. A master would know, for instance, that a trade of either the rooks or queens would vaporize White’s winning chances in the following position.

White controls more space. What ‘controls more space’ really means is that White can put his pieces safely on a lot more squares than Black. Most of those squares are on the kingside, where … h6 is a slight weakening.
It’s true that White has weaker pawns than Black, at a2 and c4. But, one more time, a king counts more. From experience White knew that the most important factor in a heavy-piece ending is king vulnerability.
Therefore, White’s non-material advantage means his best winning chance lies in a kingside attack, beginning with 1 d4! c8 2 h4!.
White uses his rook to defend his c-pawn, maintain control of the d-file and prepare for an assault on g7. He followed this with a luft-move that is also invaluable to his attack. Then came 2 … c7 3 g3.

Only two and a half moves have been played since the previous diagram but White’s winning chances are much more visible. He will play g4 and meet … g6 with h4-h5. One way or another, the kingside will be opened up.
Black’s problems aren’t solved by 3 … f5, for example, because White can build up with h2, f2-f4, h4-h5, g6 and d6.
He made a different concession, 3 … h5. The pawn can’t last long on h5. After 4 g5 g6 White could blast open the kingside with 5 g4 hxg4 6 xg4 and 7 h5.
Instead, Black sought counterplay on the other wing, and the game went 4 g5 c5 5 f4 a3 and then 6 h2 xa2 7 xh5 f8 8 d1 a5 9 e2 d8.

The most natural way of continuing is to advance his pawn to h5 and double the heavy pieces against g7. This takes a while to execute but Black found no defense. The game went 10 h5! d2 11 g4 e1 12 g5 d1 13 g4 g1+ 14 g3 g6 15 hxg6 and White won.
When material is not equal but only slightly out of balance, positional advantages usually decide the outcome. This is most evident when a player gives up the Exchange for one or two pawns.
If it’s a difference of one pawn, the player with the rook is marginally ahead. If it’s two pawns, the other player holds an equally small edge. In either case, the edge may not be enough to win without positional plusses. Few people understood that better than the sixth world champion, Mikhail Botvinnik.

White’s previous moves were designed to grab on e4. But he can’t keep an extra pawn because after 1 xe4 Black will reply 1 … h3, threatening both 1 … xf1 and 1 … xe4.
White does have a defense to both threats, 2 g2. But then 2 … xd1 3 xd1 xg2 and 4 … xe2 reestablishes material equality.
So this amounts to a critical moment. White has to decide whether he has good winning chances after 4 xg2 xe2 5 d7. Sure, he has the better position but is it enough?
Botvinnik saw a way to get a much more significant positional advantage by creating slight material imbalance. He played 1 xe4 h3 2 c2! and then 2 … xf1 3 xf1.

White is certain to win a second pawn, at h7 or b7. But what is much more important is that by eliminating Black’s bishop, he dominates the light squares. Black will be unable to use his rooks because he has to worry about kingside mating threats directed at the h7 target.
Black found the best defense, 3 … d6 4 xd6 xd6. That gave White a choice of which pawn to capture. A good argument can be made in favor 5 xb7 ab8 6 c6 followed by 7 a4, to keep his two extra pawns.
But that still leaves the ‘how’ question. Creating a passed pawn on the queenside doesn’t seem possible.
That’s why White chose 5 xh7! and then 5 … ad8 6 f3.

This is easier to win because of the inability of Black’s rooks and bishop to defend his light-square weaknesses, such as at g6 and h7. For example, 6 … xa3? allows 7 g6 and f5 or 7 f5 followed by 8 h5 with a threat of g6+.
Aside from tactics like that, White has a totally riskless winning plan of pushing the e-pawn. This unfolded with 6 … f8 7 g6 e6 (otherwise 8 f5! wins).
Once again we see how the absence of counterplay allows a player to take his time. White played 8 g2 and then 8 … d5 9 e4! d6 10 b4!.
He is beginning to make game-winning threats, such as 11 e5 xe5 12 h4+ g8 13 h7+ f7 14 g5+.
Black struggled on with 10 … e7 11 f5 h6.

White’s positional edge has grown so great that he has an alternate winning idea, 12 xc7 d8 13 xb7 followed by creating a passed queenside pawn.
He preferred 12 c4 d8 13 e5 d5 14 h4! d2 15 c3 and then 15 … g8 16 f4 d5 17 f3! resigns (in view of 18 xd5+ or 18 h7+/xf8).
Many players think that the best way to learn what it takes to win a game is to lock themselves in a room with endgame books. Bad idea.
Better idea: Find games in which one side wins after creating a slight material imbalance, like Exchange-for-pawn. These games, if they’re not just sacrificial mating attacks, will underline the importance of positional advantages. Some databases will allow you find lots of games like that. They should be excellent study material.
The corollary of what we said earlier – that a master is reluctant to trade pieces when he has a positional edge – is that a master is usually eager to trade pieces when he has a material edge. But which pieces?
If you are only one pawn ahead, which pieces do you want to keep? If you trade all the pieces and get down to just kings and pawns, you have excellent winning chances. But for other matchups it’s not that easy.
For masters it is. They know the winning hierarchy. Here’s the list for pawn-up endgames. The most winnable endings are at the top, and they go in descending order to the hardest at the bottom:
King-vs.-king endings
Knight-vs.-knight endings
Queen-vs.-queen endings
Bishop-vs.-bishop (same color) endings
Bishop-vs.-knight endings
Knight-vs.-bishop endings
Rook-vs.-rook endings
Opposite colored bishop-vs.-bishop endings
This works best with positions in which one side has an extra pawn on the other wing, typically the queenside. If all the pawns are on the kingside, the hierarchy changes slightly. Knight-vs.-bishop moves higher up the list and bishop-vs.-knight moves well down.
Relatively inexperienced players are unaware of the hierarchy. This is true even of young, highly rated players.
During a session of the U.S. Chess School a few years ago, eight promising youngsters were asked to evaluate the winning chances of some of these matchups. They were given a slightly different example, with all the pawns on one wing:
Suppose all the pawns were on the kingside, with one player having pawns on the e-, f- g-, and h-files, and the other player having pawns just on the f-, g- and h- files. What are the winning chances, from zero to 100 percent, for each matchup?
The youngsters, almost all of whom soon became strong masters, gave varied answers. For example, with just rooks on the board, one student thought the right answer was zero, that is, no chance of winning. Another said the chances were only 10 percent. The right answer is more like a 30 percent.
All but one of the students thought that with same-colored bishops, the pawn-up player had reasonable winning chances, 40 or 50 percent. Their instructor, GM Joel Benjamin, told them it was really only about 20 percent.
And what about queen endings? Three of the eight students thought they offered a 20 or 30 percent chance of winning. It’s more like 50 percent.
Even many experienced players have an irrational fear of queen endings, for example. Given a choice of what to swap in a pawn-up +-vs.- + ending, they’ll trade queens instead of minor pieces. That’s often a blunder.

Queen endings are among the easiest to win. Yuri Averbakh, the great endgame authority, claimed they are even easier to win than knight endings. Here, for instance, 1 … xd4! reaches either a won pawn ending or a won queen ending.
The pawn ending comes about from 2 xd4 b1+ 3 g2 e4+! 4 xe4 fxe4. It takes longer to win after 4 f3 xd4 5 exd4 g5 6 f4+ f6 but it is still a win.
The queen ending is won because Black can create an outside passed d-pawn after 2 exd4 b2 3 g2 e5 4 dxe5 xe5.
The winning technique is essentially the same with other same-piece endings. The superior side first forces the enemy to take steps to stop the passed pawn’s advance. Then he advances his king and looks for an opportunity to raid pawns on the other wing.

In this case the first step was accomplished by 5 d2+ g7 6 f3 d4 7 f2 c5 8 b2. The second was realized by 8 … f6 9 e2 c4+ 10 d2 g5.
The game ended with 11 a3 e6! 12 b4 e3+ 13 c2 f2+ 14 c1 g1+ 15 c2 xh2+ 16 d3 xg3 17 e7+ h6.
When material is equal, positional plusses naturally take center stage. But the hierarchy continues to play a role. In the next example, Black has a positional edge in view of his passed h-pawn and White’s doubled pawns. The hierarchy indicates he should have good winning chances. Let’s see how two of the world’s greatest endgame players handled it.
White naturally wants to liquidate the queenside pawns. Black can meet his threat of axb6 by offering either of two trades, 1 … d4 and 1 … bxa5 2 xa7 b4.
The hierarchy gives an indication of which is correct. Black confirmed this by examining 1 … d4? and seeing that 2 xd4 xd4 is drawish, e.g. 3 c1 e7 (else 4 c7+) 4 axb6 axb6 5 h1 d6 6 h5.
The alternative was 1 … bxa5 2 xa7 and then 2 … b4! 3 xb4 axb4. This should be winnable because of three factors: First, Black has two passed pawns. Second, he can slow the advance of White’s pawn (4 b6 d4!). And third, the White f-pawns interfere with his bishop’s ability to stop the h-pawn.
Play went 4 e3 e7 5 d4 h5! 6 b6 b3 7 b7 d6.

Here 8 b8() xb8 9 xb8 b2 is plainly lost. Ditto 8 c3 h4 and … h3.
There are a lot of other finesses to appreciate in this game, such as White’s attempts to divert Black’s bishop from control of b8, and Black’s skillful use of his passed pawns. But that’s not rare in bishop endgames. That’s why they are winnable more often than rook endings.
Play went 8 c3 h4 9 d4! b8!. Black’s point is that 9 … h3? 10 e5! and 9 … xf4? 10 b8 h3 11 b8() xb8 12 xb8 would stop the h-pawn.
After 9 … b8! came 10 e5 a7 11 d4 and now 11 … b2! 12 c2 b8!. White is one move short – 13 e5 h3 14 xb8 h2 15 e5 b1()+! 16 xb1 h1()+.
The winnable hierarchy comes with a few caveats. The biggest is: A winning ‘how’ matters more. Case in point:

White saw that the only targets were at b6 and f7, and the only immediate threat he could come up with was 1 e3!. Then 1 … b5 2 b6 wins material, while 1 … c7 2 f3, with the idea of f2 and c3 would make some progress.
But what if Black meets a forcing move with a forcing move? After 1 … c5, White knew that trading queens was dubious, particularly if he also traded rooks. Bishops of opposite color endgames are at the bottom of the hierarchy and are hard to win even when two or three pawns ahead.
But White can ask himself the obvious question: If I did play 2 xc5 bxc5, how could I win?

The answer is: “My king and rook can go after the targets at a5 and c5.” That’s why White sought this ending and why it turned out to be so easily won. He played 3 f3 and Black stopped the threat of b3-b5 with 3 … b8.
White has a simple winning plan beginning with trading rooks, 4 a2! f8 5 b3!. Now 5 … c8 6 b7 e7 7 b3 would leave Black paralyzed.
Instead he played 5 … xb3 6 xb3. You should be able to see that White’s king must win either the a-or c-pawns.
But there is still a finesse to two to appreciate, Play continued 6 … g5 7 a4 d2 8 b5 e7.

Once again White has a choice. But it’s an easier choice if he asks himself one more time: How can I win?
The answer is: “With a passed a-pawn.” Black would have to give up his bishop to stop it.
So instead of 9 xc5? c1!, White played 9 a4! with the idea of 10 c3 and 11 xa5.
Black found nothing better than 9 … c1 and the outcome was clear after 10 xa5! xb2 11 c4! f5 12 b6 c3 13 a5 xc5+ 14 xa5.
And if you’re wondering why White spent a tempo on 11 c4!, the answer is that it stops Black from getting his bishop onto the a7-g1 diagonal. White may be able to find another winning plan after 11 b5 c4 12 xc4 d4! 13 a5 d6. But it’s not worth investigating when you already have one.
By playing over master games you can often find the enough moment. It may be the point when the player with advantage traded queens and gave up the initiative. It may be when he took an irrevocable step that led to a winning heavy-piece endgame. It may be when he created a material imbalance that was accompanied by a big positional plus. These are the moments worth studying when it comes to winnability.
And once again, some quiz positions:

Does Black have realistic winning chances?

Same question: Does Black have realistic winning chances?

Where do White’s winning chances lie? What specific steps can he take?

White has an extra pawn but Black’s last move, … b8, creates problems. How should he proceed?

What move should White consider first? And does it work?

How should White proceed?