You read game notes all the time that say Black ‘has a difficult position’. This sounds like the annotator is saying ‘Black is worse’. Or perhaps he means ‘Black is much worse’. Or even ‘Black may be completely lost but my computer can’t find a forced win for White’.
He could mean any of those. But experienced players know that ‘difficult’ can be taken literally.
Some positions are simply harder to play than others: It is more difficult to find the best move, or even a good move, in them.
Other positions are relatively easy to play. That makes them more attractive to a master, even though a computer may evaluate them as slightly inferior to the difficult alternatives.
The machine must be objective. But you’re not a machine and you’re allowed to be subjective when it means being pragmatic. Masters steer their way into ‘easier’ positions all the time.
Even the strongest masters do. After 15 moves of a Scotch Game at Nanjing 2009, Magnus Carlsen had given up a pawn but had two bishops and more space than his opponent, Peter Leko. Carlsen conceded afterwards that he had no advantage. But “it is much easier to play,” he said, and that was enough for him. He won.
Here’s an illustration of how ‘easier’ works.
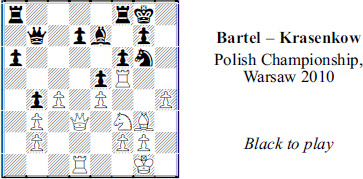
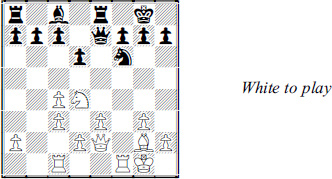
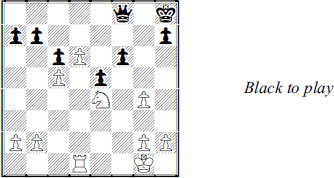
Black is a pawn down and faced with the prospect of losing another, on d7. If he defends it with 1 …  ad8 or 1 … fd8, White plays 2 h5. After the Black knight retreats to f8 or h8, White makes inroads with 3
  h4 and 4 g6. That would sentence Black to difficult defense with virtually no counterplay.
He made a practical decision. He chose 1 …  c5 to get the most piece activity he could. Then 2
  xd7 xe4? doesn’t work (3 e6+
  h7 4 h5 mate or 3 … f7 4 xf7+! xf7 5 g5+).
But 2 … xd7 3 xd7 e7 4 h5 ad8 or 4 … g6 5 xe5 gxh5 can make White’s life difficult.
After 1 … c5! it was White’s turn to weigh his future. He can avoid the complications with 2 e1 and then 2 … e7 3 f3, so that his rook escapes. Then after the natural 3 … d6 and 4 e2:

But he still has some difficult choices to make as he tries to unravel his forces, such as with 5 fd3, followed by 6 h2, 7 f3 and c2-e3.
In the end White rejected both the 2 xd7 ending and the 2 e1 regrouping. He chose 2 h5! even though it traps his rook after 2 … e7.
“Of course, computers condemn the Exchange sacrifice,” he wrote. “But after it, White’s play is very simple.” On the other hand, he added, “Black’s defense, in view of his weakness and his useless bishop on c5, is very hard.”
What White meant is that after 3 h4 xf5 4 xf5 he can just throw everything he has against the target at g7.
What’s more, his moves are easy to find. He can’t be stopped from getting his queen and rook to the g-file. He can also use his bishop to attack f6 from h4 and look for a chance to break through at g7.
This kind of pragmatism separates many of today’s masters from the maximalists of the past. Great players like Alexander Alekhine or Mikhail Botvinnik claimed they always sought the objectively best move. It didn’t matter how difficult it was to wade through the complications. They wanted the best.
Today’s masters are willing to admit when they take the easy way out – and they say there’s nothing wrong with it. They still want more out of a position than non-masters. But they recognize the limits of what you can do while your clock is burning minutes.
In this game, White created a situation in which he can play his next five or so moves almost with his eyes closed. Play proceeded with 4 … d6 5 f3 f7 6 g4 h7 7 d3 h8 8 h4 g8 9 g3 h7. White was ready to open his eyes and look for big tactics.
White found 10 f3!, which threatens 11 xg7+! xg7 12 h6+ and 13 xf7. If Black stops that, White has a second idea, less explosive but effective just the same. He can play 11 g6 followed by 12 g4 and 13 h6, which must win in the long run.
Don’t think that White saw all that when he sacrificed the Exchange. But he didn’t need to. He saw the positional compensation. We’ll expand on that in the next chapter.
But for the moment, let’s appreciate how much White benefited from pragmatism. The bonus he got from 2 h5 and 4 xf5 was being able to play several ‘easier’ moves that were obviously good. Black, with a much broader choice of moves of uncertain value, had a tougher task.
Let’s put that into perspective: Most would-be-masters can make the first ten or so moves of a game without thinking. They rely on opening theory they memorized.
A typical game lasts another 20 to 30 moves beyond that. Now, suppose we subtract the automatic moves, such as recaptures and responses to simple threats and checks from those 20 to 30 moves. What’s left?
The bottom line is you may face no more than 10 to 15 somewhat hard choices in a game. Those choices typically cost you two thirds to three quarters of the clock time you spend on the entire game.
Being able to play five ‘easier’ moves, means reducing your work load considerably. This helps explain why you see masters winning tournaments while taking less clock time than their opponents.
Consider how Black reduced his work load to a minimum in this example.

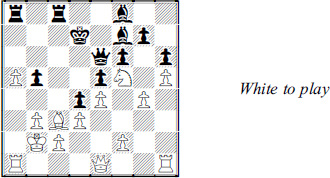
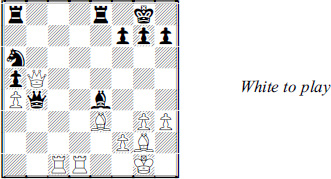
As in many modern opening positions, the tension in the center is deliberate. White is reluctant to exchange on d5 (say 1 … 0-0 2 exd5) because that would undouble Black’s pawns (2 … cxd5) and liberate the c8-bishop.
Black, on the other hand, has to think twice about exchanging on c4 or e4 because it would leave him with ugly, apparently undissolvable c-pawns. And 1 … d4? is a positional error that closes the position to the benefit of White’s knights. Therefore you might expect the center to remain the way it is for several more moves.
Nevertheless, once Black saw 1 … dxc4! 2 dxc4 e5! he realized how strong it was. How strong – and how practical.
Black can continue with a maneuver of his knight through f8 and e6 to the splendid d4 square. Unlike some good (but impractical) plans, this one cannot be stopped.
Because of White’s weakness at f3, once the knight lands on d4 he will be more or less forced into xd4. Then … cxd4 will turn Black’s pawns from a liability into a major asset. He will have a protected passer on d4 and no weak pawns.
White had a lot to think about in the next three turns. Black didn’t.
Play continued 3 bd2 f8 4 f1 e6 5 e3 d4 6 xd4 cxd4 7 f5.

Black has his first real choice since 2 … e5!. He considered preserving his bishop with 7 … f8 and then driving the knight back with 8 … g6.
That’s not a bad plan. The knight won’t find any great squares and Black’s bishops look good after, perhaps, 8 h5 g6 9 hxg6 fxg6 10 h6 e6.
Yet Black opted for a simpler policy – largely because it was simpler and easier. He can trade bishops and castle, followed by piling up on the b-file.
It was, once again, a plan that couldn’t be forestalled and required hardly any calculation. Play went 7 … b4+ 8 d2 xd2+ 9 xd2 0-0.
After 10 g4 Black looked at 10 … c5 but had doubts about what would happen after 11 g5 because a trade of queens helps White.
Instead, he played 10 … f6 and there followed 11 f3 e6 12 c5.
Black finds himself with an opportunity to carry out another eyes-closed plan. He can double his heavy pieces against the target at b2 by means of … a5, … b8 followed by … a7-b7 or … b4/ … fb8.
The effectiveness of this plan was shown by the next few moves, 12 … a5 13 b3 b8 14 f2 (not 14 e7+ f7 15 xc6? c7).
Black had more ‘easier’ moves coming up and his advantage grew with 14 … a7 15 hc1 b4 in view of 16 xb4 axb4 17 c2 fa8 or, as the game went, with 16 d3 a4!. He won.
Of course, he made some difficult choices in the course of the game, such as 1 … dxc4 and 10 … f6 and the rejection of 7 … f8. But he also played many more ‘easier’ moves. That’s the mark of a pragmatic master.
The 1987 world championship match was a case study of how to shift the work load to your opponent. Of the eight decisive games, six were lost due to time pressure mistakes by the player who had been repeatedly forced to make hard choices earlier.
Anatoly Karpov said it was because of difficult middlegame decisions he had to make in the critical, final game that he didn’t have 20 seconds at the point when the game – and match – were decided. “Imagine,” he said years later. “For 20 seconds I lost the world championship title, and if you’re talking about money, 600,000 dollars.”
Here’s another key moment in the match.

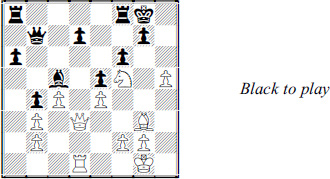
White spent 34 minutes on this move. But thanks to his decision he didn’t spend more than 14 minutes on any of the game’s remaining moves.
The press room GMs expected a Kasparovian 1 f5 because it complicates, e.g. 1 … c5 2 h6+! f8 3 xf6! gxf6 3 d5, with a brutal attack.
Objectively, 1 f5 may be the best move. But it leaves White with a lot to think about after 1 … d8 or 1 … e6. Black has a difficult defense but White has a difficult attack.
Instead, White forced matters with 1 e2 and then 1 … xc1 2 axc1. Black replied 2 … d6.
Black was nearly half an hour ahead on the clock. But his time edge soon vanished because White could play several progress-making plus-moves, such as f4, cf1, d3 and f5.
Black, on the other hand, has to decide what to do with his center pawns (… c6 or … c5), to complete development and to watch out for an Exchange sacrifice on f6.
Play went 3 f4 c6 4 cf1 and now he had to avoid 4 … e6? 5 xf6! gxf6 6 e4 with another strong attack.
He spent time to find 4 … e5 and then, after 5 d3, to choose 5 … d7, avoiding another strong sacrifice, 5 … h5? 6 xf6!.
By now White was ready to force a trade of minor pieces, 6 f5 xf5 7 xf5.

Afterwards, analysis determined that Black should have retreated his queen to e7, now or on the next move. But in trying to navigate his way through the complications, he chose 7 … e6 8 d4 e7? and there followed 9 h4! d7 10 h3! f8.
White’s advantage had grown and he was ahead on the clock. Once again the GM analysts argued in favor of a sharp candidate, such as 11 xf7 or 11 g5 or even 11 b5.
But White spent just four minutes on the safe – and ‘easier’ – 11 5f3!. It forces a highly favorable endgame, 11 … e5 12 d4 e4 13 xe4 xe4 and then 14 xf7 xe3 15 xb7 would have won quickly. It was a rare case of Karpov being outplayed in a relatively simple position – and it happened because the work load had been shifted to him.
Of course, having an easier choice of moves isn’t always a good thing. The simplest positions of all to play occur when your king is being checked all over the board. You are forced to play the only legal move available. Your moves are easy to find – but you’re about to be checkmated.
On the other hand:

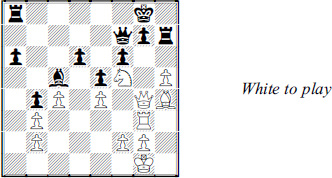
White has a huge choice. There are at least 18 good moves. Databases say 1 h3 is best. But the 17 others are nearly as good.
Over the next several moves, White will continue to have more than a dozen more or less equal moves. Finding the best one is difficult. But only when White is close to mate will finding the best move matter much. Bottom line: The difficulty factor isn’t in the slightest way significant in some positions.
Taking the ‘easier’ option makes its biggest impact when there is more than one good candidate and the theoretically best move, the one endorsed by computers, lies outside a human’s comfort zone.

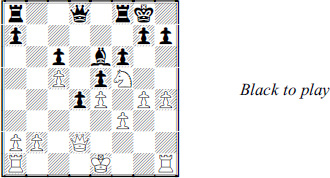
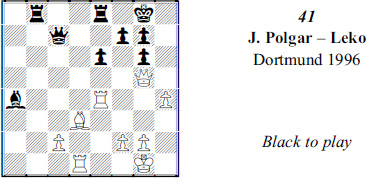
Black had sacrificed a pawn to obtain his queenside attack. He could cash in with 1 … c3+, since 2 a3?? allows 2 … xa5 mate.
But White had been planning to give up his bishop when he had to. He played 2 xc3.
It should be clear that 2 … dxc3+ 3 xc3 favors Black. A computer would like 2 … dxc3+. But winning with an extra piece versus three pawns in this position is no simple matter.
Since Black’s position seems good enough to win in the middlegame, he should also consider 1 … cxb3. But 2 xf8 isn’t clear after 2 … xf8 3 b4! or 2 … bxc2 3 b4.
In the end, Black took the easy way out. He chose 1 … c3+ and then 2 xc3 c8!.
Black prepares to take on c3 under much better circumstances than 2 … dxc3+. The key tactical point is that if the bishop retreats, Black has … xc2+!.
One line runs 3 d2 xc2+! and Black wins after 4 xc2 xb3+ 5 c1 c8+. Not much better is 3 b4 xc2+! 4 xc2 xb3+ 5 d2 xb4+.
White recognized how hopeless his position would be in those lines. He played 3 xd4!.
This is best because if Black wins the queen, 3 … xc2+ 4 xc2 xb3+ 5 d2 b4+ 5 e3 xe1, White can hold out for quite a while by playing 6 hxe1 exd4+ 7 xd4.
Once again we would have a situation in which Black should win because of superior material, a queen versus a rook and some pawns. But he would have to navigate slowly, perhaps with 7 … b4 8 eb1 c5 9 xb5 c3, and can’t expect to force resignation for many moves.
Black shouldn’t have to work that hard. He didn’t because he met 3 xd4 with 3 … exd4!.

Black still threatens … xc2+. But he can also attack with simple moves he doesn’t have to calculate, such as … e5, … c3 and … b4 or … c5/ … c8.
The only variation he needed to check was 4 xd4 e5, which turns out to be winning (5 e3 c5 6 c3 b4!).
The game went 4 d2 e5 5 b4 c3 6 f4 c7 7 f2 and now 7 … c8 was the fastest of a number of winning lines. By restraining himself earlier – passing up 2 … dxc3+ and then 3 … xc2+ – he saved time and energy.
’Easier’ also helps guide masters in the endgame. This leads them to make choices that seems at odds with material.

Black has just moved a to d7 to deter b6 or b6. But he failed to notice that 1 b6! is still possible because after 1 … xb6 2 b3! White wins material.
Black’s queen isn’t trapped. But if it escapes to a4, he allows 3 xb6, forking three heavy pieces and winning the Exchange.
Black made a savvy judgment. Rather than 2 … a4 he played 2 … xd5! and then 3 xa5 c3!.
Instead of being the Exchange down he preferred to give up a lot more material, a queen for two minor pieces. What was he thinking?
He was thinking that both material deficits – down the Exchange or giving up the queen for two pieces – are enough to lose. But there’s a practical difference.
His opponent would have an elementary task of winning with the extra Exchange in the 2 … a4 3 xb6 line. Routine moves would do the trick.
But winning wouldn’t be routine in the diagram after 4 bxc3 xa5. White’s material advantage is much greater but Black has excellent positional trumps such as the targets at c3 and c4. White should win but the process requires a lot more thinking.
White understood this just as Black did, and that’s why he chose 4 xc6! instead of 4 bxc3. This leads to a forcing variation, 4 … xd1 5 xe7+ f8 6 xc8.

Now White is the Exchange and a pawn ahead and would have another easy time clinching the point after, say, 6 … xc8 7 fxd1.
For example, 7 … xc4 8 ac1! or 7 … xb2 8 ab1 e5 9 xb7. No better is 7 … e7 because of 8 ab1 xc4 9 dc1 e6 10 xc8 xc8 11 g4!.
Black cut his material deficit by playing 6 … xb2 instead of 6 … xc8. But after 7 b6 a7 8 ab1 his task is fairly simple and Black decided to end matters with 8 … a5 9 fc1 d4 10 c2 resigns. Had White chosen 4 bxc3 he’d be playing for at least 10 more moves than he did in the game and some of his decisions would be difficult.
Another cliché that annotators love is: ‘Three results are possible’. This is their way of saying the position in question is so double-edged that either player could win, or the game could end up as a draw.
Alternatively, a player will say he avoided a particular line of play because only two results were possible – and that’s not good.
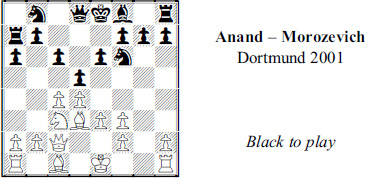
Black said he considered 1 … dxc4 for a long time, with the likely continuation of 2 xc4 b5 3 d3 c5.
But he rejected it because it would probably lead to a middlegame “where only two results were possible.”
In other words, he was afraid that if he liquidated tension, only White would have winning chances thanks to greater space and the two bishops. The best Black could hope for then is a draw, he felt. (He left the center tension intact with 1 … e7 and the third result occurred: He won.)
Increasing the number of possible results is a stock in trade of masters when they are Black and playing a weaker player. To appreciate what’s involved, play through grandmaster games, such as by Morozevich when he has Black. Or just look at how masters handle Black in the second or third round of a large Swiss tournament, when they are paired against a lower-rated but not easily beatable opponent. They manage to maximize winning chances while minimizing the chances of the third result, a loss.
There’s another skill to be learned: Reducing the number of results from three to two, a draw and a win. This can often be done in a way that also makes your future decisions easier.

After Black played 1 … f8, White had a lot to consider. He could have invested time in checking out queen moves such as 2 xb7. But he needs to calculate them because Black has prospects such as 2 … e3+ and 2 … xf3 3 gxf3 g8+ or 3 … e3+. It’s conceivable that White could even get mated if he overlooks a shot.
But why calculate when there is an alternative like 2 xf8+! xf8 3 fxg4 ?
White doesn’t have to see far at all to play this with confidence. He might notice that 4 d7 looks strong. He might also see that if 4 d7 doesn’t win quickly, he has a good alternative in 4 f1 followed by a capture on f6. That should win in the long run.
In any case, there is virtually no chance of Black winning. Only two results are possible.
Black replied 3 … d8 and then came 4 d7 g8. No better was 4 … g7 5 d6 xd7 6 f5+.
The game ended with 5 xf6+! f7 6 e4 e7 7 d6, when Black resigned in view of 8 xb7 (or 7 … xd7 8 f5+).
Of course, Boris Spassky could calculate well enough to check out all the variations after 3 fxg4 until they reached a ‘and White wins’ end. But often there are simply too many lines that last too many moves into the future to count out and evaluate.
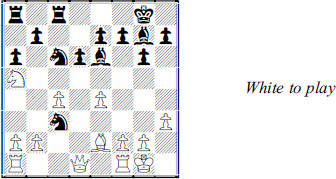
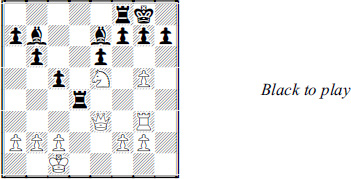
Reducing the number of results becomes more important as the inability to calculate with certainty increases. Consider the next diagram. White has temporarily sacrificed a pawn and clearly intends to take on c6. But how should he capture?

Sure, 1 xc6 looks like it must be best because it forks the rooks. The likely continuations are 1 … xh3 and 1 … b7 and White will win the Exchange.
There is no quick forced win then. That is, there is no sequence of White shots that will bring Black to his knees in a reasonably short number of moves. Moreover, there is no way to force a trade of queens
White would have to be careful not to allow Black’s queen to threaten mate on the c6-h1 diagonal. Yes, White should win. But he could lose.
The alternative is 1 xc6. Then White can force a position that has only two possible outcomes, and the winning chances are vastly greater than the drawing chances. For example 1 … e6 2 b5! and Black is quite lost (2 … xb5 3 axb5 or 2 … e7 3 xa8 xa8 4 xa5).
In the game, Black chose the superior 1 … f5 and he met 2 b5 with 2 … e4.
But now comes 3 c4!, forcing a liquidation into an easily won endgame. Black must reply 3 … xb5 4 axb5 xg2 5 xg2.
Black’s knight becomes useless after 5 … b4. The White rooks and b-pawn will decide after 6 b6 e7 7 c7! or, as the game went, with 6 … ab8 7 d7 h6 8 b7 followed by a7 or f4.
Reducing the number of outcomes from three to two only works if there is a very good chance of a win. In the last example, 1 xc6! would have been 1 xc6? if Black had strong drawing chances. Then 1 xc6 would have been superior, despite the complications.
Masters are also good at reducing three results to two when on the defensive. Here’s an example.

White has just shifted his rook to g3. If Black replies 1 … cxd4? White has 2 xh7+! xh7 3 gxf7, forking heavy pieces and also threatening 4 h6+ and 5 g6 mate.
Black can’t stop that with 1 … h6 (2 h7+!) and he saw that 1 … xd4 2 xh7+ costs the queen.
That seems to indicate 1 … g6 is best. But playing the pawn move requires analyzing variations such as 2 xh7, with lines such as 2 … xh7 3 dxc5 bxc5 4 xg6+ or 3 … xc5 4 xg6 or 3 … c7 4 cxb6 axb6 5 h5! xh5 6 h1. Black may be OK in one of those lines but it takes an effort to be sure.
Black took the practical way out. He chose 1 … xd4! after all, because 2 xh7+ xh7 3 xd4 xd4 kills the attack at a small material cost. Play went 4 e3 xg5 5 hxg5.
It may not be obvious but White’s attacking chances are extinguished. An added benefit is that Black’s moves are easier to find. After 5 … e4 6 c3 d6 the kingside pawns became targets.
White was losing after 7 f4 xf4 8 d3 d5 9 f3 g4! 10 e1 c4 11 d4 xg2.
’Taking the easy way out’ used to be considered laziness. Masters know that moves like 1 … xd4! save energy but also half points. And with that it’s time again for you to work on some quiz positions.

Black has all the winning chances. But White has real drawing chances. What should Black play?

How can White make his life easier?

White has just played 1 c5! so that 1 … dxc5 2 e5 followed by d5 after the knight retreats. Should Black avoid that? And, if so, how?
Black should be OK if he retreats his attacked bishop to c6. What else is there to consider?