9. QUICK-REACTION TIMING
 reating style in an image is a process that also involves knowing just when to press that shutter. It’s a process that involves seeing the image with your eyes, identifying the right moment, and physically clicking the shutter button-but all this must happen in just milliseconds. To stay on top of your game, you have to keep all those processes in shape-just like a police officer or military soldier who goes out to the firing range to keep their shooting skills honed. Like them, we rely on our eye-mind-hand coordination for many tasks. While we often take them for granted, these complex acts of coordination can define our style and affect our ability to achieve great photographs.
Obviously, if we can find a way to improve the cohesion of the eye, mind, and hand, our skills (and therefore our images) will improve. One method is what I call “QRT” (Quick Reaction Timing). Practicing QRT several times a year helps us learn to capture that sweet moment in time so we can seize the opportunity as we see it happen, not regret missing it after the fact. This will help you build your confidence and eliminate the hesitation that can lead to the loss of a great photograph. It’s a simple, proven method that even a veteran photographer can turn to when they fall into a creative rut.
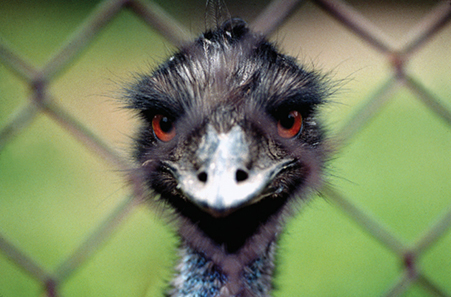
This image is typical of what you can capture when practicing Quick Reaction Timing (QRT). Here, the rule of thirds is effectively broken as the subject, a female ostrich, is placed directly in the center of the image. The diagonal lines of the fence help make this rule-breaking visually effective.
I shot this image back in the late 1970s using existing light. I made the shot while conducting a test on the latitude of Fuji 400 negative film. It was exposed at ISO 800 but processed at ISO 400. While creating an image like this is great for practicing QRT, it also shows the latitude of negative film from the perspective of shadow detail-similar to digital capture. Like slide film, digital capture devices also have no latitude in the highlights.
So what will we be shooting for this QRT exercise? Hired models? Friends? Children? Nope-we’ll be taking a trip to the zoo to photograph animals. If you think about it, this is the perfect place to practice your timing. After all, the zoo is a place where interesting subjects do interesting and spontaneous things all day long.
 PLANNING
Set Aside a Day. The initial step is to religiously dedicate at least one day each month for three months to QRT training. Then wean off to one day every three to six months. Make this day your day-a day where you will not be bothered. Make it a day where you set your mind on achieving nothing but great photographs. Forget about the real world, forget about the clock and the cell phone; this is your time.
Pack a Bag. The day prior to your shooting day, pack your camera bag. Make sure you have plenty of memory cards, fresh batteries, and various lenses-and, heck, bring your flash, too (although we’ll try to avoid using it; part of QRT is learning to see the light, too).
Food and Drink. Make sure you take a little cash to quench your thirst and hunger, so even your body’s most natural requirements won’t disturb your mental process. Besides, you can often buy food for the animals and they make interesting subjects when they’re eating.
Previsualization. Get a good night’s rest the day before your shoot. As you toss and turn, don’t count sheep. Instead, previsualize what you might expect-reflections of flamingos in the water, polar bears bathing in the cool waters, monkeys climbing trees, lions roaring. These are all great shots if you can capture the right moment, the moment when your subject will be photographed in the most interesting and colorful manner, or sometimes even in the funniest state. Think about powerful images you’ve seen on National Geographic specials or the Animal Planet cable channel. Heck, tune in to Animal Planet and fall asleep to the television while studying the animals on the show instead of the local newscast. The idea is to exercise your creative mind the night before so it will be fresh on your shooting day.
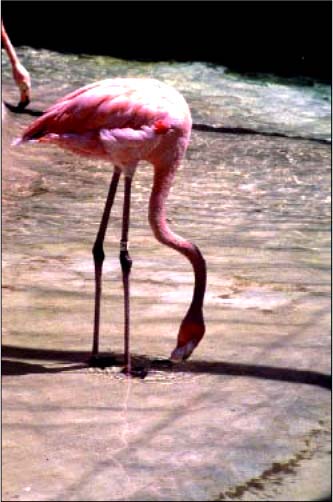
This image was taken at the Baltimore Zoo while while practicing Quick Reaction Timing (QRT). The idea of the image was to utilize the shadow line instead of the light. The first flamingo at the top of the image leads the eye to the second flamingo.
This practice should also be done the day before a glamour session. Previsualization makes your shooting day much easier. It gives you more time to be creative so you can spend less time being preoccupied with the question, “What do I do next?”
AT THE ZOO
Arrive Early. Plan to be at the zoo early, right when they open. Call ahead and get their hours so you can be the first at the gate. This is the best time to shoot, because the animals are eating breakfast and are usually more active after their good night’s rest-call it frisky-fresh critters basking in the morning sun.
Get Your Bearings. Once at the zoo, spend a few minutes watching and observing the different subjects while getting a lay of the land. Make mental notes of the critters that capture your emotions; they are the ones that will make for your best subjects. After studying the animals, go back to those subjects that caught your eye. If it helps, carry a small notepad and develop an itinerary of where you want to go shoot for the rest of the day or for reference for your next visit. Focus on one region at a time; this saves on footwork-otherwise your dogs will be barking before the day is even close to being over and you’ll lose interest in QRT.
Shooting. The second step is to shoot images-don’t worry about how much time you spend with each subject. If you run out of time, you can always come back on your next shooting day and find those same subjects again. After all, the majority of the zoo inhabitants aren’t going anywhere.
Set your frame of mind to see the right moment. Study your subject and try to predict its next move. Look at how the animals play with each other. Be prepared for when the zookeeper feeds them. Animals do funny things when playing and eating, and it’s up to you to see and feel those acts in your mind just before they happen. When things start to happen, don’t hesitate-snap that shutter. Wham! Bam! Shoot it-don’t hesitate! Critique yourself. Did you get the shot?
KEEP AN EYE OUT …
While you’re roaming the zoo grounds, keep an eye out for children or people doing their own interesting acts. If you see people, don’t hesitate to ask them permission to take their photographs-and today, you do it before you shoot, unless the subjects are your own relatives or friends. If children are involved, identify yourself to the parents and give them your business card. Ask the parents if they would like copies of the images. This usually makes them feel more comfortable when allowing you to shoot images of their little ones. I carry a mini-portfolio that fits in my camera bag to show them my credentials. If the images appeal to you for future use (stock agencies are always looking for “lifestyle” images), offer them prints in exchange for their model release-and you must have a signed model’s release to use these images. If you have children in the photos, you must get the parents to sign the release.
Some zoos will actually buy your images or allow you to come back for free if you provide images for their use or display. Make a great print of a zoo animal, place your name and contact information at the bottom of the image, then give it to the zookeeper. This is a good way to develop a networking relationship with the zoo and its staff. Sometimes zoos will even hire you for future photographic projects, such as brochures, posters, advertising, and public relations events. Doing a little probono work for your community is something all photographers should do-especially if you’re trying to get your name out there as a professional photographer.
QRT at the zoo is not glamour photography, obviously, but it’s great training. It not only produces confidence in timing, it develops your knowledge of proper exposure techniques under different lighting conditions. Most importantly, it improves your style while helping you gain confidence in your photographic equipment.
WHEN YOU GET HOME
After your day at the zoo, download your files and review them immediately. The sooner you view your images, the easier it is to capitalize on your mental notes. This step of QRT is a self-critique that builds your confidence. You will quickly learn what you should have done to get that image (or a better image). This conditions you for the next QRT shooting session, making you faster and more effective.
On your computer, set up a main QRT directory, called “QRT,” with subfolders named “great,” “good,” and “gone.” Study your images.
If the exposure is off, if the image is blurred or out of focus, place it in the “gone” folder. (The reason we don’t trash these images right away is because keeping them allows you to go back later and study what you did wrong-a great training tool for future self-critiques.) Everyone has bad outtakes-even professionals. What’s important is learning to ask yourself what went wrong. Then, determine what can you can do better next time. This process is important; it makes you a better photographer over time.
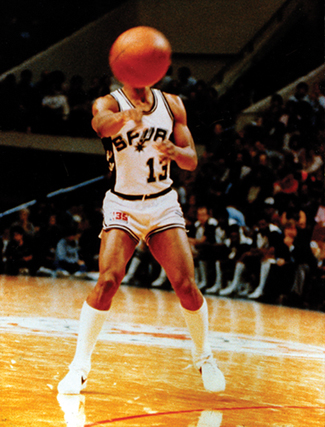
Hillary, one of my longtime models, was photographed at Michael Dean Photography in Coatesville, PA. The model showed up with a referee outfit and whistle, then decided to ditch the outfit and sit on a girl’s basketball that was laying around the studio as a prop. The line formed by the dangling whistle seems to point at the lines in the basketball. What makes this image interesting is Hillary’s mood, indicated by the turn of the head and the hand under the chin. Her bent legs also create a W shape. (CAMERA: Olympus E-1, Zuiko 50mm lens [eff. 100mm]; EXPOSURE: 1/160, f/5.0, ISO 100; WHITE BALANCE: 6,000K)
Once you’ve moved the bad images to the “gone” folder, go through the remaining images. Find those that follow good, basic, fundamental photography rules but just don’t have much punch. Place these in your “good” folder. These images should have tight compositions, excellent lighting and exposure, and interesting subject matter. Most importantly, the subject-especially around the face-must be sharp. Even if an image is great otherwise, if it lacks focus on the face, it needs to go in the “gone” folder. After all, you only want to use top-quality images, not inferior ones. Remember, you’re looking for quality, not quantity. You can save your “good” images for manipulation later in Adobe Photoshop, but don’t save them for your portfolio.
You should narrow down your “great” images into separate sets by creating subfolders for horizontals and verticals. From these sets of great images, narrow your selection down further so that you’re left with only the most interesting, properly exposed, and well-composed images-perhaps as few as one to three images. These are your keepers-they are the strongest shots and the ones that can be used time and again.

To create these images, I placed a Rosco #4430 green gel over the flash and white balanced my camera to its exact opposite, a Rosco #4730 Magenta gel. The flash hit the model with green light, which was canceled out through the magenta. The flash does not, however, travel to the sky and light it green. Therefore, the sky took on a more magenta appearance. (CAMERA: Olympus E-1, Zuiko 50mm lens with 1.4x converter [eff. 140mm]; EXPOSURE: 1/20 second, ISO 100, f/8; WHITE BALANCE: custom to Rosco #4730 Magenta gel) (CAMERA: Olympus E-1, Zuiko 50mm lens with 1.4x converter [eff. 140mm]; EXPOSURE: 1/20 second, ISO 100, f/6.3; WHITE BALANCE: 6,000K)
Study these images. Look at the “gone” and “good” images and ask yourself, “What can I do to improve these images the next time?” Look at the keepers and ask yourself, “How did I achieve these images?” Remember, there is no luck involved in achieving great images; knowing when to squeeze the shutter is a skill. This process hones your skills as a photo editor and helps you develop your own style of shooting, the foundation of improving your skills over time.
QRT gives you a chance to sharpen your skills while fine-tuning your thoughts. It forces you to discipline your photography. Naturally, your success with QRT is based on your commitment to yourself and to your photography; the more you put into QRT, the more it shows in your work.
PUTTING QRT TO WORK
Glamour photography is where you can apply your QRT skills. It will improve your ability to see and make you feel more confident during your glamour shooting sessions. Remember, most great shots are the ones not taken because we hesitated. QRT is also a great “slump solution.” Even seasoned professionals fall into a rut from time to time-it happens even to the best photographers! So, regardless of your skill level, you should take time out of your busy schedule and get in a little QRT.
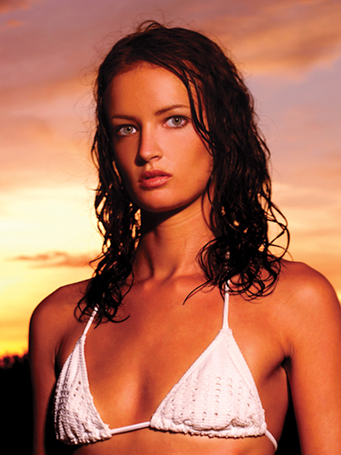
For this image, I used a Dyna-Lite Uni400 Jr. head with a 7-inch reflector pointed into a California Sunbounce Pro (4x6-foot size) with zebra fabric. The light was aimed at a 45-degree angle into the Sunbounce reflector about two-thirds up to the top, about one foot away from the reflector itself. The reflector was angled slightly down so that the light hit the model at an angle that replicated the light from the setting sun. The shutter speed was slowed (dragged) down to 1/25 second to properly expose the color of the ambient sunset. (CAMERA: Olympus E-1, Zuiko 50mm lens with 1.4x converter [eff. 140mm]; EXPOSURE: 1/25 second, f/10, ISO 100; WHITE BALANCE: 6,000K)

Playboy Playmate Holley D., our cover girl for this book, was actually standing behind the water. The clue? Her hair isn’t wet. She was illuminated by a Hensel Premium Porty, a battery-powered system, with a Hensel Ringflash. This was directed through a glass window to the left of the image to cross-light the model’s face. This helped side-light the water droplets, creating a more translucent droplet that stands out from the dark background. (CAMERA: Olympus E-1, Zuiko 50mm lens [eff. 100mm]; EXPOSURE: 1/160 second, f/8.0, ISO 100; WHITE BALANCE: 6,000K)