In a personal computer or server, when the host firmware finishes the initial boot, it transfers the control to the host operating system (OS) loader. Then the host OS loader transfers the control to the final operating system (OS). The OS may be installed by the manufacturer, by the enterprise information technology (IT) department, or by the end user. The typical OS is Windows or Linux. For mobile devices, there may be other types of general-purpose OS, such as Chromium, Android, or iOS. They are created and customized by the platform manufacturer as a part of the whole mobile device solution. In an embedded system or microcontroller, the OS is tightly coupled with the firmware or even a part of the firmware. Some of these solutions include a real-time OS (RTOS), such as FreeRTOS, RT-Thread, Contiki OS, mbed OS, ThreadX, uC/OS, LiteOS, TinyOS, and so on.
Because the OS is the environment which provides the real services, the OS is a major target for attacks. If a Windows or Linux OS instance in a personal computer is attacked, the end user may need to reinstall a new one. But if an Android or iOS instance in a mobile phone is attacked, how can the user install a new one? Not to mention an RTOS running in an embedded system, of which the end user is unaware. From the whole solution perspective, the concept of “resiliency” should be extended from the firmware to the OS.
Similar to firmware resiliency, the OS resiliency also includes three parts: protection, detection, and recovery. Because this book focuses on firmware, we will not introduce all aspects of resiliency in the OS but only focus on the firmware-related part.
Protection
Automated Update
Most of the current commercial OSs, such as Windows, Linux, Android, and iOS, support automated component update. An update service is provided by the OS vendor, and it runs in the background. Whenever the OS vendor provides a new release, the end user will receive a notification, and the patch will be deployed automatically.
The benefit of automated update is that the OS software version is always up to date. The vulnerability of the OS software can be fixed immediately once the patch is available.
Detection
Image Signing
Image signing verification is an effective detection mechanism. UEFI secure boot is one of the solutions that use this mechanism in UEFI firmware. The image signing verification is extended from the firmware to the OS kernel. Some OSs such as Windows 10 enforce the code signing policy to maintain the execution code integrity.
Case Study
Now, let’s take a look at some real cases of secure boot for the OS/loader.
Linux Machine Owner Key (MOK)
The UEFI secure boot defines the key hierarchy. A platform key (PK) is provided by the platform owner. Here, the platform owner typically refers to the platform manufacturer who creates the machine, although it might be someone else, such as the end user. The PK is used to sign the key exchange key (KEK) which is provided by the operating system vendor. The KEK is used to sign the allowed image database and forbidden image database. Current platforms are typically required to enable UEFI secure boot by default. Since the end user does not have the PK or KEK, they cannot enroll any new image into the database. This design is good for an end user who just wants to use the OS. But in the Linux world, a developer is considered as the owner of the machine. What if the developer updates the OS loader or OS kernel and tests the update on their own machine with UEFI secure boot enabled?
The developer may disable UEFI secure boot. According to the Windows logo requirements for using UEFI, UEFI secure boot can be disabled with physical user presence. The UEFI specification itself is silent upon disabling the feature. However, once UEFI secure boot is disabled, malware may be installed on the system before UEFI secure boot is enabled again, which is a potential risk.
The minimum secure boot requirements for Linux are as follows: 1) The OS loader must be signed with a key enrolled in the firmware and verified by the firmware. 2) The OS kernel must be signed with a key trusted by the OS loader and verified by the OS loader. One option is to enroll a Linux key for all firmware, similar to the one used by the UEFI Certificate Authority (CA) and Microsoft that lets all other firmware enroll the UEFI CA/Windows key. But that brings a scalability issue.
MOK and UEFI Secure Boot Key
Key | Provided by | Enrolled by | Signing | Storage |
|---|---|---|---|---|
UEFI secure boot key (PK) | Platform owner – platform manufacturer | Platform owner – platform manufacturer | KEK | UEFI Authenticated Variable |
UEFI Secure Boot Key (KEK) | OS vendor – UEFI Certificate Authority (CA), Microsoft | Platform owner – platform manufacturer | db/dbx | UEFI Authenticated Variable |
UEFI secure boot key (db/dbx) | OS vendor – UEFI Certificate Authority (CA), Microsoft | Platform owner – platform manufacturer | UEFI option ROM, UEFI Loader (Windows OS loader), Linux shim | UEFI Authenticated Variable |
Linux MOK | Machine owner – end user | Machine owner – end user | Linux OS loader, Linux OS kernel | UEFI Boot Service Variable (not authenticated) |
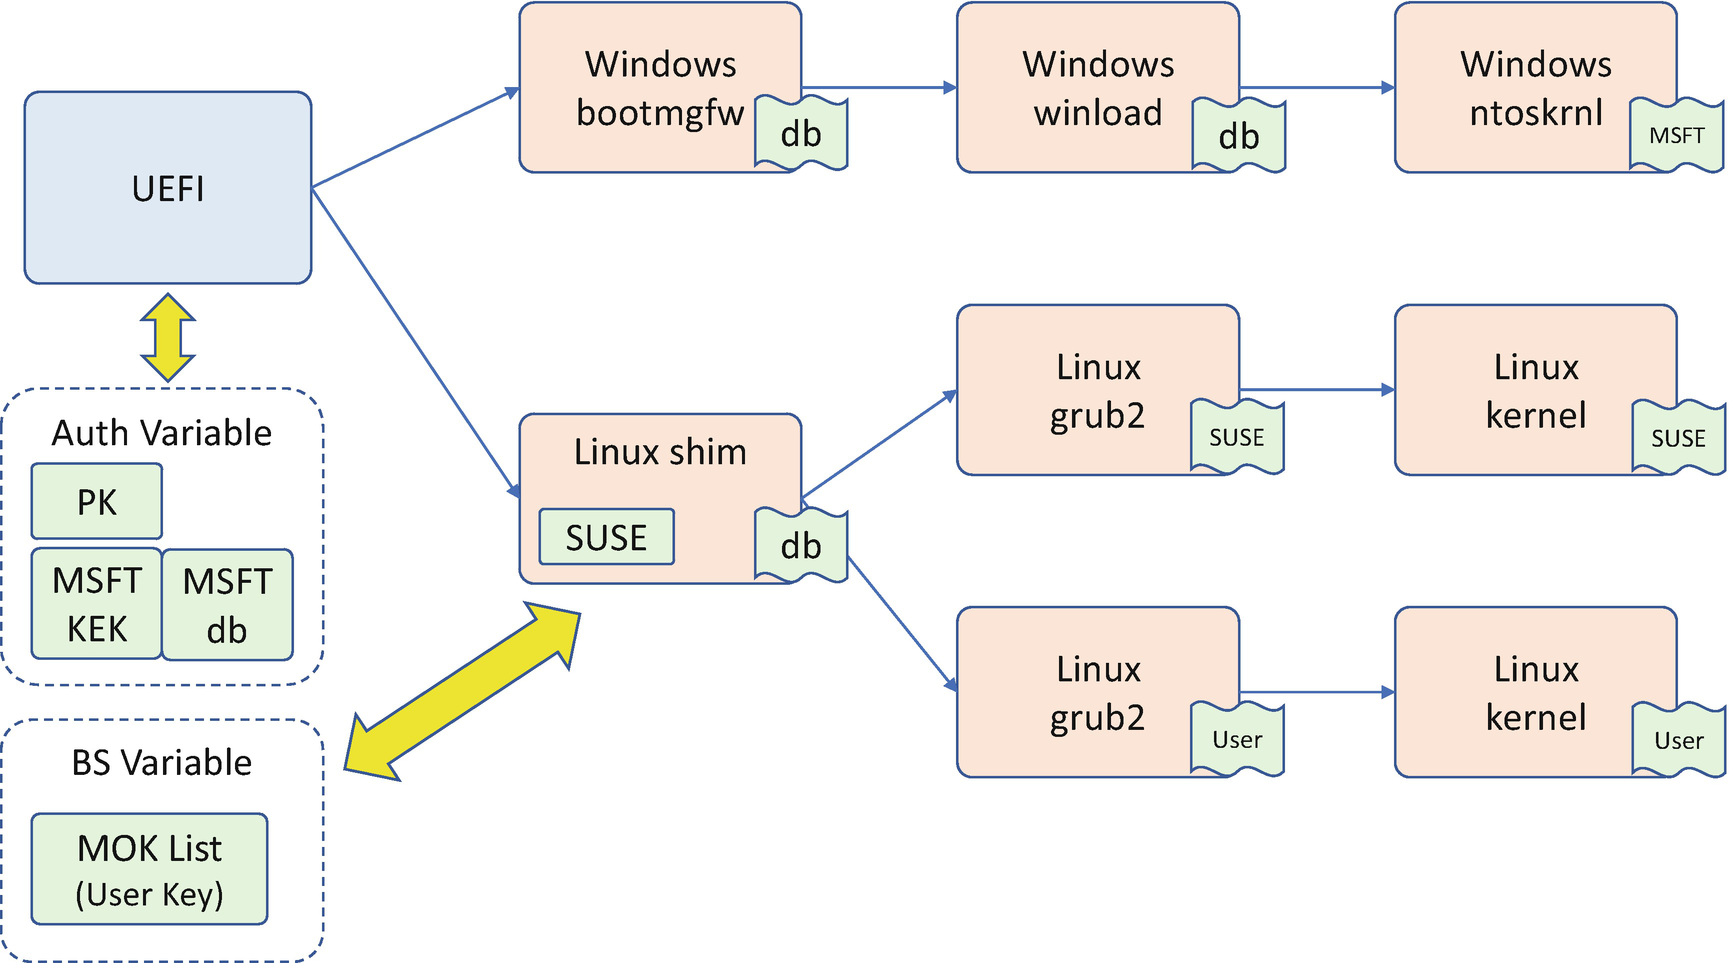
Signing Verification with MOK
If a Linux developer wants to create a new Grub2 or Linux kernel, they can create a Machine Owner Key (MOK) in the Linux environment and sign the Grub2 and Linux kernel. The user needs to use a MOK utility to enroll the MOK with a password and reboot the system. On the next boot, the MOK manager detects the change request and lets the user input the password to confirm the MOK enrollment. Once the user confirms the update, the MOK takes effect. The Linux shim uses the MOK list to verify the new Linux Grub2 and Linux kernel.
The benefit of the Linux MOK system is that it maintains the secure boot chain from the platform to the Linux kernel, with the flexibility that the end user can enroll the secure boot key for the kernel development.
Chromium OS Verified Boot
Keys Used by Chromium Verified Boot
Key | Verifies | Storage | Versioned |
|---|---|---|---|
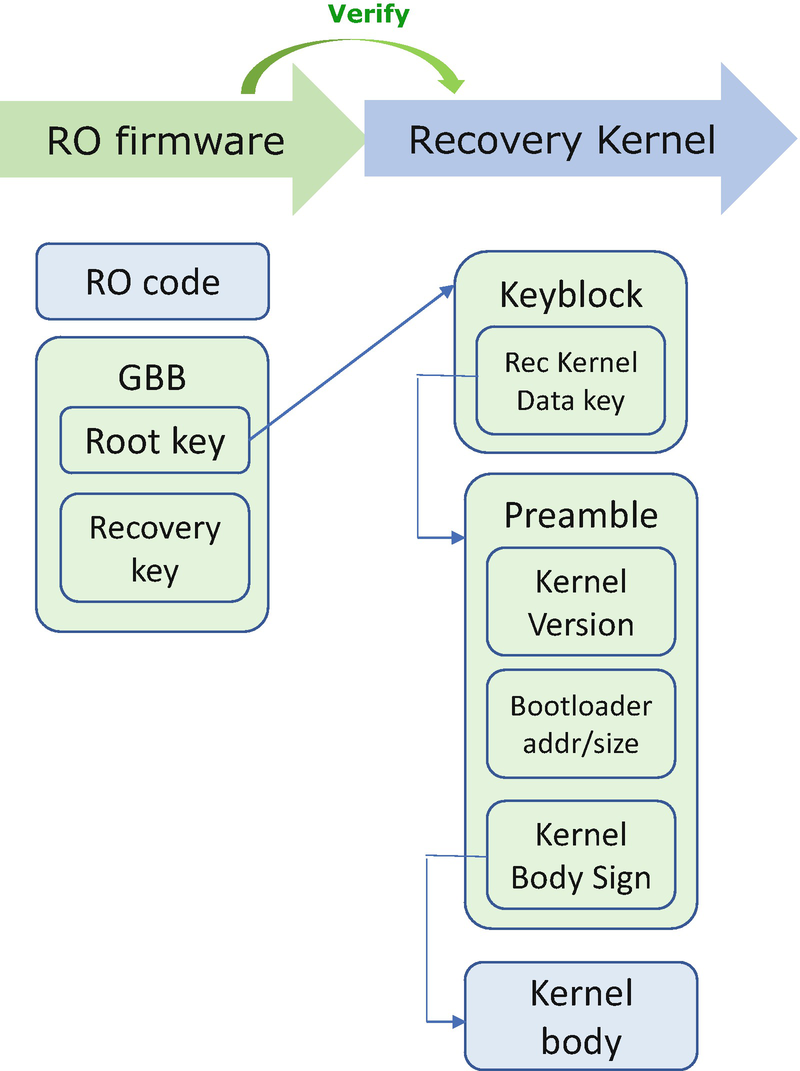
Root key | Firmware data key | RO firmware (GBB) | NO |
Firmware data key | RW firmware | RW FW header (VBLOCK) | YES |
Kernel subkey | Kernel data key | RW firmware | YES (as FW) |
Kernel data key | OS kernel | OS kernel header | YES |
Recovery key | Recovery OS kernel | RO firmware | NO |

Signing Verification in Chromium Verified Boot
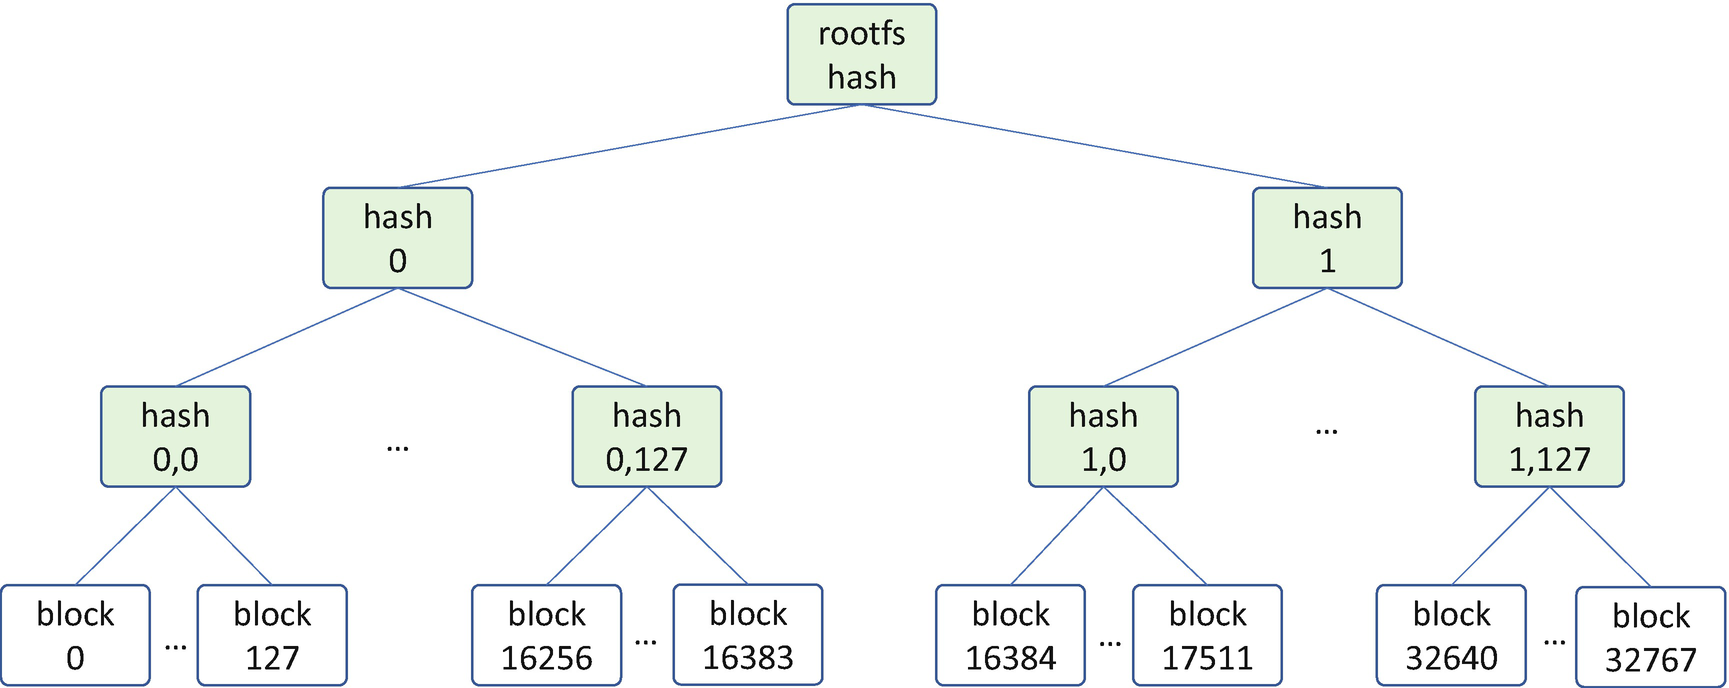
rootfs Hash Verification in Chromium Verified Boot
The verified boot feature works well in normal boot mode for an end user. But what if the kernel is under development? In order to make the development work easier, Chromium OS supports a special developer mode. This is a built-in “jailbreak mode” to turn verification off. In order to prevent unnecessary user mistakes, the user gets a warning message on the screen if the verification is turned off. When the system switches between the developer mode and normal verified boot mode, the device state is cleared. For example, the Trusted Platform Module (TPM) ownership is cleared.
Chromium OS supports rollback protection. The firmware and kernel key versions are stored in the TPM non-volatile RAM (NVRAM). An image is rejected if its version is smaller than the one recorded in the TPM NVRAM.
Android Verified Boot
The Android system is widely used in mobile phone devices. Android versions 8.0 and higher include Android Verified Boot (AVB) which is also known as the Verified Boot 2.0 reference implementation. The AVB’s goal is to ensure the integrity of the software code running on the device. All executed code must come from a trusted source instead of an attacker.
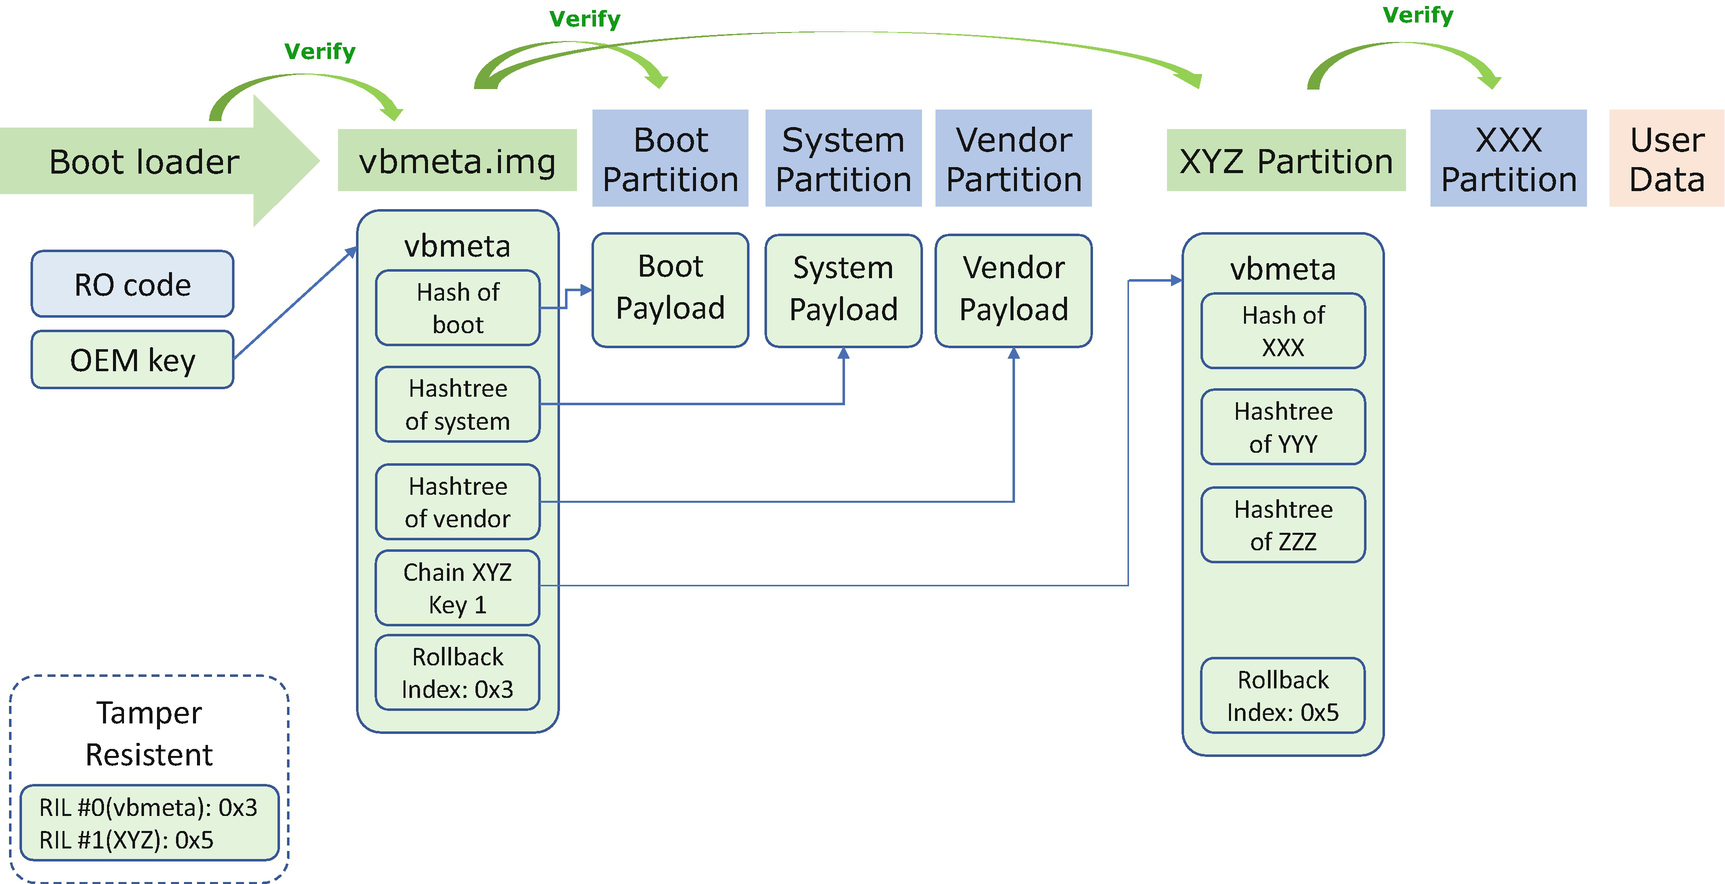
Hash Verification in Android Verified Boot
The vbmeta structure supports the chained structure. For example, a user can define an XYZ partition which includes the vbmeta structure (the hash of XXX partition, YYY partition, and ZZZ partition) and is signed with key 1. The user includes the public of key 1 in the vbmeta.img. During launch, once the vbmeta.img is verified, the chain XYZ key 1 can be used to verify the vbmeta of the XYZ partition.
The Android Verified Boot also supports rollback protection. Each vbmeta structure has a rollback index location (RIL) number, and each vbmeta structure includes the rollback index number. The rollback index number increases for each image which has a security fix. A system uses the tamper-resistant storage to store all the rollback index numbers with the RIL number. During the runtime check, the vbmeta is rejected if the rollback index is smaller than the stored rollback index in the tamper-resistant storage.
Recovery
Automated Recovery
If the verification fails, the system needs to have a way to restore the known good environment. Since the normal image cannot be used to continue the boot, a special recovery image is used in this case. Ideally, this recovery process can be designed to run automatically and requires minimal user interaction.
Case Study
Now, let’s take a look at some real cases for the recovery of the OS/loader.
UEFI Boot Option Recovery
The UEFI specification specifies normal boot options and recovery boot options. A UEFI boot option is recorded in a UEFI variable. The variable contains the description of the boot option, the attributes of the boot option, and, the most important part, the location of the bootable image. The boot option variable name follows the “Boot####” format, where # is a hexadecimal number. Because the typical boot image is provided by the operating system (OS) vendor, the secure boot image verification is required for the boot images.
UEFI Boot Option Recovery
Action | Provided by | Purpose | Image | Image Signature Database |
|---|---|---|---|---|
Normal boot | Operating system vendor | Boot to OS. | Defined in “Boot####” variable. | db/dbx/KEK/PK. |
OS recovery | Operating system vendor | Allow OS to recover boot options or launch the full OS recovery. | Defined in “OSRecovery####” variable. | dbr/dbx/KEK/PK (dbr is the recovery image signature database). |
Platform recovery | Platform manufacturer | Run the remediation as the last resort when no OS is found. | Defined in “PlatformRecovery####” variable. | N/A if it is internal image. Or follow the same UEFI secure boot rule – db/KEK/PK. |
Chromium OS Recovery
OS recovery is also supported by non-UEFI OSs, such as Chromium OS. In these systems, the recovery mode can be triggered when the verification fails during normal boot, or it can be triggered when the end user pressed a recovery button.
Signing Verification in Chromium Recovery Boot
Summary
In this chapter, we discussed the OS/loader resiliency including protection, detection, and recovery. In the next chapter, we will discuss the trusted boot, which complements the secure boot.
References
Conference, Journal, and Paper
[P-1] Murali Ravirala, “Windows Boot Environment,” in UEFI Plugfest 2007, available at https://uefi.org/sites/default/files/resources/UEFI-Plugfest-WindowsBootEnvironment.pdf
[P-2] Olaf Kirch, “UEFI Secure Boot,” SUSE presentation, available at www.suse.com/media/presentation/uefi_secure_boot_webinar.pdf
[P-3] “Chrome OS Verified Boot,” 2016, available at https://docs.google.com/presentation/d/14haBMrbpc2zlgdWmiaTlp_iDG_A8t5PTTXFMz5kqHSM/present?slide=id.g11a5e5b4cf_0_140#slide=id.g34551fb06_0121
[P-4] David Weston, “Advancing Windows Security,” in Platform Security Summit 2019, available at www.platformsecuritysummit.com/2019/speaker/weston/
[P-5] Yunhai Zhang, “Liar Game: The Secret of Mitigation Bypass Techniques,” in Bluehat Shanghai 2019, available at www.microsoft.com/china/bluehatshanghai/2019/
[P-6] Tony Chen, “Guarding Against Physical Attacks: The Xbox One Story,” in Bluehat Seattle 2019, www.slideshare.net/MSbluehat/bluehat-seattle-2019-guarding-against-physical-attacks-the-xbox-one-story
Specification and Guideline
[S-1] UEFI Organization, “UEFI Specification,” 2019, available at www.uefi.org/
Web
[W-1] “Ubuntu Secure Boot,” https://wiki.ubuntu.com/UEFI/SecureBoot
[W-2] “Chromium OS Verified Boot,” www.chromium.org/chromium-os/chromiumos-design-docs/verified-boot
[W-3] “Chromium OS Recovery Mode,” www.chromium.org/chromium-os/chromiumos-design-docs/recovery-mode
[W-4] “Chromium firmware boot and recovery,” www.chromium.org/chromium-os/chromiumos-design-docs/firmware-boot-and-recovery
[W-5] “Chromium OS verified boot data structures,” www.chromium.org/chromium-os/chromiumos-design-docs/verified-boot-data-structures
[W-6] “Android A/B (Seamless) System Updates,” https://source.android.com/devices/tech/ota/ab
[W-7] “Android Verified Boot,” https://source.android.com/security/verifiedboot
[W-8] “Android Verified Boot 2.0,” https://android.googlesource.com/platform/external/avb/+/master/README.md
[W-9] “Android Verified Boot 2.0,” https://blog.csdn.net/rikeyone/article/details/80606147
[W-10] “Android dm-verity,” https://source.android.com/security/verifiedboot/dm-verity
[W-11] “Practical Windows Code and Driver Signing,” www.davidegrayson.com/signing/