

Chapter 7: Introducing Interface Builder

In This Chapter
Introducing nib files
Getting started with Interface Builder
Setting classes and subclasses
As emphasized in previous chapters, Interface Builder — also known as IB — could be called Application Builder. Many developers use IB exclusively as an interface design tool. But you can use it in a completely general way, creating arbitrary collections of objects for your applications and defining arbitrary links between them.
 Tip
Tip
Even when used exclusively for UI design, you can use IB to create loadable elements within a UI, such as individual entries in a table or scrolling subwindows. You don't have to use IB to design complete views. Potentially you can combine IB elements with code to create customized animated interfaces that have more in common with Flash design than with the standard Aqua/OS X look and feel.
Introducing Nib Files
A nib file is a collection of objects. The contents of a nib file are read-only: you can't use a nib file as a persistent store for mutable data. But IB includes initialization options for certain objects, so you can preset some of their properties to useful values; for example, you can set the initial position and size of an application window. Table 7.1 lists some of the key features of the nib system.
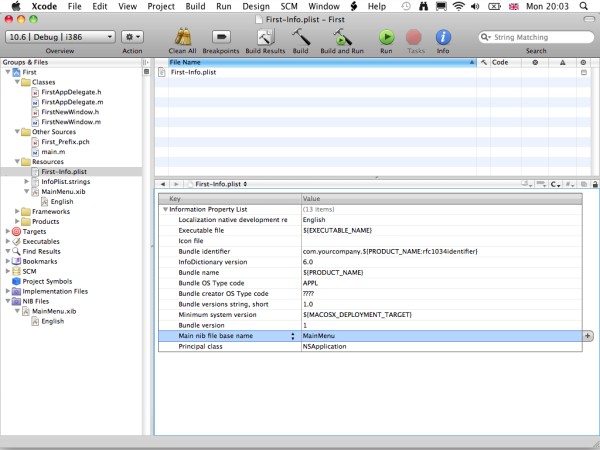
Nib file loading is semiautomated. An application's initial nib file is defined in its info.plist file, as shown in Figure 7.1. This nib is always loaded automatically.
|
Table 7.1 Key Features of the Nib System |
|
|
Feature |
Explanation |
|
General object support |
Nib files can include any Cocoa object or customized subclass. |
|
Implicit object instantiation |
Object instances loaded from a nib file are allocated and initialized in memory without alloc/init code. |
|
Visual UI design |
Objects with visible elements can be positioned with IB's graphic view editor. |
|
UI object defaults |
Visible objects can have a subset of their properties initialized to default values. |
|
Object graphs |
Objects can be grouped together in trees or hierarchies, which are accessed via a common root object. |
|
Semiautomated loading |
Nib files can be loaded automatically or loaded manually using code. |
|
Lazy loading |
Object groups can be loaded and released as needed to maximize memory. |
|
Nib swapping |
Nib swapping is a practical application of lazy loading. Nib files can be swapped as needed — for example, to load different views into a single window. |
|
Outlets and actions |
Objects in the nib file can be linked to objects in code via IBOutlets. Methods in code can be triggered by events generated by nib objects via IBActions. |
|
Bindings |
Objects can trigger code events automatically without explicit outlets or actions. |
Figure 7.1
To locate the default nib file, open the Resources group, click First-info.plist, and scan down the list of items to find the Main nib file base name. You can edit this name to load a different nib file, but more typically you'll use the default nib when the application loads.
The classes shown in Table 7.2 can load a nib file on demand. NSNib supports two-stage loading, where the nib is loaded in one operation and expanded into a set of accessible objects in a second operation. This guarantees that all objects are available. For practical examples of on-demand nib loading, see Chapter 15.
|
Table 7.2 Cocoa Nib Loading Options |
|
|
Option |
Explanation |
|
info.plist |
The application info.plist file includes a default nib that is loaded automatically. |
|
NSNib |
Use the initWithNibNamed: method to load a named nib, and use either instantiateNibWithOwner: or instantiateNibWithExternalNameTable: to unpack the nib objects into memory. Use this deferred unpacking option to control when objects are ready to be accessed. |
|
NSBundle |
Use the loadNibNamed: method to create a new object from the nib contents. |
|
NSDocument |
Use the windowNibName: method to specify a nib that creates an empty document. |
|
NSWindowController |
Use initWithWindowNibName: to specify a nib that defines the window contents. |
|
NSViewController |
The iPhone equivalent of NSWindowController — use initWithNibName: to select and load a nib that contains a view. |
Loading objects from nib files
The nib files generated by IB contain blank class instances, arranged in groups called graphs. Certain Cocoa objects can be nested in a folder-like way to create a tree or hierarchy. For example, a view controller object can contain a number of views, each of which may contain subviews. IB supports structures like these automatically and displays them visually. Not all objects can be graphed, and IB automatically limits nesting to objects that support it.

Cocoa's nib loader runs its own implicit alloc/init code as objects are loaded into memory. But by default, the objects aren't accessible from your code. To make them accessible, you must create links to them — a complex process that combines code directives with manual editing in IB, introduced in detail in the next chapter.
Editing nib files
Editing a nib is a six-step process. Typically you repeat the steps as the project evolves, adding more objects to a nib, or more nibs to the project.
1. Define outlets and actions in your code.
2. Launch IB, using one of the methods listed later in this chapter. IB scans your code and generates a list of outlets and actions. To avoid restarting IB after every code edit, you can also choose File ⇒ Reload All Class Files file option.
3. Add objects to the nib file. If the objects are visible — buttons, windows, and so on — specify their size, position, color, and other default properties.
4. If your code uses subclasses, reclass any modified objects to force IB to load the subclass.
5. Use IB's linking tools to connect objects and messages to outlets and actions.
6. Save the nib file. This step is critical because Interface Builder doesn't save changes automatically before a build.
When you build and run the project, Xcode includes the modified nib file. If you follow the steps and create links successfully, your application can receive messages from objects in the nib file, send messages to them, and read or write their properties.
Getting Started with Interface Builder
You can launch IB by double-clicking any nib file within Xcode. You can also run IB directly by double-clicking Interface Builder.app in the Applications directory created by Xcode, but double-clicking a nib file is more convenient.
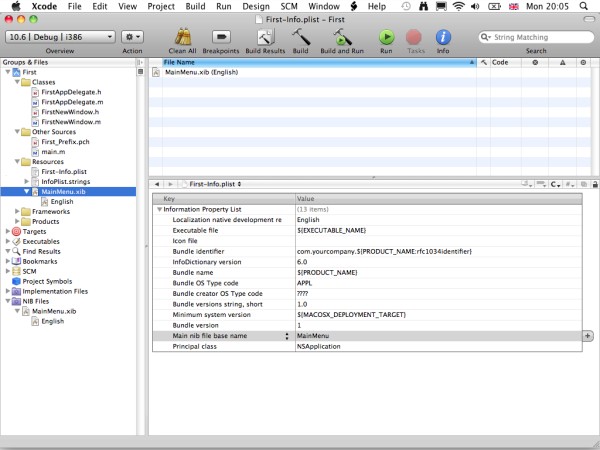
With the First project open, click the Resources group in Xcode's Groups & Files pane to open it. MainMenu.xib is generated automatically when you create a new project, so you'll see it when you open the Resources group, as shown in Figure 7.2.
Double-click MainMenu.xib and wait. Interface Builder is a complex application, and it can take up to a minute to load. When it appears, choose Window ⇒ Bring All To Front. You should see the windows shown in Figure 7.3.
Figure 7.2
The MainMenu.xib file is in the Resources group. The English item indicates the default English localization for the –; you can support other languages by creating nibs for them with different labels.
 Note
Note
Although nib files have a .xib extension, they're not called xib files. The original extension was .nib, an acronym for NeXT Interface Builder. In Interface Builder 3.0, nib files were reimplemented using XML, and the extension was changed to .xib. The original name remained the same — possibly because no one is entirely sure how to pronounce xib.
Introducing IB's windows
IB has four window types. The Document, or Doc, window lists the objects in the nib file. The Doc window is associated with one or more Edit windows, which preview the visual design of the nib file. A nib often contains multiple elements that can be previewed in separate edit windows; for example, the standard application template includes a blank window and a separate menu element.
Figure 7.3
Interface Builder's windows, which are described next. The Main Menu window is independent of the others and simulates the application menu.
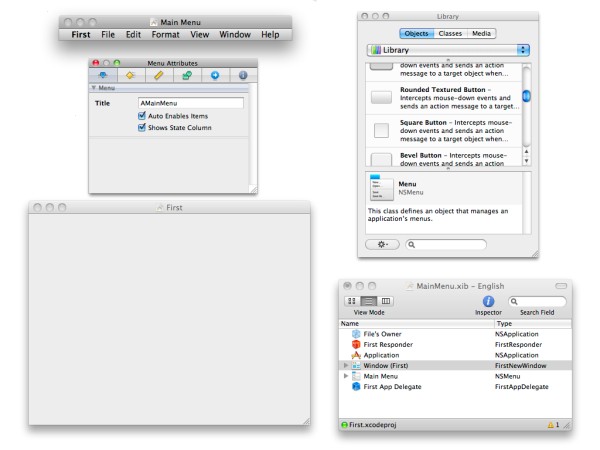
The Library window displays a library of Cocoa and other OS X items that can be added to the file. The Inspector window displays information about whichever item is currently selected in the Doc window. The Inspector and Library windows include tabs that can display subwindows.
Tip
For reasons that remain mysterious, windows in Interface Builder like to hide behind other windows. It's helpful to get into the habit of selecting the Bring All To Front menu option to force them into the foreground. You can open multiple projects in Interface Builder. When you select Bring All To Front, they all appear, so it's a good idea to work on a single project at a time.
Introducing the Document window
Selecting the Doc window shown in Figure 7.4 reveals the full list of objects included in the blank template. Objects are arranged in a finder-like way, with reveal triangles. Select the Window (First) object and click its reveal triangle. You'll see another object, called Content View, which appears indented under Window. Indentation indicates that an object is “inside” another object, within a tree structure with the top-most object as the root.
Figure 7.4
Expanding the items in the Doc window reveals how items are shown “inside” other items or placed on a lower branch of the object tree.

You can change the graph by dragging and dropping items. To remove items from the nib, highlight them and choose Edit ⇒ Delete. You can also use the backspace-delete key. To add items to the nib, drag them across from the Objects list in the Library window.
The hierarchy is interpreted by different objects in different ways. To see an example, click the reveal triangle next to the Main Menu object. For a menu, the hierarchy defines menu headings, followed by lists of menu items. For a window, the hierarchy defines the objects that appear inside the window, and it also sets the order in which they're drawn. It's possible to hide objects behind other objects by changing their position in the graph. Objects with the same indentation are drawn top down, so objects lower down on the list cover objects above them, as shown in Figures 7.5 and 7.6.
Figure 7.5
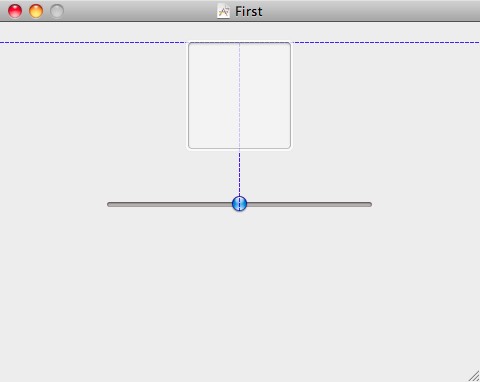
Objects are drawn from the top of the Doc window down. Lower objects cover higher objects. When the slider is under the text field — the small white rectangle — it appears above it in the preview.

Note
When you drag an object from the Library to the Doc window, the release location is important: it defines the object's position in the graph. Only certain object relationships are permitted, and it's impossible to drop an object in a location that creates an invalid graph.
Figure 7.6
Swapping the items changes the draw order. When the text field is drawn last, it covers the slider.

Introducing the Edit window
The Edit window, shown in Figure 7.7, is visual representation of the visible elements in the Doc window. Double-click the Window object to open an Edit window for it. The window in the blank template is empty, but you can add items to it by dragging them from the library window.
Use the Edit window for visual editing by dragging elements to set their sizes and positions. As you move items, guidelines appear to indicate useful visual relationships that help you align elements with each other. Note that you can use the Inspector window, described later, to set an object's size and position numerically.
Figure 7.7
The Edit window's guidelines appear automatically to indicate alignment. In this example, the text field is center aligned with the slider, and it is also aligned with the “safe” edge of the window, which defines the useful drawing area. On the iPhone — but not on the Mac — a guideline appears to indicate the window's center line.
 Caution
Interface Builder displays independent nib elements in separate preview windows, so an application's menu always appears separately. It's considered an independent feature that isn't associated with a window, and it has a special preview window that enables you to test the menu design dynamically. However the preview doesn't support editing — you can only add, remove, and rearrange menu items in the Doc window.
It's important to understand that only some of the items in the Doc window can be edited in an Edit window. For example, if you double-click the NSApplication object in the Doc window, nothing happens. It only exists in code, and code is edited in Xcode, not in IB. Typically only menus, windows, and preference panes can be edited visually.
Introducing the Library window
The Library window is a list of resources that can be included in a nib file. It has three tabs: Objects, Classes, and Media. When you design a nib file, you'll use the Objects tab regularly and the Classes and Media tabs much less often.
The Objects tab, shown in Figure 7.8, displays a scrollable list of objects that you can add to a window to create a Cocoa interface. To add an object to a nib, drag it from this window to the Doc window and release it. The Doc window automatically enforces valid object trees. You can drop any object at the root level of a nib file, but only selected objects can be dropped inside other objects. For example, you can't drop an instance of NSApplication inside a window, because — not surprisingly — windows can't contain applications.
Figure 7.8
The Objects tab of the Library shows visible objects — Cocoa elements that can be used to build an interface. Not all Cocoa objects are visible.
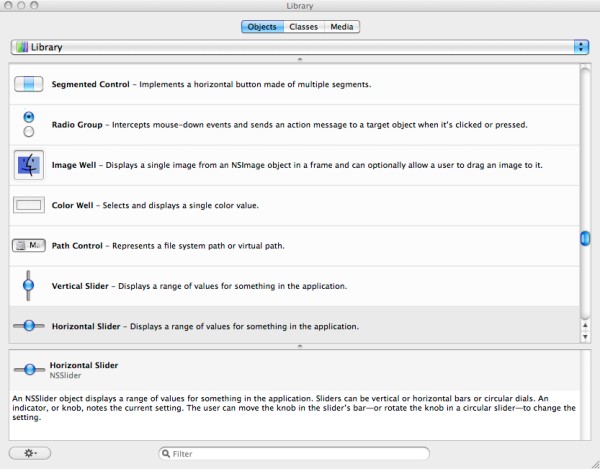
You can also add objects with a visual element by dragging and dropping them onto an open Edit window. This immediately adds the object to the nib design so you can see it and work with its location and size. It also places it into a valid position in the graph.
Tip
You can create a very simple Hello World application by dragging a Label object — an instance of NSTextField — from the Library onto an empty window, double-clicking it to enable editing, and changing the text to “Hello, World.” If you save the nib file and then build and run the application, the window appears showing the text. After an empty window, this is the simplest of all possible Cocoa applications.
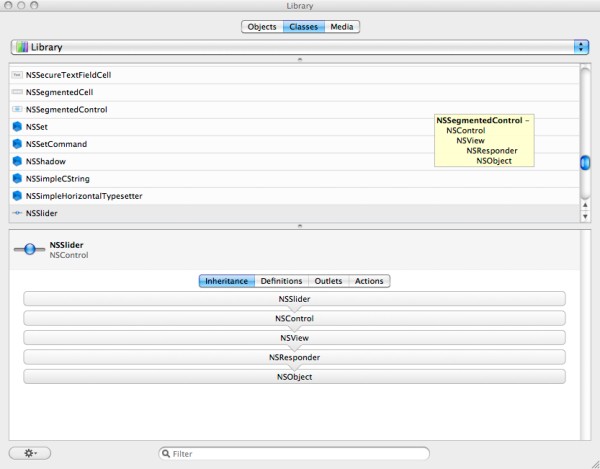
The Classes tab, shown in Figure 7.9, displays an alphabetical list of Cocoa classes. Selecting an object reveals information about it in four subtabs:
 Inheritance displays the object's superclasses.
Definitions displays the framework that defines the object. Some objects are defined in plug-ins. Ignore the plug-in feature for now; it's not used in basic nib design.
Outlets displays object properties that have been prelisted in IB as a convenience. You can create your own custom outlets for any objects, but a handful of objects feature predefined outlets. For example, NSDrawer includes outlets to a parent window, a content view, and a delegate.
Similarly, Actions displays a list of predefined actions. For example, NSDocument includes links to predefined print, save, save as, and other methods.
Most objects don't include predefined outlets and actions, so these elements remain blank. The contents of this tab are occasionally useful as a memory jogger, but it's possible to design a nib file without using this tab at all.
Figure 7.9
The Classes tab of the Library window shows all Cocoa objects — visible and invisible. You can use this tab to add data objects such as NSSet to a nib. This tab also displays class inheritance relationships and predefined connections.
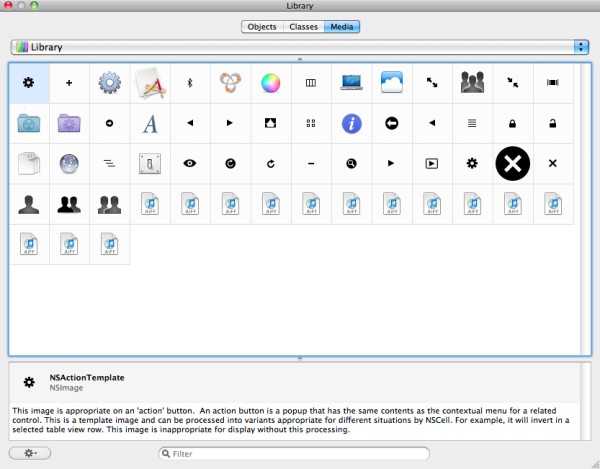
The Media tab, shown in Figure 7.10, displays predefined graphics and other media features. Most of the graphics are designed to be used within an instance of NSCell — Cocoa's button and table cell manager class. Use this tab to add standard Mac graphics to your application.
Note
You can design your own graphics and import them manually using other Xcode features, but they won't appear in the Media tab. For details, see Chapter 16.
Figure 7.10
The Media tab displays standard Mac graphics that you can use in your applications to create a familiar look and feel. You can also load graphics independently and assign them in code, but this tab is a quick way to create a UI with standard Aqua features.
Introducing the Inspector window
The Inspector window is the most critical window in IB. It has multiple functions, and is used for the following:
Presetting object properties and behaviors
Defining object special effects, including animations
Setting object position and size and defining object behaviors when a window is resized
Creating bindings, implicit links to code that are triggered when the object is modified
Creating explicit links to object and outlets in code
Assigning an object to a subclass
Setting an object tooltip
When you select an object in the Doc window, its corresponding properties appear in the Inspector window, selected by the icons in the tab bar at the top of the window. The icons are slightly cryptic. Here's a list of their formal names, from left to right.
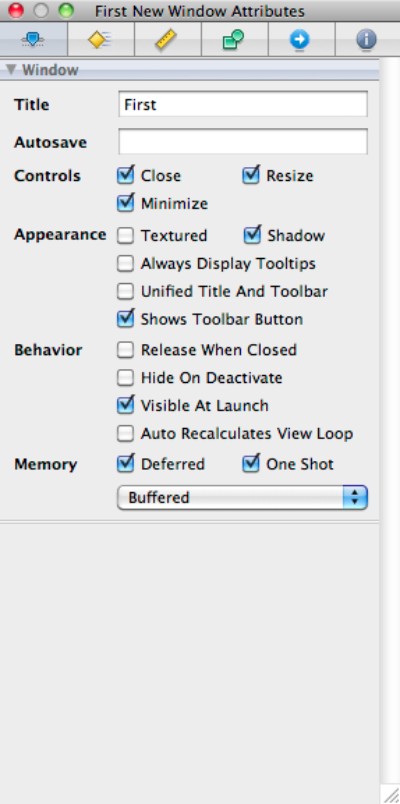
The Attributes tab, shown in Figure 7.11, is a context-dependent property editor. It's equivalent to setting object properties in code, but is easier to work with because it displays many properties simultaneously. When the selected object is visible in an Edit window, changing its properties in the Inspector immediately updates its appearance. Each object has a different selection of editable properties: some objects have no editable properties at all; others display tens of options. Properties define how the object appears and how it behaves. For example, a slider object can appear with or without check marks, and the slider's movement can be free or constrained to the check marks; a text field can be center-, left-, or right-justified, with various possible line break options; and so on.
Figure 7.11
The Attributes tab is one of the most critical elements of IB. Use this tab to preset object properties. Every object displays a different selection of properties; for example, you can set the title and define the controls that are visible for the application's window.
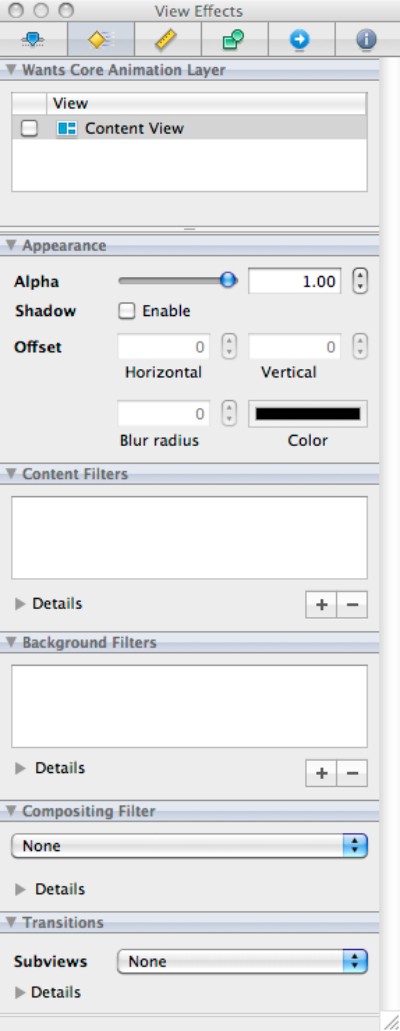
The Effects tab, shown in Figure 7.12, selects special effects, including drop shadow and transparency effects, and various animation effects implemented with both predefined and editable filters. For example, you can specify Photoshop-like compositing modes to combine the object with objects that are drawn beneath it. You can also set animated transitions — such as page curls and dissolves — that are triggered in response to user actions.
Caution
IB's animated effects can be unreliable. It's better to create animations using the techniques introduced in Chapter 17.
Effects are optional and usually cosmetic, so you can ignore these options, as many developers do. But this tab provides creative possibilities that you can use to create unique, striking, and distinctive effects. Effects are supported by almost all visible objects.
Figure 7.12
The Effects tab defines optional animations and special effects. Most of these features are specialized, and many are only used rarely, although the drop-shadow effect shown here is a simple but useful effect that adds depth to a window or object. This tab is not available on the iPhone.
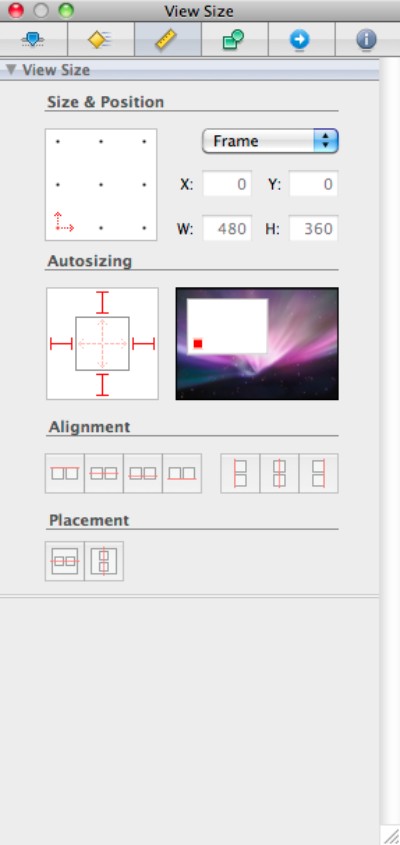
The Size tab, shown in Figure 7.13, defines object size and alignment. It not only sets the object dimensions, it also defines how the object is anchored to the window around it, and it includes alignment and placement buttons that can center an object horizontally or vertically or align it with other elements.
Tip
You can select multiple objects in either the Editor or the Doc window, and use the placement buttons to align and center them as a group. For an example of working with the Inspector, see the next chapter.
Figure 7.13
Use the Size tab to set the size, position, and alignment of objects with fine numerical control. The Placement and Alignment buttons auto-align and auto-center selected items.
The Bindings tab, shown in Figure 7.14, links a selection of object properties to various data processing features in the application. Bindings are an advanced Cocoa feature that simplifies data management. For example, you can use bindings to manage application preferences without having to create outlets and actions for every possible preference. For more information, see Chapter 13.
Figure 7.14
The Bindings tab links items to data structures in the application, bypassing standard accessors and allowing for automated refreshes and updates. Bindings are not available on the iPhone.

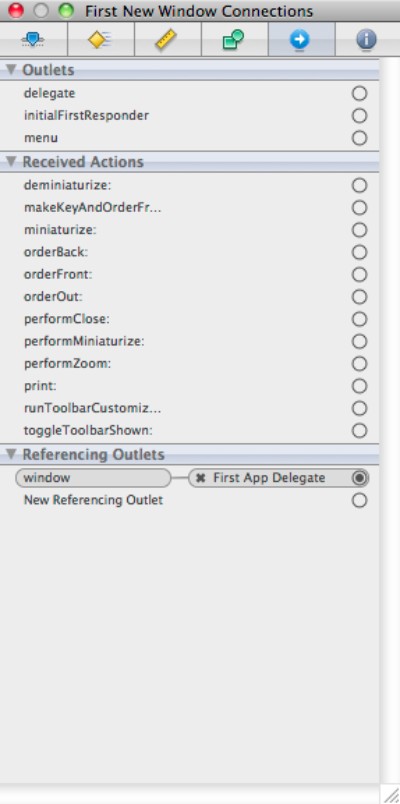
The Connections tab, shown in Figure 7.15, is used to link an object to outlets and actions defined in code. When you select the tab, the Inspector window displays a list of available outlets and actions. The linking process is detailed in the next chapter. After linking, you can click this tab to review the connections between an object and its supporting code.
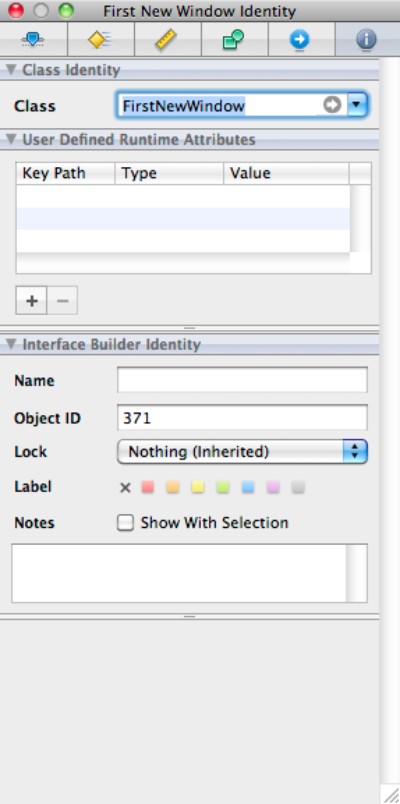
The Identity tab, shown in Figure 7.16, defines an object's class, sets an optional tool tip, and defines optional runtime attributes. You can also highlight objects with a colored tag for convenience. This is a cosmetic feature that doesn't affect the object's appearance in the application, but makes it easier to view related objects in IB. The Class Identity field at the top of the Identity tab is the most useful element. Use it to set the class of an object using a drop-down list that displays a list of available classes. This list is automatically preset to show compatible classes; for example, you're not allowed to reclass an application object as a slider object, but you can change a text field into a different type of text field with slightly different features.
Figure 7.15
The Connections tab lists an object's outlets and actions. Received actions are events received by the object from other objects or processed internally, while sent actions (not shown here) are sent from the object to other objects. Outlets are links to predefined properties, while Referencing Outlets are links to custom properties in the code.
Introducing First Responder and File's Owner
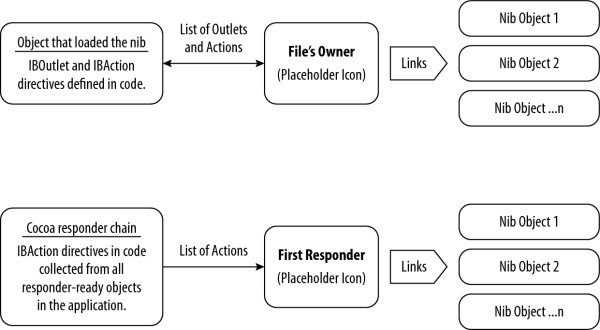
The Doc window includes two items called File's Owner and First Responder. Unlike the other items in a nib file, they aren't true objects — they're placeholders, and they are used as link destinations. As Figure 7.17 illustrates, they're a halfway house between messages and outlets generated within the nib and the corresponding outlets and actions defined in code. File's Owner is a placeholder for the object that loaded the nib and stands in for the object that “owns” the nib. First Responder is a placeholder for the Cocoa responder chain.
Figure 7.16
Use the Identity tab to select an object's class from a list of nominally compatible classes – including custom subclasses. You can also define tool tip text here.
Note
The blank application template includes an instance of Font Manager. If your application doesn't need to support multiple fonts, you can delete this object. It's essential for full-featured text editing, but is redundant in simple applications. The template also includes an instance of NSApplication, which is the main application object. This object must appear in the main nib file. It isn't needed in any other nibs.
Figure 7.17
File's Owner is a virtual placeholder object, standing in for the object that loaded the nib. It's included as a link source and destination — it's not practical to link from IB to the corresponding code in Xcode, so File's Owner is used as a halfway house. First Responder performs an equivalent function for the Cocoa Responder Chain.
Setting Classes and Subclasses
Now that we've had a tour of Interface Builder, we can return to the problem at the end of the previous chapter where we successfully subclassed NSWindow, but discovered it wasn't responding to messages.
Under the menu tree is an object called Window (First). Window (First) is an instance of NSWindow — this is why the subclass of NSWindow we created in the previous chapter does nothing. The nib file is still loading an instance of NSWindow, and our new subclass is being ignored.
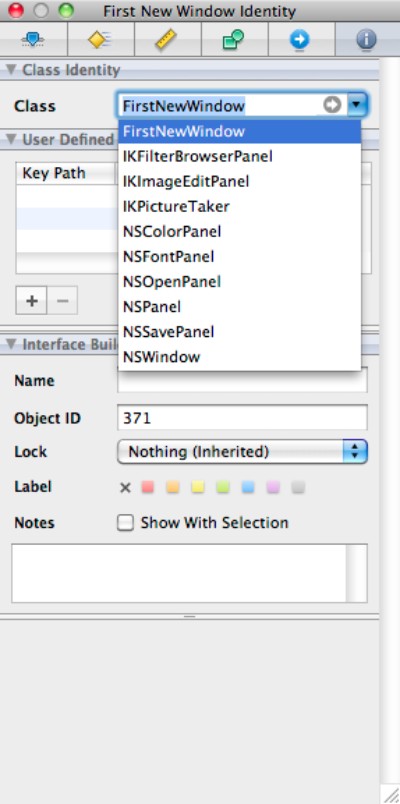
Interface Builder includes an option for changing the class of an object. Click on it in the Doc Window to highlight it, and click the right-most tab in the Inspector window — it shows the letter “i” inside a circle. The top-most pane is called the Class Identity pane. It includes a drop-down menu with a list of all the classes used in the project. Click on the drop-down menu to see a list of compatible classes, and select FirstNewWindow, as shown in Figure 7.18. This reclasses the window as an instance of our new subclass, adding the newly defined features to the object.
When you create a subclass in code, you must subclass the corresponding object in any nib file that references it. If you don't, the application loads the original unmodified class, and your code is ignored. I illustrated this feature early on because it can be one of the more puzzling and confusing features of Cocoa application design.
Figure 7.18
To replace an object with a custom subclass, select it in IB, click the Identity tab, and select the subclass name from the list. The object now supports all the properties and methods of your subclass.
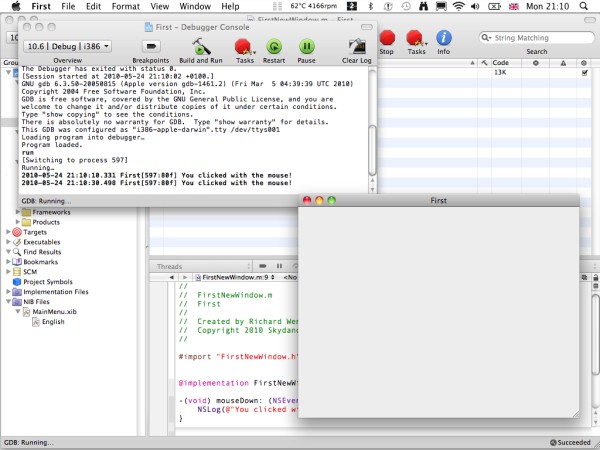
Save the file, and Build and Run the project. You should get the result shown in Figure 7.19. The default window has been replaced with the subclass, which now responds to mouse events. Success!
Now that you have created a very simple project, you can move on to a more complex application.
Figure 7.19
After reclassing the application window as your new FirstNewWindow class, the window responds to mouse click events and runs your click handler.
Summary
In this chapter, you were introduced to nib files and looked briefly at the Cocoa classes you can use to load them into your application. You were given a detailed tour of the different windows in Interface Builder, with their subtabs. Finally, you learned how to use the Identity tab in the Inspector window to subclass a nib object to force it to run custom code.