CHAPTER 3
HOLDING THE LINE
1939 - 1942
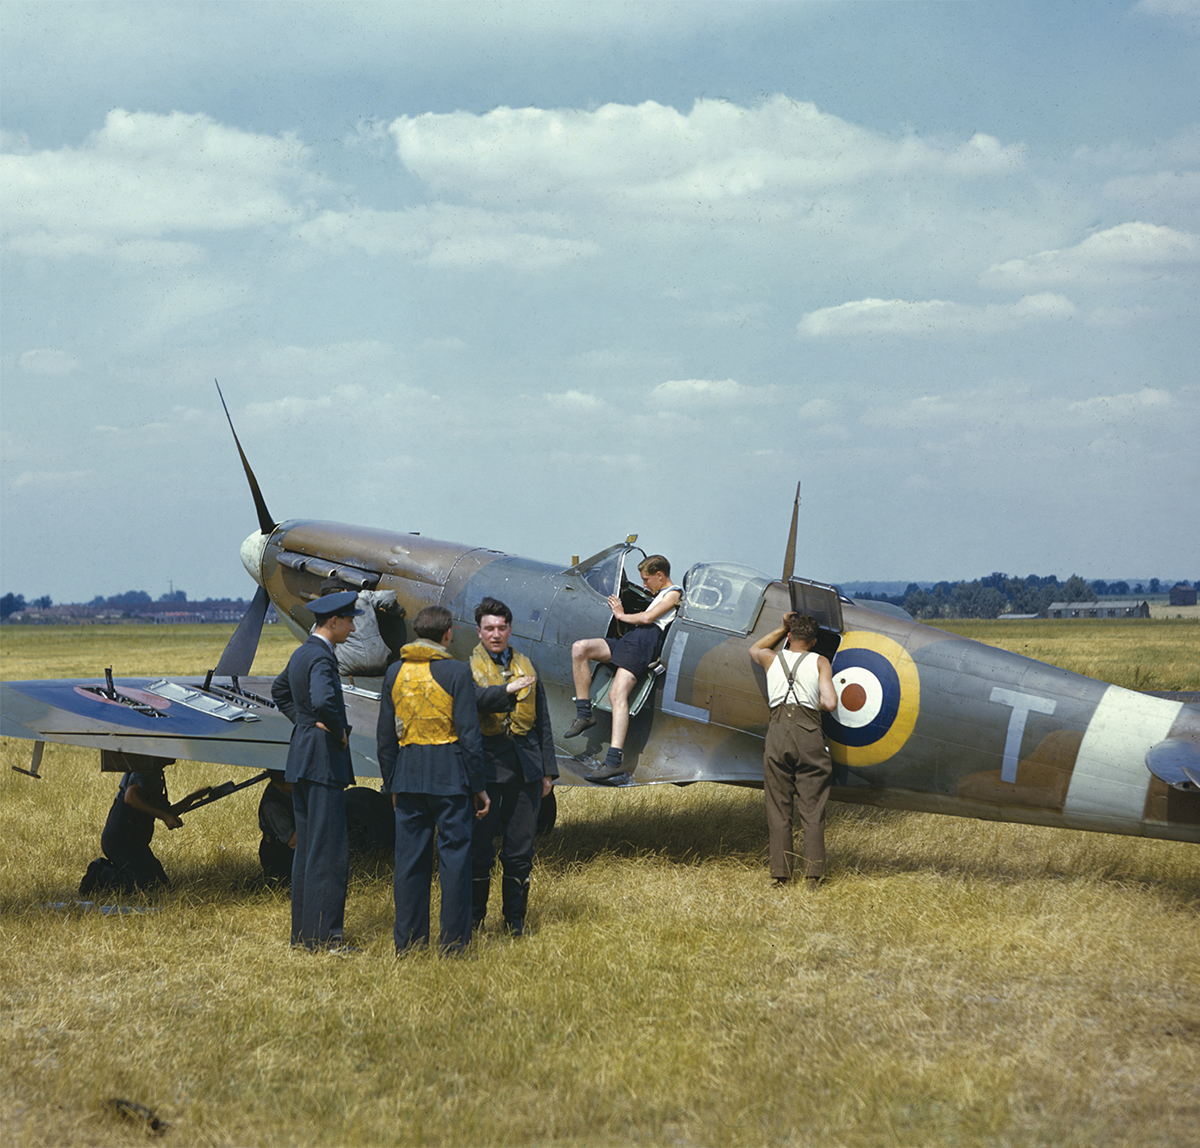
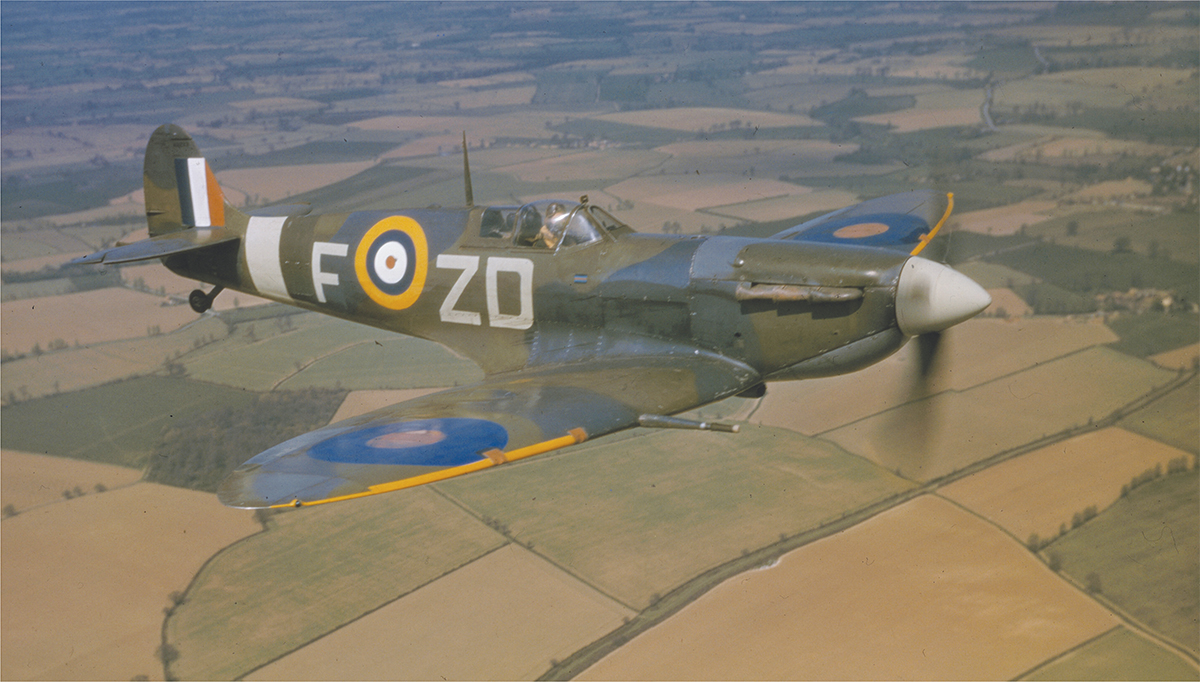
Supermarine Spitfire pilots discuss tactics on an airfield ‘somewhere in England,’ while the ground crew service the aircraft. Although the Spitfire is often considered to be the embodiment of the RAF during the Battle of Britain, there were infact more Hurricanes than Spitfires in service at the time. However, the type was undoubtably a decisive factor in establishing air superiority on all fronts during World War II. (William Vandivert/The LIFE Picture Collection/Getty)
As the end of the decade loomed, the responsibilities of colonial policing remained, although Iraq and the Northwest Frontier of India had quietened over the preceding ten years. However, it was the threat of impending war with Germany that occupied most people’s minds. The Munich Crisis had effectively given the RAF a year’s grace in which to prepare for war and as the number of front-line units grew under Expansion Scheme ‘M’, the RAF began to look more like a viable fighting force. However, the majority of its squadrons were still equipped with aircraft that were, at best, obsolescent.
COLONIAL DUTIES
The influx of Jewish immigrants to Palestine continued through 1939 and the Vickers Wellesley bombers of 14 Squadron maintained coastal patrols to give the naval forces warning of approaching ships carrying illegal immigrants. In Palestine itself, bands of Arab dissidents continued to fight Jewish gangs and both sides fought the British authorities. Bands of insurgents from neighbouring Arab countries were also active in Palestine. A Hawker Hardy from 6 Squadron was shot down on 11 March while supporting a TJFF patrol which was engaging insurgents from Syria. The action was joined by another Hardy and a Gloster Gladiator, but little progress was made against the invaders, who had secured ideal defensive positions in a narrow wadi. The ensuing stalemate was broken that evening by Wellesley bombers of 14 Squadron dropping 250lb bombs on their positions. In India, 5 Squadron equipped with the Westland Wapiti spent the month of August providing close air support to the column relieving the garrison at Wana, Waziristan, but otherwise the region enjoyed an unaccustomed peace.
OPENING MOVES
Germany invaded Poland on 1 September 1939 and two days later Great Britain responded by declaring war on Germany. On that day, a Bristol Blenheim IV of 139 Squadron carried out a reconnaissance of the German naval bases and discovered a number of naval ships, including the heavy cruiser Admiral Scheer, in the Schillig Roads, just outside the port of Wilhelmshaven. Unfortunately, the crew of the Blenheim was unable to report their sighting until they returned to their base so that a combination of bad weather and darkness prevented the striking force from locating the ships. However, the reconnaissance was repeated the next day, 4 September, and a force of 15 Blenheim IVs (five aircraft each from 107, 110 and 139 Squadrons) set off to attack the Admiral Scheer and the cruiser Emden in dock at Wilhelmshaven. At the same time, nine Vickers Wellingtons (from 9 and 149 Squadrons) flew to Brunsbüttel, at the mouth of the River Elbe, where two German battleships had been reported. Neither attack was successful: five Blenheims and two Wellingtons were lost and the German ships suffered only superficial damage.
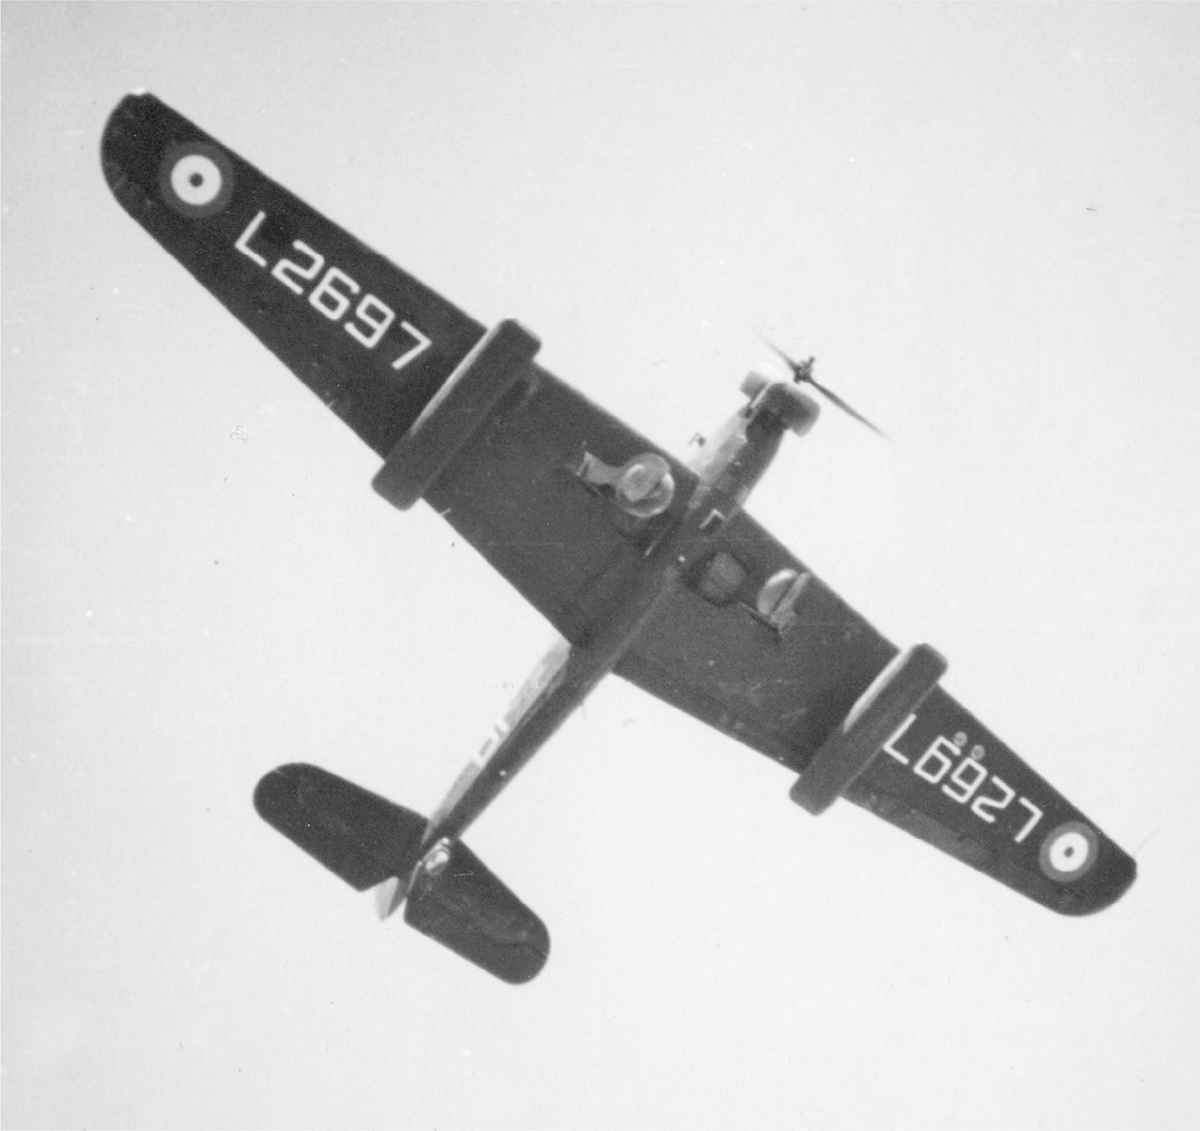
Colonial policing duties continued despite the impending war. In 1939, 14 Squadron equipped with the Vickers Wellesleys flew operations against insurgents in Transjordan. The aircraft is fitted with under-wing panniers which carry bombs. (14 Squadron Association)
The next missions by Bomber Command comprised armed reconnaissance in strength over the German coastal waters. A successful mission by 12 Handley Page Hampdens on 26 September was followed three days later by another sortie by 12 Hampdens of 61 and 144 Squadrons. These aircraft found two destroyers and bombed them, but were they intercepted by German fighters and five Hampdens were shot down. During the next two months poor weather over the Heligoland Bight frustrated further missions.
The Armstrong-Whitworth Whitley, which equipped 4 Group, had the longest range of any aircraft type in Bomber Command service, but as it was also the slowest type, the Whitley was considered to be too vulnerable to attack by fighters for use on daylight operations. Instead, they were to be used solely for night bombing. In fact, the type was first used to drop propaganda leaflets over German cities, starting with Bremen and the Ruhr on the first night of the war, by aircraft of 51 and 58 Squadrons. After a break in activities, the leaflet drops were resumed in mid-September and from then on, the aircraft ranged far over Germany: on 1 October 1939, Whitleys of 10 Squadron dropped leaflets on Berlin and on 27 October aircraft of 51 Squadron carried out similar raids on Munich and Frankfurt. In contrast to the dangers of operating in daylight, the aircraft did not suffer from the attentions of German fighters or anti-aircraft defences.
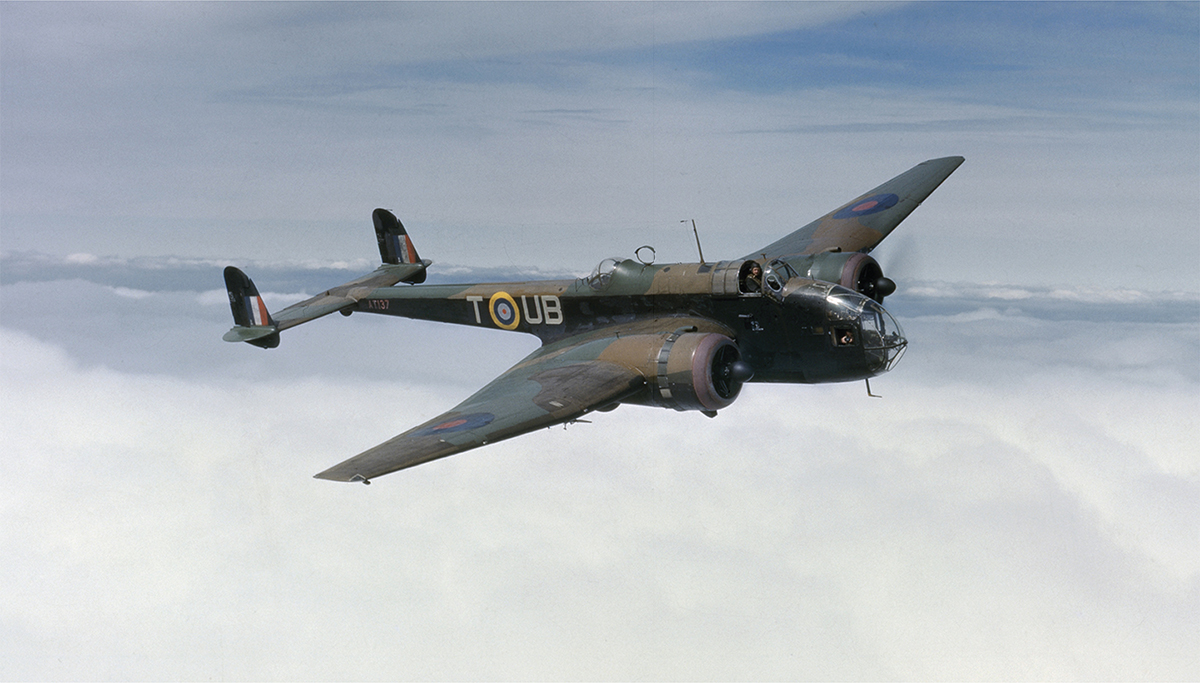
The Vickers Wellington B Is of IX Squadron were amongst the first RAF aircraft to see action when they attacked German battleships in the Elbe estuary on 4 September 1939. The Wellington, which remained both in production and RAF service throughout the war, formed the backbone of the RAF bomber force in the UK and the Middle East. (Flintham)
In early December 1939, the weather had cleared sufficiently for bomber operations to resume over Heligoland Bight. On 3 December, a force of 24 Wellingtons from 38, 115 and 149 Squadrons attacked shipping near Heligoland. Although the formation was engaged by fighters, no aircraft were lost. However, this success was short-lived: on 14 December, 12 Wellingtons of 99 Squadron lost two of their number to anti-aircraft fire over the Schillig Roads and another three were shot down by fighters. Four days later 22 Wellingtons of 9, 37 and 149 Squadrons found no suitable targets during their armed reconnaissance, but lost 12 of their number to fighters, with another three aircraft badly damaged. Clearly this rate of attrition could not be sustained, especially in view of such meagre results, and this was the last major operation carried out by the ‘heavy’ bombers of Bomber Command in daylight.
The Lockheed Hudson progressively replaced less suitable types such as the Avro Anson as a maritime patrol aircraft. On 8 October 1939, three Hudsons from 224 Squadron became the first RAF aircraft to shoot down a Luftwaffe aeroplane. (© IWM COL 183)
COASTAL COMMAND
Despite Great Britain being a pre-eminent naval power, and despite the experience of anti-submarine operations during World War I, Coastal Command entered World War II woefully underequipped. Nevertheless, standing patrols in the form of a continuous ‘daisy chain’ of aircraft flying from Montrose to the limit of endurance for the Avro Anson (some 50 miles short of the Norwegian coast) were mounted from 24 August 1939 in order to close off the North Sea to German vessels. Unfortunately, the patrols were initiated just too late to detect the departures of the heavy cruisers Admiral Graf Spee and Deutschland.
The obsolescent Anson was progressively replaced by the Lockheed Hudson, which proved to be much more suitable for long-range patrols. The Hudson was also better armed: on 8 October 1939, three Hudsons from 224 Squadron led by Flt Lt A.L. Womersley claimed one of the first RAF aerial victories when they shot down a Dornier Do18 operating over the Skagerrak.
DEPLOYMENT TO FRANCE
The British Expeditionary Force (BEF) deployed to France in September 1939 and took up defensive positions in northeast France, near the Belgian border. The air component supporting the BEF comprised four squadrons of Westland Lysander army co-operation aircraft (from 2, 4, 13 and 26 Squadrons), four squadrons of reconnaissance aircraft (15 Squadron with the Fairey Battle and 18, 53 and 59 Squadrons with the Bristol Blenheim) and two squadrons of Hawker Hurricanes (85 and 87 Squadrons) to provide fighter cover. The Battles of 15 Squadron were soon replaced by Blenheims of 57 Squadron. The air component was based on airfields in the vicinity of Lille, but its close proximity to the border with neutral Belgium meant that its units could not carry out any offensive action. However, the Blenheim squadrons were used for photographic reconnaissance sorties along the German Westwall (Atlantic Wall) defensive system.
The light bombers of 1 Group, Bomber Command were unable to reach central Germany from their peacetime bases in the UK, so the group was sent en-masse to France to form the Advanced Air Striking Force (AASF). Flying from bases in the Rheims area, it was intended that the eight squadrons of Battles and two squadrons of Blenheims would, much like the Independent Force of 1918, be able to prosecute independent operations and could carry the war into Germany. Two Hurricane squadrons (1 and 73 Squadrons) were to provide fighter cover for the AASF. Like the air component, initial operations by the AASF consisted of reconnaissance flights over the westernmost parts of Germany. Unfortunately, these sorties proved to be costly: two out of three Battles from 88 Squadron on reconnaissance over Aachen were shot down by fighters on 20 September and ten days later four out of the five aircraft of 150 Squadron were also shot down by fighters over Saarbrucken. Flights by Battles over Germany were curtailed after these incidents. The Hurricanes of the air component and the AASF also encountered German aircraft periodically. On 30 October, a Dornier Do17 reconnaissance aircraft was shot down by Pilot Officer (Plt Off) P.W. Mould of 1 Squadron flying a Hurricane; by April 1940, Fg Off E.J. ‘Cobber’ Kain of 73 Squadron had shot down five enemy aircraft, making him the RAF’s first ‘ace’ of the war. In January 1940, British Air Forces France (BAFF) was established to provide central command of both the air component and the AASF.
A Fairey Battle of 103 Squadron, part of the Advanced Air Striking Force (AASF) in France. When the fighting began, the obsolescent Battle proved no match for the German defences and by the summer of 1940, most of the AASF squadrons had been annihilated. (Flintham)
A Spitfire Mk I of 602 City of Glasgow Squadron. The first Luftwaffe aircraft to be shot down over the UK was a Heinkel He111 bomber which was intercepted by Blue Section, ‘B’ Flight from the squadron on the morning of 16 October 1939. (Pitchfork)
FIGHTER COMMAND
Meanwhile the Luftwaffe (German air force) also began to take an interest in British naval activity. Reconnaissance aircraft probed the naval dockyards at Rosyth and the anchorage of the Home Fleet at Scapa Flow. On the morning of 16 October 1939, two Heinkel He111 aircraft carried out a reconnaissance flight over Edinburgh and Rosyth and that afternoon a force of 12 Junkers Ju88 bombers attacked warships in the Firth of Forth. The bombers were intercepted by Supermarine Spitfires of 602 and 603 Squadrons, which shot down two of the German aircraft. Reconnaissance and bomber sorties by the Luftwaffe continued sporadically through the winter and, despite some gaps in radar coverage, many of these were successfully intercepted by RAF fighter aircraft. Amongst German losses were a number of Heinkel He111 aircraft, shot down by 603 Squadron on 22 and 28 October and 7 December.
Fighter aircraft also carried out offensive action: on 28 November 1939, 12 Blenheim IFs of 25 and 601 Squadrons carried out a low-level raid at dusk against the German seaplane base on the island of Borkum, where they strafed five seaplanes and a number of coastal patrol vessels.
Luftwaffe reconnaissance aircraft continued to probe the defences of all naval installations in Scotland and bombers attacked convoys in the North Sea. Fighter Command continued to intercept many of these aircraft and, for example an He111 was shot down by Hurricanes from 43 Squadron on 3 February 1940 while attacking shipping off Whitby. German aircraft also dropped magnetic mines in coastal waters, but from January 1940 many of these were cleared by Wellington IA Directional Wireless Installation (DWI) aircraft operated by 1 General Reconnaissance Unit (GRU) from Manston. The DWI equipment consisted of a large circular electromagnet which caused the mines to explode when they were overflown by the aircraft.
A Vickers Wellington Mk IA Directional Wireless Installation (DWI) aircraft of 1 General Reconnaissance Unit (GRU). The aircraft was fitted with a 35ft diameter electromagnet (degaussing) covered with a balsa wood fairing to clear German magnetic sea mines from coastal waters. (Flintham)
On 15 February 1940, a patrol of three Hudson bombers from 220 Squadron located the Altmark, a German oil tanker and supply ship, off the coast of Norway. The Altmark, which was transporting 299 prisoners from ships sunk by the ‘pocket battleship’ Admiral Graf Spee, attempted to seek refuge in the Jøssingfjord. But the aircraft had alerted HMS Cossack, which entered the fjord on 16 February and rescued the prisoners.
The Handley Page Hampden overcame its disastrous debut as a day bomber to play an important part in the night bombing offensive, eventually equipping 14 squadrons in Bomber Command. Another seven Coastal Command units also operated the type as a torpedo bomber. (RAF Official Photographer/IWM/Getty)
After a Luftwaffe bombing raid on Scapa Flow on 16 March, the British government demanded that the RAF carry out some form of retaliation. Three days later, Bomber Command carried out the first night bombing raid on the seaplane base at Hörnum on the island of Sylt. A total of 30 Whitley and 20 Hampden bombers took part in the raid and although many crews claimed direct hits on the target, subsequent photo-reconnaissance revealed that little damage had been done.
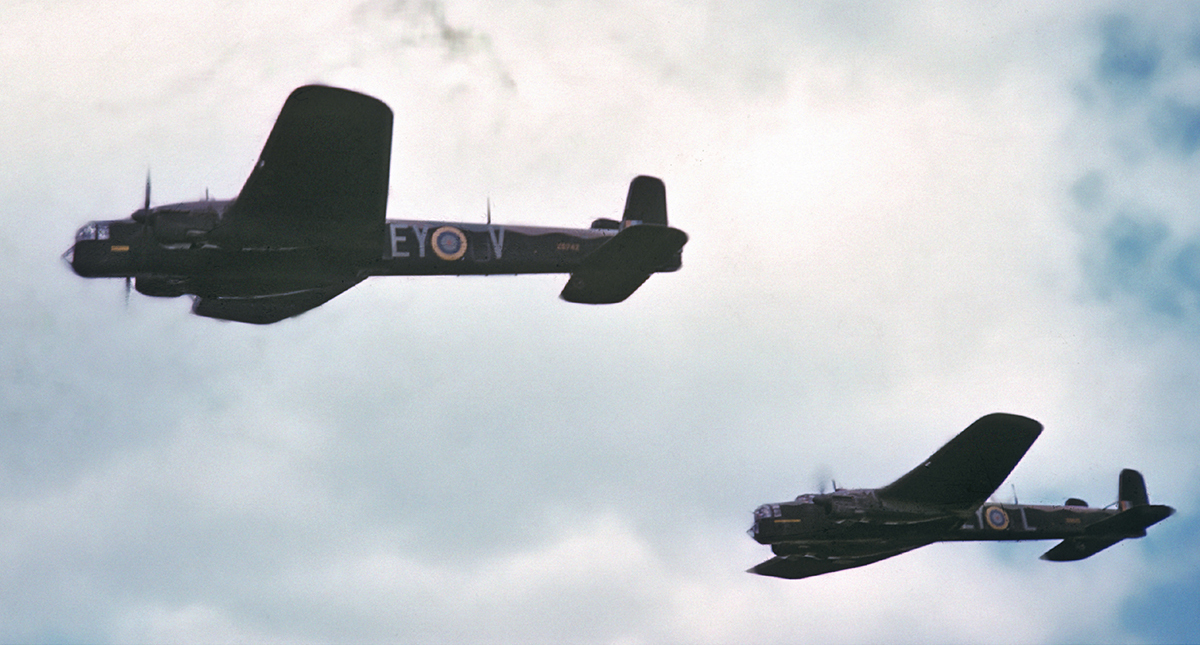
The Wellington and Hampden, and the Armstrong Whitworth Whitley (above) were the medium bomber types operated by Bomber Command during the first years of the war. These aircraft are from 78 Squadron. (Fox Photos/Hulton Archive/Getty)
NORWAY
On 7 April 1940, the crew of a Coastal Command Hudson reported that the German battleships Scharnhorst and Gneisenau were heading north after leaving Wilhelmshaven. Unfortunately, an attack by 12 Blenheim bombers of 107 Squadron achieved no hits and a follow-up mission by two squadrons of Wellingtons could not locate the ships in deteriorating weather. Fearing that the ships might be attempting to break out into the Atlantic, a full-scale search of the North Sea and the Norwegian coast was ordered for Coastal Command aircraft the next day. Weather conditions remained poor, but a Short Sunderland of 204 Squadron located the cruiser Admiral Hipper and escort which were heading for Trondheim. In fact, the German naval activity was in support of an invasion of Norway and by the evening of 9 April much of southern Norway was under German control. A number of reconnaissance flights over Bergen confirmed the presence of two light cruisers, Köln and Königsburg, and a force of 12 Wellingtons from 9 Squadron and 115 Squadron were dispatched to bomb the ships; however, neither vessel was damaged in the attack. On 12 April, six out of a force of 12 Hampdens from 44 Squadron and 50 Squadron were shot down by fighters when they attempted to bomb a German ship at Kristiansand. Unfortunately, many of the airfields being used by the Luftwaffe were beyond the range of most RAF bomber types, but the airfield at Stavanger could be reached and was bombed on 11 April and again on 14 April. From then on, RAF aircraft also began to be used to lay mines in the Elbe estuary and in addition, over the next seven days Bomber Command aircraft flew 200 sorties against airfields used by the Luftwaffe in Norway and Denmark.
On 12 April 1940, British forces landed at Åndalsnes and two days later at Namsos, but they had to wait a further ten days before they had any air support. This arrived during the evening of 24 April when 18 Gloster Gladiators from 263 Squadron, flown off the aircraft carrier HMS Glorious, landed on the frozen surface of Lake Lesjaskog, situated between Trondheim and Lillehammer. Unfortunately, the presence of the aircraft was soon discovered by the Luftwaffe, which bombed the lake and by the following evening ten of the aircraft had been put out of action. Over the next two days, the remaining Gladiators carried out useful work, flying reconnaissance sorties and intercepting Luftwaffe bombers, but their numbers rapidly dwindled until all had been completely wiped out by 26 April. A general evacuation of British forces from southern Norway commenced on 28 April. Bomber Command attacked airfields at Stavanger, Oslo and Aalborg; on 30 April a night raid on Stavanger was flown by 28 Wellingtons and Whitley bombers. These efforts limited the ability of the Luftwaffe to interfere with the evacuation, which was also covered by Blenheim IV long-range fighters of 254 Squadron.
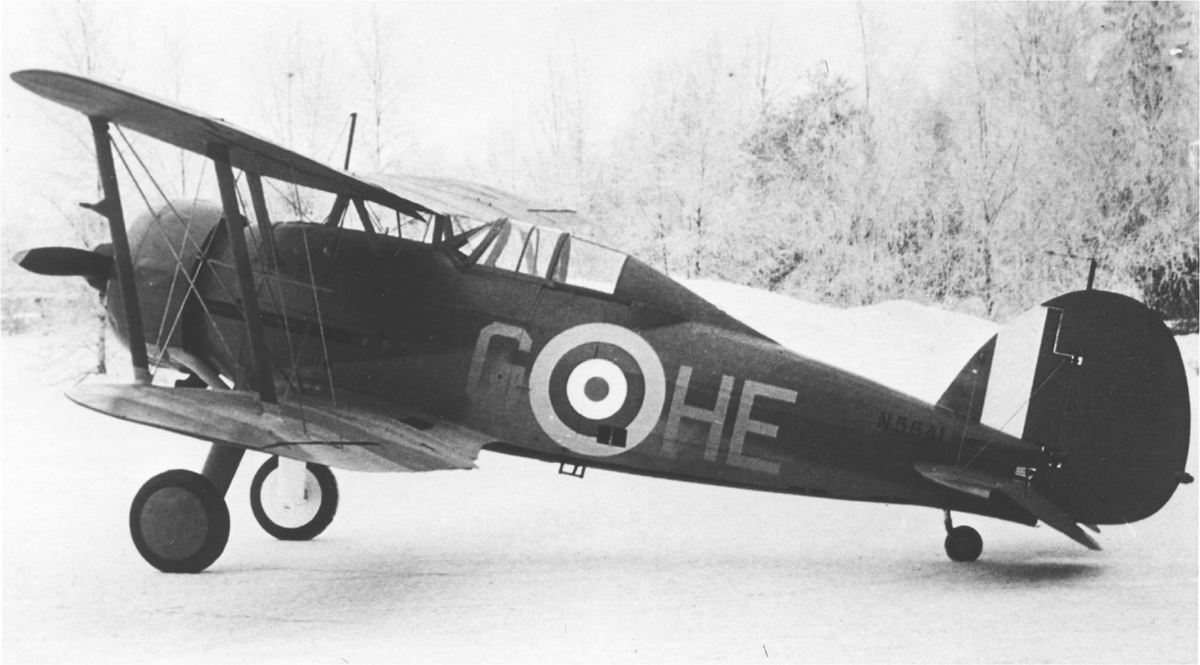
A Gloster Gladiator of 263 Squadron in Norway during the campaign of April 1940. The aircraft were deployed on 24 April, but were overwhelmed by Luftwaffe forces and all had been destroyed by 26 April. (Flintham)
FRANCE
The German invasion of Belgium and the Low Countries on 10 May 1940 was accompanied by a ferocious air campaign against Allied airfields. The BAFF fighter presence, already increased by the addition of 607 Squadron and 615 Squadron, was further reinforced by 501 Squadron on 10 May, followed by 3, 79 and 504 Squadrons; a total of ten Hawker Hurricane squadrons deployed to France. Although these squadrons fought hard and effectively, with pilots flying up to six sorties a day, they were heavily outnumbered and were unable to stop the overwhelming might of the Luftwaffe. One wave of eight Fairey Battles and another wave of 24 Battles were sent to attack German military columns advancing through Luxembourg. These missions were flown at 250ft to avoid Luftwaffe fighters, but at that height the slow-flying aircraft were extremely vulnerable to ground fire: a total of 13 Battles were lost, for negligible results. Six Bristol Blenheim IF long-range fighters from 600 Squadron, operating from Manston, carried out a strafing attack on German aircraft and Fallschirmjäger (parachute troops) at the Dutch airfield at Waalhaven, but once again losses were heavy as five of the Blenheims were shot down by German fighters. Another attack on Waalhaven airfield by Blenheim bombers was more successful and this was followed with a night raid by 36 Wellington bombers. Also that night, nine Whitley bombers were dispatched to attack roads and railways near Geldern, Goch, Kleve and Wesel. During the day, the BEF had advanced to take up a defensive line on the River Dyle in central Belgium and the Blenheim squadrons of the air component had carried out reconnaissance sorties to locate the main thrusts of the German army. Two main thrusts had been identified: one through Luxembourg and the Ardennes and the other centred on Maastricht, where German glider-borne Fallschirmjäger had captured the bridges across the River Maas (Meuse) and the Albert Canal as well as Fort Eben Emael. The following day eight reconnaissance sorties were flown by Blenheims over Maastricht, but the Luftwaffe continued to attack Allied airfields; 114 Squadron lost all of its aircraft in such an attack. A force of eight Fairey Battles from 88 Squadron and 218 Squadron were dispatched against a German column in Luxembourg, but only one aircraft returned from the mission. Bomber Command aircraft were also involved in the day’s actions: Blenheim long-range fighters from 21 Squadron and 110 Squadron attacked troops in the Maastricht area in the afternoon and that night, 36 bombers attacked the transport infrastructure around Mönchengladbach.
By 12 May 1940, the BEF had established positions along the Dyle and the BAFF concentrated operations against the German thrust through Maastricht which was directly threatening the BEF. Nine Blenheim bombers from 139 Squadron carried out a dawn raid on the bridge over the Albert Canal at Vroenhoven on the western outskirts of Maastricht, but the bridge was not hit and seven aircraft were shot down by Luftwaffe fighters. A follow-up raid by 24 Blenheim bombers from 15 Squadron and 107 Squadron was similarly unsuccessful but despite a fighter escort by Hurricanes of 87 Squadron, ten Blenheims were lost. In a final attempt to destroy the canal crossings, five Fairey Battles from 12 Squadron were sent to bomb the bridge at Vroenhoven and another nearby bridge at Veldwezelt. Although the bridge at Veldwezelt was slightly damaged, all five aircraft were shot down. A force of 15 Fairey Battles also attacked German troops near Sedan and despite losing six aircraft, the action helped to delay, albeit temporarily, the German advance. That evening another force of Blenheim bombers from 21 Squadron and 82 Squadron bombed German troop positions to the west of Maastricht, an action which also succeeded in slowing the German advance.
The following day the Blenheims were not used, in an attempt to husband the resources of the RAF in France. However, seven Battles from 226 Squadron were sent to stop German tanks advancing from Breda towards Antwerp. Operating at low level, they could not find any German forces and instead elected to bomb a disused factory building in the southwest suburbs of Breda and thereby block the main road with rubble. It was during this day the Germans had forced a crossing of the River Meuse near Sedan and had broken through the French defences. On the morning of 14 May, a patrol of eight Battles from 103 Squadron, escorted by Hurricanes of 73 Squadron, found and bombed German pontoon bridges over the Meuse near Sedan with some success. Subsequently four Battles of 150 Squadron also bombed the bridges. That afternoon, all bombers available to the BAFF were sent against bridges and troops in the Sedan area. The first wave of 19 Battles (five from 12 Squadron, eight from 142 Squadron and six from 226 Squadron) encountered stiff opposition from anti-aircraft fire as well as Luftwaffe fighters and 11 Battles were shot down. The second wave formed by 11 Battles of 105 Squadron and four from 150 Squadron, with two Blenheims from 114 Squadron and six more from 139 Squadron also suffered heavily: ten Battles and five Blenheims were lost. The final wave of Battles (ten from 88 Squadron, eight from 103 and seven from 218 Squadron) lost nine of their number. After suffering such catastrophic losses, no further missions were mounted by the BAFF, but 30 Blenheims from 21, 107 and 110 Squadrons of Bomber Command carried out an attack in the evening with the loss of seven aircraft. The BAFF Hurricane force had also suffered heavily losing 27 aircraft during the day, but they claimed 38 Luftwaffe aircraft destroyed.
A Bristol Blenheim IV long-range fighter of 248 Squadron over the North Sea in 1940. However, the majority of Blenheims were used as light bombers, equipping some 21 squadrons in Bomber Command, including some of those allocated to the AASF. (RAF Official Photographer/IWM/Getty)
DEVELOPMENTS IN NORWAY & FRANCE
A second expedition by Allied troops to Norway had landed at Harstad in late April. On 22 May, a re-equipped 263 Squadron flew its Gladiators from HMS Furious to Bardufoss, about halfway between Narvik and Tromsø. They were joined four days later by Hurricanes of 46 Squadron, which been flown off HMS Glorious to Skånland. The aircraft carried out intensive operations against Luftwaffe bombers over the next few weeks, including, after the ground campaign faltered, covering the evacuation of Allied forces during the first week of June. The squadrons left Norway on 7 June and landed on HMS Glorious. Unfortunately, all the aircraft and many of the crews were lost when the carrier was attacked and sunk by Scharnhorst on 8 June 1940.
By now the airfields of BAFF were at risk of being overrun. The Air Component was withdrawn to England, from where it could continue to operate more securely and no less effectively, and by 21 May only a handful of Westland Lysanders of 4 Squadron remained in France. Meanwhile the AASF had consolidated its remaining aircraft into six squadrons of Battles: the four remaining aircraft of 105 and 218 Squadrons were redistributed and the nine Blenheims of 114 and 139 Squadrons were transferred to the reconnaissance units of the Air Component. The Battle and Hurricane squadrons had also withdrawn to airfields in the Champagne area near Troyes, from where the Battles were used for night bombing. However, Bomber Command attempted once more to operate by daylight over Belgium: on 17 May, 12 Blenheims from 82 Squadron set out to attack German troops near Gembloux, south of Brussels, but despite a fighter sweep, they were intercepted by 15 Messerschmitt Bf109 fighters and 11 of the Blenheims were shot down.
By 26 May the BEF had started to withdraw towards Dunkirk. With the battlefront in range of fighters based in southern England, the RAF was able to establish a degree of local air superiority over the Calais area. The AASF Battles continued their task of night interdiction, supplemented by Bomber Command’s heavy bombers; Blenheim night fighters of 604 Squadron patrolled over the Channel ports. With sufficient cloud cover or fighter escort, Blenheim bombers were now able to operate by day against enemy troops approaching the frontline. During the evacuation from Dunkirk, between 27 May and 4 June, the RAF operated at maximum effort to protect the troops within the Dunkirk perimeter, however the fighter patrols were frequently overwhelmed by numbers. On 27 May Spitfires from 74 and 610 Squadrons and Hurricanes of 65 and 145 Squadrons fought hard to stop Luftwaffe bombers from reaching Dunkirk, but were outnumbered two-to-one by the escorting fighters. The number of fighter patrols was increased further, sometimes by up to four squadrons, so that there would be a continuous presence over Dunkirk. Over the nine days of the Dunkirk evacuation RAF fighters flew nearly 3,000 sorties in support of the operation as well as a further 650 bombing and 170 reconnaissance sorties.
The three fighter squadrons of the BAFF continued to fight, covering the withdrawal of other units of the BEF towards Nantes. On 7 June, two more Hurricane squadrons, 17 and 242 Squadrons, were sent to France to reinforce the fighter strength. However, by then the Battle of France was lost: the French requested an armistice on 17 June and it was formally signed five days later. The BAFF Hurricane units were all recalled to the UK on 18 June, once the evacuation at Nantes had been completed.
ITALY DECLARES WAR
When Italy declared war on Britain on 10 June 1940, the British response was immediate. After refuelling in the Channel Islands, 36 Whitleys of 10, 51, 58, 77 and 102 Squadrons set off to bomb Turin and Genoa on 11 June, although only 13 aircraft reached their targets because of storms and severe icing over the Alps. Eight Wellingtons from 99 and 149 Squadrons, which had been based forward at Salon, near Marseille, were prevented from taking off by the French authorities that night, but they did fly on 15 June. Unfortunately, once again the weather intervened and only one aircraft attacked its target. The following night four of nine Wellingtons made successful attacks from Salon.
However, it was in the Middle East and East Africa that the Italian threat was felt most acutely: only comparatively light British forces in Egypt stood between the Italian army in Libya and the Suez Canal, and further south in Eritrea the powerful Italian air and naval forces at Massawa presented a direct threat to shipping in the Red Sea en-route to or from the Suez Canal. Eight Blenheims from 45 Squadron carried out an attack on El Adem airfield, near Tripoli, on the morning of 11 June destroying a number of Italian aircraft on the ground. A follow-up attack was carried out in the afternoon by Blenheims of 55 and 113 Squadrons, which, like 45 Squadron, were based at Fuka. Meanwhile in Eritrea, the Wellesleys of 47 Squadron flying from Erkowit and 223 Squadron from Summit attacked the airfields at Gura and Asmara respectively and the Wellesleys of 14 Squadron, operating from Port Sudan, carried out a dusk attack on the naval oil storage facility at Otumlo near Massawa. The following day it was the turn of the Blenheim squadrons at Aden: nine Blenheims from 8 Squadron attacked the airfield at Assab in southern Eritrea and eight aircraft from 39 Squadron bombed the airfield at Dire Dawe in Ethiopia. That day also saw further raids on Gura and Asmara by 47 and 223 Squadrons and in Libya nine Blenheims from 113 Squadron bombed ships in Tobruk harbour.
A Whitley V of 58 Squadron takes off at dusk. The unit was part of the force that bombed Turin and Genoa the night after Italy declared war in 1940. (RAFM)
Over the next few months the bomber squadrons in Sudan and Aden carried out interdiction sorties against Italian forces in Eritrea. The Gladiators of ‘K’ Flight 112 Squadron, based at Port Sudan, and 94 Squadron at Aden also took their toll on Italian aircraft. These units also operated in conjunction with South African Air Force (SAAF) squadrons which were based in Kenya. The Blenheim IVF long-range fighters of 203 Squadron, operating from Aden, were mainly used for convoy escort duties, covering the southern part of the Red Sea; the northern part was covered by Wellesleys (and later Blenheims) of 14 Squadron, which also flew bombing and coastal reconnaissance work over Eritrea. Over Libya, too, the RAF kept the pressure on the Italians, with regular bombing attacks by the Blenheim squadrons; the Gladiator squadrons (33, 80 and 112 Squadrons) also contested air superiority with the Italian Air Force.
THE BATTLE OF BRITAIN
Air attacks on coastal shipping increased as more Luftwaffe units moved to forward bases in France. From early June, there were almost daily combats over convoys in the English Channel between RAF fighters and Luftwaffe bombers escorted by Messerschmitt Bf109 and Bf110 fighters. Southern England was now in range for German bombers and on the nights of 5 and 6 June 1940 a force of around 30 bombers attacked airfields and air defence installations on the east coast of England. However, this development was short-lived: there were no further raids over the next week while the German forces concentrated on the last days of the campaign in France. On 18 June, the day after the French collapse, a force of 18 Blenheims escorted by 24 Hurricanes successfully attacked Luftwaffe aircraft on the ground at Merville airfield and similar operations followed over the next five days against Schipol, Amiens, Rouen and Eindhoven. On 18 June, the Luftwaffe also recommenced its night attacks, which continued for most nights thereafter. These raids, typically comprising 70 bombers, all attacking widely-spaced targets, caused more nuisance than damage. Blenheim IF night fighters from 23 and 29 Squadrons were launched to intercept the raiders, but initially they enjoyed little success. However, Air Intercept (AI) radars became available from mid-July and the first kill using AI was by Fg Off G. Ashfield and Sergeant (Sgt) R. Leyland from the Fighter Interception Unit, who shot down a Dornier Do17Z on the night of 22 July.
If the night raids by the Luftwaffe could be largely dismissed as a nuisance, the same could be said of the RAF’s efforts over Germany. On the night of 15 May 1940, Bomber Command started its strategic campaign against Germany’s means of oil supply and production. That night 96 aircraft, comprising a mix of Wellington, Whitley and Hampden bombers attacked a number of targets in the Ruhr industrial area, near Duisburg and Dortmund. Attacks by similar numbers of aircraft against oil- and transport-related targets then continued on virtually every subsequent night: these mainly covered an arc across northern Germany from the Ruhr to Kiel, but also, on occasions extending as far as Mannheim in the south and Berlin in the east. However, despite these efforts very little damage was done to German industry. Another nightly task was that of laying sea mines in the approaches to the main ports in northern France, the Low Countries and Germany; finally, the Channel ports were bombed by Blenheims and Battles, operating at night. During the week following 21 June 1940, Blenheim squadrons in Bomber Command also started a series of daylight ‘cloud cover’ raids. A force of some 20 would head towards targets in Germany, such as the railway system at Osnabruck or Hamm, but if there was insufficient cloud cover in which to hide from fighters, they were to return to base. However, these tactics proved to be largely ineffectual with few attacks actually being made.
Through the last week of June and the month of July, most of the Luftwaffe’s efforts continued against maritime convoys in the English Channel. Although a number of vessels were sunk, it was not a particularly effective anti-shipping campaign, but it did serve to draw RAF fighters into battle. RAF fighters were in action on most days through June and July and, for example on 10 July, four squadrons (74 Squadron with Spitfires and 32, 56 and 111 Squadrons with Hurricanes) intercepted 24 Do17 bombers, escorted by 30 Bf109 and Bf110 fighters, which were attempting to bomb a convoy. However poor weather limited the Luftwaffe’s efforts for much of the second half of July and the beginning of August. Even so, during the period from 10 July to 10 August, the RAF lost 96 aircraft and the Luftwaffe lost 227, giving a good indication of the ferocity of the combat over the English Channel. One consequence of the fighting over the Channel was the establishment of the Air Sea Rescue (ASR) service at the end of July, using RAF marine craft and Lysanders to rescue downed aircrew.
In 1940, the Hawker Hurricane Mk I formed the backbone of Fighter Command. The first monoplane fighter to enter service with the RAF, the type was powered by a 1,030hp Rolls-Royce Merlin engine and armed with eight Browning 0.303in machine guns. The type was involved in heavy fighting over France and Norway and 34 Hurricane-equipped squadrons were deployed during the Battle of Britain. (Hulton Archive/Getty)
A total of 19 Spitfire-equipped squadrons were involved in the Battle of Britain. A Spitfire Mk I of 611 West Lancashire Squadron makes a low pass over the squadron dispersal area. The unit was part of 12 Group, which was responsible for the defence of the Midlands during the battle, and provided a second line of defence after the front-line units of 11 Group. (Popperfoto/Getty)
An American pilot from 71 ‘Eagle’ Squadron fires the guns of his Hurricane into the butts to check harmonization. Three Eagle squadrons (71, 121 and 133) were formed between September 1940 and July 1941: all were manned by US-born volunteers, many of whom had enlisted in the Royal Canadian Air Force (RCAF) in order to fight for the British. A total of 11 US pilots flew in the Battle of Britain and some 250 served in Eagle squadrons until the units were absorbed into the USAAF in September 1942. (Popperfoto/Getty)
Amongst the tasks allocated to Coastal Command aircraft was that of escorting convoys, for protection against submarines or against long-range patrol aircraft. In the Western Approaches the longer-range Sunderlands and Whitleys, which had replaced some of the Ansons, could carry out this duty, but shipping in much of the eastern Atlantic was still beyond the range of land-based air cover. The basing of 98 Squadron equipped with the Fairey Battle in Iceland in July 1940 proved prescient, for although the Battles were singularly unsuitable for maritime work, the precedent had been set for longer-range aircraft eventually to be based there and to reach further into the mid-Atlantic. Bristol Blenheims of Coastal Command were used to attack German airfields in Norway, although not always with great success: on 9 July, 12 Blenheims from 21 and 57 Squadrons attacked the airfield at Stavanger, but seven of the aircraft were shot down. Apart from convoy escort, the Blenheims, along with Hudsons and Whitleys, were used for coastal reconnaissance around the eastern rim of the North Sea and a newly-formed specialist unit, 1 Photographic Reconnaissance Unit (PRU), ranged over Norway, Germany and France with camera-equipped Spitfires. One particular responsibility for these aircraft was to monitor the build-up in the Channel ports of troop-carrying barges, which were intended to convey the German invasion force to England.
Flt Lt E.S. Lock DSO, DFC* was the highest scoring RAF fighter pilot during the Battle of Britain. By the time he was killed by ground fire during a fighter sweep over France in August 1941, Eric ‘Sawn-off’ Lock, from Shropshire, had shot down 26 enemy aircraft and had become a household name as the leading ‘fighter ace’ in the RAF. (J.A. Hampton/Hulton Archive/Getty)
After delays because of inclement weather, the main German attack on the UK opened on 12 August 1940. An initial simultaneous strike by Bf110 fighter-bombers on four Chain Home (CH) radar stations was followed by large formations of Junkers Ju88 bombers, heavily escorted by Bf109 and Bf110 fighters, which attacked the CH station at Ventnor, as well as the airfields at Manston, Lympne and Hawkinge. Despite being intercepted by RAF fighters, the main bomber raids caused considerable damage to their targets. That evening was the turn of Bomber Command to strike back at Germany: 11 Hampdens from 49 and 83 Squadrons successfully bombed the aqueducts on the Dortmund–Ems Canal near Munster, denying its use for transporting invasion barges to the coast. The following morning two daylight raids were conducted by Blenheims against enemy-held airfields at Jersey (by 114 Squadron) and Aalborg (by 82 Squadron). Unfortunately, 11 of the 12 aircraft from 82 Squadron were shot down. The Luftwaffe continued its attacks in the afternoon with large formations of Junkers Ju87, Ju88 and Do17 bombers, which were, as usual, heavily escorted by fighters. Although severe damage was done to the docks at Southampton and the Coastal Command airfield at Detling, most of the raids missed their objectives after the bombers were split up by the Hurricanes of 43, 56, 87, 111, 151, 213, 238, 257 and 601 Squadrons and Spitfires of 74, 152 and 609 Squadrons. A night raid by He111 bombers against the Spitfire factory at Castle Bromwich that evening was little more successful. That night, too, Bomber Command dispatched 32 Whitleys from 10, 51, 58 and 102 Squadrons to bomb aircraft factories in Milan and Turin.
Spitfire Mk Is of 610 County of Chester Squadron on patrol during the summer of 1940. Based at Biggin Hill, Kent the squadron saw combat over Dunkirk and also as a front-line unit during the Battle of Britain. (Past Pix/SSPL/Getty)
There was less activity on 14 August, with just two raids by Luftwaffe bombers, but 15 August marked the heaviest attacks yet made on mainland Britain by the Luftwaffe. In the first major raid of the day a large formation of 60 Ju87 dive-bombers attempted to bomb Hawkinge and Lympne airfields. They were intercepted over Hawkinge by Hurricanes of 501 Squadron and Spitfires of 54 Squadron and that attack was largely ineffective, although Lympne was put out of action for two days. The next attack was delivered from the North Sea, by 63 He111 bombers escorted by 21 Bf110 fighters, which had taken off from bases in Norway. The formation was first intercepted over the Farne Islands by Spitfires from 72 Squadron and later Spitfires of 41 Squadron and Hurricanes from 79 and 605 Squadrons. The Luftwaffe formation suffered heavy losses, including one third of the Bf110 escorts, and it was completely broken up. As the bombers headed back to Norway, they were engaged by a flight of Blenheims from 235 Squadron which were on a shipping strike, and a Blenheim accounted for another He111. The day’s third raid also came from across the North Sea, this time made up of 50 unescorted Ju88 bombers from Aalborg. Despite being intercepted by Spitfires of 616 Squadron and Hurricanes of 73 Squadron, who shot down seven, the raiders were able to attack the bomber airfield at Driffield where they destroyed ten Whitleys on the ground. Meanwhile, in the south, another strike by high-speed Bf110 fighter-bombers wrought considerable damage at Martlesham Heath. This was shortly followed by 88 Do17 bombers closely escorted by more than 130 Bf109 fighters, supported in turn by a further fighter sweep of more than 60 Bf109 fighters, which approached Deal in mid-afternoon. This large formation was intercepted by Spitfires of 64 Squadron and Hurricanes of 111 and 151 Squadrons, but with such a powerful escort, the bombers were almost invulnerable and they were able to deliver a devastating attack against the Short Brothers seaplane factory at Rochester. Two more raids by Ju87 and Ju88 bombers, over the Isle of Wight and further to the west at Portland, were met by eight RAF fighter squadrons, while in the last raid of the day Bf110 fighter-bombers and Do17 bombers attacked Croydon and West Malling respectively before being caught by Hurricanes of 32 Squadron. By the end of the day, the Luftwaffe had done very little damage to any of Fighter Command’s airfields and the RAF claimed to have shot down 182 German aircraft. Although the actual figure was 76 aircraft, it was, nevertheless, an impressive total.
The next day brought more heavy raids throughout the day, which saw a total of 15 squadrons from Fighter Command in action. Although the Luftwaffe made successful attacks on a number of airfields, albeit at a high cost in aircraft lost, once again very few of these were fighter bases. There was some respite on 17 August, with no major raids, but the Luftwaffe did return in force on 18 August. Attacks on Biggin Hill and Kenley were intercepted by Hurricanes of 32 and 111 Squadrons and Spitfires of 64, 610 and 615 Squadrons. While little damage was caused at Biggin Hill, Kenley was extensively hit and the sector operations room was put out of action temporarily until it could be re-established locally in a disused butcher’s shop. A short time later, a large force of Ju87 and Ju88 dive bombers appeared over the Isle of Wight. The Ju88 force bombed the airfields at Gosport, Ford and Thorney Island, but the Ju87 formation concentrated on the CH station at Poling. Here they were intercepted by the Hurricanes of 43 and 601 Squadron and Spitfires of 152, 234 and 602 Squadrons, who shot down 16 of the 28 Junkers Ju87s. This was the last occasion that the Ju87 was used during the Battle of Britain. Another evening raid was successfully broken up by RAF fighters before it could do any damage and by the end of the day 71 Luftwaffe had been shot down for the loss of 27 RAF aircraft.
A Short Sunderland I flying boat of 95 Squadron undergoing servicing at Pembroke Dock, Wales. In early 1941, the squadron moved to Freetown, Sierra Leone to provide anti-submarine cover for the shipping routes off west Africa. (Hulton-Deutsch/Corbis/Getty)
For the next five days the weather intervened, curtailing the German offensive, but 24 August marked the start of 14 days of daily large-scale raids. These were concentrated against the airfields of Fighter Command and although the airspace was hotly contested each day by RAF fighters, much destruction was wrought at North Weald (24 August and 3 September), Debden (26 August), Hornchurch (24 and 30 August and 2 September) and Biggin Hill (30 August and 1 September). On the night of 24 August, a number of Luftwaffe aircraft bombed London, with the result that Bomber Command was ordered to carry out a retaliatory raid on Berlin the next night. A force of 12 Hampdens from 61 and 144 Squadrons, 14 Whitleys from 51 and 78 Squadrons and 17 Wellingtons from 99 and 149 Squadrons bombed targets in Berlin on the night of 25 August and further raids followed on subsequent nights.
On 7 September, the Luftwaffe switched its focus from the UK’s air-defence system to bombing London itself. On the afternoon of that day a single raid of almost 1,000 aircraft attacked dockyards, gasworks and power stations in London, followed by more attacks through the night. The following day was relatively quiet, until the evening, when Luftwaffe night bombers resumed the assault on London. Bomber Command aircraft were also active that night over the Channel ports, where they attacked concentrations of invasion barges: on 8 September, these attacks were prosecuted by 76 aircraft including Battle, Blenheim, Whitley and Wellington bombers. Over the next few days the intensity of Luftwaffe attacks on Britain decreased, influenced largely by the weather, but on 15 September two large air armadas were dispatched to bomb London. In both cases, they suffered serious losses when they were intercepted by strong forces of nearly 200 RAF fighters and they were unable to deliver their attacks. On this day, the RAF claimed to have shot down 185 Luftwaffe aircraft and although, once again the real figure was somewhat lower (56 aircraft), the losses were enough to dissuade the Germans from further large-scale daylight bombing. For the remainder of the month, daylight operations by the Luftwaffe were limited to high-level fighter sweeps in the hope of drawing RAF fighters into combat, but there were also some daylight bombing raids on London, Southampton and Bristol. However, night bombing by both sides continued unabated: Luftwaffe bombers raided dockyards at Merseyside and London and the RAF intensified the campaign against the invasion barges, launching nearly 200 aircraft on the night of 17 September and maintaining the effort each night until the end of the month.
The Martin Maryland was used as a photo-reconnaissance aircraft by 431 Flight from its base on Malta. The unit played a vital role in the preparations for the attack on ships of the Italian fleet, moored in Taranto, by Fleet Air Arm aircraft in November 1940. (RAFM)
MALTA & GREECE
Until June 1940 there were no fighters permanently based in Malta, but four Gladiators were acquired from the Fleet Air Arm (FAA) early that month. These aircraft were ready to face an attack by the Italian Air Force on 11 June and they continued to defend the island against the daily attentions of Italian aircraft based in Sicily for the rest of the year. The seaplane station at Kalafrana also became a forward operating base for the Sunderlands of 228 and 230 Squadrons from Alexandria and within three days of this arrangement 230 Squadron had sunk two Italian submarines. Malta was further reinforced during the next few months with Hurricanes of 261 Squadron and three Martin Maryland reconnaissance aircraft, which became 431 Flight. The island was also used as a base for Wellingtons, firstly for Egyptian-based aircraft to bomb southern Italian ports, including Naples, on the night of 31 October, and secondly for 148 Squadron, which formed on the island in December 1940. On 10 and 11 November, the Sunderlands of 228 Squadron and the Marylands of 431 Flight carried out the reconnaissance necessary for a successful strike by FAA Fairey Swordfish against the Italian fleet at Taranto. German forces arrived in the Mediterranean theatre in early January 1941 and Luftwaffe aircraft operating from Sicily started bombing attacks against Malta from 9 January. RAF Wellingtons replied to these by bombing the Sicilian airfields on 12 and 15 January.
A Spitfire Mk VB of 222 Squadron based at North Weald. Deliveries of this version began in early 1941 and the improvements introduced included a 1,440hp Rolls-Royce Merlin 45 series engine and improved armament comprising two 20mm cannon and four .303in Browning machine guns. (IWM/Getty)
When Italy invaded Greece in late October 1940, the Blenheim IF aircraft of 30 Squadron and Gladiators of 80 Squadron were sent from Egypt to reinforce the Greek Air Force. These were soon followed by the Blenheims of 84 and 211 Squadrons, which flew interdiction sorties against targets near the Adriatic ports of Durazzo and Valona. In that time, the Gladiator pilots of 80 Squadron claimed to have shot down 42 Italian aircraft for the loss of only six of their own aircraft.
A section of three Wellington Mk ICs of 37 Squadron, one of three long-range bomber units in the Middle East in late 1940. Eventually the force would grow to 12 squadrons. The Mk IC was also used successfully as a torpedo bomber over the Mediterranean. (Flintham)
THE BLITZ & THE OFFENSIVES IN LIBYA & ERITREA
In late 1940 the Luftwaffe campaign against Great Britain consisted mainly of sporadic but widespread small-scale raids by fighter-bombers during daylight hours and a concerted bombing campaign against London and the major industrial centres at night. London was a frequent target for night attacks, but other targets attacked between October 1940 and May 1941 included Birmingham, Coventry, Swansea, Southampton, Hull, Glasgow, Belfast, Newcastle, Plymouth and Portsmouth. Initially Fighter Command’s night fighter force, few in number and poorly equipped, enjoyed little success against the night bombers. More squadrons were formed and some of the day squadrons were re-rôled so that at the beginning of 1941 there were eight specialist night units equipped with the Bolton-Paul Defiant (85, 96, 141, 151, 255, 256, 264 and 307 Squadrons) and four with Bristol Beaufighters (25, 29, 219 and 604 Squadrons). These aircraft were also equipped with an Air Intercept (AI) radar. The last large-scale night raid by the Luftwaffe was against London on 10 May.
After advancing into Egypt in September 1940, the Italian army had stopped after a short distance at Sidi Barani. Over the next few months the British forces in Egypt prepared to eject them. The RAF, which had been diluted by sending aircraft to Greece, was reinforced by two Wellington squadrons (37 and 38 Squadrons) and the Hurricanes of 73 Squadron, which arrived via Takoradi in West Africa. The Blenheims of 11 and 39 Squadrons were recalled from Aden and those of 45 Squadron from Sudan, restoring the air forces available in Egypt to their ‘pre-Greece’ levels. The offensive started with air attacks on the Italian airfields at El Adem by Blenheims on 4 December, Castel Benito by Wellingtons on 7 December and Bennina by Blenheims on the same day. The ground campaign started at dawn on 8 December, supported by aircraft including the Hurricanes of 33 Squadron, which carried out strafing attacks against Italian transport 50 miles inside Libya. By 16 December the Italians had been pushed back into Libya, but buoyed with success, and in the face of a full-scale Italian retreat, the British and Dominion forces carried on into Cyrenaica, pushing the Italians back beyond El Agheila.
A Boulton Paul Defiant of 264 Squadron. During the early days of World War II, the type proved to be a failure as a day fighter, but was used successfully as a night fighter, eventually equipping 13 squadrons. (Corbis/Getty)
Red Sea convoy protection occupied the Blenheims of 8 Squadron operating from Aden during the autumn of 1940. The squadron still had a flight of Vickers Vincents on charge and these were needed for policing duties during an insurrection by disaffected tribes in the north of the protectorate during October. In Eritrea, Kassala was retaken on 18 January 1941 and the Blenheims of 14 Squadron and Wellesleys of 47 and 223 Squadrons supported the army’s advance towards the natural stronghold at Keren. During the Battle of Keren, which opened on 15 March, all three squadrons’ aircraft bombed Italian troop and artillery positions on the battlefield. Keren fell on 27 March and the campaign in East Africa ended in early April.
ON THE OFFENSIVE
As the ‘Blitz’ over Britain continued into the first half of 1941, Fighter Command’s night fighter force adapted and improved. Ground Control Intercept (GCI) sites were established and the monthly number of night fighter kills increased from just three enemy bombers in January 1941 to 96 by the end of May. One Blenheim fighter unit, 23 Squadron, flew in the night intruder role, patrolling enemy airfields in France and engaging Luftwaffe aircraft as they returned from missions. The day fighter squadrons also flew offensive sweeps over France (known as ‘Rhubarbs’); these were periodically interspersed with large-scale fighter escorts for Bomber Command Blenheims in operations known as ‘Circuses.’ In early 1941, a typical circus might comprise six Blenheims escorted by around 70 fighters. However, neither rhubarbs nor circuses proved to be effective in their aim of shooting down Luftwaffe fighters and it was the RAF’s fighter losses that increased: by the end of 1941, four RAF fighters were being lost for every German aircraft shot down. Meanwhile, Bomber Command continued its offensive activities: every night the Hampden, Wellington and Whitley squadrons as well as some Blenheim units targeted Germany’s oil production and transportation. The Blenheim day bomber and Coastal Command units were also used for daily anti-shipping patrols off the Dutch, German and Norwegian coasts.
In the year since the start of the war, the RAF had more than doubled its squadron strength. Some of the extra manpower came from displaced Europeans and a significant amount came from the Dominions. Poles, Czechs and Frenchmen had fought in the Battle of Britain and Canadians, Australians and New Zealanders served both in RAF units and in squadrons from their own countries’ air forces. In North Africa, the RAF was reinforced by SAAF squadrons and in the Far East the Royal Australian Air Force (RAAF) provided squadrons for the defence of Singapore.
GREECE, LIBYA, IRAQ, CRETE & SYRIA
The presence of German army units in Bulgaria in early 1941 resulted in the dispatch of a British Expeditionary Force (BEF) and further RAF units from Egypt to Greece: the Blenheims of 11 and 113 Squadrons and Hurricanes of 33, 112 Squadrons and Lysanders (plus a flight of Hurricanes) of 208 Squadron arrived in Greece in March. A detachment of Wellingtons from 37, 38 and 70 Squadrons was also sent to join them. The Greek campaign was short-lived after the German invasion of Yugoslavia on 6 April. Despite the best efforts of the Blenheim and Wellington crews, an opportunity to destroy German columns at the choke point in the Monastir Gap between 7 and 11 April was frustrated by poor weather. The Luftwaffe took its toll of aircraft, too: on 13 April, all six of a formation of Blenheims from 211 Squadron was shot down and two days later all of 113 Squadron’s Blenheims were destroyed on the ground at Niamata. British forces started an evacuation to Crete on 21 April and the last Hurricanes left three days later.
The German Afrika Korps retook El Agheila at the end of March 1941 and swiftly pushed the British forces, which had been weakened by having to reinforce Greece, back to the Egyptian border. The garrison at Tobruk held out against attack and it was bypassed by the Afrika Korps; the Hurricanes of 6 and 73 Squadron remained at the airfield for the first month and were able to establish air superiority over the enclave, defending the garrison against Luftwaffe bombing attacks and, along with the Blenheims of 45 Squadron, attacking the investing forces. The Hurricanes were withdrawn in April, but retained a forward operating base at Sidi Barani. The loss of Cyrenaica put Tripoli beyond the range of bombers based in Egypt, so the Wellingtons of 148 Squadron were moved forward again to Malta. Another arrival in Malta at the end of April was 21 Squadron, whose Blenheims were pressed into service for anti-shipping strikes.
A Bristol Bombay transport aircraft of 216 Squadron. Some 50 were built and most saw service in the Middle East. The Bombay could carry 24 troops and also be used as a bomber.
When a coup on 3 April 1941 in Iraq installed Rasid Ali, a pro-German agitator, in power, the British forces acted swiftly: 400 troops of the King’s Own Royal Regiment were flown from Karachi to Shaibah by Vickers Valentias and Douglas DC2s of 31 Squadron. However, the RAF station at Habbaniya, base to 4 Flying Training School (FTS), was besieged by the Iraqi Army. The FTS’s training aircraft comprising Hawker Audaxes, Fairey Gordons and Airspeed Oxfords were modified to carry 20lb bombs and divided into four bombing squadrons. A flight of Gladiators and ten Wellingtons from 37 Squadron were sent from Egypt to reinforce Habbaniya and ten Wellingtons from 70 Squadron were despatched to Shaibah. At dawn on 2 May the 4 FTS aircraft, supported by the Wellingtons, made a pre-emptive strike on the besieging Iraqis. Over the next four days a fierce battle raged. The force at Shaibah was further reinforced by more Wellingtons from 37 Squadron as well as Blenheim fighters of 203 Squadron. The transport aircraft of 31 Squadron were used to airlift troops from Shaibah to Habbaniya and to evacuate families and dependents on the return leg. The Wellingtons were replaced by Blenheims from 84 Squadron and Hurricanes and more Gladiators from 94 Squadron and there was further reinforcement of troops flown in by 216 Squadron’s Bristol Bombays. Armoured cars of 2 ACC were also sent as reinforcements. After a short campaign the Iraqi revolt was put down and the pro-British government was restored on 1 June.
The German invasion of Crete started on 20 May 1941 and airborne forces were soon able to establish a bridgehead at the airfield of Maleme on the west of the island. All RAF aircraft had been recalled from Crete in the second week of May, so it was left to the Blenheims of 14, 45 and 55 Squadrons, operating at the extremes of their range from Egypt, to bomb the enemy positions and aircraft during the day. At night, it was the turn of the Wellingtons of 37, 38 and 70 Squadrons. All of these units carried out operations over Crete for the next week, but they were unable to stem the flow of German troops and supplies into Crete and the island was evacuated on the nights of 29 and 30 May.
A Bristol Beaufort in service with 217 Squadron. The type was the main torpedo bomber used by the RAF and equipped five squadrons in the UK and three in the Middle East. (Hulton Archive/Getty)
Inspired by German successes, the Vichy French administration in Syria began to court the Germans, with the result that a force was sent to neutralize the French forces in Syria. Ground operations started on 8 June, supported by Hurricanes from 70 Squadron and Blenheims of 11 and 84 Squadrons, later augmented by 45 Squadron. The Blenheims bombed airfields, barracks and military objectives, including a precision attack by the Blenheims of 11 Squadron on the Governor’s residence in Beirut. After a short but hard fought campaign, the Vichy surrendered on 14 July.
BATTLESHIPS, U-BOATS & BOMBERS
After a two-month cruise in the Atlantic, the German battleships Scharnhorst and Gneisenau arrived in Brest harbour for repairs on 22 March 1941. Over the next two weeks Bomber Command mounted a number of attacks on the ships, without hitting them. However, in a suicidal attack, a Bristol Beaufort of 22 Squadron, flown by Fg Off K. Campbell, hit and severely damaged Gneisenau with a torpedo. Gneisenau was further damaged by four direct hits four days later. On 18 May, the battleship Bismarck, accompanied by the cruiser Prinz Eugen, broke out from Norway. After being caught and unsuccessfully engaged by naval forces, contact was lost seven days later. However, a Consolidated Catalina of 209 Squadron located Bismarck on 26 May and the ship was sunk the following day; meanwhile Prinz Eugen escaped to Brest. In another development, the cruiser Lützow (formerly Deutschland) was located on 13 June off the Norwegian coast by a Beaufort of 42 Squadron, which successfully hit the vessel with its torpedo, causing extensive damage.
More raids were flown against the ships in Brest and Prinz Eugen was hit (with a single bomb) on the night of 1 July. Scharnhorst, which had completed its repairs, left Brest on 21 July, but was located by a reconnaissance Spitfire the following day. On 24 July, a mass daylight raid on Brest was carried out by a force of 100 Wellington and Hampden bombers, plus three Boeing B-17 Fortress from 90 Squadron. This raid provided some diversion for the 15 new Handley Page Halifax bombers of 35 and 76 Squadrons which bombed Scharnhorst in its new dock at La Pallice (La Rochelle), scoring five hits on the ship for the loss of five bombers. As a result, Scharnhorst returned to Brest for further repairs.
With the major proportion of the Kriegsmarine’s (German Navy) capital ships languishing in Brest, the twin threats facing Allied shipping in the Atlantic were land-based aircraft (and in particular the Focke-Wulf Fw200 Condor) and U-boats. At the beginning of the war, the Royal Navy had taken responsibility for anti-submarine warfare, but as Coastal Command relearnt the lessons of World War I, while also doubling in size and re-equipping with more suitable aircraft, so more of that responsibility could be assumed by aircraft. Basing three coastal squadrons, the Sunderlands of 95 and 202 Squadrons and Hudsons of 200 Squadron, at Banjoul, Gambia in mid-1941 effectively curtailed activities by U-boats off the coast of West Africa. Additionally, the Very Long Range Aircraft, in the shape of the Consolidated B-24 Liberator which entered service with 120 Squadron in June 1941, could operate from Iceland and thereby close the ‘Greenland Gap’ between air cover from land-based aircraft flying from the mainland UK and Newfoundland. The introduction of Air-Surface Vessel (ASV) radar also improved the ability of Coastal Command’s aircraft to locate U-boats on the surface. Beaufighters, first issued to 252 Squadron in late 1940, were also an effective counter against German aircraft. Protection from long-range patrol aircraft would be eventually provided by escort carriers, but an interim measure was the introduction of Catapult Aircraft Merchant Ship (CAM ship), merchant vessels which carried a single Hurricane which could be launched, with the aid of a rocket-assisted catapult, to intercept enemy aircraft. After engaging the enemy, the Hurricane would ditch in the sea. There were nine operational launches of Hurricanes from CAM ships between August 1941 and July 1943, resulting in eight kills as well as a number of enemy aircraft being successfully driven off.
Daylight raids by the Blenheims of Bomber Command continued through the second half of 1941, including attacks against Bremen on 4 July and Rotterdam on 16 July and, by 54 aircraft drawn from 18, 82, 107, 114, 139 and 226 Squadrons escorted by Westland Whirlwinds of 263 Squadron, on two power stations near Cologne 12 August. However, while these attacks achieved some success, they did so at an unsustainable loss rate of over 20 percent. The night bomber force was less vulnerable to German defences, but its accuracy was questionable: an investigation published in August 1941 by Mr D.M. Bensusan-Butt reported the shocking statistic that of all aircraft tasked against a target, on average only 20 percent of crews would manage to drop their weapons within five miles of the actual target. Indeed, post-raid photographs by 1 PRU aircraft of Mannheim and Gelsenkirchen confirmed that little damage was being done to the intended targets. Perhaps the only result of night bombing in 1940–1941 was to ensure that the Germans had an efficient night fighting capability by the time that Bomber Command ramped up its offensive in the following years.
A Douglas Havoc I (also known as the ‘Moonfighter’) night intruder of 23 Squadron. The aircraft was originally delivered to the RAF as Boston II light bomber. The Havoc was used to patrol over Luftwaffe airfields at night, and attack enemy aircraft as they returned to their home base. (23 Squadron Archive)
RUSSIA
Two squadrons of Hurricanes (81 and 134 Squadrons) were sent to Russia in September 1941 to show solidarity with the Soviets against the Germans and to assist in the defence of Murmansk. After flying from HMS Argus, the Hurricanes operated from Vaenga airfield from 11 September until 18 October and shot down a number of Luftwaffe aircraft. The Hurricanes were then handed over to the Soviet Air Force.
OPERATION CRUSADER & NORTH AFRICA
In the days leading up to the start of Operation Crusader in North Africa on 18 November 1941, Wellingtons from Middle East Command bombed the port areas in Benghazi and Tripoli, while the Blenheim squadrons attacked airfields and storage dumps. Hurricanes and Curtiss Tomahawks had already achieved air superiority over the battlefront, which had prevented Luftwaffe reconnaissance aircraft from observing evidence of an imminent offensive and now gave RAF aircraft some degree of freedom to operate over the battlefield. These included six Wellingtons from 109 Squadron which were equipped with electronic jamming equipment which was intended to interfere with the Afrika Korps’ tank radio nets. Apart from providing escorts for Blenheims, the fighter aircraft also doubled as fighter-bombers, attacking troops and transport in the enemy’s immediate rear areas. Because of the difficulties co-ordinating Close Air Support, once the ground offensive began the Blenheims generally operated against targets 50 miles beyond the advance. On 25 November, repeated attacks by Blenheims succeeded in repelling a counter-thrust by 21.Panzer Division in the area of Sidi Omar. By Christmas the Afrika Korps had pulled back to Ajdedabia and Cyrenaica was once more in Allied hands.
Hawker Hurricanes of 134 Squadron at Vaenga airfield, Murmansk in autumn 1941. The aircraft were flown by RAF pilots for two months before being handed over to the Soviet Air Force. (Sheppard)
After the successful re-conquest of Cyrenaica at the end of 1941, the tables were turned in January 1942. Having been resupplied by sea, the Afrika Korps started a surprise counter-offensive on 21 January. Despite being diluted from supplying squadrons to reinforce the Far East, the RAF aircraft were able to establish air superiority over the battlefield but the momentum of the German advance carried them forward. By 14 February the 8th Army had withdrawn to a defensive line at Gazala, to the west of Tobruk.
Curtiss P-40 Tomahawks, being ferried on the ‘Takoradi Route’ from West Africa to Egypt. The aircraft were shipped to Takoradi in crates, then assembled and flown across Africa. Four RAF squadrons in the Desert Air Force equipped with the Tomahawk served in the ground-attack role.
In the first months of 1942 Malta was the target for heavy bombing by the Luftwaffe. By March the German raids frequently numbered more than 200 bombers and in that month over 2,000 tons of bombs were dropped on the island. The defenders were able to shoot down a respectable number of raiders, but on occasions their own losses meant that on some days only a handful of aircraft remained serviceable. On 20 April, 47 Spitfires were flown into Malta from the USS Wasp and the following month another 62 arrived. The German attacks started to slacken in mid-May.
A Bristol Blenheim IV of 14 Squadron over the Western Desert. The light bombers of the Desert Air Force proved very effective in supporting the army during the Operation Crusader offensive in late 1941; they were also instrumental in holding back the Afrika Korps long enough for the army to regroup during the forthcoming German offensive. (14 Squadron Association)
SINGAPORE & BURMA
In late 1941, the RAF presence in Malaya comprised three Squadrons of Blenheims (27, 34 and 62 Squadrons), 243 Squadron with Brewster Buffaloes, two Squadrons of Vickers Vildebeests (36 and 100 Squadrons) and 205 Squadron with Catalinas. These units were reinforced by four RAAF squadrons equipped with Buffaloes and Hudsons and by 488 Squadron RNZAF, also equipped with Buffaloes. In addition, 60 Squadron, equipped with Blenheims, and 67 Squadron with Buffaloes were based in Burma near Rangoon.
The Japanese attack on the US fleet at Pearl Harbor on 7 December 1941 marked the start of the war in the Far East, but it was only one of a number of simultaneous strikes across the Pacific Rim. The previous day a Hudson of 1 Squadron RAAF detected two large Japanese convoys heading towards Malaya, but the convoys could not be found by later reconnaissance sorties. On 8 December, Japanese troops started landing near Kota Bharu on the northwest coast of Malaya. At dawn and in heavy tropical rain, the Vildebeests of 36 and 100 Squadrons attempted to attack a Japanese cruiser but were unsuccessful. However, the landing ships were attacked through the day by RAAF Hudsons as well as Blenheims from all four RAF squadrons in the region. The Allied airfields were also subject to heavy assault by Japanese aircraft and many of the Allied aircraft were destroyed on the ground. Singapore city was also bombed. On the following day, a much-depleted force of Blenheims attacked the airfield at Singora (Songkhla) on the eastern coast of Thailand, where considerable damage was wrought amongst Japanese aircraft. A follow-up raid was itself disrupted by a Japanese air raid at Butterworth which destroyed all but one of the Blenheims on the ground. The remaining Blenheim flown by Sqn Ldr A.K.S. Scarf carried out its mission alone.
A Handley Page Halifax Mk II of 405 Squadron, RCAF being prepared for a bombing mission over Germany. The type was the second four-engined bomber to enter RAF service, the first being the Short Stirling. Over 6,000 of the type were built and saw wartime service with Bomber Command, Coastal Command and in the Middle East. (Hulton Archive/Getty)
A flight of Brewster Buffalo fighters of 243 Squadron flying over Singapore harbour in late 1941. The US-built Buffalo was hopelessly outclassed in combat by the Japanese Mitsubishi A6M Zero-Sen. (RAFM)
Over the next fortnight, the handful of remaining aircraft fought fiercely with the Japanese forces advancing relentlessly on Singapore. In mid-December, the first reinforcements from the Middle East arrived in the shape of five Blenheims. Meanwhile, part of the Japanese force in Thailand had swung northwards into Burma. Like Singapore, Rangoon also began to be subjected to a concerted bombing campaign by Japanese aircraft, but attacks against the Burmese capital were met by the Buffaloes of 67 Squadron and also the Curtiss P-40s of the American Volunteer Group, also known as the ‘Flying Tigers.’
Fund-raising schemes were set up in Great Britain and across the Empire to raise money to assist in the purchase of new military aircraft. Bristol Blenheim, serial number Z6372, was paid for by the Gold Coast Spitfires Fund; after being flown across Africa on the ‘Takoradi Route’ it was delivered to 60 Squadron in India.
A force of 50 Hurricanes, including those of 258 Squadron, arrived in Singapore in January 1942 and these first saw action on 20 January when they shot down eight bombers over Singapore; unfortunately, subsequent raids were escorted by Mitsubishi A6M Zero fighters, which were superior in performance to the Hurricane. A number of Hudsons also arrived and these were taken on by 62 Squadron. On 21 January, further Japanese landings were reported at Endau, approximately 100 miles north of Singapore. Nine Vildebeests from 100 Squadron and three from 36 Squadron carried out a torpedo attack on the Japanese ships, but lost five of their number and a second raid by nine Vildebeests and three Fairey Albacores resulted in the loss of another seven aircraft. The Japanese had also landed in Burma in mid-January. However, an attempt by the Japanese to gain air superiority over Rangoon was thwarted by the combined efforts of 67 Squadron and the Flying Tigers.
Further reinforcements from the Middle East arrived at the end of January 1942: Burma was bolstered by two squadrons of Blenheims (45 and 113 Squadron) and three of Hurricanes (17, 135 and 136 Squadrons). By now the handful of aircraft in Singapore had been withdrawn to Sumatra, where they were joined by 84 and 211 Squadrons with Blenheims and by 232, 242 and 605 Squadrons, which had flown their Hurricanes off HMS Indomitable. From a jungle airfield at ‘P2’ near Palembang successful attacks were flown against Japanese invasion force on 14 and 15 February, and although this action temporarily halted the landings near Palembang, it only delayed the inevitable. Sumatra was evacuated on 18 February and the much-reduced force of 18 serviceable Hurricanes, 12 Hudsons, six Blenheims and two Vildebeests moved to Java. Here the defence of Batavia (Jakarta) continued until 6 March, when resistance in Java capitulated.
A Short Stirling Mk I from 7 Squadron. The type was the first four-engined bomber to enter service with the RAF. Eventually 12 squadrons would be equipped with the Stirling, but it lacked performance and was never as operationally successful as the Halifax or Lancaster. (RAFM)
BATTLESHIPS AGAIN
Late on 11 February 1942, the Scharnhorst, Gneisenau and Prinz Eugen left Brest and over the course of the next day sailed through the English Channel to Kiel. The German Navy was fortunate in crossing two standing patrol lines by Hudsons while the aircraft were on their outbound leg or while their ASV equipment was not working, and the presence of the German vessels was not detected until late morning. The weather was poor, with a cloud base of 700ft, and a succession of attacks by aircraft throughout the day failed to achieve any hits. All six FAA Fairey Swordfish, which made the first attack, were shot down and subsequent attacks by Beauforts from 42, 86 and 217 Squadrons were also unsuccessful. Some 240 bombers were also launched during the course of the day, of which 39 attacked the German flotilla, but none achieved hits. Ironically both Scharnhorst and Gneisenau were damaged by mines as they neared Kiel: mine-laying was seen as a low priority by Bomber Command and yet it was one of the most effective roles carried out by its aircraft. On 26 February Gneisenau was seriously damaged when it was hit by bombs during a raid on Kiel and the ship saw no further action during the war.
Meanwhile the battleship Tirpitz was discovered by a Spitfire of 1 PRU, in Åsenfjord near Trondheim. A mission by seven Short Stirlings from 15 and 149 Squadrons and nine Handley Page Halifaxes from 10 and 76 Squadrons on 30 January was foiled by bad weather. Later raids by a mixed force of Halifaxes from 10, 35 and 76 Squadrons and Avro Lancasters from 44 and 97 Squadrons on 30 March, 27 and 28 April fared no better, partly because of weather conditions and partly because of effective smoke screens hiding the ship.
The Armstrong-Whitworth Whitley Mk II was used for parachute training by the airborne forces. In February 1942, the type was used for the first operations by airborne forces at Tragino, Italy and Bruneval, France. (Flintham)
SPECIAL OPERATIONS
From late 1941 the RAF became more closely involved in special operations on continental Europe. Based at Tempsford near Bedford, the Lysanders of 419 Flight, later renumbered as 138 Squadron, worked with the Special Operations Executive (SOE) and were used for transporting agents to and from occupied France. The unit was expanded to include Whitleys and Halifaxes for parachute dropping and it was joined by the Whitleys of 161 Squadron in early 1942. On 27 February 1942, Whitleys of 51 Squadron were used to drop airborne troops near Saint-Jouin-Bruneval, Normandy for Operation Biting, a daring raid to capture the components of German ‘Wurzburg’ radar located at La Poterie-Cap-d’Antifer.
RE-EQUIPPING BOMBER COMMAND
In early 1942, Bomber Command faced up to its inability to hit point targets at night and instead changed its policy to bombing German cities. This change of policy coincided with the arrival of more capable aircraft and better navigational equipment. The four-engined Stirling and Halifax had entered service in late 1940 with 7 and 35 Squadrons respectively, but it was not until early 1942 that these aircraft were operational in large numbers. The Lancaster also entered service with 44 Squadron in March 1942. This period coincided with the introduction of a radio-based navigation system known as ‘Gee,’ which could give position fixes accurate to within a few miles up to a range of about 400 miles. With the Master Station at Daventry, this system could theoretically offer reasonable accuracy as far as the cities of the Ruhr. However the first missions on which Gee was used, eight night raids against Essen during March, were no more accurate than previous non-Gee attacks. A raid by 135 aircraft against Cologne on 13 March was more successful, although on a subsequent raid on 5 April, the nearest bombs landed five miles from the target.
The city of Lübeck was attacked by over 200 bombers on 28 March. Lübeck was beyond the range of Gee, but its coastal location made it relatively easy to find. The bombers succeeded in destroying almost half of the city, much of which was composed of ancient wooden buildings, but, like similar raids on Rostock in the following month, this widespread destruction did not have the anticipated effects on either the morale of the civilian population or industrial production.
However, on occasions Bomber Command proved that it could be capable of precision attacks. In perfect weather conditions, a force of 235 bombers attacked the Renault factory at Boulogne-Billancourt near Paris on the night of 3 March. This raid appeared to be a complete success, although production at the factory was restored within four months. Then, on 17 April, six Lancasters of 44 Squadron and another six from 97 Squadron carried out a low-level daylight raid on the MAN submarine diesel-engine works at Augsburg. The raid was an impressive feat of airmanship, but seven of the 12 aircraft were shot down and despite accurate bombing the damage to the plant was minimal.
In late 1941, 88 Squadron was re-equipped with the Douglas Boston III light bomber in place of the Blenheim IV. Over 1,230 Boston III, IV and Vs were used by the RAF in the UK, Middle East and Italy. (Hulton-Deutsch Collection/Corbis/Getty)
Offensive sweeps in the form of ‘rhubarbs’ and ‘circuses’ continued into 1942. From late 1941, the Bristol Blenheim in Bomber Command was gradually replaced by the Douglas DB-7B Boston III. The first ‘circus’ operation involving Bostons of 88 Squadron took place on 12 February 1942 and in the subsequent months ‘circuses’ frequently attacked ports and coastal installations in northern France and the Low Countries. The Bostons were also used, as the Blenheims had been, for anti-shipping strikes, but these were mainly the preserve of the Hudson squadrons in Coastal Command. In the north, 48 and 608 Squadrons were responsible for patrolling the Norwegian coast, while 53, 59, 320 and 408 Squadrons covered the coast from the Hook of Holland to the mouth of the Elbe.
An Avro Manchester Mk IA of 207 Squadron, the first unit to operate the type. Powered by two Rolls-Royce Vulture engines, which proved unreliable in service, the Manchester was not an operational success; however, its failure led to Avro developing the four-engined Lancaster, which was arguably the most successful British-built bomber in World War II. (Flintham)
BURMA & CEYLON
By the beginning of March 1942, the RAF fighter strength in Burma had been whittled down to three Brewster Buffaloes, 20 Hurricanes and four US-crewed P-40 Warhawks. A small number of Hudsons and nine Blenheims also remained. When the order to evacuate Rangoon was issued on 7 March 1942, these surviving aircraft flew to a temporary airfield at Zigon, about halfway between Rangoon and Mandalay. Here they were split between ‘Burwing,’ comprising 17 Squadron (Hurricane) and 45 Squadron (Blenheim), which redeployed to Magwe on the River Irrawaddy and ‘Akwing,’ made up of 67 Squadron (Hurricane) and 139 Squadron (Hudson) which moved to Akyab on the coast. On 20 March, a force of nine Blenheims escorted by ten Hurricanes of Burwing carried out a highly successful raid on Japanese aircraft at Mingaloon airfield destroying 16 aircraft. Unfortunately, the enemy quickly responded and both Magwe and Akyab were subjected to heavy bombing attacks which virtually wiped out the RAF presence in Burma. In mid-April, all RAF units were evacuated to India. There was also a mass evacuation of refugees from Magwe, Schwebo and Myitkyina, mounted by the Douglas DC-2s and DC-3 (C-47) Dakotas of 31 Squadron and the 2nd Troop Carrier Squadron USAAF. Between them these units transported 8,600 refugees to India before Myitkyina fell on 8 May. Meanwhile, the Hudsons of 62 Squadron (which had recently been re-numbered from 139 Squadron) carried out two long-range raids on 14 and 18 April, refuelling at Akyab to attack a squadron of Japanese flying boats which had arrived at Port Blair in the Andaman Islands. The long-range flying boats, which posed a direct threat to shipping bound to or from Calcutta, were withdrawn.
A Douglas C-47 (DC-3) Dakota of 31 Squadron during the evacuation of Myitkyina in April 1942. The Dakota was, perhaps, the single most important aircraft type during the war in Burma, as it allowed troops and supplies to be transported for long distances over otherwise impassable terrain. (Pitchfork)
After their successful subjugation of Malaya, Singapore and the Dutch East Indies, the Japanese task force, comprising six aircraft carriers, ventured further west into the Indian Ocean. On 4 April they were detected by a Catalina of 413 Squadron, which was able to warn of its approach. Between 5 and 9 April, Japanese aircraft attacked airfields and military installations on the island, including the naval bases at Columbo and Trincomalee. The Japanese raiders were engaged by Hurricanes of 30, 258 and 261 Squadrons as well as Fairey Fulmars from 273 Squadron. On 9 April, a formation of nine Blenheims from 11 Squadron carried out an unescorted attack on the Japanese fleet and although the aircraft managed to straddle the flagship, aircraft carrier Akagi, with their bombs, the ship was not hit; five Blenheims were shot down. The Japanese force withdrew and the attack on Ceylon marked the westernmost advance of the Imperial Japanese Navy during the war.
The battered squadrons from Java and Burma were re-equipped in India. The war in the Far East had little significance to the tribes on the northwest frontier and in the summer of 1942, the Blenheims of the reconstituted 34 Squadron were diverted for operations against dissident tribesmen.
The Hawker Hurricane IIDs of 6 Squadron were armed with a 40mm cannon under each wing, which gave them the firepower to attack and destroy the tanks and armour of the Afrika Korps. The squadron subsequently became known as the ‘The Flying Tin Openers.’ (Flintham)
MIDDLE EAST
The Afrika Korps started an outflanking attack on the 8th Army at Gazala on 27 May 1942. Over the next week, the RAF fought hard over the battlefield. The Western Desert Air Force was composed of two SAAF squadrons equipped with the Boston, 223 Squadron (RAF) with the Martin Baltimore, two SAAF squadrons with the Curtiss P-40 Tomahawk and one SAAF and two RAAF squadrons with the Curtiss P-40 Kittyhawk, 112 and 250 Squadrons (RAF) with the Kittyhawk and 33, 80 and 274 Squadrons (RAF) with Hurricanes. The Boston and Baltimore squadrons bombed German and Italian positions while Hurricanes, Tomahawks and Kittyhawk fighter-bombers were deployed for attacks on enemy transport to the rear of their lines. On 1 June, the Spitfires of 145 Squadron arrived to act as top cover for the fighter-bomber squadrons. Another arrival was 6 Squadron which were equipped with the Hurricane IID, armed with two 40mm cannon intended specifically for attacking enemy armoured vehicles. However, despite the successes of the Western Desert Air Force and a valiant fight by the army at Bir Hakim and Knightsbridge, the armoured might of the Afrika Korps managed to break through and by the beginning of July the 8th Army had retreated back to a defensive line at El Alamein. Here, at the first battle of El Alamein, the Afrika Korps was halted.
While the 8th Army was fighting in the desert, two badly needed resupply convoys were on passage to Malta. On 10 June, a total of 59 Spitfires were flown to Malta from the deck of HMS Eagle. The next day the ‘Harpoon’ convoy of six merchant vessels and escort ships left the Straits of Gibraltar and on 12 June the 11 merchant vessels making up the convoy ‘Vigorous’ left Alexandria. Both convoys were subjected to heavy attacks from Luftwaffe bombers as they approached Sicily and Crete respectively. Fighter protection for Harpoon was provided by the FAA while that for Vigorous was by Tomahawk and Kittyhawk-equipped squadrons of the Western Desert Air Force. The main threats to both convoys, however, were two Italian naval forces. Vigorous was threatened by a force which included the battleship Littorio and the cruiser Trento. On 15 June, the Italian warships were attacked at dawn by Beauforts of 217 Squadron, which damaged Trento; later attacks carried out by Beauforts of 39 Squadron and also USAAF Liberators operating from Suez damaged Littorio. That night, Littorio was sunk by torpedo-carrying Wellingtons of 38 Squadron, but in the meantime Vigorous had already turned back to Egypt. By 15 June, Harpoon was being escorted by long-range Beaufighters from Malta, but it was engaged by the second Italian naval group, which sank some of the merchant ships and escorts. An attack on the Italian naval force by two Beauforts and four Albacores from Malta was inconclusive, but it appeared to persuade the Italian warships to disengage from the convoy. Closer to Malta, RAF Spitfires were able to keep enemy aircraft away from the ships and on 16 June the two remaining vessels arrived at Malta.
A Bristol Beaufort II of 39 Squadron over the Mediterranean Sea. The aerials of the air-to-surface vessel (ASV) radar can be seen projecting under the wing. Operating from Malta, Beauforts were successful in sinking a large number of of ships which were loaded with vital supplies for the Afrika Korps. (Flintham)
THOUSAND BOMBER RAID
The planned expansion of Bomber Command had been delayed by the need to provide aircraft to Coastal Command and to the Middle East, but by mid-1942 it was just possible, by using aircraft and crews from the Heavy Conversion Units (HCU), to assemble 1,000 bombers for a single raid. The first ‘Thousand Bomber Raid’ was against Cologne on the night of 30 May 1942 and was flown by 1,046 aircraft including Wellington, Whitley, Hampden, Stirling, Halifax, Avro Manchester and Lancaster bombers. A third of the aircraft came from training units. The weather conditions were good over the target area and the bomber force completed its attack within a 2-hour time window. Reconnaissance photographs taken the following morning showed that substantial damage had been done to the city and with a loss rate of nearly four percent of the participating aircraft, the operation was deemed to have been successful. Another ‘Thousand’ raid, this time by 956 aircraft, was ordered against Essen on 1 June, but with cloud cover over the target the results were more scattered. This was also the case with a third raid (the last Thousand Bomber Raid of 1942) by 1,006 aircraft on Bremen on the night of 25 June. However, mounting a 1,000-aircraft raid made large demands on the bomber units and was not yet sustainable. For the rest of the year the almost nightly bomber raids continued but on a much smaller scale.
U-BOATS IN THE BAY OF BISCAY
The geographic position of U-boat bases at Lorient and St Nazaire meant that German U-boats would have to cross the Bay of Biscay in order to reach their operating areas in the Atlantic Ocean. By leaving port at night, they were able to make passage unmolested on the surface. Leaving port in daylight was riskier, but aggressive patrols by Ju88 fighters had given the Luftwaffe a degree of air superiority over the bay. However, the campaign against U-boats received a boost in mid-1942 with the introduction of the Leigh Light, which gave aircraft a true 24-hour capability against submarines. The problem facing aircraft on anti-submarine patrols at night in areas such as the Bay of Biscay was that they had no way of knowing if an ASV contact was a U-boat or a fishing vessel. Furthermore, there was a ‘dead area’ within approximately two miles in which the ASV would lose contact. The answer was for aircraft to home to within two miles of a suspected target and then illuminate it with a powerful searchlight. The first operational use of the equipment was by Wellingtons on 172 Squadron on 4 June 1942, when one of a patrol by four aircraft found and attacked an Italian submarine. Over the rest of the month the five Leigh Light-equipped aircraft found seven U-boats, while Whitleys using conventional tactics in the same area found none. Forcing the U-boats to remain submerged during the early part of their voyage had an immediate impact on their operational capability.
The Luftwaffe superiority was also successfully challenged over the Bay of Biscay by 235 and 258 Squadrons, equipped with the Beaufighter, which shot down a number of German aircraft during the summer of 1942.
DIEPPE
An amphibious landing in force by 2nd Canadian Infantry Division took place at Dieppe on 19 August 1942. The RAF committed 41 squadrons of Spitfires, five squadrons of Hurricanes and also 266 and 609 Squadrons equipped with the rocket-firing Hawker Typhoon to provide an ‘air umbrella.’ Three squadrons of Bostons and Blenheims laid smoke screens to conceal the landings while 88 and 107 Squadrons, equipped with the Boston, carried out attacks on enemy gun emplacements and other defensive positions. These aircraft were supported by cannon-armed Hurricanes. Four squadrons equipped with the North American P-51 Mustang (2, 26, 400 and 414 Squadrons) also attacked ground targets and a force of USAAF Boeing B-17 Flying Fortress bombers attacked the Luftwaffe fighter base at Abbeville, putting it out of action for several hours. The RAF maintained air superiority over the battlefield, but at the cost of 106 aircraft lost, for 48 German aircraft destroyed.
A Wellington Mk VIII of 172 Squadron, the first unit to be equipped with the Leigh Light. The four aerials on the top of the aircraft are the transmitters for the sideways-looking ASV radar; the housing for the Leigh Light is retracted into the belly of the aircraft, under the letter ‘A’. (Flintham)
CONVOYS
After the Harpoon/Vigorous convoys of June 1942, another attempt to resupply Malta was made when ‘Pedestal’ sailed two months later. The last ship in the convoy, the tanker Ohio, arrived in Malta on 15 August, just as fuel supplies on Malta had become critical. The arrival of more fuel in Malta meant that air operations against Axis shipping and resupply lines could be restarted. On 17 August, a force of six Beauforts of 39 Squadron and nine Beaufighters escorted by eight Spitfires sank the tanker Rosalino west of Lampedusa. Over the next 14 days, Beauforts and Beaufighters sank another three tankers which were transporting much-needed fuel to North Africa. As a result, by the end of August the Afrika Korps had only 20 percent of the fuel it needed for sustained operations.
Consolidated B-24D Liberator IIIs of 120 Squadron. The Yagi aerials for the forward-looking ASV radar are clearly visible under the wing. With an operational range of some 2,400 miles (as compared to 1,300 miles for a Sunderland), the Liberator gave Coastal Command a quantum leap in its anti-submarine capability. (RAFM)
After the disaster of convoy PQ17 in the Barents Sea in early July, it was decided that the next convoy, PQ18, should have more dedicated air cover for protection from German attacks. Nos 144 and 455 Squadrons, equipped with anti-shipping Hampden bombers, and 210 Squadron with nine anti-submarine Catalina flying boats were sent to Russia as the convoy sailed at the beginning of September. The Hampdens operated from Vaenga and the Catalinas from Lake Lakhta, near Arkhangelsk. Four photo-reconnaissance Spitfires were also dispatched to Russia to monitor the Tirpitz during the course of the convoy. After PQ18 arrived at Arkhangelsk on 21 September, all of the remaining aircraft were handed over to the Russians.
A Consolidated PBY-5 Catalina flying boat. The type served with nine squadrons in Coastal Command and another 14 based overseas, including Gibraltar, North Africa and the Far East. On 26 May 1941, a Catalina from 209 Squadron on a reconnaissance flight spotted the German battleship Bismarck after it had evaded a pursuing force of ships from the Royal Navy.
The ability to protect convoys against submarines on the western side of the Atlantic was improved by the deployment of 53 Squadron, equipped with the Hudson, to Rhode Island in July 1942. When this task was taken over by the US Navy, the squadron moved further south to Trinidad to counter the U-boat threat in the Caribbean.
THE TURNING POINT
The Afrika Korps again attempted to seize the initiative at Alam el Halfa on the night of 30 August. The German troops were bombed by Wellingtons of the Desert Air Force in conjunction with FAA Fairey Albacores which dropped flares over target concentrations so that the Wellingtons could bomb accurately. The following day the Desert Air Force fighters were able to establish air superiority over the battlefield so that not only could Bostons and Baltimores, as well as USAAF North American B-25 Mitchells, attack enemy troops and vehicles, but also air operations by the Luftwaffe were severely curtailed. The Afrika Korps withdrew from the offensive on 3 September.
The Luftwaffe made one last attempt to defeat Malta, starting with heavy bombing raids on 10 October, which continued for ten days. However, these attacks were met by Malta-based Spitfires which gradually took their toll on the German and Italian raiders. During this ordeal, the Malta-based bombers continued to operate every night against Axis shipping.
The second Battle of El Alamein began on 23 October, but in the preceding days, the Desert Air Force had taken advantage of heavy rainfall which had waterlogged the Luftwaffe airfields at Fuka and El Daba: these airfields were attacked and some 30 aircraft were destroyed; the supply and servicing infrastructure was also badly damaged. When the battle opened, Spitfires were sent to patrol over Luftwaffe airfields. Unlike previous campaigns in which both the quantity and quality of the RAF’s aircraft had been suspect, the air forces in Egypt now comprised 96 operational squadrons equipped in the main with modern aircraft. In addition, the establishment of total air superiority over the battlefield enabled the army to keep its intentions hidden from the enemy until the last moment. Even the Luftwaffe high-altitude Junkers Ju86P reconnaissance aircraft, capable of flying above 40,000ft, had been forced to withdraw after three of them had been shot down by specially modified Spitfire V fighter aircraft in late August and early September. At night the Wellingtons of 37, 40, 70, 104 and 108 Squadrons were in action against troop concentrations and artillery emplacements, working again in conjunction with Albacores from the FAA. During daylight, the Boston, Baltimore and Mitchell-equipped squadrons kept up continuous pressure on the Afrika Korps, until the Germans began to withdraw on 4 November.
IN PURSUIT OF PRECISION
The establishment in August 1942 of a Pathfinder Force (PFF) was an attempt to improve the accuracy of Bomber Command’s attacks. The PFF was initially made up from four units which had demonstrated the highest operational effectiveness: 7 Squadron (Stirling), 35 Squadron (Halifax), 83 Squadron (Lancaster) and 156 Squadron (Wellington). During an attack their task was divided into three stages: in the first phase ‘finder aircraft’ would drop lines of flares in the vicinity of the target area so that under this light the ‘illuminator’ aircraft, the second phase, would locate the exact target area and drop a concentrated pattern of flares overhead. These flares would enable the ‘marker’ aircraft in the third phase to drop incendiary bombs accurately onto the target. The resulting large conflagration would then indicate where the main force should drop their bombs. If the ground was obscured by cloud, the target could be ‘sky-marked’ with further flares. Unfortunately, the new techniques suffered from some teething problems, particularly on the first PFF-marked raid on Flensburg on 18 August 1942, when strong winds blew the markers off the target, but on subsequent raids the levels of accuracy improved.
A number of other techniques were tried in the pursuit of accuracy. A low-level raid was carried out by 94 Lancaster bombers against the Schneider armaments factory at Le Creusot, near Dijon, at dusk on 17 October. Only one aircraft was lost on this mission and all crews reported successful attacks, but later analysis showed that the bombing had not in fact been as accurate as had been claimed: considerable destruction had been caused to French civilian housing outside the factory complex but damage to the factory was light. However, new high-speed aircraft, such as the de Havilland Mosquito, looked like a more promising option for low-level precision operations: four Mosquitoes of 105 Squadron bombed the Gestapo headquarters in Oslo on 25 September. Although four bombs hit the actual building, they passed through it before exploding and devastating houses on the opposite side of the street. While the accuracy of this attack cannot be questioned, it did demonstrate the unsuitability of the weapons used. On 6 December, a large force of unescorted day bombers comprising 47 Lockheed Venturas of 21, 464 and 487 Squadrons, 36 Bostons of 88, 107 and 226 Squadrons and ten Mosquitoes of 105 and 139 Squadrons attacked the Phillips electronics factory in Eindhoven. In this particular raid, the bombing was very accurate, but the attrition rate of nearly 20 percent of the aircraft involved was unsustainable.
‘Rhubarbs’ by fighter aircraft continued and the advent of longer-range aircraft meant that fighters could roam further afield. A section of four Mustangs from 268 Squadron were the first Allied single-engined fighters to venture over Germany on 21 October 1942. Flying at low level they attacked industrial targets at Lathen, near Meppen, before shooting up barges on the Dortmund–Ems Canal.
Bomber Command revisited Italy in October, with raids on industrial centres timed to coincide with the offensive at El Alamein. Genoa was attacked by a force of 120 Halifaxes, Stirlings and Wellingtons on the night of 23 October, but cloud in the area resulted in most of the bombs falling 20 miles away near Savona. A daylight raid on Milan the following day by 88 Lancasters was more successful, but of 72 Halifaxes, Stirlings and Wellingtons which followed up that night, only 39 aircraft claimed to have bombed the target and little damage was reported by the Italian authorities.
Curtiss P-40K Kittyhawk IIIs of 112 Squadron in North Africa. This version of the aircraft was fitted with the 1,600hp Allison V-1710 engine rather than the 1,040hp engine used for the Tomahawk. Eventually, the Kittyhawk equipped five RAF squadrons in the Middle East, as well as one RAAF and five SAAF units in the theatre. (© IWM TR 975)
OPERATION TORCH
A largely US force landed in northwest Africa on 8 November, opening a second front on the continent. The RAF participation was limited to a handful of fighter squadrons and four light bomber units, 13, 18, 114, 614 Squadrons, which were equipped with the Bristol Blenheim V. These latter units suffered devastating losses, culminating in an unescorted raid against an airstrip at Chouigui, Tunisia, by 18 Squadron on 4 December during which the entire formation ten aircraft was shot down.
CHANGING FORTUNES
At the close of 1942 the tide seemed to have turned in favour of the Allies: despite the setbacks in the Far East, the victory at El Alamein and the American landings in North Africa pointed towards a brighter future. New aircraft and hard-won combat experience were beginning to make the RAF more effective, too, for despite the expansion of the 1930s, the RAF had entered World War II woefully unprepared and chronically under-equipped. At that time only Fighter Command had had a truly modern aeroplane in the Spitfire, which fortunately was also part of an effective integrated air defence system. Coastal Command had lacked aircraft suitable for role and the overseas Commands had been saddled with obsolete aircraft which, though usable for colonial policing, were wholly inadequate for modern warfare. However, it was Bomber Command, the very embodiment of Trenchard’s offensive policy and of the RAF’s ability to wage independent war, that had been the least prepared for combat: its aircraft and weapons were totally inadequate for purpose and its crews were poorly trained. Furthermore, while the other Commands quickly – through necessity – adapted to the new situation, often relearning the lessons of the previous World War, Bomber Command seemed reluctant to change its tactics. Three years into the war it was still unable to hit any target consistently and it still seemed to be intent on mounting suicidal operations which achieved little. However, it says much about the quality of RAF personnel that despite these handicaps they did not break under pressure and were able to keep the UK secure against the aggression of Nazi Germany.
Four Supermarine Spitfire VB fighters from 249 Squadron fly over Malta in late 1942. The fighter squadrons on the island fought a ferocious battle with both the Italian Air Force and the Luftwaffe. But when Spitfires were delivered they were able to tip the balance of power in their favour. (Flintham)