Chapter 10
Printing Checks
IN THIS CHAPTER
 Getting your printer ready to print checks
Printing checks one at a time
Printing several checks at a time
Printing a register
This chapter covers the reductiveness of the postcolonial implications in Joseph Conrad’s Heart of Darkness. Just kidding. It covers how to print checks and checking registers.
Printing checks in QuickBooks is quick. Well, it’s quick after you set up your printer correctly. If you have a continuous-feed printer, you know by now that these printers have problems printing anything on a form. The alignment always gets messed up.
QuickBooks has check forms that you can buy, and I recommend using them if you print checks. After all, the QuickBooks checks were made to work with this program. And all banks accept these checks.
 If you want help with printing reports, check out Chapter 15, where I cover this topic in almost too much detail.
Getting the Printer Ready
Before you can start printing checks, you have to make sure that your printer is set up to print them. You also have to tell QuickBooks what to put on the checks: your company name, address, logo, and so on. And you might try running a few sample checks through the wringer to see whether they come out all right.
Follow these steps to set up the printer:
-
Choose File ⇒ Printer Setup.
After you choose this command, you see the Printer Setup dialog box, as shown in Figure 10-1.
-
Choose Check/PayCheck from the Form Name drop-down menu.
QuickBooks sets your printing options differently depending on which form you want to print. For printing checks, you want to choose the Check/PayCheck form from the Form Name drop-down menu at the top of the dialog box.
-
From the Printer Name drop-down menu, choose your printer.
Click the down arrow on the Printer Name drop-down menu, and look at the printer names. When you installed QuickBooks, it had a frank, software-to-software talk with Windows to find out what kind of printer(s) you have, among other things. Your printer is probably already selected; if it isn’t, choose the correct printer.
-
Set the correct Printer Type option, if necessary.
This field is probably already filled in, too, thanks to that frank discussion that I mention in Step 3. But if it isn’t, click the down arrow and then choose Continuous or Page-Oriented. (The former is generally for dot-matrix printers, and the latter is for laser and inkjet printers, but the choice depends on what kind of paper you use for your printer.)
-
Select the appropriate Check Style.
Now you’re cooking. This step is where you get to make a real choice:
- Voucher checks are the same width as standard checks, but they’re much longer. When you select the Voucher option, QuickBooks prints voucher information as well: the items and expenses tabulations from the bottom of the Write Checks window. QuickBooks also provides information about the checking account that you’re writing this check on.
- Standard checks are sized to fit into legal envelopes.
- The Wallet option is for printing checks that are small enough to fit into — you guessed it — a wallet.
-
(Optional) Click the Options button, adjust your printer options, and click OK to return to the Printer Setup dialog box.
After you click the Options button, QuickBooks displays your printer’s Properties dialog box. Specify print quality, number of copies, and other options specific to your printer; then click OK.
-
Click the Fonts tab of the Printer Setup dialog box and then click the Fonts button on that tab to customize the fonts on your checks.
When you click either the Font button or the Address Font button on this tab, you see the Select Font dialog box (shown in Figure 10-2) or the Select Address Font dialog box. You use the Address Font button (not shown) to designate how your company’s name and address look and the Font button to designate what all other print on your checks looks like. Here’s your chance to spruce up your checks and make your company’s name stand out.
Experiment for a while with the Font, Font Style, and Size settings. If you have a bookstore, for example, choose the Bookman font (maybe using bold for your company’s name and address); if you run a messenger service, choose Courier; Italian mathematicians can use Times New Roman (just kidding). You can see what your choices look like in the Sample box.
- When you finish fooling around with the fonts, click OK to go back to the Printer Setup dialog box.
-
Click the Partial Page tab of the Printer Setup dialog box, and select a Partial Page Printing Style.
Fortunately, some graphics appear; otherwise, you wouldn’t have a clue what these options are, would you? These options are for the environmentally friendly among you. Suppose that you feed two checks to the printer, but the check sheets have three checks each. You have a leftover check.
Thanks to this option, you can use the extra check. Select one of the options to tell QuickBooks how you plan to feed the check to the printer: vertically on the left (the Side option), vertically in the middle (the Centered option), or horizontally (the Portrait option). You feed checks to the printer the same way that you feed envelopes to it.
-
(Optional) Click the Logo button and then enter a company logo or some clip art.
In the Logo dialog box, click File and then find the directory and BMP (bitmap) graphic file that you want to load. Click OK. Note: You can use only graphics that are in BMP format on your checks, and Intuit recommends that the logo be square.
-
(Optional) Click the Signature button and then enter a check signature image.
Want to get really adventurous? Click the Signature button that appears in the Printer Setup dialog box. When QuickBooks displays the Signature dialog box, click File and then find the directory and BMP graphic file with the signature that you want to load. Click OK. Note: As with a logo, you can use a signature here only if it’s a BMP graphic.
-
Click OK when you’re finished.
That setup was no Sunday picnic, was it? But your checks are all ready to be printed, and you’ll probably never have to go through this ordeal again.
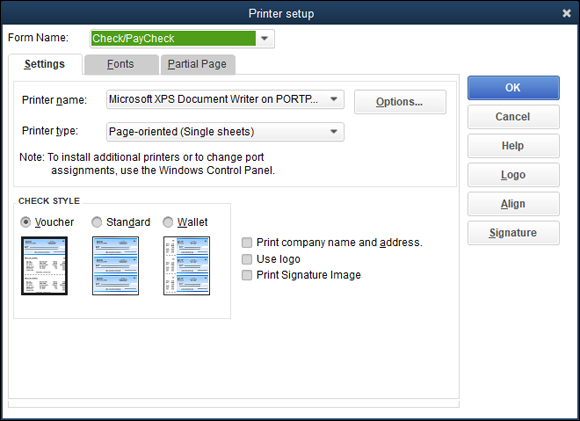
FIGURE 10-1: The Settings tab of the Printer Setup dialog box.
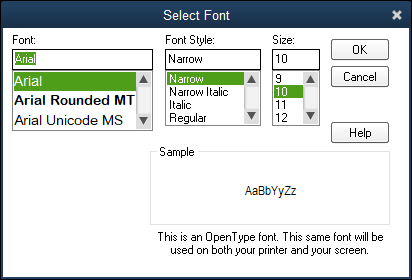
FIGURE 10-2: The Fonts tab of the Printer Setup dialog box.
Printing a Check
For some reason, when I get to this part of the discussion, my pulse quickens. Actually writing a check for real money seems terribly serious. I get the same feeling whenever I mail someone cash, even if the amount is nominal.
I think that the best way to lower my heart rate (and yours, if you’re like me) is to just print the darn check and be done with it. QuickBooks can print checks in two ways: as you write them or in bunches.
First things first, however. Before you can print checks, you have to load some blank checks into your printer. This process works the same way as loading any paper into your printer. If you have questions, refer to your printer’s documentation. (Sorry I can’t help more on this process, but a million different printers exist, and I can’t tell which one you have, even when I look into my crystal ball.)
A few words about printing checks
Check printing is kind of complicated, isn’t it? For the record, I’m with you on this one. I really wish it weren’t so much work, but you’ll find that printing checks gets easier after the first few times.
Pretty soon, you’ll be running rather than walking through the steps. Pretty soon, you’ll just skate around such roadblocks as check-form alignment. Pretty soon, in fact, you’ll know all this stuff and never have to read pretty soon again.
Printing a check as you write it
If you’re in the Write Checks window, and you’ve just finished filling out a check, you can print it. The only drawback is that you have to print checks one at a time with this method. Here’s how:
-
Fill out your check.
Yes, I strongly recommend filling out the check before printing it. And make sure that the Print Later check box is not selected. Turn to Chapter 6 for help with writing checks with QuickBooks.
-
Click the Print button in the Write Checks window.
You see the Print Check dialog box, as shown in Figure 10-3.
-
Enter a check number in the Printed Check Number text box and then click OK.
After you click OK, you see the similarly named Print Checks dialog box, shown in Figure 10-4. The settings that you see in this dialog box are the ones that you chose when you first told QuickBooks how to print checks. If you change the settings in the Print Checks dialog box, the changes affect only this particular check. The next time you print a check, you’ll see your original settings again.
-
Click Print to accept the default settings, or make changes in the dialog box and then click Print.
In the Printer Name field, specify which printer you want to print to. In the Check Style area, indicate whether you want to print a Voucher, Standard, or Wallet check.
If you’re printing a partial page of forms on a laser printer, use the Partial Page tab to indicate both the number of check forms on the partial page and how you’ll feed them through your printer.
If you want your company’s name and address to appear on the check, select the Print Company Name and Address check box on the Settings tab.
After you click Print, QuickBooks prints the check, and you see the Print Checks — Confirmation dialog box (shown in Figure 10-5). There’s nothing tricky here — only a list of the checks that you just tried to print.
-
If the check didn’t print correctly, follow these steps:
- Click the check listed in the Print Checks — Confirmation dialog box to select it and then click OK to return to the Write Checks window.
- Click the Write Checks window’s Print button again.
- Enter the new check number, and click Print again.
 QuickBooks doesn’t automatically keep track of incorrectly printed check forms, so you have to. If you botch a check form, be sure to write VOID in large letters and permanent ink across the face of the check. Then file the check away for your reference. Don’t throw it away!
If you still have questions about how to check any mistakes, see the section “What if I make a mistake?” later in this chapter.
-
If your check looks good, click OK.
You return to the Write Checks window. Don’t forget to sign the check.
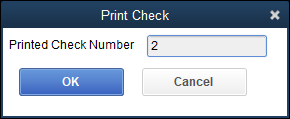
FIGURE 10-3: The Print Check dialog box.
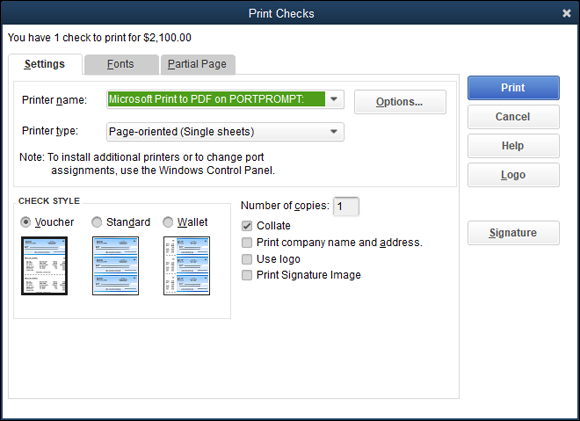
FIGURE 10-4: The Print Checks dialog box.

FIGURE 10-5: The Print Checks — Confirmation dialog box.
Printing checks by the bushel
What if you write a mess of checks and then decide to print them? That’s how the process usually works. Here’s how to print a bushel of checks:
-
Go into the register, and make sure that the checks that you want to print are marked To Print.
The quickest way to get into the register is to choose Banking ⇒ Use Register. If you have more than one bank account, select the Checking Account register that you want to open and then click OK. Do the checks that you want to print have To Print in the Number line? If not, tab to the Number line, press T, and then click the Record button. QuickBooks automatically fills the Number field with To Print and then moves on. (If the check you want to print already has a number, you need to replace the number with T.)
-
Choose File ⇒ Print Forms ⇒ Checks.
You see the Select Checks to Print dialog box, in which you select the checks to print (see Figure 10-6).
-
Click the check marks next to the checks that you don’t want to print and then click OK.
All the checks are selected at first. If you want to print them all, fine. If not, click the check marks next to the checks that you don’t want to print so that QuickBooks removes the check marks. Or if you want to print only a few of the checks, click the Select None button and then click next to the checks that you want to print so that QuickBooks places a check mark in the column.
When only the checks that you want to print have check marks, click OK to continue with this crazy little thing called check printing. QuickBooks, happy with your progress, displays the Print Checks dialog box (refer to Figure 10-4). Here, you see the settings that you chose when you first told QuickBooks how to print checks.
-
Click Print to accept the default settings, or make changes in the dialog box and then click Print.
You can change the settings in this dialog box if you want them to be different. Any changes that you make for a particular batch of checks don’t affect the default settings. The next time you print a check, your original settings appear again.
In the Check Style box, indicate whether you want to print Voucher, Standard, or Wallet checks. If you’re printing a partial page of checks, enter the number of checks on the first page in the Number of Checks on First Page text box.
If you want your company’s name and address to appear on the checks, select the Print Company Name and Address check box on the Settings tab.
Change the default value (1) in the Number of Copies text box to print more than a single copy of the check.
QuickBooks prints the checks, and then you see the Print Checks — Confirmation dialog box (refer to Figure 10-5). Please do not click anything from this window until you’ve walked or reached over to the printer to review the checks that have printed.
-
Review the checks that QuickBooks printed and then do one of the following:
This is your opportunity to correct any mistakes that may have happened during the print - for example if you accidentally put in the check paper upside-down or a check you thought was going to print didn’t actually print.
- If QuickBooks printed the checks correctly, celebrate by simply click the blue OK button. It’s totally alright to do a little fist pump too. (QuickBooks, apparently thinking that you now want to do nothing but print checks, redisplays the nearly exhausted Write Checks window.)
- If QuickBooks didn’t print a check correctly, click in the Reprint column for any checks that weren’t satisfactory, and then click OK. In this case, repeat the steps for check printing. Note, though, that you need to reprint only the first bad check and the checks that follow it. You don’t need to reprint good checks that precede the first bad check.
 Don’t forget to write VOID in large letters and permanent ink across the front of incorrectly printed check forms. Then file the checks for safekeeping. (Do not throw them away.) To record the voided check in QuickBooks, see the next section, “What if I make a mistake?” If the numbers of the checks that you need to reprint aren’t sequential and are, in fact, spread all over creation, make it easy on yourself. Click OK to clear the list of checks to be printed, go into the register, click the Number line of the checks that you need to print, and then press T. QuickBooks automatically fills these with To Print. Then choose File ⇒ Print Forms ⇒ Checks, as in Step 2, and continue from there.
If your checks came out all right, take the rest of the day off. Give yourself a raise while you’re at it.
-
Sign the printed checks.
Then — and I guess you probably don’t need my help here — put the checks in the mail.
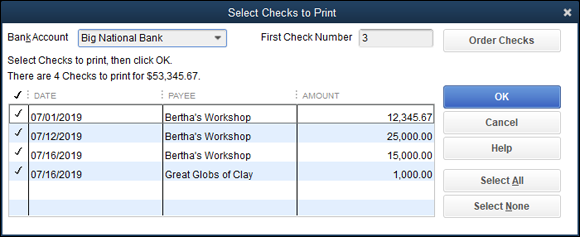
FIGURE 10-6: The Select Checks to Print dialog box.
What if I make a mistake?
If you discover a mistake after you print a check, the problem may not be as big as you think.
If you’ve already mailed the check, however, you can’t do much. You can try to get the check back (if the person you paid hasn’t cashed it already) and replace it with a check that’s correct. (Good luck on this one.)
If the person cashed the check, you can’t get the check back. If you overpaid the person by writing the check for more than you should have, you need to ask the person to pay you the overpayment amount. If you underpaid the person, you need to write another check for the amount of the underpayment.
If you printed the check but haven’t mailed it, void the printed check. This operation has two parts. First, write VOID in large letters across the face of the check form. (Use a ballpoint pen if you’re using multipart forms so that the second and third parts also show as VOID.) Second, display the register, highlight the check, and then choose Edit ⇒ Void Check. (This option marks the check as one that’s been voided in the system so that QuickBooks doesn’t use the check in calculating the account balance.) If you’re voiding an incorrectly printed check, you first need to create a transaction for the check number that printed incorrectly and then void that transaction.
If you want to reissue a voided check, just enter the check all over again — and this time, try to be more careful.
If you notice only after clicking OK in the Print Checks — Confirmation dialog box that a check printed incorrectly, you can tell QuickBooks you want to reprint the check in one of two ways. If you have the register window displayed, you can change the check’s number from 007, for example, to To Print. If you have the Write Checks window displayed, you can select the To Be Printed check box.
Oh where, oh where do unprinted checks go?
Unprinted checks — those that you entered by using the Write Checks window but haven’t yet printed — are stored in the register. To identify them as unprinted checks, QuickBooks puts To Print in the Number line. What’s more, when you tell QuickBooks to print the unprinted checks, what it really does is print the checks in the register that have To Print in the Number line. All this knowledge is of little practical value in most instances, but it results in several interesting possibilities.
You can enter the checks that you want to print directly into the register, for example. All you need to do is type To Print in the Number field.
Printing a Checking Register
You can print a Checking register, or a register for any other account, too. Follow these steps to print a register:
-
Open the account register you want to print.
Choose Banking ⇒ Use Register, or click the Check Register icon on the home screen. If you have more than one bank account, choose the account register you want to print from the drop-down menu and then click OK.
-
Choose File ⇒ Print Register or click the Print button at the top of the register.
You see the Print Register dialog box, as shown in Figure 10-7. This option is available whenever you have a register open for an account.
-
Fill in the Date Range fields.
To print a register of something other than the current year-to-date transactions, use the From and Through fields. This step is pretty darn obvious, isn’t it? You just move the cursor to the From and Through text boxes and type the range of dates that the register should include.
-
(Optional) Select the Print Splits Detail check box.
As you know, a register doesn’t show all the messy details, such as the Items and Expenses tab information, but you can select this check box to include all this stuff on your printed register.
-
Click OK.
You see the Print Lists dialog box, as shown in Figure 10-8.
-
Do one of the following:
- If everything is cool, click the Print button, and skip the remaining steps.
- If you want to change options in the Print Lists dialog box, proceed to Step 7.
You don’t have to fool around with the Print Lists dialog box. If you want to print a register pronto, just click Print; QuickBooks sends the register on its merry way to your printer. Then again, if you’re the sort of person who likes to fool around with this kind of stuff, carry on with the rest of these steps.
If you want to see the effect that the different settings in this dialog box have, just experiment. You can’t hurt anything or anybody. -
(Optional) Print the report to disk.
To print the report to disk as a text file, select the File option button and then choose one of the following Print To options:
- Choose ASCII Text File if you want to create a text file (such as when you want to import the register into a word processing program).
- Choose Comma Delimited File if you’ll later import the register into a spreadsheet program, such as Microsoft Excel.
- Choose Tab Delimited File to, for example, import the register into a database program like Microsoft Access. (Oooh … fancy.)
-
Choose the paper orientation.
In which direction do you want the report to be printed: Portrait (regular) or Landscape (sideways)? Select the appropriate option button.
-
(Optional) Tell QuickBooks which pages to print.
Use the Page Range option buttons and text boxes to limit the pages for QuickBooks to print.
-
(Optional) Color your world: Print your report in color.
If you have a color printer and want to print the register in color, select the Print in Color (Color Printers Only) check box.
-
(Optional) Preview the report.
To see how your settings will affect the report before you actually print it, click Preview. QuickBooks shows you the results onscreen. This feature has probably saved more trees than you can imagine.
-
Click Print.
After you have the report exactly the way you want it (and not one moment before!), click Print. QuickBooks finally prints the register.

FIGURE 10-7: The Print Register dialog box.
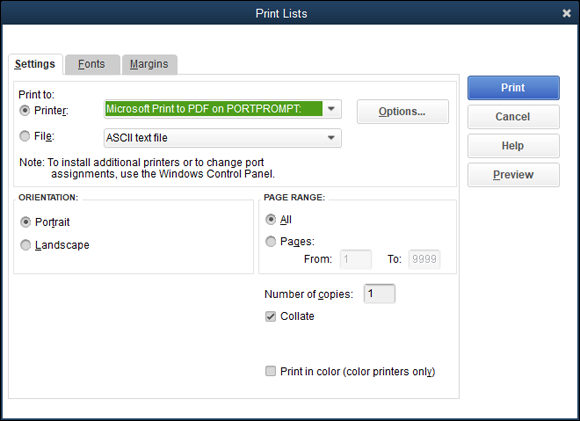
FIGURE 10-8: The Print Lists dialog box.