Chapter 18
Fixed Assets and Vehicle Lists
IN THIS CHAPTER
 Discovering fixed-assets accounting
Finding out about fixed-assets accounting in QuickBooks
Setting up a Fixed Asset list
Tracking vehicle mileage
In this chapter, I cover two specialty topics of modest interest to a small handful of business owners: how the QuickBooks Fixed Asset list works and how the QuickBooks vehicle mileage-tracking tool works.
Let me say at the outset that you may not need these tools. QuickBooks users commonly think the tools do more than they really do. In some situations, though, business owners and accountants truly find these two simple tools to be helpful.
But you know what? I’m getting ahead of myself. Let me start at the start.
What Is Fixed-Assets Accounting?
So that you understand where the Fixed Asset list and vehicle mileage tracker fit into the scheme of things, let me begin by defining the term fixed assets and by explaining just what fixed-assets accounting is.
Fixed assets historically refers to assets that are fixed in place. A factory or building set into concrete is fixed. Likewise, a 20-ton piece of machinery bolted into the floor is fixed.
In the context of QuickBooks and its Fixed Asset list, fixed assets also include items such as furniture, equipment, and vehicles — things that aren’t so “fixed” but instead are assets that last a long time, and that a business, therefore, must depreciate.
Now that you know what fixed assets are — at least according to Steve Nelson — let me define fixed-assets accounting. Fixed-assets accounting, I’m going to say, refers to three accounting tasks:
- Tracking your fixed assets’ costs, descriptions, and other relevant information so that you can take proper care of your stuff
- Calculating and recording fixed assets’ depreciation so that tax returns and financial statements can be prepared
- Calculating and recording the effect, including the gain or loss stemming from the disposal of fixed assets so that tax returns and financial statements can be prepared
Obviously, this fixed-assets accounting stuff is important. Having said that, let me throw you a curveball: I’m not sure whether you need to worry about this stuff.
Now, of course, you do indeed want to keep track of fixed assets so that you know what you own. This stuff-you-own information is pretty essential for thinking smartly about how much insurance you should purchase, for example. You may also pay property taxes on this stuff, which is another good reason to really know what you have.
Ditto for your need to be able to depreciate your fixed assets and to keep track of what happens when you sell a fixed asset. Shoot, you don’t have to be in business for more than about a year before you know that tax laws and generally accepted accounting principles say that you have to do this, regardless of whether you want to.
But here’s my lazy-boy thinking. You know your accountant? The person who does your taxes is already keeping such a list to calculate the correct amount of depreciation that you should enter in your income tax returns. This makes me wonder why you need to maintain a duplicate list.
To me, you need to do the fixed-assets accounting yourself in only two situations:
- You have so much stuff that your poor accountant needs or would benefit from help in tracking the stuff. This will be the case if you have hundreds or thousands of items.
- You don’t use an accountant. You, therefore, are the poor sap who has to do this fixed-assets accounting work.
 Be cautious here. Perhaps a quick telephone call to your accountant can confirm that your fixed-assets accounting is already being performed. Another way to check is to look carefully at last year’s tax return. Do you see, buried somewhere near the back of the return, a listing of your fixed assets? If so, skip this chapter. Check out your most recent tax return or contact your CPA, though, to make sure.
I hope that most readers can quit their reading at this point. Most readers now realize that their accountants are almost certainly already doing their fixed-assets accounting work. Most readers, in fact, will realize that they really don’t need to worry about noodling around with the QuickBooks Fixed Asset list at all!
If you realize that you need to handle the fixed-assets accounting yourself, however, keep reading.
Fixed-Assets Accounting in QuickBooks
Fixed-assets accounting amounts to three things:
- Keeping a list of the assets that you own
- Recording depreciation on any depreciable assets
- Recording the disposal of an asset, including any gain or loss on disposal
The Fixed Asset list, which I describe in the next section, takes care of the first task. The Fixed Asset list doesn’t help you directly with the second or third tasks shown in the preceding list, though. You need to understand this important point: You still need to calculate and then enter asset depreciation. And when you dispose of an asset, you still need to construct a journal entry that records the disposition.
 Chapter 19 describes how depreciation works and how you go about recording the disposal of an asset. Read that chapter if you want to know how that stuff works.
Setting Up a Fixed Asset List
As noted earlier in the chapter, if your business owns a lot of stuff with long-lasting value, either you or your accountant needs to keep track of the items. If you need to track the items, you can do so by using the Fixed Asset list.
Adding items to the Fixed Asset list
To add a piece of furniture, some bit of equipment or machinery, or another item of long-lived value to the Fixed Asset list, follow these steps:
-
Choose Lists ⇒ Fixed Asset Item List to display the Fixed Asset list.
QuickBooks displays the Fixed Asset Item List window, as shown in Figure 18-1. Initially, because you haven’t yet added any assets, the list shows no assets.
Have assets you’ve purchased already? You can edit the original purchase transaction and add the fixed asset to the list during editing. -
Tell QuickBooks that you want to add an item to the Fixed Asset list.
Click the Item button (bottom-left corner) and then choose New from the drop-down menu that QuickBooks displays. QuickBooks displays the New Item window, as shown in Figure 18-2.
-
Name the asset.
Give the asset a unique name. You might give a piece of furniture a name like Leather couch, a computer a name like HP Pavilion, and a vehicle a name like a 2015 Ford F-150 pickup truck.
-
Choose the appropriate fixed-asset account.
From the Asset Account drop-down menu, choose the fixed-asset account in which the asset you’re describing should be placed. A leather couch used in your opulent reception area, for example, might be placed in a Furniture and Equipment fixed-asset account. A delivery truck might be placed in a Vehicles fixed-asset account.
QuickBooks, as you might guess, supplies a bunch of accounts automatically, but you may not see the account you need or want in the Asset Account drop-down menu. You can add a new asset account on the fly, so to speak, by entering a new account name and pressing Enter. When QuickBooks sees that the fixed-asset account isn’t yet set up, it prompts you to set up the new fixed-asset account. -
Describe the purchase terms.
Use the Purchase Information area to describe the item that you purchased and the purchase terms. You want to indicate whether the item is new or used, for example, by selecting the New or Used radio button. You can provide a purchase description, purchase date, purchase cost, and even identify the vendor by using the other, self-explanatory boxes in the Purchase Information area.
-
(Optional) Describe the asset in further detail.
The Asset Information area at the bottom of the New Item window provides additional text boxes that you can use to describe the asset. The area provides a humongous field in which to place a lengthy asset description, for example. You also have fields you can use to identify the asset location, the original purchase order (PO) number, the asset’s serial number, and the warranty expiration date. If these fields aren’t adequate, heck, QuickBooks even supplies a Notes area that you can use to write a small ode to your asset or record some other bit of relevant asset information.
-
Save the asset item description.
Click OK to simultaneously save the new asset item description and close the New Item window. Or click Next to save the new asset item description but leave the New Item window displayed.
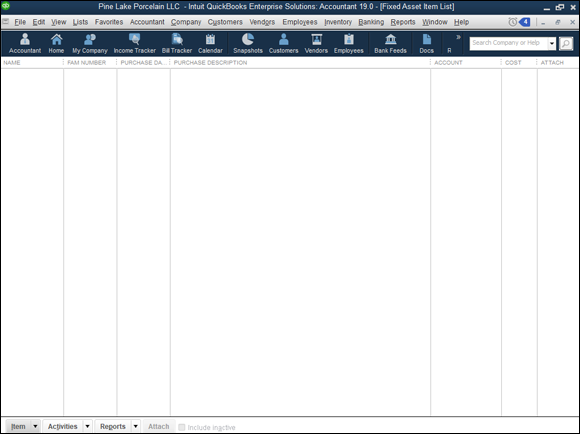
FIGURE 18-1: The Fixed Asset Item List window.
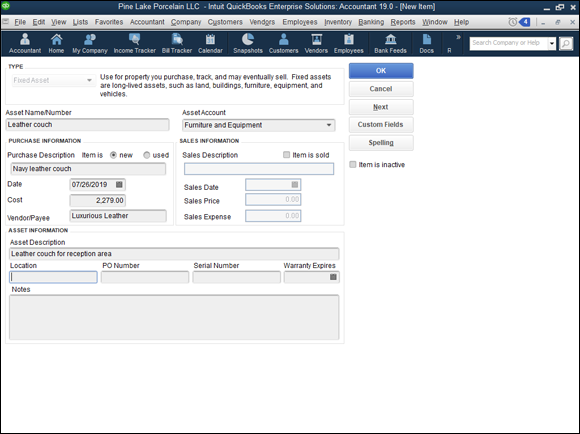
FIGURE 18-2: The New Item window.
Adding fixed-asset items on the fly
You can add items to the Fixed Asset list, as described in the preceding paragraphs. Alternatively, you can add an item to the Fixed Asset list when you record the bill that records the vendor invoice for the asset or when you record the check that pays the vendor invoice for the asset.
Here’s how this works: If you told QuickBooks that you want to maintain a Fixed Asset list, QuickBooks prompts you to add a fixed-asset item when you categorize, or debit, a fixed-asset account while entering a bill or recording a check.
To collect the information required to set up the fixed-asset item, QuickBooks displays the same New Item window (refer to Figure 18-2). The steps that I provide in the preceding section for filling in the New Item window also work for adding fixed-asset items on the fly.
Editing items in the Fixed Asset list
To edit a fixed-asset item (say you made a mistake entering some bit of information), follow these steps:
-
Choose Lists ⇒ Fixed Asset Item List.
QuickBooks displays the Fixed Asset Item List window. (Refer to Figure 18-1.)
-
Double-click the item that you want to edit.
QuickBooks displays the Edit Item window, as shown in Figure 18-3.
-
Update the asset description.
As necessary, update the information shown in the Purchase Information and Asset Information areas. Note, too, that if you want to record the disposal of an asset, you can select the Item Is Sold check box. Then QuickBooks enables the Sales Information area’s text boxes, which you can use to identify the sales date, price, and amount of selling expenses.

FIGURE 18-3: The Edit Item window.
QuickBooks doesn’t do any bookkeeping with the purchase and/or sales information shown in the New Item and Edit Item windows. It doesn’t add an asset to the balance sheet because you set up a fixed-asset item, for example. And QuickBooks won’t calculate the gain or loss on disposition of the asset because you enter sales information. You need to do that yourself — or have your accountant do that — by using either standard QuickBooks transactions or traditional journal entries.
Read Chapter 6 for information on how to record a bill that stems from a vendor invoice, and see Chapter 8 for information on how to record a check that pays for some asset. Peruse Chapter 19 for instructions on how to record depreciation and how to record asset dispositions.
Tracking Vehicle Mileage
QuickBooks supplies a business-vehicle mileage tracker that you can use to track and tally business mileage. As you may already know, you need to know both your total miles and your business miles to accurately deduct vehicle expenses on your tax return. (If you’re not sure how this works, confer with your tax adviser.)
Identifying your vehicles
By law, you’re required to track your mileage by vehicle. QuickBooks, accordingly, provides a Vehicle list. To add items to the Vehicle list, follow these steps:
-
Choose Lists ⇒ Customer & Vendor Profile Lists ⇒ Vehicle List.
QuickBooks displays the Vehicle List window, as shown in Figure 18-4. Initially, because you haven’t yet added any vehicles, the list shows no assets.
-
Click the Vehicle button (bottom-left corner), and choose New from the drop-down menu that QuickBooks displays.
QuickBooks displays the New Vehicle window, as shown in Figure 18-5.
-
Enter a name for the vehicle in the Vehicle text box, and enter a description of the vehicle in the Description text box.
Identify the vehicle by its make and maybe the year of manufacture. I suppose that if you have a fleet of cars or trucks, you may want to provide more identifying information than this.
- Save the vehicle description by clicking OK.
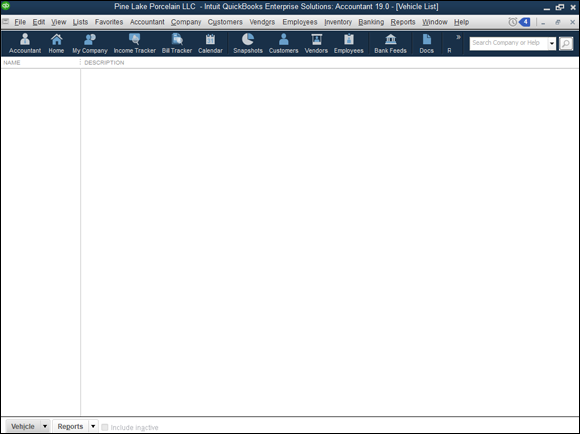
FIGURE 18-4: The Vehicle List window.
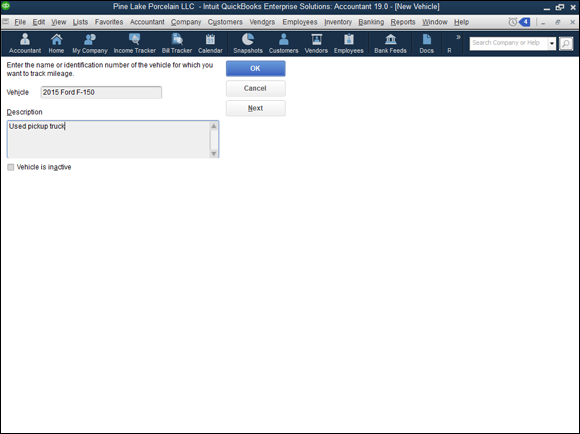
FIGURE 18-5: The New Vehicle window.
Recording vehicle miles
After you add your business vehicles to the Vehicle list, you record each trip by using the Enter Vehicle Mileage window. To do this, follow these steps:
-
Choose Company ⇒ Enter Vehicle Mileage.
QuickBooks displays the Enter Vehicle Mileage window, as shown in Figure 18-6.
- From the Vehicle drop-down menu, choose the vehicle in which you took the trip.
-
Provide the starting and ending dates of the trip.
Enter the starting date of the trip in the Trip Start Date field and the ending date of the trip in the Trip End Date field. Note that you can click the little calendar button at the right ends of these two text boxes to display the QuickBooks pop-up calendar.
-
Enter the starting mileage of the odometer in the Odometer Start field and the ending mileage of the odometer in the Odometer End field.
After you enter the two mileage readings, QuickBooks calculates the total trip miles.
-
(Optional) Identify the customer and job.
If the trip’s miles should be billed to or associated with a particular customer or job, choose the customer or job from the Customer:Job drop-down menu. For more information about how invoicing works, refer to Chapter 4.
-
(Optional) Associate the trip miles with a particular invoice item.
If you bill the trip miles on an item, choose the invoice item that should be used from the Item drop-down menu. For more information about how invoice items work, refer to Chapter 4.
-
Provide additional information as necessary.
Use the Notes text box to collect or store any additional information needed for the vehicle mileage record keeping.
- Save the trip information by clicking the Save & Close button.
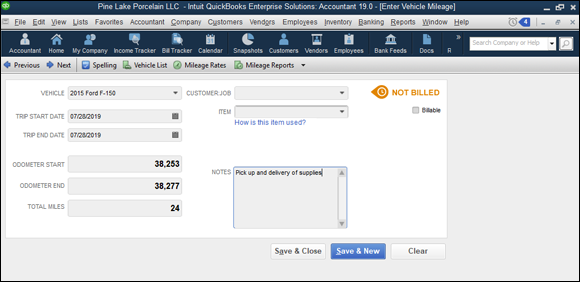
FIGURE 18-6: The Enter Vehicle Mileage window.
Using the vehicle reports
If you click the Reports button at the bottom of the Vehicle List window (refer to Figure 18-4), QuickBooks displays a drop-down menu that lists four vehicle mileage reports: Mileage by Vehicle Summary, Mileage by Vehicle Detail, Mileage by Job Summary, and Mileage by Job Detail.
You can access another menu of commands that produce these same reports by clicking the Mileage Reports button that appears at the top of the Enter Vehicle Mileage window (refer to Figure 18-6).
To produce a particular vehicle mileage report, choose one of the reports from either of these menus.
Updating vehicle mileage rates
If you click the Mileage Rates button at the top of the Enter Vehicle Mileage window (refer to Figure 18-6), QuickBooks displays the Mileage Rates dialog box (see Figure 18-7). The Mileage Rates dialog box lists Internal Revenue Service (IRS) mileage rates and their effective dates. You can enter a new mileage rate by clicking the next open row of the mileage rate schedule and then entering the effective date in the Effective Date column and the standard rate in the Rate column. You can find the current year’s business mileage rate at the IRS website at www.irs.gov.
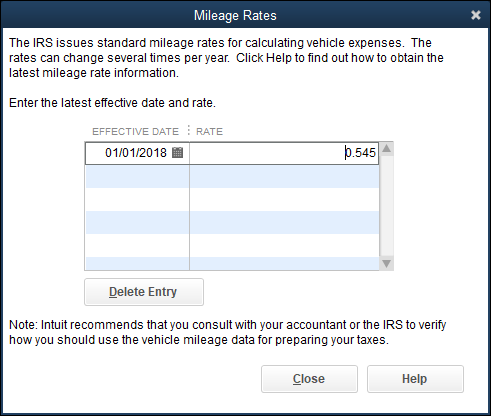
FIGURE 18-7: The Mileage Rates dialog box.
Note: In 2018 (when I was writing this book), the standard mileage rate equaled 54.5 cents a mile, but the IRS usually updates this figure once and sometimes twice a year. So you want to check for the rate that’s current when you do your calculations. In other words, don’t use one of the old, out-of-date standard mileage rates. Please.