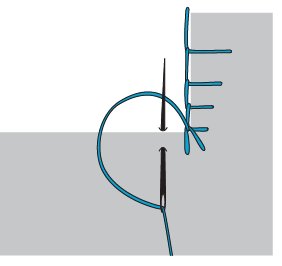

Outer Points
You need to take special care when appliquéing points in felted wool because felted wool is thick and soft. By adjusting the stitch you can keep the points sharp and the stitches pretty.

Tulip showing inner and outer points
Refer to Felted Wool Preparation.
1.When you are 2 or 3 stitches away from an outer point, begin making shorter stitches.

Begin making shorter stitches.
2.These shorter stitches are smaller than your regular stitch, so it will take more of them to reach the point. You may need more, or fewer, than are shown in the illustration. The points will look better if the stitches get smaller incrementally.
Keep enough tension on the thread to pull the stitches into place against the edge of the appliqué. The stitches will look better if you pull the thread away from the edge of the appliqué.

Make stitches incrementally shorter.
3.When you make the stitch at the point, bring the needle out of the background fabric a little farther away from the edge than you normally would. This will help to keep this stitch from rolling underneath the edge of the appliqué and making the point look soft.

Corner stitch comes out beyond appliqué.
4.As you turn the corner, do your best to mirror the stitch length from the first side of the point.

Mirror stitches after you turn corner.
5.You can go back to your normal stitch length when you are past the point.

Resume regular stitch length.
Inner Points
Inner points are handled in much the same way outer points are, with stitches getting smaller then bigger on either side of the point. These shorter stitches are smaller than your regular stitch so it will take more of them to reach the point. You may need more, or fewer, than are shown in the illustration. The points will look better if the stitches get smaller incrementally.
Keep enough tension on the thread to pull the stitches into place against the edge of the appliqué. Your stitches will look better if you pull the thread away from the edge of the appliqué.
1.When you are 2 or 3 stitches away from an inner point, begin making shorter stitches. The last stitch on the first side of the inner point will be in line with the edge of the appliqué on the other side of the point.
When you make this stitch, bring the needle out of the background fabric next to the edge of the appliqué, at the deepest part of the inner point.

Bring out needle at edge of appliqué.
2.The stitch at the inner point is made on the diagonal and is spaced evenly between the 2 sides of the point. As you make this stitch, bring the point of the needle up through the same hole made by the previous stitch.

Diagonal stitch comes up through hole made by previous stitch.
3.As you turn the corner, do your best to mirror the stitch length from the first side of the point. Again, bring the point of the needle up through the same hole made by the previous 2 stitches.

Mirror stitches after you turn corner.
4.The stitches at the inner point should resemble a chicken foot.

Three inner stitches come up through same hole.
5.You can go back to your normal stitch length once you are past the point.

Resume regular stitch length.
Curves and Circles
The length of the stitches on curved appliqué shapes is determined by the acuteness of the curve and whether you are sewing an inner or an outer curve. The tighter the curve, the smaller the stitches need to be. This is true on any curved edge, including circles.

Tighter curves require smaller stitches.
How can you tell it’s time to shorten the stitch? Keep an eye on the way the appliqué looks as you are sewing. If your stitch is too big it tends to roll under the edge of the appliqué as you sew, making the edge look less round than it is.