

Finishing the Quilt
1.Construct the back of the quilt, piecing as needed.
2.Place the backing right side down on a firm surface. Tape it down with painter’s tape to keep it from moving around while you baste, but don’t stretch it.
3.Place the batting over the backing and pat out any wrinkles.
4.Center the quilt top right side up over the batting.
5.Thread-baste the layers together. Yes, we thread-baste for both hand and machine quilting.
6.Quilt by machine or by hand (see Quilting Felted Wool).
7.Trim the outer edges of the quilt, leaving ¼˝ of backing and batting extending beyond the edge of the quilt top. This extra fabric and batting will fill the binding nicely.
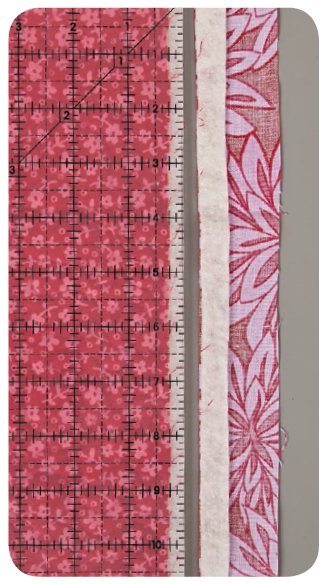
Trim outer edges of quilt, leaving ½˝ of backing and batting beyond edge of quilt top.
8.Finish the outer edges with continuous bias binding (see Continuous Bias Binding).
9.Make a hanging sleeve and label, and attach them to the back of the quilt.
Freshen It Up
Quilts with felted wool appliqué can be freshened up with a quick toss in a dryer set to air dry (no heat). This helps to remove dust and fluff them up.
Quilting Felted Wool
When quilting quilts made with cotton fabric, we usually quilt in-the-ditch around the edges of the appliqué. If you quilt in-the-ditch around felted wool appliqué shapes, the quilting tends to make the appliqué puff out too much.
Quilting through Multiple Layers
It is next to impossible to hand quilt through two or more layers of felted wool. If you want to quilt in these areas, quilt by machine. If you do decide to hand quilt, take your needle to the back of the quilt with each stitch. This is called stick-and-stab quilting or stab-stitch quilting.
Some of the quilts in this book are both hand and machine quilted.
Whether you are quilting by hand or machine, what works better is to quilt the background lightly, and not too close to the edges of the appliqué. Too much quilting will distort the appliqué. The same is true with quilting inside the appliqué shapes—less is better.
When you are trying to decide on a pattern to quilt in the background, look to the fabric first. If there is a pattern in the background fabric, you can quilt around the motifs. If that isn’t an option, choose a pattern that complements the appliqué design and that is not too tight.
We recommend that you use a 40-weight cotton thread, such as King Tut by Superior Threads, for machine quilting felted wool projects. It is a nice weight to use with the thick felted wool fabrics, especially when you are quilting through multiple layers of felted wool.
Use a closed-toe foot, if you have one, when machine quilting a quilt with felted wool appliqué. The blanket stitches at the edges of the shapes can get hung up on an open-toe foot.
If you are hand quilting, you can use a hoop or not. If you use a hoop, put the quilt in the hoop but don’t tighten the outer ring. Press down with your hand to loosen the tension on the quilt; then tighten the hoop.
Hand quilted stitches made with perle cotton thread look great with felted wool appliqué. This thicker thread holds its own next to the thick felted wool. When hand quilting with perle cotton, use any of the needles listed in Basic Supplies. Make stitches that are ⅛˝ long, or longer.
You can combine hand quilting with perle cotton and machine quilting—or you can quilt the entire project by hand or by machine.
Continuous Bias Binding
Fabric strips cut on the bias are stretchy. These stretchy strips are perfect for binding, cording, bias stems, and piping. Make a continuous bias strip when you need more than a short length of bias. A surprisingly small amount of fabric makes quite a bit of bias with no waste.
We make continuous bias strips 2½˝ wide for binding and 2˝ wide for cording; the size of the square you begin with determines how long the continuous bias strip will be. Refer to the specific project instructions for the size of the square needed for that project.
1.Start with a square of fabric and cut it in half diagonally.
2.Sew together the 2 triangles, right sides together, as shown. Be sure to sew the edges that are on the straight of grain.
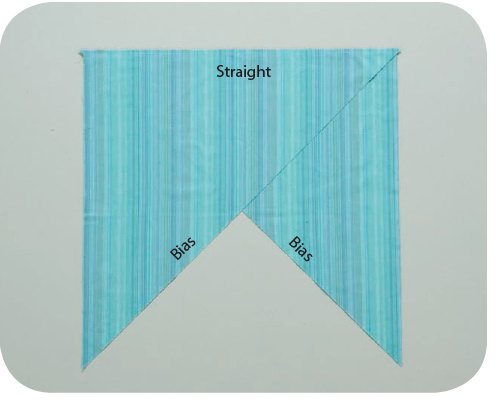
Sew together straight-of-grain edges of triangles.
3.Press the seam allowances open. Make a short cut 2½˝ wide (2˝ wide for cording) into each side as shown.
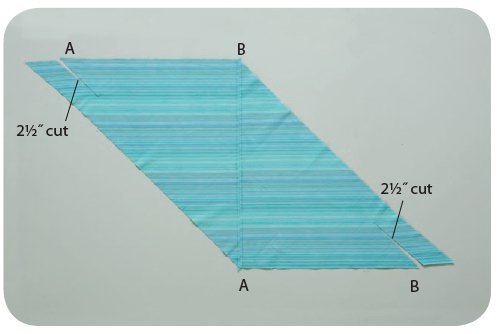
Make short cut into each side.
4.Match the A’s and B’s with the fabric right sides together. Pin and sew. Press the seam open.
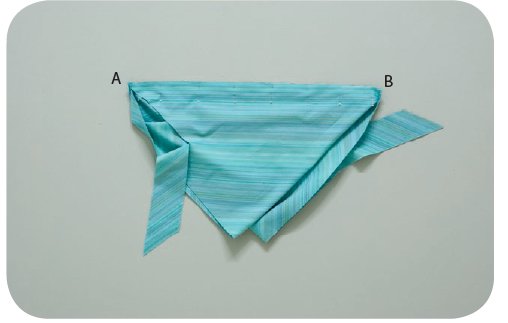
Pin and sew; press seam open.
5.You have sewn the fabric into a tube. Use a rotary cutter and ruler to cut the continuous bias strip 2½˝ wide (2˝ wide for cording) from a single side of the tube.
6.Press the binding strip in half lengthwise, wrong sides together. It is now ready to use to bind the edges of the quilt.
Straight-Grain Binding from Strips
1.Cut strips across the width of the fabric as designated by the pattern. Angle both ends at the same 45° angle.
2.Place 2 strips right sides together. Offset the ends so that a V is formed at the ¼˝ seamline.
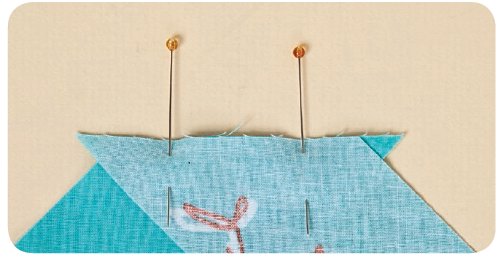
Offset ends and sew together strips.
3.Sew together the strips, end to end, with a ¼˝ seam. Press the seams open. Trim away the dog-ears that extend beyond the edges of the strips.
4.Press the binding strip in half lengthwise, wrong sides together. Be sure to use a walking foot to sew this binding to the quilt.

Sewing Binding to the Quilt
It works best to sew binding to the quilt with a walking foot.
1.Make a continuous bias strip 2½˝ wide by the length specified in the pattern. (Refer to Continuous Bias Binding).
2.Cut the first end of the strip at a 45˚ angle. Turn under this end ½˝ and press.
3.Press the binding strip in half lengthwise, wrong sides together.
4.With raw edges even, pin the binding to the edge of the quilt top beginning a few inches away from a corner. Start sewing 6˝ from the beginning of the binding strip, using a ¼˝ seam allowance.
5.Stop ¼˝ away from the corner and backstitch several stitches.
6.Fold the binding straight up as shown. Note the 45˚ angle.
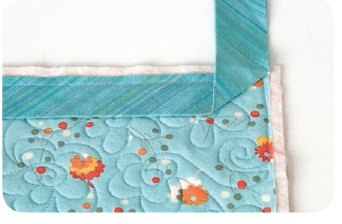
Fold binding up.
7.Fold the binding straight down, pin in place, and begin sewing the next side of the quilt.
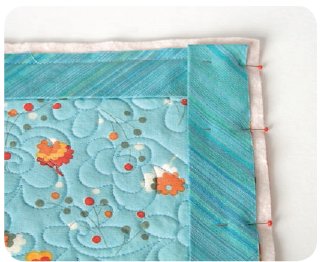
Fold binding down and begin sewing.
8.Sew the binding to all sides of the quilt, following the process in Steps 5–7. Stop a few inches before you reach the beginning of the binding, but don’t trim the excess binding yet.
9.Overlap the ends of the binding and cut the second end square. Be sure to cut the binding long enough so that the cut end is covered completely by the angled end.
10.Slip the squared end into the angled end.
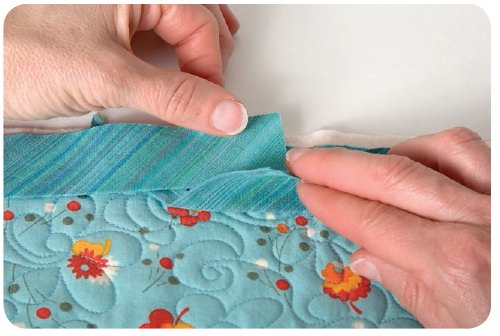
Slip squared end into angled end.
11.Pin the joined ends to the quilt and finish sewing the binding to the quilt.
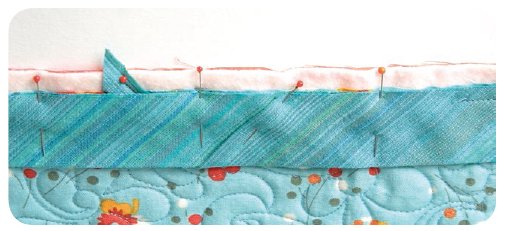
Pin and finish sewing.
12.Turn the binding to the back of the quilt, covering the raw edges. If there is too much batting, trim some to leave the binding nicely filled. Hand stitch the folded edge of the binding to the back of the quilt.
Piping
Piping makes a very nice edge on any pillow, including the leaf pillows in this book (Leafy Pillows).
1.Make a strip of continuous bias binding (see Continuous Bias Binding). Cut the strip 2˝ wide for cording.
2.Gently press the continuous bias strip in half lengthwise, wrong sides together.
3.Cut the first end of the bias strip at a 90˚ angle. Turn this end under 1˝, and press.
4.Place ¼˝ cotton piping cord down the lengthwise fold of the bias strip, ½˝ from the first end of the strip.
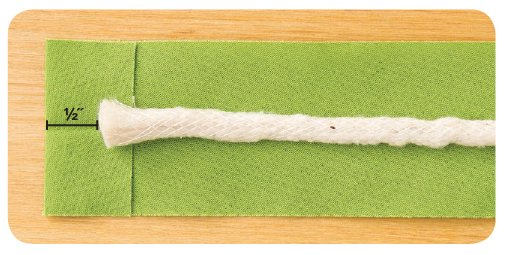
Place piping cord ½˝ from first end of strip.
5.Using a zipper foot and matching thread, sew the piping cord into the bias strip beginning ¾˝ from the beginning of the strip. Use a relatively long stitch length.
6.Trim excess fabric, leaving a ¼˝ seam allowance. Do not trim excess fabric at the first end of the strip—you’ll want this fabric to hold onto when you hide the end of the cord.
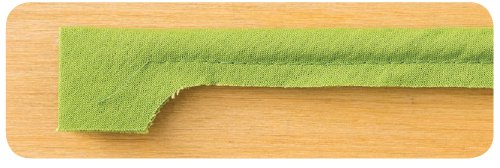
Trim excess fabric next to cotton cord, leaving ¼˝ seam allowance. Do not trim excess fabric at first end of strip.
7.With raw edges even, pin the cording to the edge of the pillow front. Do not begin at a corner.
8.Start sewing ¾˝ away from the beginning of the cording strip, using a ¼˝ seam allowance, matching thread, a long stitch length, and the zipper foot. The corners will be rounded. Make sure that they all have the same degree of roundness.

Corners will be rounded; make sure they all have same degree of roundness.
9.Work your way around the pillow top. When you get back to the beginning, cut the cording so that it is even with the end of the cotton cord that lies inside the first end. Nestle the cut end inside the first end of the cording. Sew it in place. Cut off the excess fabric at the beginning of the strip.
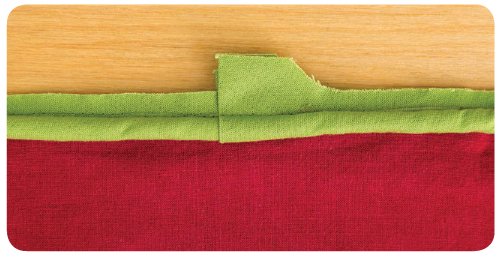
Nestle ends of cording together and sew cording in place.