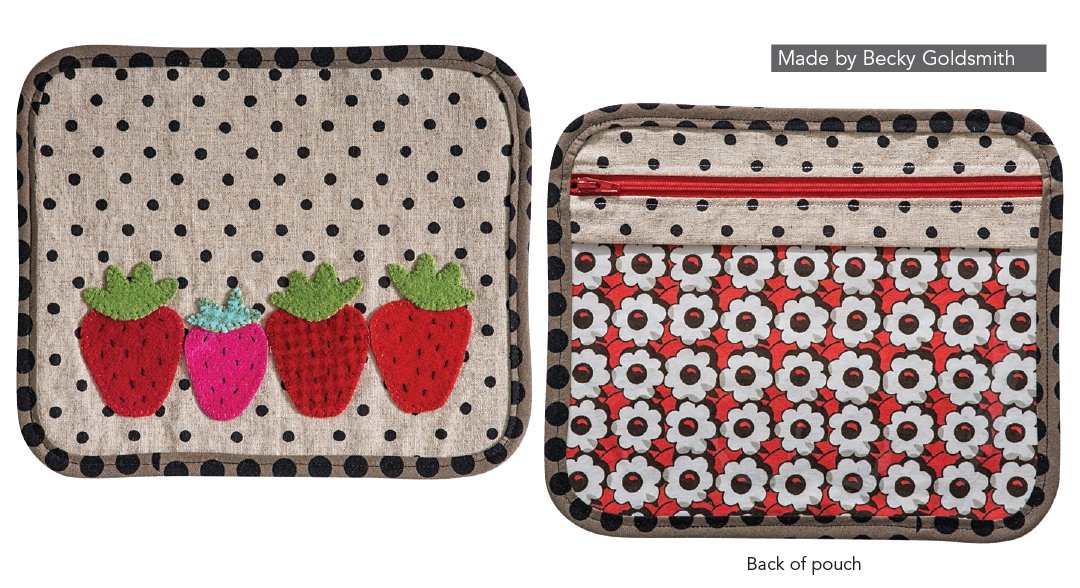
Strawberry Zip Bag
FINISHED SIZE: 9½˝ × 8˝

This handy pouch is both cute and functional. After you see how fast and easy it is to make, you’ll want to make them for all your friends.
Materials
•Pouch front and zipper facing fabric: 1 fat quarter
•Lining fabric: 1 fat quarter
•Appliqué fabrics: A variety of scraps of felted wool
•Binding: 1 fat quarter
Additional supplies
•Self-adhesive laminating sheets: 1 sheet
•Clear vinyl for overlay and to sew into pouch: ¼ yard of 54˝ wide OR ⅓ yard of 16˝–18˝ wide
•Fusible web:
1 sheet of SoftFuse OR ⅛ yard of 18˝-wide fusible for the appliqué
AND
1 piece 8½˝ × 10˝ or ¼ yard of 18˝-wide fusible for the lining
•Appliqué threads: Perle cotton size 12 OR Aurifil wool in colors to match or complement the fabrics
•Nylon zipper, 16˝ or longer: 1
•1˝ bias tape maker (optional)
•Wonder Clips or binding clips (optional)
Cutting
WOF = width of fabric
Pouch front and zipper facing fabric
Cut 1 rectangle 9½˝ × 11˝ for the pouch front.
Cut 2 strips 1½˝ × 11˝ for the zipper facing.
Lining fabric
Cut 1 rectangle 8½˝ × 10˝.
Clear vinyl
Cut 1 rectangle 5¾˝ × 9½˝.
Binding
Cut 2 strips 1¾˝ wide × 24˝ from the true bias of the fat quarter.
Pouch Assembly
Refer to General Appliqué Instructions as needed. Seam allowance is ¼˝.
1.Make templates for the pouch using strawberry shapes 26–29 from the Fruitful Market Basket patterns.
2.Draw an 8˝ × 9½˝ rectangle on a piece of paper. Draw horizontal and vertical centerlines on the rectangle. Refer to the appliqué placement diagram (at right) and place the templates on the paper.
3.Trace around the templates to make a pattern. The tops of the larger strawberries touch the horizontal centerline, and the strawberries should almost touch each other.
4.Make an overlay from the pattern.
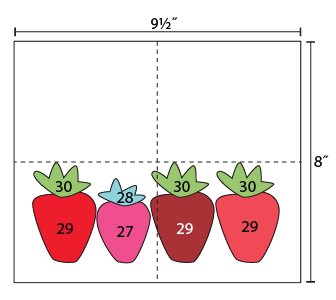
Appliqué placement
5.Press the background in half horizontally and vertically. Place it on your design wall.
6.Refer to Preparing to Stitch to choose fabrics, fuse the fusible web to all the felted wool appliqués, and cut them out.
7.Place the appliqué pieces on the background on your design wall. Use the overlay to place the appliqué pieces in the proper position, or place them by eye. Play with color and fabric choices until you are happy with the way the block looks.
8.Fuse and appliqué the pouch front. Select your appliqué stitch from Stitches for Appliquéing with Felted Wool. Embroider straight lines through all layers for the seeds.
9.Follow the manufacturer’s instructions and press the fusible web to the wrong side of the lining fabric. Fuse the lining fabric, centered, to the wrong side of the pouch front. Use a nonstick pressing sheet to protect the iron and ironing board.

Fuse lining to wrong side of pouch front.
10.Press the lined pouch front on the wrong side, and trim it to 8˝ × 9½˝.
Preparing the Zipper Side of the Pouch
1.Move the zipper pull down about 13˝, opening the zipper.

Sew and press zipper facing strip to each side of zipper.
2.Using the zipper foot on your sewing machine, sew a zipper facing strip to each side of the zipper, right sides together. Open out the facings and press.
3.Close the zipper. Trim the pull end as shown, leaving ½˝ of fabric and zipper tape extending beyond the zipper pull. Measure 9½˝ along the length of the zipper and trim away the excess fabric and zipper.

Trim excess zipper and facing.
4.Place the zipper unit right side up on a table, with the zipper pull on the right. Clip, and then sew, the clear vinyl to the zipper unit as shown.
5.Open up the seam and finger press the seam allowances toward the zipper facing.

Clip and sew vinyl to zipper.
Binding Preparation
1.Trim an end of each bias strip so that both ends are at the same 45° angle.
2.Refer to the photo in Straight-Grain Binding from Strips to place the 2 strips right sides together. Offset the ends to form a V at the ¼˝ seamline. Sew the bias strips right sides together, end to end. Press the seam allowance open.
3.If you have a bias tape maker: Follow the instructions in this step; otherwise, go to Step 4.
Feed an end of the strip through the bias strip maker. As you move the tool down the strip, the edges are folded in toward the center of the strip, wrong sides together. Move the tool slowly and press with a hot iron as you go. If you use steam, be careful not to burn yourself.
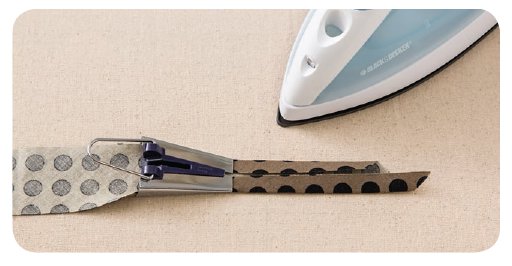
Feed bias strip through bias tape maker.
Fold the pressed bias in half, with the raw edges to the inside of the finished bias tape.

Fold bias in half.
4.If you don’t have a bias tape maker: Fold the bias in half and press. Unfold, fold the raw edges to the fold line, and press. Fold the bias tape in half.
Clear Vinyl Sewing Tips
•If you pin through the vinyl, the pins will leave holes in the vinyl. If you don’t have binding clips you can try using hair clips or a glue stick.
•It is easier to sew with the vinyl on top, not next to the feed dogs. The vinyl wants to grip the bed of the sewing machine, making it harder to sew smoothly. If you do have to sew with the vinyl side down, place tissue paper between the vinyl and the bed of the machine to keep it from sticking.
•Use a walking foot when sewing with the vinyl on top.
•Set the machine to a relatively long stitch when sewing vinyl. If you have too many stitches close together they can tear the vinyl at the seamline.
Strawberry Pouch Assembly
1.Make the corner template using the pattern (below).
2.Clip the 2 sides of the pouch with wrong sides together. Be sure that the front and back are oriented the same way, with the appliqués and the vinyl at the bottom.
3.With the zipper/vinyl side up, baste together the 4 edges of the pouch on the sewing machine with a scant ¼˝ seam allowance.
4.Place the template on each corner of the pouch, lining up the edge of the circle with the raw edges at each corner. Trace around the template and cut away the excess fabric to make rounded corners.
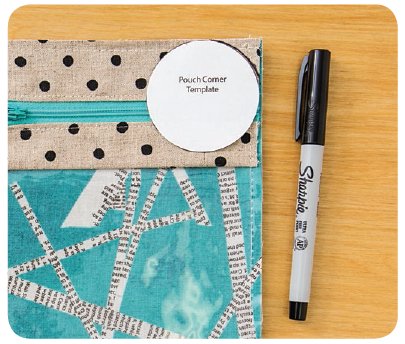
Use template to round corners.
5.Clip the binding to the edges of the pouch, encasing the raw edges as shown. Cut the bias where the ends meet straight, not at an angle, leaving ½˝ of overlap. Leave the first and last few inches of the binding unclipped.
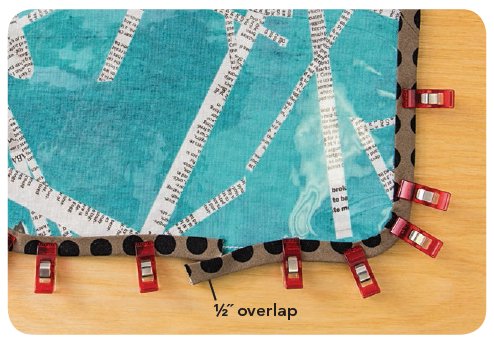
Clip binding to pouch.
6.Unfold the ends of the bias strips and pin them right sides together.
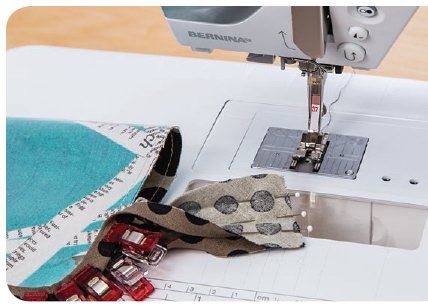
Pin together binding ends.
7.Sew together the ends. Finger-press the seam allowances open. Refold the bias strip and clip it in place, over the raw edge of the pouch.
8.Sew through all layers with thread that matches the bias strip.
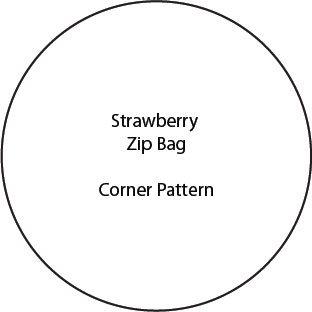
For all printable patterns or digital content: http://tinyurl.com/11109-patterns-download