Tulips Do the Polka
FINISHED BLOCK SIZE: 18˝ × 18˝
FINISHED QUILT SIZE: 45¾˝ × 45¾˝

Twirling tulips cut from red felted wool dance and polka dotted cottons bring a smile to your face. This pattern would also be fun to make with only cotton prints stitched with attitude. Color the tulips as Linda did and they are perfect for Christmas, or color them to match your decor.
Look close—there is one flower in each block that is different. When four blocks are set together, these different flowers form a subtle square in the center of the quilt that the more traditional tulips dance around.
Materials
For the background, Linda used LaCouture fabric by Stof. For the sashing and corner squares, she used Gypsy Full Moon by Felicity Miller for Westminster. The borders are Collage and Newspaper Stripe by Carrie Bloomston of SUCH Designs.
•Block background fabric: 16 squares, each 10˝ × 10˝ OR 1¼ yards of 1 fabric
•Sashing and border corner squares: ½ yard
•Outer border: ½ yard
•Appliqué fabrics:
Outside of tulips (cotton polka dots): ¼ yard each of 4 different polka dots for the traditional tulips
Flowers and inside of tulips (red felted wool): 1 yard or 5 Chubbies (16˝ × 16˝)
Calyx (green felted wool): ¼ yard or 1 Commercial Chubby (16˝ × 16˝)
Leaves (green felted wool): ¼ yard or 1 Commercial Chubby (16˝ × 16˝)
Block center (red plaid felted wool): A large scrap or 1 Chunk (9˝ × 10˝)
•Binding: ⅞ yard
•Backing and sleeve: 3⅛ yards
•Batting: 54˝ × 54˝
Additional supplies
•Self-adhesive laminating sheets: 2 sheets
•Clear vinyl: ½ yard of 54˝ wide OR ⅝ yard of 16˝–18˝ wide
•Fusible web: 17 sheets of SoftFuse OR 2 yards of 18˝-wide fusible
•Appliqué threads: Aurifil wool in colors to match or complement the fabrics
Cutting
WOF = width of fabric
Block background fabrics
Cut 16 squares 10˝ × 10˝ from a variety of fabrics OR cut 4 squares 20˝ × 20˝ from 1 fabric.
Sashing and border corners
See About Width of Fabric (below left).
Cut 6 strips 1¾˝ × WOF.
A: Subcut 6 strips 1¾˝ × 18½˝.
B: Subcut 3 strips 1¾˝ × 40¼˝.
Cut 1 strip 3½˝ × WOF. Subcut 4 squares 3½˝ × 3½˝ for border corners.
Border
Cut 4 strips 3½˝ × 40¼˝ for borders.
Binding
Cut 1 square 26˝ × 26˝ to make a 2½˝-wide continuous bias strip 220˝ long for the binding (see Continuous Bias Binding).
About Width of Fabric
It is true that most fabrics off the bolt are a bit wider than 40˝, even after washing and drying. However, we don’t calculate our yardage amounts for fabric that is wider than that because, if you are unlucky and your fabric is barely 40˝ wide, you won’t have enough and you will be unhappy. We don’t want you to be unhappy.
That said, three sashing strips and the four border strips are cut 40¼˝ long. We are 99 percent positive that you will be able to cut these strips from the width of the fabric without having to piece them. However, if the fabric is just a bit too short you will have enough to be able to add to the strips to get them to the proper length.
Block Assembly
Refer to General Appliqué Instructions as needed.
1.Make templates and overlays for the block using the Tulips Do the Polka patterns.
2.Place the 10˝ × 10˝ background squares on your design wall. Play with their placement until you are happy. Sew together the squares with a ¼˝ seam allowance into Four-patch blocks. Press seam allowances in alternate directions. Place the backgrounds on your design wall.
OR, if you cut 20˝ × 20˝ background squares, press them in half horizontally and vertically. Place them on your design wall.
3.Refer to Preparing to Stitch to choose fabrics, fuse the fusible web to all the felted wool appliqués, and cut them out.
4.Place the appliqué pieces on the backgrounds on your design wall. Use the overlay to place the appliqué pieces in the proper position, or place them by eye. Remember that the 3-petal tulip in each block points to the center. Play with color and fabric choices until you are happy with the way the block looks.
5.Fuse and appliqué the blocks. Select your appliqué stitch from Stitches for Appliquéing with Felted Wool.
6.When the appliqué is complete, press the blocks on the wrong side, and trim them to 18½˝ × 18½˝.

Appliqué placement
Quilt Assembly
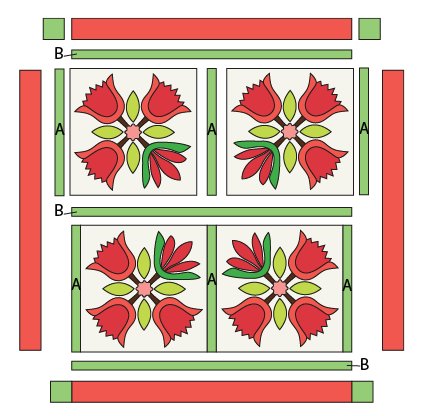
Refer to the quilt assembly diagram (below) for quilt construction. Seam allowances are ¼˝.
1.Place the blocks, sashing, border strips, and border corners on your design wall.
2.Refer to the quilt assembly diagram and sew the A sashing strips between the blocks in both rows and to the ends of both rows. Press the seam allowances toward the sashing.
3.Sew a B sashing strip horizontally between the 2 rows. Press the seam allowances toward the sashing.
4.Sew a B sashing strip to the top and bottom of the quilt. Press the seam allowances toward the sashing.
5.Sew the side borders to the quilt. Press the seam allowances toward the sashing.
6.Sew a corner square to each end of the top and bottom borders. Press the seam allowances toward the border corners.
7.Sew the top and bottom borders to the quilt. Press the seam allowances toward the sashing.
8.Layer and baste the quilt. Quilt by hand or machine, and bind. Refer to Finishing Techniques.

Quilt assembly