
While many of the techniques shown in this section for building islands and penninsulas highlight kitchen uses, many basements, and family room are now using these special cabinets to leave an open room feel, but still divide the area into separate functional spaces.
Seating at an island or peninsula that has an overhang usually means using stools or high bar-style chairs. Seat height is determined using the rule of 12s, which is a relationship of countertop to chair height. The standard 30″-high desk needs an 18″-high chair. An overhanging countertop that is 36″ high requires a stool with a seat height of 24″. Simply stated, the seat height should be 12″ lower than the work-surface height for maximum comfort.

Standard cabinet depth and width can be modified to build islands and peninsulas. Islands without seating can be standard-or increased-depth base cabinets. However, always calculate the total depth adding the doors, overhangs and finish trim on the rear of the cabinets. The ends of the island are finished because they are exposed, so remember to account for the extra width when determining countertop measurements.


Traffic patterns and safety are a concern when designing islands and peninsulas. Kitchen islands may be freestanding units or placed against a wall, more properly called a peninsula, and often define traffic patterns in the room. For this reason, countertop edges should be designed and constructed to minimize accidents, particularly with small children. Order your island countertops with radius edges or build a custom countertop with mitered corners. Always account for the loss in length because of these eased or radius ends when calculating your requirements.

I normally don’t use adjustable legs for island or peninsula cabinet bases, because the cabinets must be anchored to the floor. Construct a base platform using plywood or construction-grade 1½″-thick lumber that’s 4¼″ high. Face the platform with 4¼″-high hardwood that matches the door and face-frame wood as the finished kick plate. The base frame, with finished face, should be 3″ to 3½″ in from all cabinet edges that are open.
Locate the platform on the floor and level if necessary. Use brackets to secure it to the floor. Anchor the cabinets through the bottom board to the platform using screws. The exposed heads of the screws can be covered with caps.

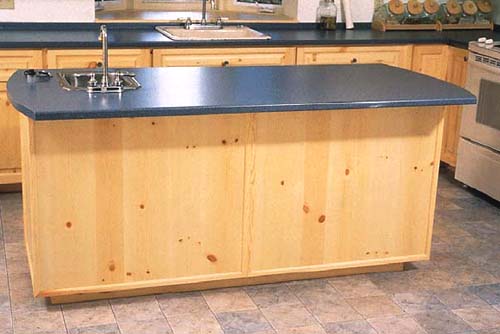
Islands must be finished on all four sides and peninsulas require finished surfaces on three sides. The doors and face frame are on one side, and the exposed melamine PB carcass is usually covered with ¼″-thick veneer plywood.
The perimeter of these covered sides can be trimmed with doorstop moulding with a right-angle trim piece on the corners. It’s necessary to widen the stiles by ¼″, making the overhang on the carcass sides larger to accommodate the thickness of plywood and perimeter trim.

Island and peninsula backs can be finished with ¼″ veneer plywood and a flat trim around the perimeter of the cabinet. You can choose from dozens of trim options and styles to make these large surfaces interesting.

Changing the depth of base cabinets for an island work center is not a difficult process. The only carcass components that are altered are the depths of the sides and bottom board. All other dimensions remain constant in the standard cabinet.
The same holds true for increased-depth cabinets. These minor changes to meet custom requirements show the flexibility of this building system. You should be able to make changes to any of the standard cabinet dimensions to meet all of your needs.
Kitchen islands, whether fixed, peninsula or movable, give you an opportunity to design some unique and useful features in a kitchen. They can increase the counter space in a small kitchen and add a bit of flair to a large area. Often, I use the island and peninsula concept as area dividers to help define the kitchen space while maintaining the open feeling that most people desire in today’s kitchens.
White melamine PB covered with ¼″ veneer plywood isn’t the only sheet material combination that can be used to build islands and peninsulas. Cabinets can be constructed using  -or ¾″-thick veneer-covered plywoods or particleboards. Both faces are covered with veneer that matches the cabinet doors and face frames, so all that’s required is a little trim around the perimeter.
Kitchen islands that can be moved, sometimes called portable work centers, are another option that increases the functionality of a kitchen. Additional workspace is often required to meet meal preparation demands.

Any base cabinet can be adapted for use as a mobile island with a few modifications. For instance, if you want a movable island, construct a standard base unit without the legs. To strengthen the bottom board, attach pieces of ¾″ wood, about 4″ square, on all four corners of the cabinet. Make certain the wood fully covers the bottom edge of the cabinet side, so the wheel will properly support it. The overhang of the face frame will hide the front edges of the wood supports. The sides and back can have ¼″ plywood veneer installed.
Attach four wheel assemblies to the bottom of the cabinet. Build the cabinet with l¼’-wide stiles on the face frame, in place of the standard 1″-wide stiles, so you can install veneer plywood and doorstop moulding as the finish trim. The back of the cabinet can be finished in the same manner. Buy or build a countertop that overhangs the cabinet on all edges. Angle brackets will secure the countertop to the cabinet. You can also install a solid-surface countertop or even a granite slab, which will give you a beautiful and unique island.
The interior of the island cabinet can be designed in many ways. A standard drawer-over-door base will give you a useful place to put cutting utensils and other equipment. A full-door standard cabinet can be fitted with multiple adjustable shelves for storage. Vertical fixed shelving is another option if the island will be used to store cutting boards and large trays.