The simplest and least expensive approach in a renovation project is to use one of the many styles of roll or postformed laminate countertops that are readily available. Laminate is applied under pressure over a particleboard form that has a curved, moulded backsplash and front edge. It is relatively inexpensive and available at one of the many countertop specialty companies in most major cities.
If you’re building a great deal of custom cabinetry, you might have some problems with postformed tops, as they are fairly standard in size and design. However, this style can be used for the majority of projects.
Postformed countertops are usually sold by the running foot. You can get bartop countertops, island tops and preassembled or assemble-yourself angled tops. Most countertop suppliers will cut and assemble right-angle countertops, including ones that go from a standard countertop to a bartop on a peninsula.
If possible, have the supplier assemble the right-angle runs, as they seem to produce a better joint in their shop than can be achieved on the job site. Suppliers have roll countertop designs called bullnose, flat-top, traditional, etc., and countertop styles such as bartop, regular and island. Finish materials are numerous and varied from manufacturers such as Wilsonart, Formica and many others. Costs are reasonable and they can supply countertops for most of your needs.

A popular material is the so-called solid-surface countertop, with product names such as Corian and Gibraltar. This can be an expensive alternative, and specialists trained by the manufacturers normally do installation. Not everyone can afford the luxury of this material, but you may find it fits within your budget. The demand seems to be increasing, and the cost is getting lower as more manufacturers enter the marketplace. Contact two or three of your local countertop suppliers and speak to them about their pricing schedule, product supply, sample material and literature.
Ceramic tile is used as a countertop material in some kitchen renovation projects. It is one of the oldest and most versatile materials. Available in many sizes, shapes and styles, this long-lasting and durable product can lend itself to many design applications. Ceramic tile is stain resistant and heatproof. However, the grout lines require constant maintenance due to the possibility of staining from food. It’s best to seal the grout with a high-quality silicone sealer prior to use.

Ceramics are often used on the wall between the upper and lower cabinets because they are easy to clean. Application on the walls is a straightforward process and fairly simple as there are normally only three or four rows of tile to apply. Information on wall tile application is available at most tile specialty stores and is quite often a do-it-yourself procedure.
Countertop ceramic tile installation is also a relatively simple operation that requires a bit of skill and a lot of patience. Tile application over water-resistant plywood seems to work well with the proper glue and grout. Again, ask the experts at the tile center for the right combination with the product you purchase. Choose the tile, but remember to calculate the width of tiles and tile spacing before cutting your plywood to the correct size. With this method you can avoid a lot of unnecessary tile cutting. Band the countertop edge, following tile installation, with a 1″ × 2″ hardwood strip to match the wood on your cabinets for a professional-looking finish. If you want to avoid a wood edge, you can purchase special edge tiles with a raised lip to complete the installation.
Natural materials such as granite, shown in the photo below, are becoming popular. The cost is toward the high end, often in the same range as solid-surface materials. It is a beautiful and long-lasting countertop option that you might want to investigate.
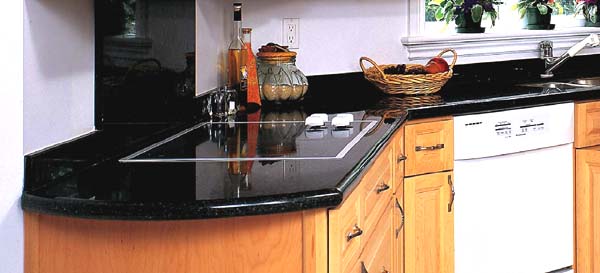
Granite is available in many colors, but not in as wide a range as the high-pressure laminates. The colors are natural, so you’ll notice some variance in long runs, and from section to section, if your kitchen has a number of countertop runs. Stone is normally installed by specialists because of the training and tools that are required. Diamond cutting blades and heavy-duty polishing equipment are just a couple of the specialty tools required. Surprisingly, stone can break or be easily damaged if not installed properly, so the work is best left in the hands of professionals.
This countertop style is easily made and well within any woodworker’s capabilities. The process involves attaching a wood edge trim to a panel, called the substrate, and covering the top with a high-pressure laminate.
These laminates are made with decorative surface papers impregnated with melamine resins, which are pressed over kraft paper core sheets. These sheets are then bonded at pressures of 1,000 pounds or more per square inch, with temperatures approaching 300° F (149° C). The finished sheets are trimmed, and the backs are sanded to facilitate bonding. Most manufacturers have many patterns available.
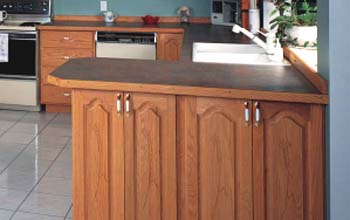
High-pressure laminate materials come in two thicknesses. The thinner version is used to manufacture postformed countertops that are common in almost every kitchen and bathroom. The thicker, general-purpose (GP) laminates are used for applications like the top in the photo at right. The GP material is able to stand more abuse because of its thickness.
This great-looking wood-edged countertop style has a number of uses. It can be used as a kitchen or bathroom top, a work center/desk or as a utility countertop. I’ve used it in dozens of projects over the years. And, because the laminate is available in 4′ × 8′ or 5′ × 12′ sheets, most tops can be made without a seam.
You can use any stable sheet material as the substrate, including particleboard, plywood or medium-density fiberboard. I recommend a minimum ¾″-thick substrate for strength and stability. The wood edge can be any hardwood or softwood that complements your cabinets.
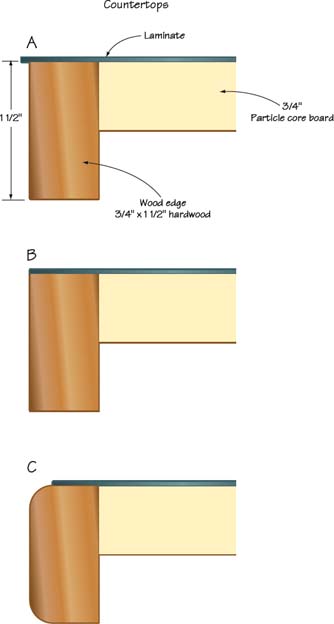

1 Cut the substrate sheet material to the required size. Reduce the desired finished size by ¾″ where a wood edge will be installed. I am using ¾″-thick particleboard as my substrate for this top.

2 Attach the wood edge with glue and screws covered by wood plugs. You can also use dowels or biscuits. Any of these three options will work equally well. Be sure the top of the wood edge and the surface of the substrate are perfectly flush. If not, sand both to achieve a flat, smooth surface. This is a critical step, as the laminate won’t bind properly to an uneven surface.
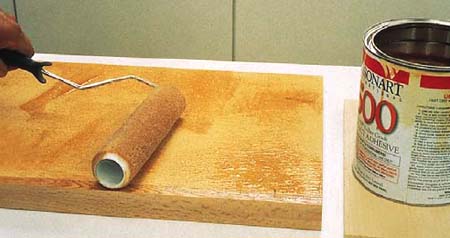
3 Cut the laminate 1″ longer than the substrate on all edges. That extra width and length will allow for any slight positioning errors. Apply a contact adhesive to both the underside of the laminate and the substrate top. Make certain there’s an even coat on both surfaces, and that all areas are covered. Many types of contact cement are available. I’m using a roller-grade liquid, but brush and spray contact cements are available at most home stores.

4 The contact cement is set when it’s dry to the touch. Read the instructions listed on your container for best results. This adhesive will bond only to another surface with the same glue applied. Therefore, place dry sticks on the substrate to keep the materials from touching until the laminate is correctly positioned. Be careful: Once the two glued surfaces touch, they are bonded!
Remove the center stick and press the laminate in place with your hand. Move your hand from the center to the outside edges pushing out any trapped air bubbles. A pressure roller is the best tool to use to make certain the laminate is completely bonded to the substrate. If you don’t have a commercial roller, use a wooden rolling pin or large wood dowel. Again, roll from the center to the edges, paying particular attention to the laminate edges.
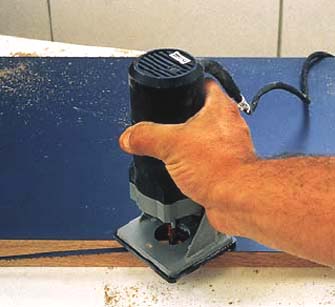
5 The excess laminate can be cut flush to the wood edge using a flush-trim router bit. These bits have a guide bearing that tracks along the substrate and wood edges, cutting the laminate flush.
I’m using a small trim router; however, these trim bits will work fine in any router. Always verify that the bit is clean and the bearing is in good shape.

6 Use a roundover bit in a router to make a simple rounded profile on the bottom of the wood edge.
Cut the top or laminated surface of the countertop using the same roundover bit. Set the bit so its straight cutters, which are above the curved portion of the bit, cut slightly lower than the thickness of the laminate material. That cutting pass will trim the laminate cleanly and expose the wood under the laminate, as well as rounding over the top edge.
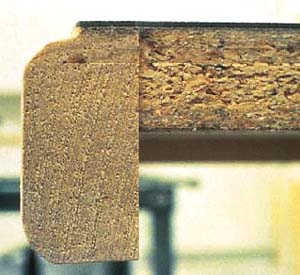
7 The wood edge and laminate profile should look like the end view shown in this photograph. Once all the cutting has been completed, sand the wood edge smooth and apply a finish.
If you have children running around, or desire a softer look, the substrate can be angle-cut, fitted with 1′ × 2′ wood banding and sanded round prior to laminate installation and routing.
The edge trim and roundover bits will follow the wood-edged profile and cut the laminate to almost any shape. The wood-edged tops can be cut into many shapes to meet your requirements. It’s a flexible style of top that’s easily customized.
Backsplash material is normally 1×3 hardwood of the same type as the cabinet wood. Attach the backsplash material to the wall with screws in countersunk holes. Cover the holes with wooden buttons, or attach the wood edge to the top with 1½″ screws, from the underside, before the countertop is installed. It’s also good practice to run a bead of clear silicone between the wood backsplash and laminate to seal the joint.

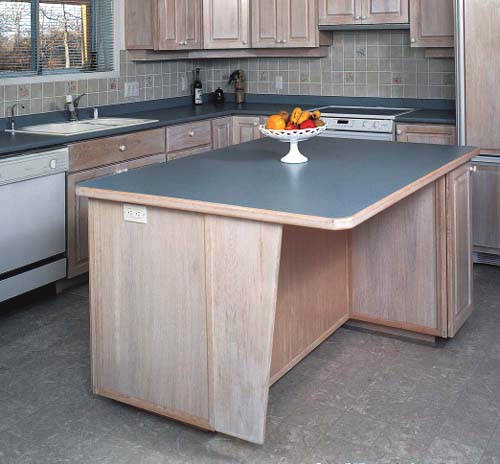
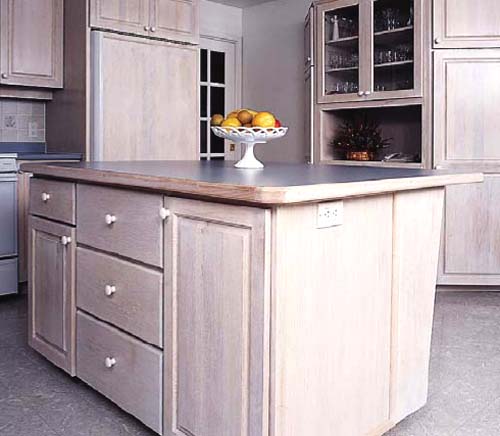
Island countertops have four exposed counter edges and are usually a custom width. These top styles can be ordered from the supplier, or you can use the custom wood-edge style. Bartop, island and peninsula cabinet systems are becoming more and more popular as people tear down walls to create open-concept homes. Base cabinets with fancy tops are created as room dividers, providing workspace but maintaining an open feeling. Many of my new kitchen projects use the island and peninsula concept to add excitement to newly created spaces, simply by removing a wall.
Using general-purpose laminate, which is a thicker material, will provide you with a durable countertop. However, use care when cutting to avoid damaging the laminate. The best router bits are carbide tipped and work exceptionally well for this application.
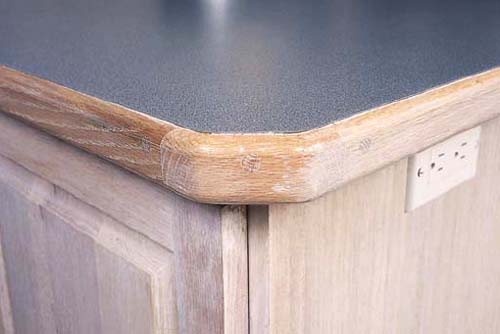
The wood edge in my case was oak, but any species can be used. Stick with the major brands of laminate material for the best results. High-quality material and contact cement will give you perfect results every time.
Some of the adhesives are toxic, particularly the petroleum-based products, so work in a wellvented area. And make sure you closely follow the application directions from the adhesive manufacturer, because heat range and humidity levels are important when using these products.