
Cabinet installation methods vary depending on the installer. The primary difference is whether to begin by installing the uppers or the bases. Each method has its merits, as there is no absolute correct way of installing cabinets. Find a process that you are comfortable with to achieve the end result: properly installed cabinets. I will describe my method of cabinet installation based on our sample kitchen layout at the beginning of the book.
Unless you’re building cabinets for a new home, you’ll be faced with tearing out the existing kitchen cabinets. And unless they are reasonably modern cabinets, you’ll most likely find they were built in place.

Carpenter or stick built-in-place cabinets depend heavily on the structural support from existing walls. Therefore, finding fastening devices such as screws and nails can sometimes be quite a challenge. I’ve seen every fastening device under the sun when tearing out existing cabinets. It can be fun to see various support systems that have been installed.
Be careful and take your time tearing out old cabinets. Electrical wiring is often hidden, plumbing is sometimes routed through cabinets, and heating ducts may have been directed under the existing base cabinets.
In the interest of safety, I suggest you turn off the water supply and electrical service to the kitchen area, as well as other nearby rooms. This safety measure will help avoid accidents or damage should you inadvertently break a water line or cut a power cable.
Site preparation prior to new cabinet installation is an important process. Verify that water and waste supply lines are in the correct location, and that electrical service is sufficient and correctly positioned. If you plan to move the sink location, now is an excellent time to reroute supply lines. The frameless and face-frame cabinet building systems detailed in this book incorporate a full backboard on both upper and lower units. Therefore, you can remove wall sheathing to allow changes in supply line positioning.

The same is true with electrical service lines. Verify that outlets are in the correct location and at the correct height. Base cabinet height is 36″, but you must also account for the height of the countertop backsplash, which can often add an additional 4″ to the overall base height.
Use a long level or straightedge to check the wall condition. You’ll never find a perfect wall, but a wall stud that has badly bowed over time can cause problems during new cabinet installation. If you find a bad bulge in any of the walls, remove the sheeting and correct the problem.
You should be aware of some considerations before proceeding. Often a room is out of square and walls are not plumb. This can cause a number of problems during cabinet installation.
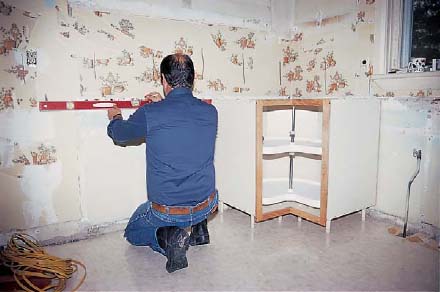
In our sample kitchen, I will go through the process as described, checking the room dimensions for cabinet runs that are between walls. For example, referring to the drawing in chapter twelve, the N to L base cabinet run is between two walls, so verify that your space requirements are correct as you install each cabinet. It’s possible for the wall at L to be out of plumb enough that your cabinet will not fit. Hold your level vertically on the wall to determine if the wall is out of plumb. It’s best to test fit your cabinets prior to anchoring them permanently in place.
In our sample kitchen, the upper cabinet runs are both closed runs. This is typically the most difficult installation. In this situation I would start in the corner with cabinet E and work out to both sides, always checking my remaining distances to avoid any serious problems. It can be frustrating if you have to remove installed cabinets to plane a face frame because you’ve run out of space.
The first step in cabinet installation is to determine the level or slope of the floor and how much the walls are out f plumb. This is your biggest challenge when installing kitchen cabinets. When wall are out of plumb, adjustable cabinet legs allow for easier installation as compared to the constructed base support assembly system. And the overhang of the face frame allows room for scribing cabinets to an out-of-plumb wall.
Draw a level line on the walls around the room at a reference height of 35¼″ from the floor. After drawing the line with a level, measure from the floor to the line at various positions around the room. Determine the highest point in the room. (It will be the place with the smallest distance from that level reference line to the floor.) Start your base cabinet installation from that high point, setting the top edge of the base at 35¼″. That height, plus the thickness of the countertop material, will set the top surface at the required 36″ above the floor.
All floors have a slope, some greater than others, and it’s important that you determine the high point. If you start installing cabinets in an area other than the high point, you may not have sufficient adjustment range on the legs.

1 Use a wall stud finder to locate the first and second stud.

2 Drive a small finishing nail into the mark and locate the outer limits of the studs. Mark the centers of both studs.

3 Measure the distance between studs and mark the stud locations around the room. You may want to check the locations with your stud finder to satisfy yourself that the stud center-to-center distances are staying constant.

4 Use a long level to extend the stud lines below the upper cabinet position and above the base cabinet tops.

5 Support the upper cabinets with blocks or a strong wooden box prior to removing screws or nails. The sudden weight shift downward when the last fastener is removed can be surprising. Always, if possible, enlist the help of someone to stabilize the cabinet as you remove the fasteners. Again, with respect to upper cabinets, remove all loose assemblies, such as shelves, to lighten them. You’ll also avoid the danger of having shelving fall on you should the cabinet suddenly tip. I remove the cabinet doors before taking the fasteners out to further lighten the load.
Removing base cabinets can be hazardous even though they appear to be sitting on the floor. Rotten floor support systems or poorly connected kick platforms may cause the base cabinet to fall forward when the last screw is removed. Again, enlist the aid of another person to support the assembly when removing fastening devices.

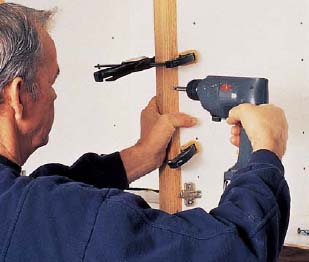
1 Install a base cabinet at the highest point in the room. If you cannot start at the highest point, be aware of the adjustment limits with the cabinet legs. Level that base cabinet and anchor it to the wall with 3″ screws into the studs. Four screws per cabinet are more than enough to firmly secure the base units.
After the first cabinet has been installed, continue in either direction, leveling and securing the cabinets. The procedure changes slightly with the second cabinet. For frameless cabinetry, join the front edge of the second cabinet flush with the first cabinet’s front edge and secure with 1″ screws through the cabinet sides. When installing face-frame cabinets, join the stiles together and use 1¼″ screws through the stiles. Now anchor the back of the cabinet to the wall.
2 When installing face-frame cabinets, remove the doors and clamp the left-side stile of one cabinet to the right-side stile of the adjacent cabinet. Be sure the face frames are flush with each other.
Drill a  countersunk pilot hole through one stile and partially into the other. Drill a hole slightly larger than the screw body thickness through the stile on the screw-head side to allow the screw to rotate freely in that stile to prevent bridging (the effect caused when the screw threads into both pieces of wood being fastened, preventing the pieces from being drawn tightly together). Fasten the stiles together with three 1¼″ screws at the top, middle and bottom. Then anchor the cabinet to the wall with 3″ screws through the backboard and into the wall studs.

3 The same procedure holds true for frameless cabinets, except they are tied together with 1″ screws or double-headed bolts at the front edge.

4 All cabinets, particularly the first upper and base, must be plumb. Use a long level to read the position, and shim the cabinet into plumb if necessary. A small fraction out of plumb will cause a great deal of trouble, particularly on long runs of cabinets.

5 A level cabinet is equally important. Use a good level to properly locate the cabinet before it’s permanently anchored to the wall.
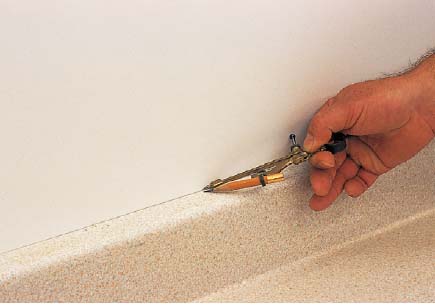
6 You may be required to scribe the stile if it isn’t tight against the wall or the countertop to achieve a snug fit along the wall contours. Check the fit after leveling the cabinet and use a compass, adjusted to the widest part of the gap, between the wall and stile, as your reference. Holding the point of the compass against the wall, draw a pencil line on the stile face. Use a sharp plane and remove wood up to the pencil line until you get a tight fit. You may find that a belt sander does the job when you have many contours in the wall.
The same process holds true for countertop fitting. A countertop usually requires scribing and fitting as most walls are not perfectly flat. Draw the line and use a belt sander to remove material.

7 Install the remainder of the base cabinets in the same manner. With respect to the sample layout, set the stile-to-stile spacing between cabinets K and J at 31″. This will provide clearance for a  countertop overhang on cabinet K and J and leave a 30¼″ space for the stove.

8 Install the countertop, scribing and removing material if necessary, so that the countertop fits tightly against the wall. Overhang the small countertop on base cabinet J by on each side. Use screws in the brackets to secure the countertop in place.

9 Attach the upper cabinets to the wall with four 3″ wood screws through the backboard into the wall studs. The first cabinet must be level and plumb, as it’s the reference point for all the upper cabinets. Verify your remaining space after installing each cabinet. With regards to our sample kitchen, cabinets A and H will probably require stile scribing to get a perfect fit.
Install the remainder of the upper cabinets, being sure they are well supported. Level the cabinets, screw the adjoining stiles to each other and anchor the cabinets to the wall. The bottoms of the stiles must be even on the cabinets. Reduced-height cabinets (cabinets G, C and A) should be installed with the cabinet tops in line with the top edges of the other upper cabinets.

10 Install veneer plywood on the underside of all upper cabinets with either contact cement or brad nails. I have also successfully used high-quality construction cement, which is much quicker to apply than contact cement.

11 Cut to size and install trim moulding on the top edge of the upper cabinets. Any errors in stile length cutting or gaps between the stiles can be left at the top of the cabinets and will be covered by the moulding. Trim moulding style is dependent on individual taste. I’ve installed everything from 1″ bead to 4″ crown moulding to achieve different finished appearances. Purchase short lengths of a number of moulding styles
Installing appliances is always challenging. Always verify your appliance dimensions before beginning the kitchen design process. One common point of frustration in the kitchen cabinetmaking industry is with ranges. Many cabinetmakers leave 31″ of space between lower cabinets for range placement. This allowance provides for countertop overhang on each cabinet side and ¼″ clearance between the countertop sides and the range for easy removal and replacement during cleaning. However, range hoods, which are installed above the range, are exactly 30″ wide and look properly installed when there isn’t any space on either side. The simplest way I’ve found to overcome the problem, and to have the upper and lower cabinets align, is to add ½″ to each upper cabinet stile on either side of the over-the-stove cabinet. The upper stove cabinet, being 30″ wide, will allow installation of the range hood without space on each side. The added stile width (now a 1½″ stile), on each of the upper cabinets to the right and left of the upper stove cabinet, will force them in line with the lower cabinets. This added stile width is only on the upper cabinet’s side that butts against the upper stove cabinet.

It’s important that you avoid racking (twisting) the cabinet during installation. Most walls are not straight. Many have irregular surfaces and are not plumb. When anchoring cabinets to the wall, verify that the cabinet back is touching the wall, and if there is a gap, use a shim to fill the space. I find cedar shims work well because they are tapered. Always check the level, front to back and side to side, as well as the plumb of each cabinet before and after you anchor it securely.

Cut the kickboards to length, install the plinth clips and secure the boards to the cabinet legs. Use butt joints where the kickboards intersect at right angles. If the floor is out of level, you may have to scribe the bottom of the kickboard to get a tight fit. Alternatively, you can use quarter-round moulding, which is flexible, to fill the gaps between the floor and the kickboard. Simply nail the quarter-round to the kickboard while holding it tightly against the floor.
Install doorstop moulding around the perimeter on the exposed base and upper cabinet sides. Use mitered corners with the moulding to form a perimeter picture frame. This adds visual depth to the cabinet ends. As well, any wall irregularities can be hidden, as the moulding is slightly flexible and can be pushed into the contours of the wall. It’s best to cut and install one moulding piece at a time to give you the tightest fit possible.