Tables are very important in presenting data in HTML. There may be instances where data needs to be displayed in tabular form on a website or webpage. This is where tables come in handy. Tables not only make reading tabular data easy, but also present information in a neatly fashion using columns and rows.
Tables are basically just a bunch of data arranged in columns and rows. Tables are defined with the table <table> tag. To create the other aspects of a table in HTML, you’ll be enclosing them within the opening <table> tag and the closing </table> tag. One such aspect would be the table row.
To create a table row, the <tr> must be used. Let’s look at the example below on how to define the table and its rows in HTML code:
1<!DOCTYPE html>
2<html>
3<head>
4<title>Creating Tables in HTML</title>
5</head>
6<body>
7<table>
8<tr></tr>
9<tr></tr>
10</table>
11</body>
12</html>
As you can see in our example code above, we’ve created a table by nesting a <table> and </table> tag within the body tag. In between the <table> and </table> tags, we’ve nested two lines of <tr> and </tr> tags which depicts the table’s rows. An important thing to remember about tables in HTML is that we never really create table columns per se. Instead, you just specify the number of cells each row must have and that automatically create columns for your table.
Cells, or table data, are created with the use of the <td> tag. A table data <td> basically act as containers for different elements like text, lists, and images, just to name a few. If you run the aforementioned HTML code example, you’ll see that the browser doesn’t render any tables at all. Do not worry. The reason why nothing is rendered is because we haven’t specified a border for our table yet. The table’s rows are already rendered; we just can’t see them yet since there are no borders to distinguish it from the rest of the background.
Let’s go ahead and create a table with rows and cells or table data in HTML below:
1<!DOCTYPE html>
2<html>
3<head>
4<title>Creating Tables in HTML</html>
5</head>
6<body>
7<table>
8<tr>
9<td>Data 1</td>
10</tr>
11<tr>
12<td>Data 2</td>
13</tr>
14<tr>
15<td>Data 3</td>
16</tr>
17</table>
18</body>
19</html>
As you can see in the example above, we’ve created a table with three rows. Each of those rows has a cell or table data. Looking at this come from a browser, you’ll see that the data are just arranged on top of one another. It doesn’t look like a table at all since there are no borders.
To put a border on our table, we must make use of the border attribute. Just like any attribute, we must insert it at the opening tag of the element where you want the attribute to be applied. Let’s take a look at our previous example below, but this time with borders incorporated into it:
1<!DOCTYPE html>
2<html>
3<head>
4<title>Creating Tables in HTML</html>
5</head>
6<body>
7<table border=”1px”>
8<tr>
9<td>Data 1</td>
10</tr>
11<tr>
12<td>Data 2</td>
13</tr>
14<tr>
15<td>Data 3</td>
16</tr>
17</table>
18</body>
19</html>
Looking at line 7 of our example HTML code above, you can see that we’ve applied the border attribute to your table element. Similar to the way we change the font size of a text, we assign a pixel value to our border attribute to determine the table’s border thickness; in this case we assigned a value of 1 pixel, which is the thinnest.
It may not seem much, but you just learned how to create a single column table in HTML. Now let’s go ahead and create another column for our table. As what was mentioned prior, there’s no way to create additional table columns in HTML. Instead, we horizontally add cells in a row to give the illusion of creating a column. Let’s see how this is done in the example code below:
1<!DOCTYPE html>
2<html>
3<head>
4<title>Adding Columns in HTML</title>
5</head>
6<body>
7<table border=”1px”>
8<tr>
9<td>Ball</td>
10<td>Red</td>
11</tr>
12<tr>
13<td>Umbrella</td>
14<td>Blue</td>
15</tr>
16</table>
17</body>
18</html>
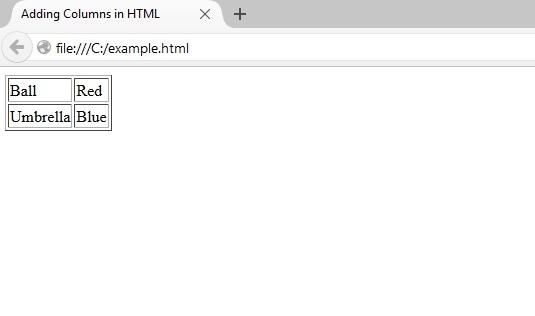
Remember that rows always go on a horizontal manner. Logically, if you add a new cell in a row, it could only go one way; horizontal. Therefore, if you keep on adding cells in each row, you’re virtually creating a column. Let’s try and render the above code in the browser.
The illustration above shows how our previous HTML code example is rendered in the browser. Notice how two new columns are formed after adding a second cell for each row in our table. Each time a cell is added in a row, they sit beside each other forming the illusion of a second column.