Now that we know how to make a complete border in HTML, the next thing that we'll do is put some style in our table to make it look more appealing. Check the code below out and then we'll go through the attributes that makes a table stylish line by line:
1<!DOCTYPE html>
2<html>
3 <head>
4 <title>Table Time</title>
5 </head>
6
7 <body>
8
9 <table style="border-collapse:collapse;">
10 <thead>
11 <tr>
12 <th colspan="2" style="color: red">Famous Monsters by Birth Year</th>
13 </tr>
14 <tr style="border-bottom:1px solid black;">
15 <th style="padding:5px;"><em>Famous Monster</em></th>
16 <th style="padding:5px;border-left:1px solid black;"><em>Birth Year</em></th>
17 </tr>
18 </thead>
19 <tbody>
20 <tr>
21 <td style="padding:5px;">King Kong</td>
22 <td style="padding:5px;border-left:1px solid black;">1933</td>
23 </tr>
24
25 <tr>
26 <td style="padding:5px;">Dracula</td>
27 <td style="padding:5px;border-left:1px solid black;">1897</td>
28 </tr>
29
30 <tr>
31 <td style="padding:5px;">Bride of Frankenstein</td>
32 <td style="padding:5px;border-left:1px solid black;">1944</td>
33 </tr>
34 </tbody>
35 </table>
36
37 </body>
38</html>
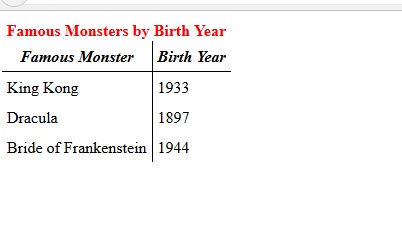
And here’s how it looks like when rendered in a browser:
Let’s start dissecting our code from line 9. As you can see this time around, instead of just declaring our table’s border to 1px using the border attribute, we’ve now declared an overall style for our table using the style attribute. For your style attribute, we’ve assigned it with a “border-collapse:collapse” attribute value.
So what does the border-collapse property do? What the border-collapse property basically does is it specifies whether the borders of our HTML table are collapsed into either separate mode (which is the default mode in HTML) or single border mode. The border-collapse has four different property values namely:
Collapse – With this property value, the borders of the table will be collapsed into a single border whenever possible. This means that border-spacing and void-cell properties will be bypassed.
Separate – With this property value, the borders of the table will be detached. This means that border-spacing and void-cell properties will be disregarded. This is basically the default border style in HTML.
Inherit – When you give the border-collapse property with the Inherit value, you’re basically giving this element the same value as its parent element. Of course, this is under the assumption that you’ve nested a table within another element. If the table element that you’re assigning this property value is not nested, then this would definitely not work.
Initial – Initial and Separate are basically the same. It sets the property back to its original value.
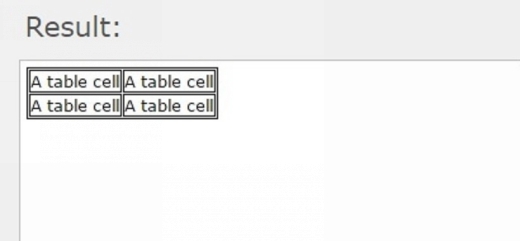
Let’s take a look at the illustration below and see how elements with these property values are rendered in the browser:

As you can see from your illustration above, we have the border-collapse property value set to separate. You’ll notice that with the Separate value, the cells are separated by individual borders making it look like there are four small boxes (the cells) inside one big box (the table border).
Now let’s see how the table would look like if it has a property value of collapse:
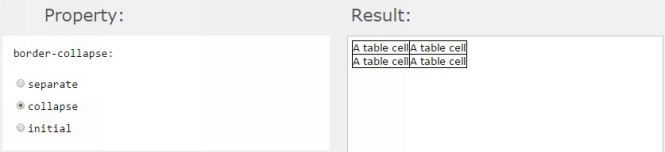
As you can clearly see from your example above, the cells aren’t separated with each other. The collapse property value removes the inner borders on all the cells giving it the appearance that they are all collapsed together.
We will not be showing an example of the Initial property value here since it yields the same output as the Separate property value. Now let’s move forward with the rest of our HTML analysis.
In line 12 of our last code example, we made use of this line of code:
<th colspan="2" style="color: red">Famous Monsters by Birth Year</th>
What we’re doing in this line of code is we’re basically setting the parameters of our Table name. We’re making use of the colspan attribute and giving it a value of 2 to make your Table name span two columns. We also gave it a style attribute with a color property that has a value of “red”. This means we’re giving your Table name a red font color.
In lines 14 through 17 of our code we’re basically setting the parameters of our table head names.
14 <tr style="border-bottom:1px solid black;">
15 <th style="padding:5px;"><em>Famous Monster</em></th>
16 <th style="padding:5px;border-left:1px solid black;"><em>Birth Year</em></th>
17 </tr>
––––––––
Keep in mind that our table has no overall border defined. The divisions for the individual cells are there, but it is not clearly apparent because there’s no general border attribute applied to our <table> tag; which is okay since we want to make the table have a similar style to the one below:
In line 14, you can clearly see that we’ve put applied a style attribute to the 2nd row of our table which is part of the table head. We’re basically giving the 2nd row of our table head a bottom border of 1 pixel that’s solid black:
<tr style="border-bottom:1px solid black;">
This gives both cells where our table headers “Famous Monster” and “Birth Year” are contained, have a solid black border at the bottom.
In line 15, we’re giving our table header “Famous Monster” a style attribute that has a padding property value of 5 pixels. So what is padding? Padding is one of three things that comprise an HTML box model. An HTML box model basically works something like this:
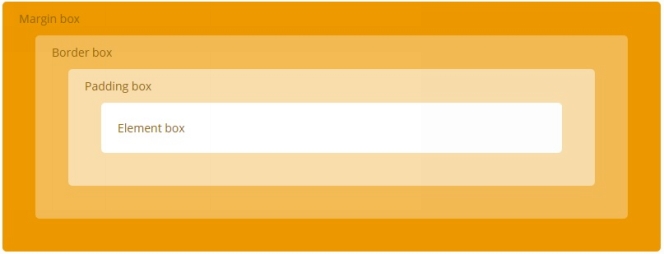
Say for example you have a cell. A cell of course is composed of the content that has a border around it. The area inside the border where the content/data is placed is called the element box. Know that the content/data within contained within then border doesn’t necessarily touch the border itself. It is surrounded by a space called the padding box.
Think of the padding box as a margin between the content and the border. Now the area in which the border is placed is called the border box. The border box is basically as think or as thin as the border itself. Around the border is a space that basically prevents other elements from being too close. It is called the Margin box.
So basically when you say padding, we’re talking about the space around the element inside the border. So when you set a padding value for a particular attribute, you’re basically setting how much space there would be between the content/data and the border itself. We can clearly see this implemented in lines 15, 16, 21, 22, 26, 27, 31, and 32 of our code.
When there’s no padding value set, the data or content may be oriented at any point within the cell. By setting a padding value, we’re basically centering the content inside the cell since padding goes around it entirely. You’ll also notice that we’ve enclosed our table headers “Famous Monster” and “Birth Year” inside emphasis tags; <em> and </em>.
Emphasis tags basically have a visual function and an audio function. On the visual side, it denotes emphasis by italicizing text. On the audio side, it denotes emphasis by stressing the enunciation of the word. This is only evident when the HTML code is read by a screen reader for the visually impaired.
With that being said, understanding the rest of our code example for applying Styles in tables comes easy. It’s just a matter of putting together certain attributes and properties to get the desired effect.