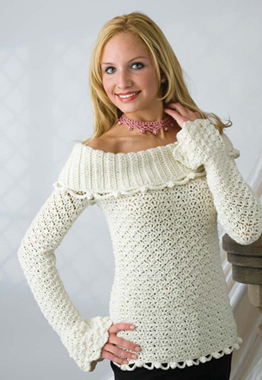
Ivory Shells Sweater
Misses sizes xs (sm, med, lg, xlg, 1x, 2x, 3x). All sizes from neck edge — approx. 19½″ long
Skill Level — Intermediate

I was inspired to create the scalloped edging on this sweater by the design of a valance hanging in my living room. Creating your own unique designs can be fun and easy if you just keep your eyes open and think “outside the box.” I had no idea that I'd get a crocheted sweater idea from my home decor!
INSTRUCTIONS:
Back
With G hook, loosely ch 68 (74, 80, 86, 92, 104, 110, 116).
Row 1: Sc in second ch from hook and in each ch across, ch 1, turn — 67 (73, 79, 85, 91, 103, 109, 115) sc.
This row should measure approx. 16½″ (17½″, 18½″, 19½″, 20½″, 22½″, 23½″, 24½″). If this row is not the correct length, change your crochet hook until you achieve the correct gauge.
Row 2: * 1 sc in next sc, sk 2 sc, in next sc work (dc, ch 1,dc, ch 1, dc) for sh, sk 2 sc, rep from * across. End with 1 sc in last st, ch 4, turn — 11 (12, 13, 14, 15, 17, 18, 19) shs.
Row 3: (RS) 1 dc in first sc, * 1 sc in center dc of next sh, 1 sh in next sc, rep from * across, end with (1 dc, ch 1, and 1 dc) in last sc, ch 1, turn.
Row 4: 1 sc in first dc, * 1 sh in next sc, 1 sc in center dc of next sh, rep from * across. End with 1 sc in tch, ch 4, turn.
Rep Rows 3 and 4 in patt, until piece measures approx. 16″-16¼″ from beg (all sizes). End with row 3.
Front
Work same as back. With RS tog, sew side seams with yarn and yarn needle
Armhole Opening
Turn RS out.
Pm to st next to side seam at left, and another marker to st at rt of side seam. Attach yarn to st where marker was placed at rt of seam, ch 42 (48, 54, 60, 66, 78, 84, 90). Being careful not to twist ch, attach with sl st to st at left of seam, where marker was placed. End off. Rep on other side. Without stretching ch, lp should measure 4½″ (5″, 5½″, 6″, 6½″, 7½″, 8″, 8½″) when folded.
Yoke
Worked in rnds — pm at beg of each rnd. You will be working across front, armhole ch, back and armhole ch.
Row 1: Attach yarn to same sp as sl st, where marker was placed at left of seam. Ch 4, dc in same st, ch 1, dc (sh made), * sc in top of center dc of sh, sh in next sc, rep from * across front to next armhole ch, sh in same sp where marker was placed [beg ch of ch 42 (48, 54, 60, 66, 78, 84, 90)], * Sk 2 chs, sc in next ch, sk 2 chs, sh in next ch, rep from last * around, skipping last 2 chs of armhole chs, work sh in same sp as joining where marker was placed to left of seam — 8 (9, 10, 11, 12, 14, 15, 16) shs across armhole ch (which includes 1 sh at each corner), sc in top of next sh, cont in patt around. When you get to second armhole ch, work sh in sp as first joining and cont around. End with sk last 2 chs of armhole ch, join to ch 3 of first dc (first sh made) 6 (7, 8, 9, 10, 12, 13, 14) shs across each armhole ch + extra sh at each sp where marker was — 36 (38, 40, 42, 44, 48, 50, 52) shs.
Rnd 2: Sl st to center dc of next sh, sc in same sp, sh in next sc, cont in patt around, end with sl st in first sc — 36 (38, 40, 42, 44, 48, 50, 52) shs.
Rnd 3 (dec rnd): Pm at each st directly above where markers were placed at each end of armhole ch, ch 4 (counts as dc + ch 1) sc in top of next sh, work in patt around, working 1 dc (dec) in each marked st instead of a 3-dc sh. End with sc in top of last sh and sl st to ch 3 of ch 4 — 32 (34, 36, 38, 40, 44, 46, 48) shs + 1 dc in each marked sp (4 decs on rnd).
Materials:
14 (15, 16, 17, 18, 20, 21) hanks (1.75 oz./50 g/100 yd. each) 59% rayon, 41% wool yarn in ivory
Size G/6 (4 mm) and H/8 (5 mm) hooks
Used in this project:
Berroco Softwist in Vanilla. Caron Simply Soft or Red Heart Soft Yarn are great substitutes, but you will have to use a much larger hook (like a size K) to get the correct gauge.
Gauge:
3 shells (2 sc between) = 4″
5 shell rows = 2½″
4 dc on collar = 1″
Gauge is very important with this sweater. If your gauge does not match, change to a different-size hook.
Special Stitch:
Shell (sh): On body of sweater (dc, ch 1, dc, ch 1, dc) in same st.
Popcorn Stitch (pc): Ch 4, work 4 more dc in same st, take yarn off hook, slip hook through third ch of beg ch-4, placing hook behind 5 dc, put loose lp back onto hook, pull through ch 3 of ch-4 (in back) ch 1 loosely from front, sl st through same sp at base of pc st.
To Decrease Shell: Work 1 dc in sp (sc that is marked) instead of 3 dc shell.
Words of Encouragement
Many of us love trendy things and keep up with the latest styles. A young lady needs to be aware that drawing attention doesn't necessarily mean that she looks sharp. Clothing that is revealing or just plain weird may draw attention, but most people will perceive this as a girl trying to compensate for feelings of inadequacy. Be mindful of the trends you choose to follow and who you may be influencing.
Rnd 4: Pm at 4 sps on Rnd 3, evenly spaced (2 on front and 2 on back). Ch 4, (dc, ch 1, dc) in same sp (sh made). Cont in patt around, working sh in each sp where dcs were placed on prev rnd (at beg and end of armhole), and work 1 dc where markers were placed, join, 28 (30, 32, 34, 36, 40, 42, 44) shs — 4 decs.
Rnd 5: Sh in same sp (ch 4, dc, ch 1, dc) pm in center front sc. Rep on back, cont around in patt, working 1 dc in same sp as marker, and sh in same sp as dc, join — 26 (28, 30, 32, 34, 38, 40, 42) shs — 2 decs.
Rnds 6 and 7: Work in patt, with no decs — 26 (28, 30, 32, 34, 38, 40, 42) shs.
Rnd 8: Mark center sc on each armhole; work in patt around, dec in sps at markers, join — 24 (26, 28, 30, 32, 36, 38, 40) shs — 2 decs.
Rnd 9: Mark 1 sc on front and 1 sc on back, in a different sp as before; work in patt around — 22 (24, 26, 28, 30, 34, 36, 38) shs — 2 decs.
Rnd 10: Rep Rnd 9. End off — 20 (22, 24, 26, 28, 32, 34, 36) shs — 2 decs.
Sleeves
Rnd 1: Working in loose lps on opp side of ch at armhole ch, attach yarn to sp at base of any sh, ch 1, sc in same sp, sk 2 chs, sh in base of next sc, sk 2 chs, sc in base of next sh, cont working in patt until you have 8 (9, 10, 11, 12, 14, 15, 16) shs. End with sl st in first sc.
Rnd 2: (Ch 4, dc, ch 1, dc) in same sp, sc in top of next sh, work in patt around. End with sc in top of last sh and sl st to ch 3 of ch 4 — 8 (9, 10, 11, 12, 14, 15, 16) shs.
Rnd 3: Sl st over to middle dc of sh, ch 1, sc in same sp, work in patt around, end with sl st in first sc.
Rnds 4–30: Rep Rows 2 and 3 or until sleeves measure approx. 15″ (or desired length) from beg of first rnd. End off. If you want sleeve to narrow a little to wrist (before flare is added), start crocheting a more tightly from Rnd 24 to end.
Rep Rnds 1–30 for other sleeve.
Flare on End of Sleeve
Attach yarn to any sc on last rnd worked, to sc that is at fold (on side closest to side of sweater) when lying flat.
Rnd 1: (If you crocheted tighter on bottom of sleeve, start working sts normally here.) Ch 4 (counts as dc + ch 1) dc, ch 1, dc, ch 1, dc (4 dc sh made) in same sc as sl st. Cont in patt around — 8 (9, 10, 11, 12, 14, 15, 16) shs.
Rnds 2–3: Cont in patt, working a 4-dc sh in each sc between shs.
Rnds 4–7: Work 5 dc shs around.
Rnds 8–10: Work 6 dc shs around. End off.
Collar
All dcs in blo — collar should measure 5¼″-5½″ vertically.
Attach yarn to any sc on neck edge, ch 1, sc in same sp, and in each st around, join to first sc. End off. If neck edge is too loose, sk some scs on this rnd by doing the following: Decide how many sts you want to dec, and pm in that number of scs evenly spaced around. While working scs around, as in step 1, sk scs where markers were placed. End off.
Row 1: Change to size H hook. Work collar with loose dcs.
Attach yarn to any sc on inside/WS of neck edge, ch 21. Dc in fourth ch from hook and in each ch across (19 dc — all sizes) sk next sc, tightly sl st in next 2 sc, ch 1, turn.
Row 2: Dc in blo of each dc across; end with dc in tch, ch 3 (counts as first dc from here on out), turn — 19 dc.
Row 3: Sk first dc, dc in blo of next 18 dc, sk next sc, tightly sl st in next 2 sc, ch 1, turn — 19 dc total.
Rep Rows 2 and 3 around entire neck edge. End off. With RS tog, sew first row to last row with yarn needle.
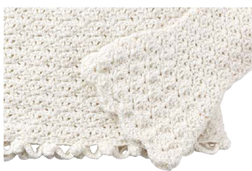
Scalloped Edge — Bottom of Sweater
Row 1: Change to size G hook. Starting on WS (inside edge) of sweater, attach yarn to st that is to left of side seam (directly above st where sh is on Row 1). * Ch 9, sk 5 sts, sl st in next st, and rep from * around entire bottom edge.
Note: When you get to next side seam, sl st again over seam and into st directly above sh on row 1. Cont around; end with sl st to st that is to rt of st where yarn was attached at beg. Ch 1, turn. (You'll be working above same sts as sc and sh on Row 1 of front and back — sl sts and popcorns on next row go here.)
Row 2: (Popcorn st row) Front side — * In ch-9 lp, work 9 sc. Ch 1, sl st to same sp as sl st before next ch 9 (between ch 9s). In same sp work pc st (see special sts) ch 1, rep from * around, end with pc between last and first ch-9 lp. End off.
Edging for Collar — Front Facing
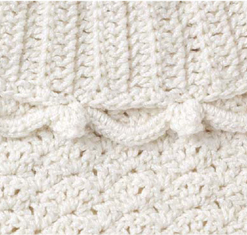
Rnd 1: With H hook and being careful not to pull too tight, attach yarn on bottom edge of collar at seam, ch 1, sc in same sp, sc in side of dc, sc in st between first and second row. Cont working scs around entire collar edge, making sure you work a sc in side of each dc and a sc in sp between each row, sl st to first sc, turn.
Rnd 2: Change to G hook. Sl st to first sc that is to left of seam, * ch 12, sk 7 sc, sl st in next sc, rep from * around, end with sl st in first sc, ch 4, turn.
Note: If you end up with extra rows on your collar, you'll have to adjust the number of sts between ch 12s and you may have to ch more or less than 12 to get it to hang right. This is general instruction — each person may have a different number of st on their rnd in step 1 of collar.
Rnd 3: * Pc in same st, ch 1, in ch 12 work (12 sc, ch 1), sl st in next st (between ch 12 lps), rep from * around. End with sl st in st before first pc. End off.
Finishing
If you have holes or spaces where you attached the yarn to start working the sleeves at the armholes, this is because your beg ch across the arm is too loose. To fix the problem, just untwist 1 ply from yarn and carefully sew hole (from the WS) with a sewing needle. Weave in ends.
Helpful Hint:
Remember that crocheting is incredibly easy! All it takes is a little patience to learn how to hold the hook and yarn. If you stick with it, you can make almost anything!