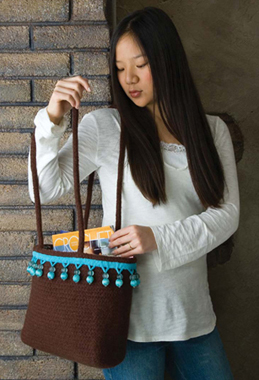
Chocolate Felted Tote
Size before felting — 11½″ tall and 16½″ wide, when flat, size after felting — 10½″ tall × 11½″ wide, without straps
Skill Level — Beginner

The agitation of your washing machine puts the finishing touch on this thick and sturdy tote, roomy enough to carry your yarn project or any other larger items. It could even be a fashionable diaper bag! An optional pocket on one side carries your cell phone, keys or sunglasses.
INSTRUCTIONS:
Tote Bottom
Tote is made using 2 strands of yarn.
Row 1: With 2 strands of yarn ch 37, hdc in third ch from hook, and in each ch across, turn — 36 hdc.
Row 2: Ch 2 (counts as beg hdc), hdc in each hdc across, turn — 36 hdc.
Rows 3–7: Rep Row 2, turning after each row. Do not end off after row 7, but cont with Rnd 1 of tote body. Bottom should measure approx. 15″ × 4¾″ before felting.
Body of Tote
Rnd 1: Ch 2 (counts as first hdc), 2 hdc in first hdc, hdc around entire bottom rectangle piece, working 3 hdc in each corner and 9 hdc evenly spaced along short sides. Join with sl st to ch 2. Do not turn — 98 hdc.
Rnd 2: Ch 2, hdc in each hdc around. Join to tch — 98 hdc.
Rnds 3–27: Rep Rnd 2 or for 11½″. End off.
Tote will measure approx. 16½″ wide.
Straps
Make 2. With 2 strands, loosely ch 105.
Row 1: Hdc in third ch from hook and in each ch across, ch 1, turn — 104 dc.
Row 2: Sc in each hdc across. End off. Fold strap and loosely sew long edges tog with yarn and yarn needle, forming a long tube. End off. Straps will be sewn on after felting.
With 2 strands, ch 21.
Row 1: Hdc in third ch from hook and in each ch across, ch 2, turn — 20 hdc.
Row 2: Hdc in each hdc across, ch 2, turn — 20 hdc.
Rows 3–12: Rep Row 2, omitting ch 2 after Row 12. Pocket should measure 5½″ × 7¼″. Sew pocket to side of tote with yarn and yarn needle before felting. Weave in ends.
To felt, After last spin cycle, place tote on box covered with plastic bag that fits tightly to hold its shape. Dry completely. Straighten straps by stretching before drying.
Finishing
Pin trim onto tote ½″ from top edge. Sew in place with needle and thread. Pm where you want straps, and sew to inside of tote.
Optional lining: Cut piece of interfacing 23″ × 10¾″ (½″ smaller than width of tote). This will be one long piece that will fit front, back and bottom of tote, omitting sides. Cut piece of fabric 1″ longer than interfacing to fold over short ends, and 2½″ wider than long sides of interfacing. See Diagram A.
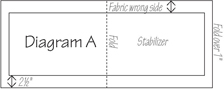
Fold 1″ of fabric over short ends and sew or glue tog. Do not fold sides of fabric over stabilizer. Sew or glue fabric and stabilizer tog on long sides, leaving 2½″ of fabric on sides. Fold piece in half and sew up sides on outer edges with ½″ seam, leaving short ends open and making sure RS of fabric shows inside tote. Place piece inside tote and adjust to fit if necessary. Hand st lining to inside of purse.
Materials:
4 skeins (3.5 oz./100 g/223 yd. each) 100% wool worsted-wt. yarn in chestnut brown
Size J/10 (6 mm) hook
33″ beaded trim
1 large snap
Yarn needle
Sewing needle and matching thread
½ yd. fabric for lining (optional)
23″ × 10¾″ stabilizer
Used in this project: Patons Classic Merino Wool in Chestnut Brown, Peltex.
Note: If you use one strand to make the tote, you will only need two skeins of yarn, but the tote will be smaller.
Gauge:
8 hdc and 6 rows = 3″
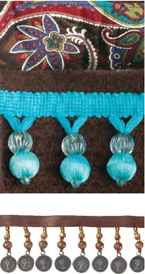
Special trims make your purse stand out.
Words of Encouragement
Are you and your mate often agitated with each other? It's not a fun way to live. I have friends who used to fight day and night, but today they get along great. I had to ask my friend their secret. She said, “You want to really know what made us stop fighting? We just got sick and tired of fighting!” It was one of the best decisions they ever made.