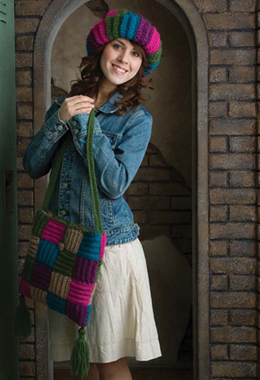
Patchwork Purse
Finished size — 11″ × 11″ (without strap)
Skill Level — Beginner

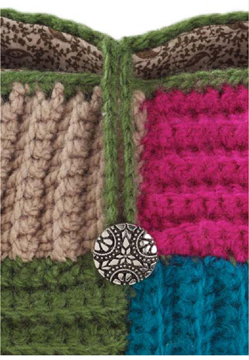
This colorful shoulder bag is very easy to make, and it has an interesting texture. The simple single crochet stitch was used to form the ridges. The pretty decorative button sets it off perfectly!
INSTRUCTIONS:
Square
Make 6 squares each of A, B, C and MC, and 8 squares in D — 32 total.
Row 1: Ch 11, sc in second ch from hook and in each ch across, ch 1, turn — 10 sc.
Rows 2–9: Sc in blo of each sc, ch 1, turn — 10 sc. At end of Row 9, end off.
To Assemble
Place squares on flat surface in any color order using photo as a guide. Be sure to alternate the direction of the ridges on the squares as you lay them out. With RS tog, sew squares tog with yarn and yarn needle (16 squares for front and 16 squares for back). With RS tog, sew front to back at sides and across bottom. If you are making a lining, you do not need to weave in the loose ends.
Top Edge
Attach MC to top edge of purse at side seam, ch 1, sc in each st and sp around top. End off.
Strap
Row 1: On either side seam, attach green yarn to st that is to RS of seam. Tightly ch 100, sl st to other side of purse to st at RS of seam, sl st to next sc to left of seam, ch 1, turn.
Row 2: Sc in each sc across, sl st to next 2 sc on top edge of purse, ch 1, turn — 100 sc.
Row 3: Sc across row, sl st to next sc on top edge. End off.
Row 4: Join yarn in st on opp side (loose ls) of beg ch, sc in each lp across. End off.
Tassels
Make 2 tassels, 6″ each.
Wrap yarn around 6″ piece of cardboard 15 times. Slip a 12″ piece of yarn under the yarn at top of cardboard and tie tight knot, leaving ends to attach tassel to purse. Remove from cardboard. Cut another 12″ piece of yarn, wrap around top of tassel about ½″ from the top, and tie knot. Trim ends evenly.
With yarn needle, weave remaining loose ends into center of tassel. Attach 1 tassel to each bottom corner of purse.
Materials:
1 ball (3 oz./85 g) each yarn in fuchsia (A), plum (B), blue (C), taupe (D) and green (MC)
Size I/9 (5.5 mm) hook
1″ decorative button
½ yd. fabric for lining (optional)
Yarn needle
6″ piece of cardboard
Sewing needle and matching thread for lining
Used in this project: Lion Brand Jiffy yarn in Peacock, Plum, Fuchsia, Grass Green (MC), and Taupe (D).
Gauge:
1 square = 3″ × 3″
10 sc = 3″
9 sc rows = 3″
Helpful Hint:
Do you want to have your own designs in a magazine, but you don't know where to start? Visit crochet magazines' Web sites, and you will find designer guidelines. Try to follow their guidelines as closely as possible.
Words of Encouragement
Have you come to ridges, bumps or roadblocks along your path? Obstacles are not fun, and they can really slow us down. Maybe these things come along and slow us down to help build patience. Instead of getting frustrated, ask “what can I learn here?” The bumps and ridges in life can strengthen us. Just get back up when you fall down!
Optional Lining: Cut fabric 25½″ × 13½″. With RS tog, fold fabric in half (fold will be at bottom of purse). Sew side seams with a ¾″ seam, leaving top open. Place lining inside purse (WS tog), adjusting if necessary. Fold top lining edge under ¾″. Pin top edge of lining to inside of bag. Whip st lining to bag with needle and thread.
Closure
Sew button to purse front with needle and thread. For button lp, attach yarn to top edge of back at center st. Ch 38, join to same st where ch was started. End off.
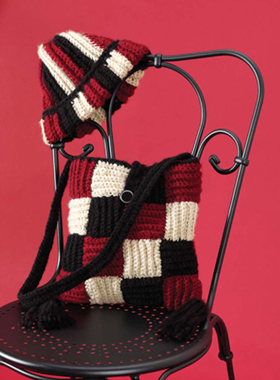
Try using other colors to match different outfits.